Docy Documentation
Connect Accounts
Facebook & Instagram Accounts
FransChat is primarily a marketing application based on Facebook and Instagram. So you have to import your Facebook and Instagram accounts into FransChat. Importing Facebook and Instagram accounts into FransChat is simple and straightforward. Just follow the instructions and you’ll be importing your Facebook and Instagram accounts in no time.
Import Facebook and Instagram Accounts
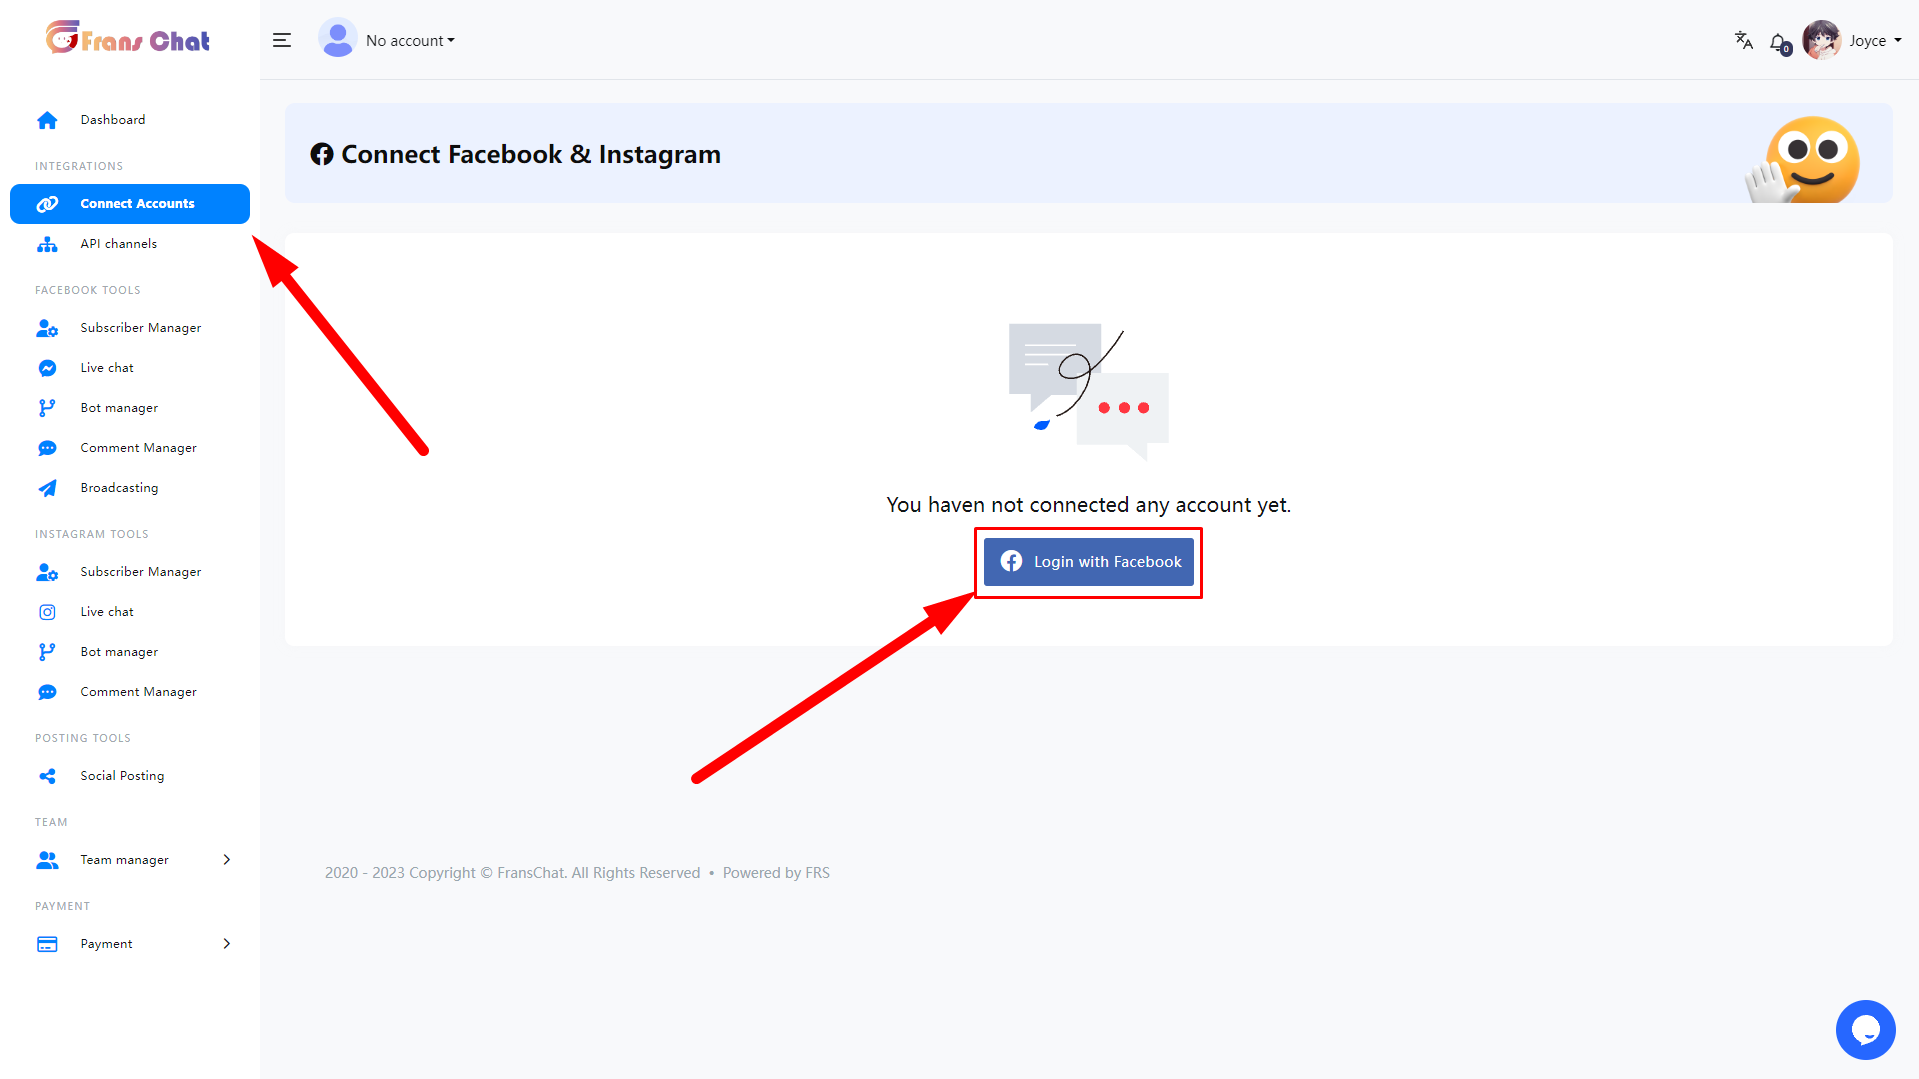
To import Facebook and Instagram accounts, first, go to the dashboard of FransChat. At the left sidebar of the dashboard, you will see a menu called Facebook and Instagram. Click on the menu.
Instantly, a page called connect Facebook and Instagram will appear with a button called Login with Facebook.
Not that, to import Facebook and Instagram accounts, Facebook(Logged In) has to be opened on another tab of the same browser.
Well, now click on the Login with Facebook button
Instantly, a modal form will appear on Facebook with three buttons edit settings, continue as your profile name and log into another account.
Click on the edit settings button if you want to edit the settings.

Just as you click on the edit settings button, a modal form will appear on the Facebook profile that is opened on another tab of the browser.
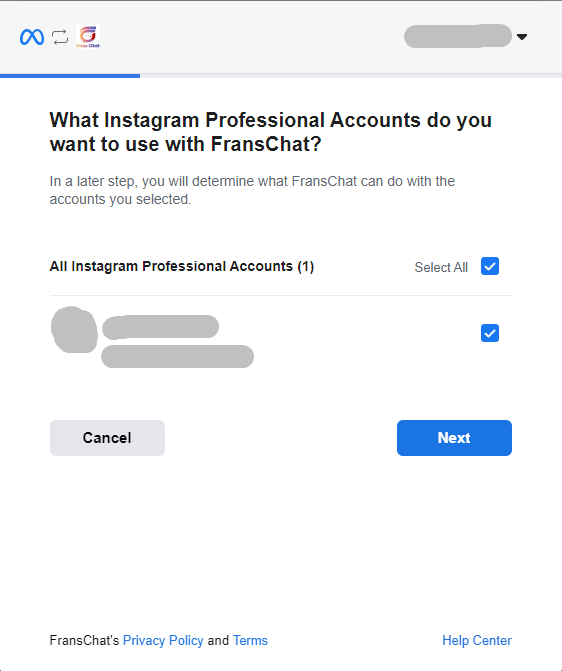
On the modal form, you have to select Instagram business accounts you want to use with FransChat. Of course, you can select multiple or all Instagram business accounts.
Then click on the Next button.
Instantly, another modal form will appear on the Facebook profile. On the modal form, you have to select the Facebook pages you want to use with FransChat. Of course, you can select multiple or all Facebook pages.
Then, click on the Next button.

Instantly, a modal form will appear. On the modal form, you have to select what FransChat is allowed to do. Keep every option turned on.
Then click on the Done button.

Instantly, another modal form will appear with a message that now you have linked FransChat to Facebook and the Ok button.
Now click on the OK button.

Import Account Directly
By clicking on the Continue as Profile name, you can import Facebook accounts directly.

Import Another Account
You can also import another account by clicking on the log-in into another account button.

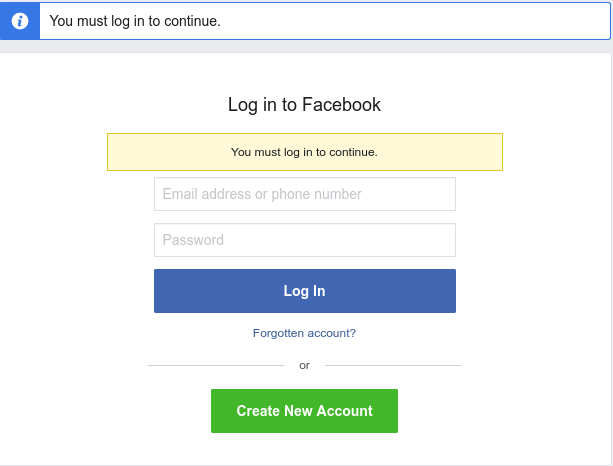
Click on the Log in into another account button and the Facebook login page will appear.
Now Log in with the Facebook and the account will be imported into FransChat.
Successfully Imported Account
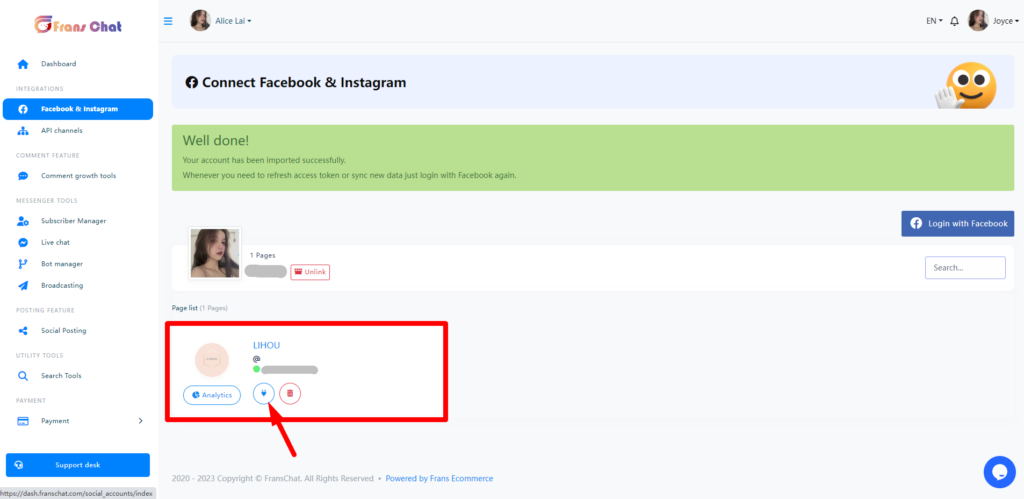
Instantly, the Connect Facebook and Instagram page will appear with a successful message and Facebook profile and Facebook page. Under the Facebook pages, you will see two buttons — the plug button and the delete button.
Enable Bot Connection
Now you have to enable bot connection for the pages. To enable bot connection for a page, click on the plug button under the page.

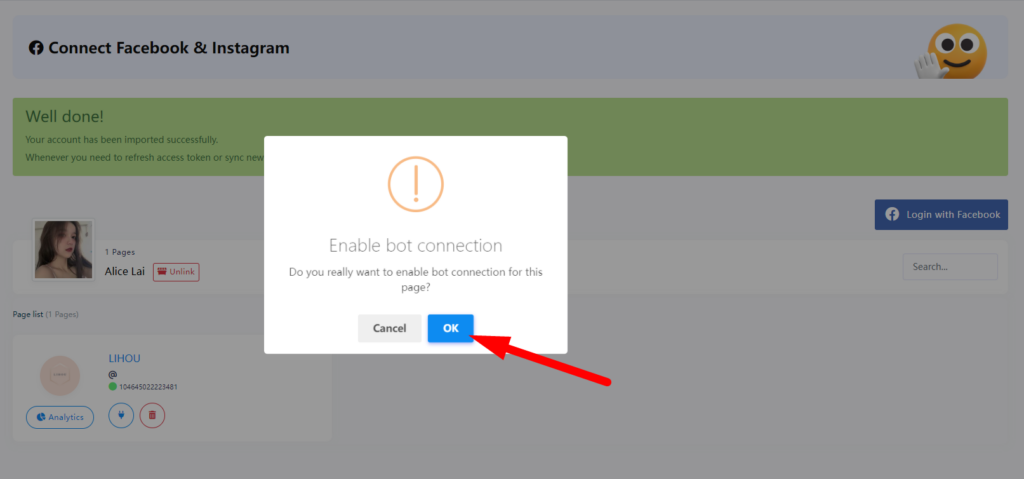
Instantly, a modal will appear with Cancel and OK button. Click on the OK button.
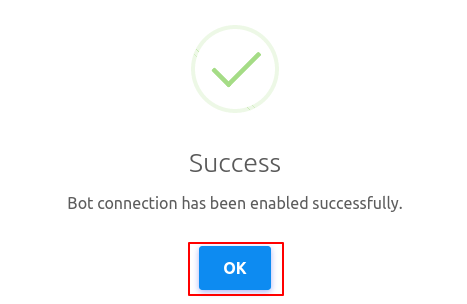
And a successful message — Bot connection has been enabled successfully — will appear.
Instead of the plug button, you will see two more buttons — the Eraser button and the Power button.

Disable Bot Connection
By clicking on the power button, you can disable the bot connection. Just as you click on the power button, a modal will appear with Cancel and OK buttons. Click on the OK button and the bot will be disabled.


And Instead of the power button, a radio button will appear.

Re-start Bot Connection
To re-start the bot connection, click on the radio button. Instantly, a modal will appear with Cancel and OK buttons. Click on the OK button and the bot will be restarted.


And instead of the radio button, the power button will appear.

Delete Bot Data
Click the eraser button on the left and immediately, a modal will appear with “Cancel” and “OK” buttons. Click the “OK” button and the robot will delete all data again.


Now the Bot will return to its initial state

Delete Page
You need to delete the Bot when it is not connected.

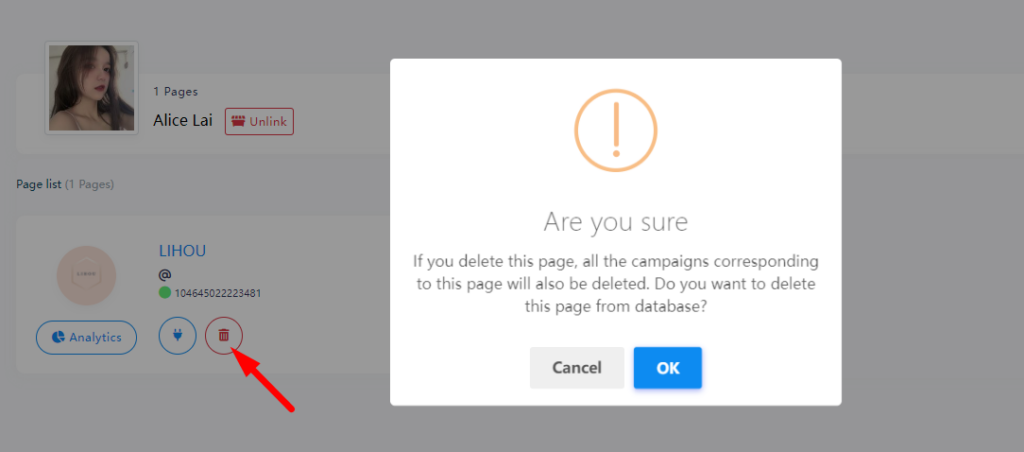
By clicking Delete, you will delete the connection between the page and FransChat. If you need to re-import this page, you will need to log back into your Facebook account import page
Delete Facebook Account
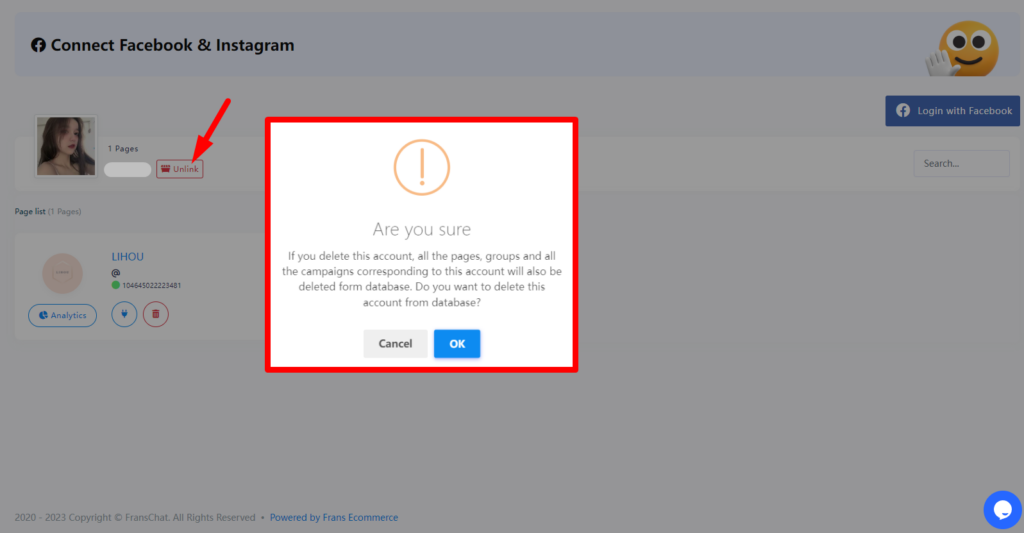
Deleting a Facebook account will delete all currently imported pages.
Immediately after clicking the Unlink button, a modal will appear with Cancel and OK buttons.
Click the OK button and a success message will appear. Facebook account will be deleted.
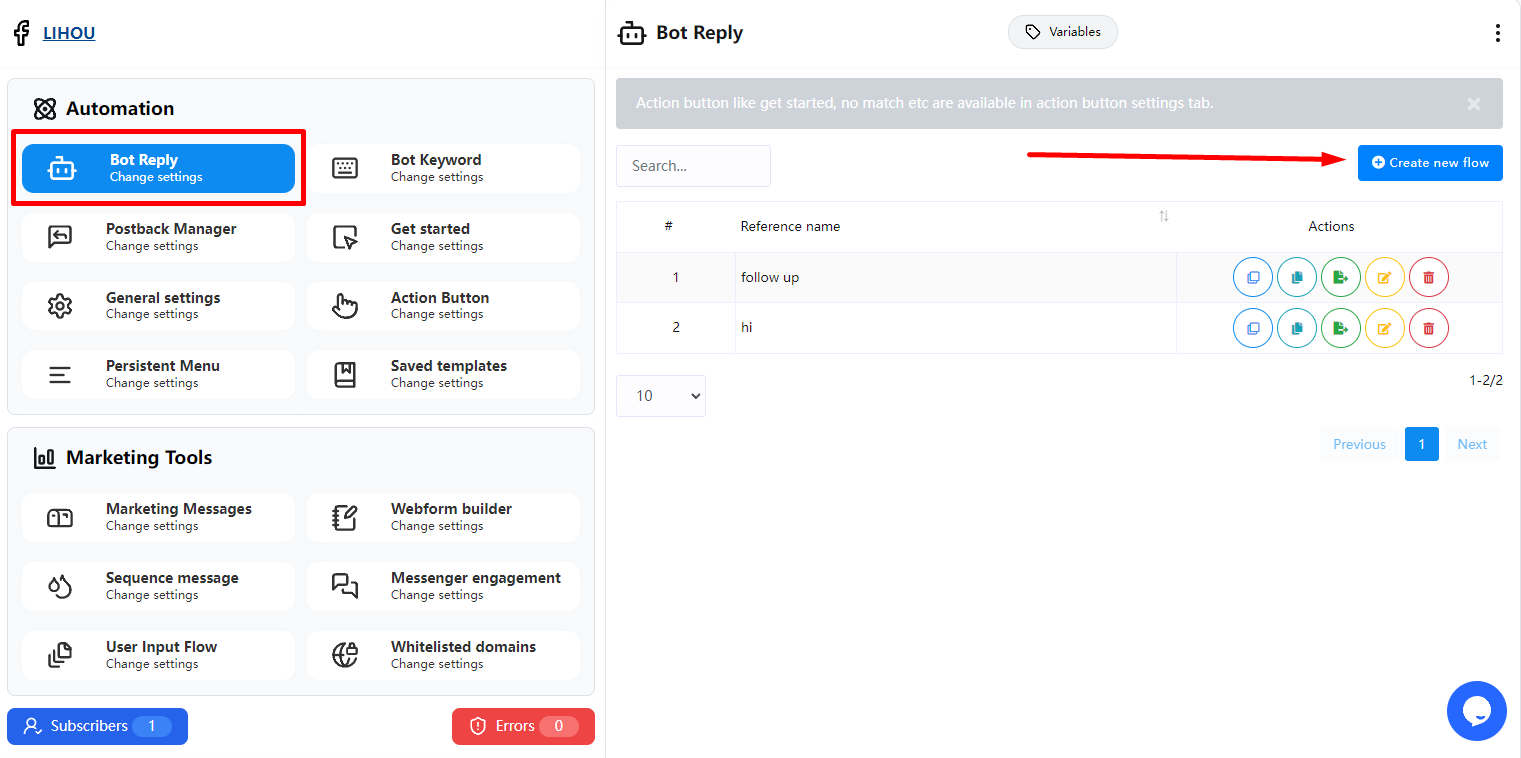
Bot Reply
Visual Flow Builder Editor
Well, to build a bot, click on the “Create New Flow” button.
And instantly, the editor of the Flow Builder will appear. The editor is divided into two parts – Doc-menu and editor. On the Doc-menu, all the components are gathered together.
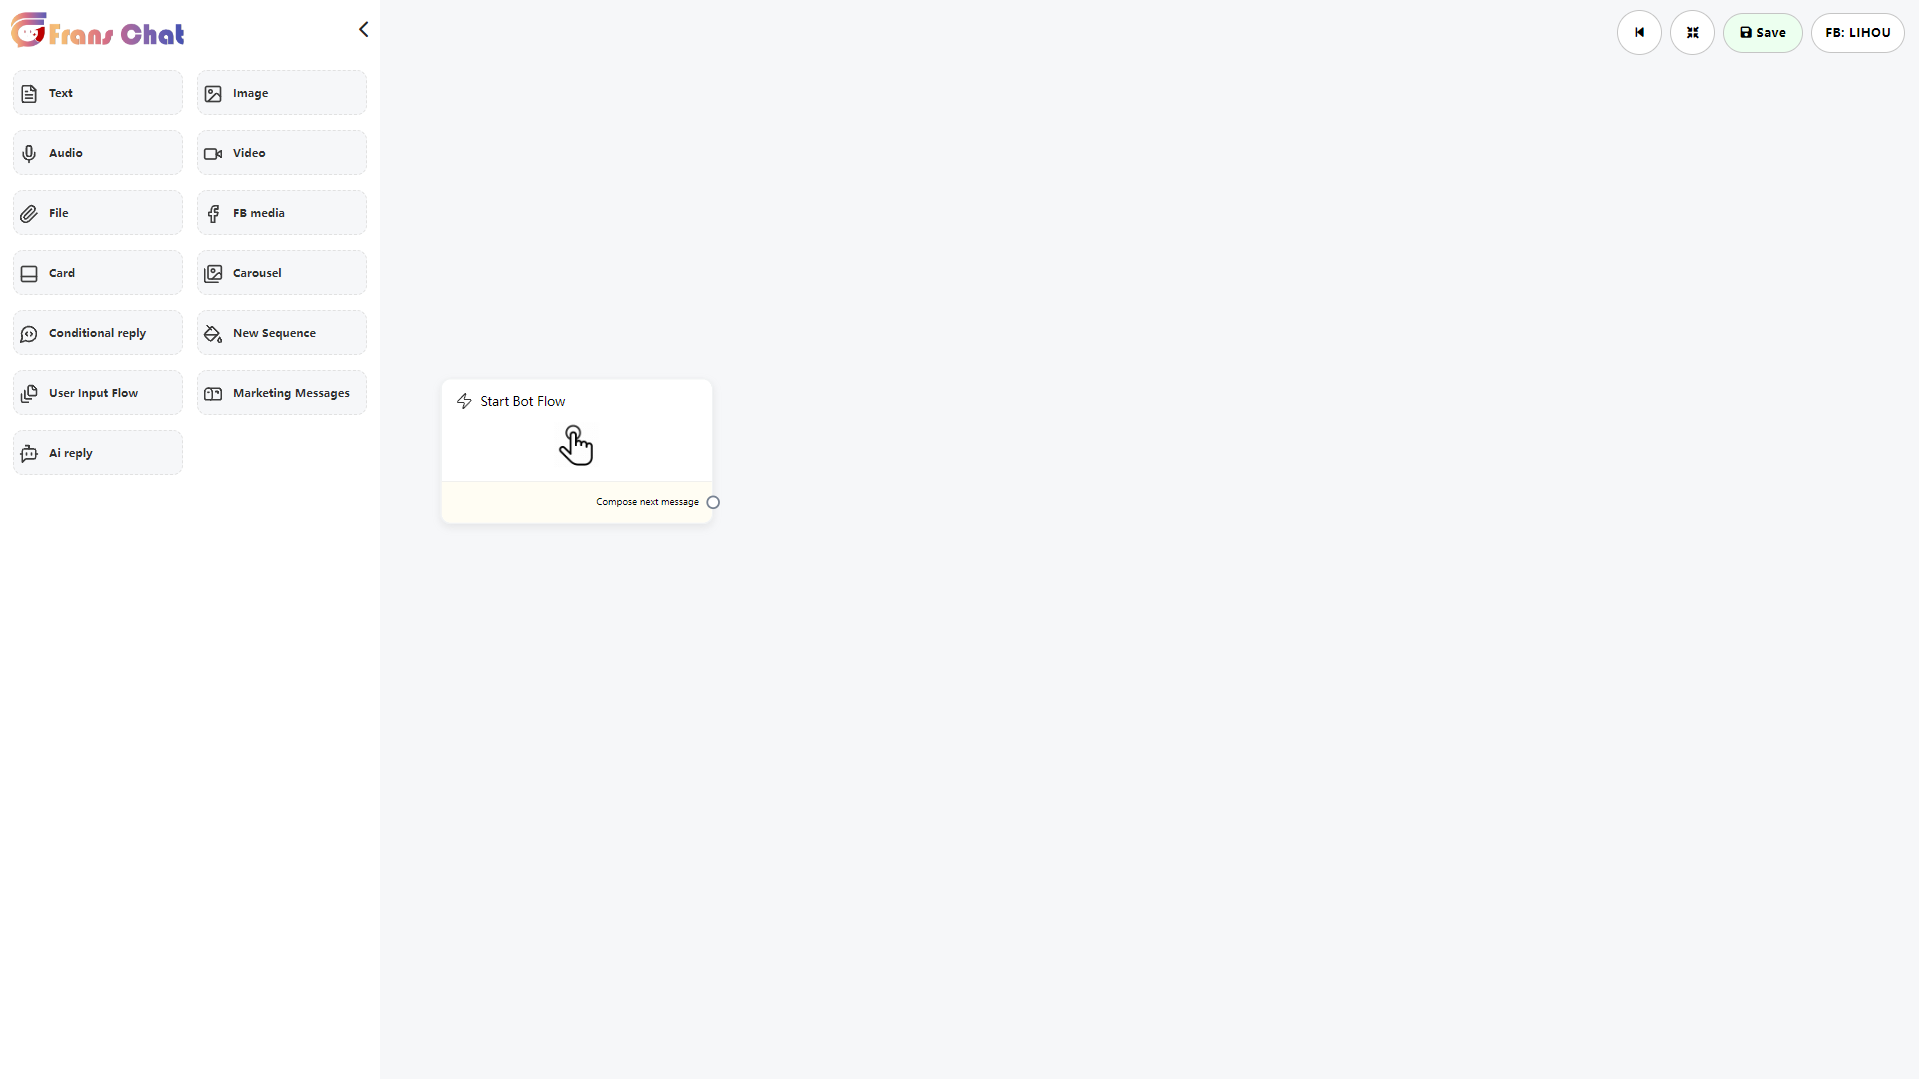
To build a bot, you have to drag components from the Doc-menu and drop them on the editor. Then you have to configure the components and connect them to each other. On the Doc-menu, there are 13 components.
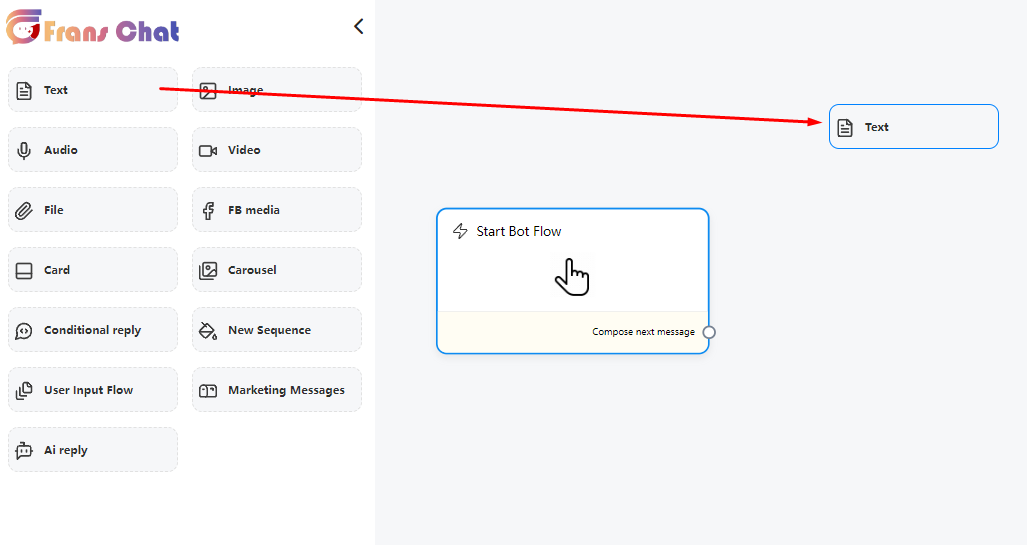
Add components without dragging from Doc-menu.
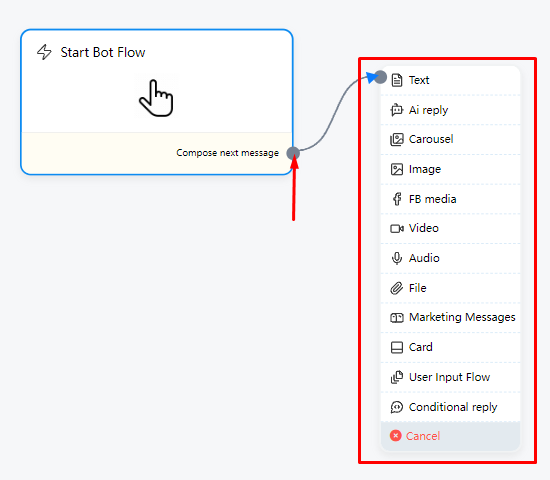
You can also add components without dragging the component from the Doc-menu and dropping it on the editor. From the next output of any component, drag the cursor and drop. And instantly a menu of the different components will appear. And from the menu, select a component and the component will appear on the editor connected with the mother component.
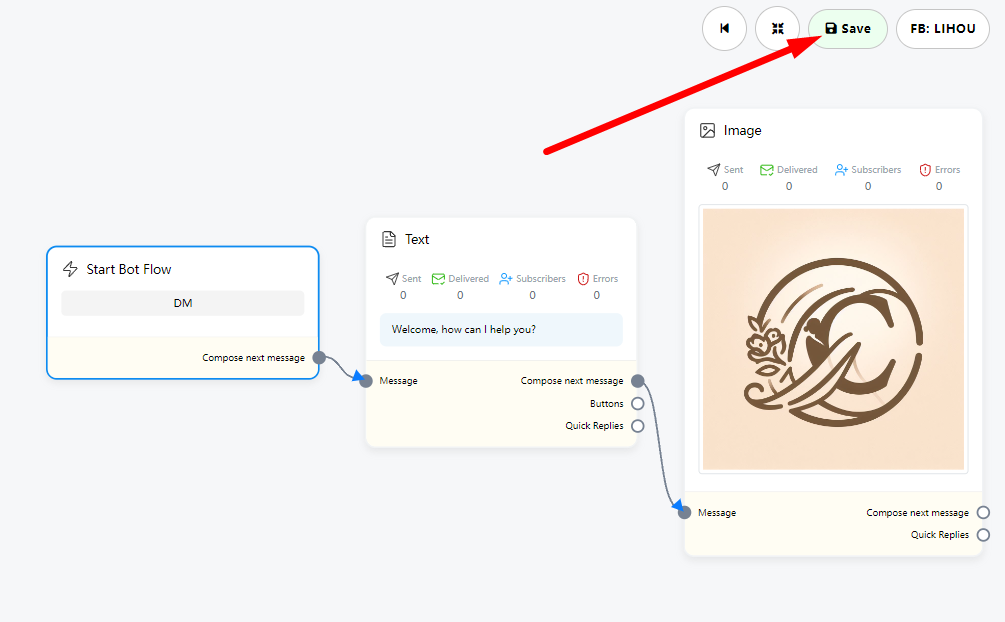
When all components are connected, click the save button on the upper right to run.
Next, we will explain to you the use of each component in detail.
Start bot flow
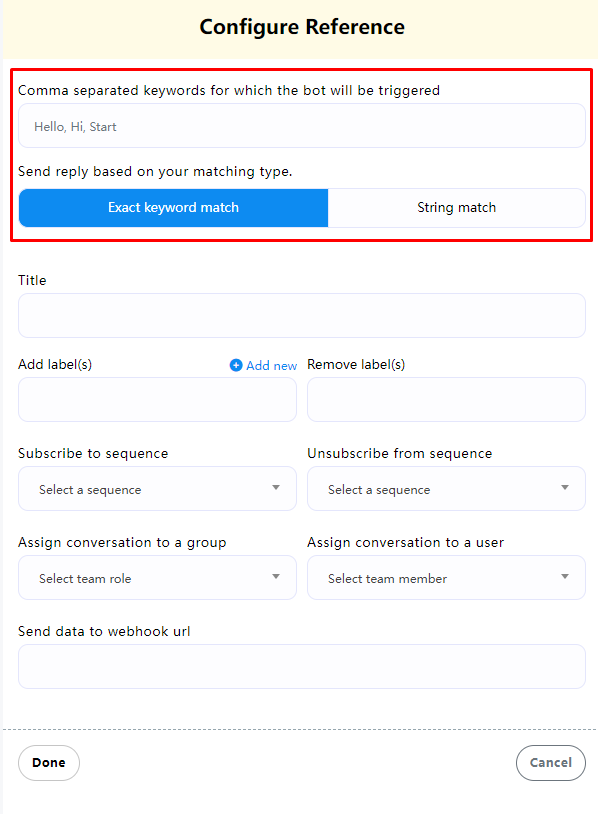
On the Editor, you will see an element called start bot flow. This component is essential to building the bot. Double-click on the Start bot Flow element and the Right Sidebar called Configure Reference will appear.
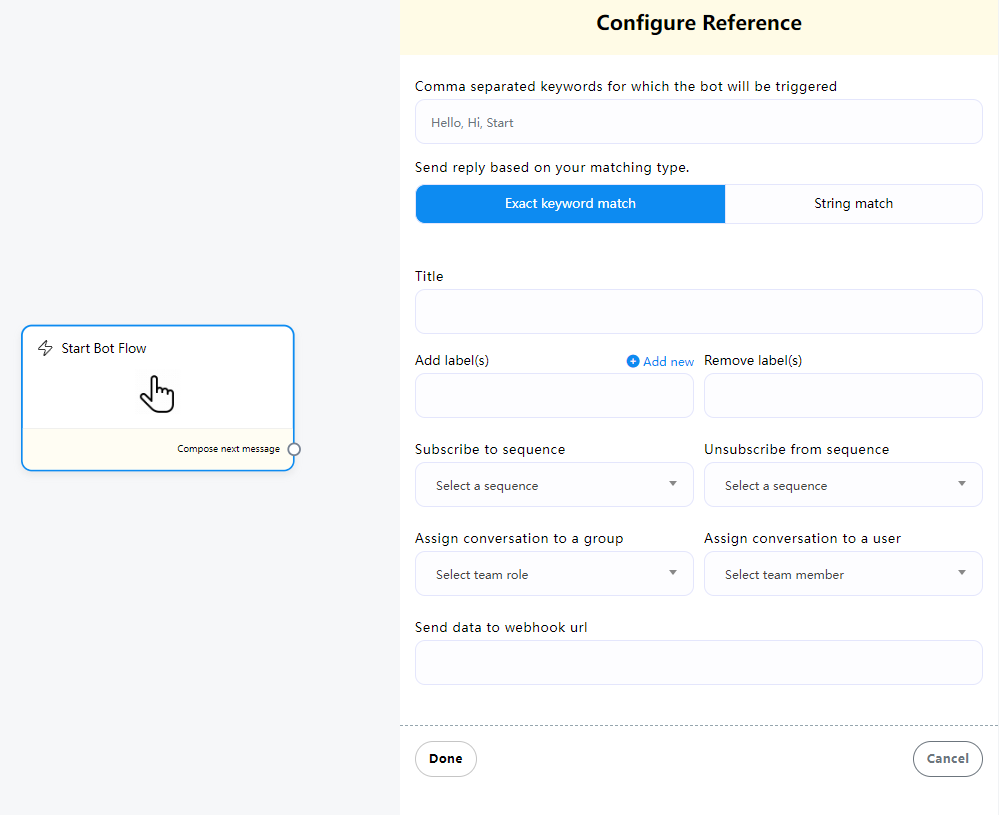
The instructions in the Configure Reference of “Start bot flow” can be divided into two parts.
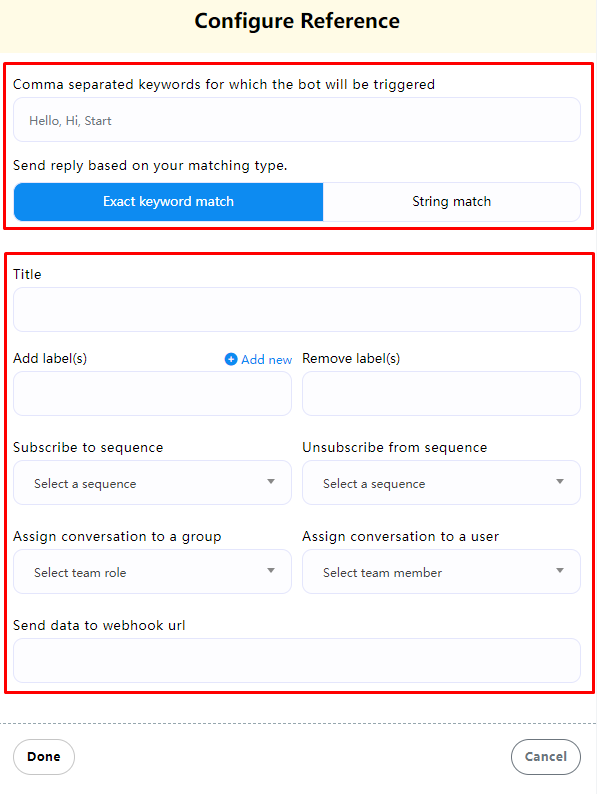
The first is the upper part, where you set the trigger keyword for the entire Bot Flow reply.
For example: We enter “Hi” in the input box. You can also set multiple similar keyword combinations, but you must provide keywords separated by commas, such as “Hello, Hi, Start”. When a user sends a private message to your Page Then enter the keyword “Hi” or “Hello, Hi, Start” to trigger an automatic reply behind the Start bot flow component.
You can also choose the match type – exact keyword match and string match.
- Exact keyword match – this will only be triggered when the user must enter a complete match of the keyword
- String match – triggered if the field entered by the user contains keywords
Next, the second part of the “Start bot flow” configuration is explained.
- Title – Give the “Start bot flow” a name
- Add label(s) – Add a label (when the user triggers this Start bot flow, a label will be automatically added to the user to facilitate subsequent classification of different user groups)
- Remove label(s) – Remove labels (when the user triggers this Start bot flow, a specific label currently owned by the user will be automatically removed)
- Subscribe to sequence – When the user triggers this Start bot flow, the user will automatically subscribe to the sequence (mainly used for Follow Up)
- Unsubscribe from sequence – When the user triggers this Start bot flow, the user’s current subscription sequence will be removed (when the user has subscribed to the same sequence once and completed the automatic message push, the system will not re-subscribe the user to the same sequence again. , even if the user triggers the Start bot flow again, it will not resubscribe. At this time, you can use the “Unsubscribe from sequence” method to remove the user’s sequence at a certain stage)
- Assign conversation to a group – Assign the current conversation that triggered this flow to a specific team role.
- Assign conversation to a user – Assign the current conversation that triggered this flow to a specific team user.
- Send data to webhook url – This function will be integrated with third-party applications. When the user triggers this Flow, a webhook notification will be sent to the URL address filled in. You can go here to view the currently created webhook notification.
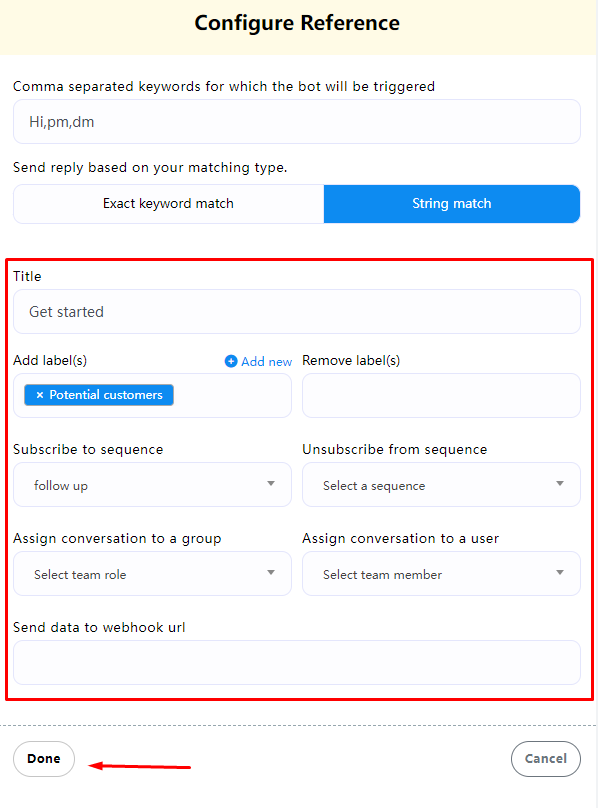
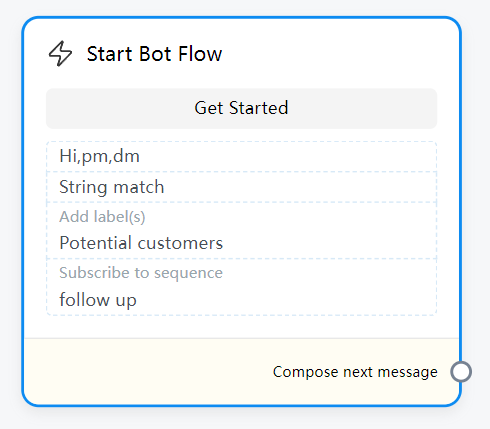
After the settings are completed, click Done. Now you can see that the “Start bot flow” component has displayed the Title name you set, as well as tag information such as keywords.
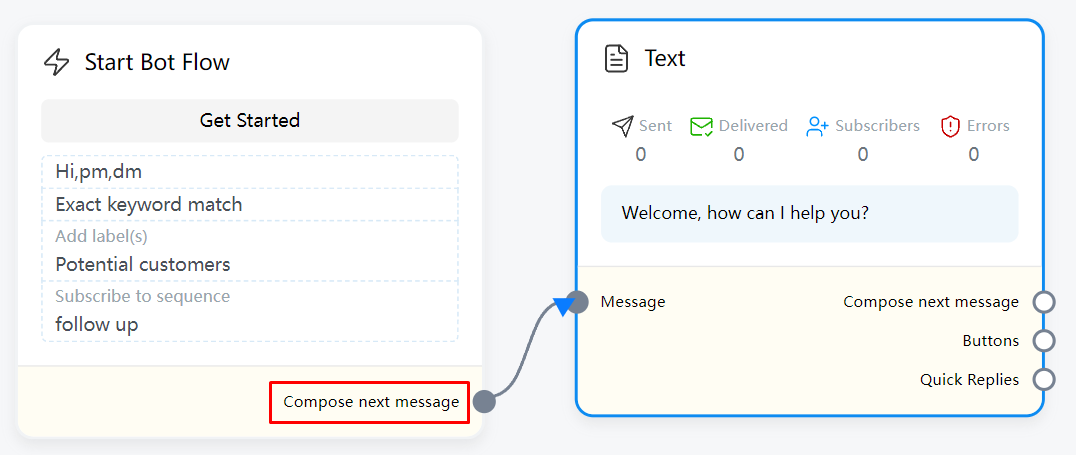
Compose next massage – This connection point represents the next response content after triggering this component.
Text
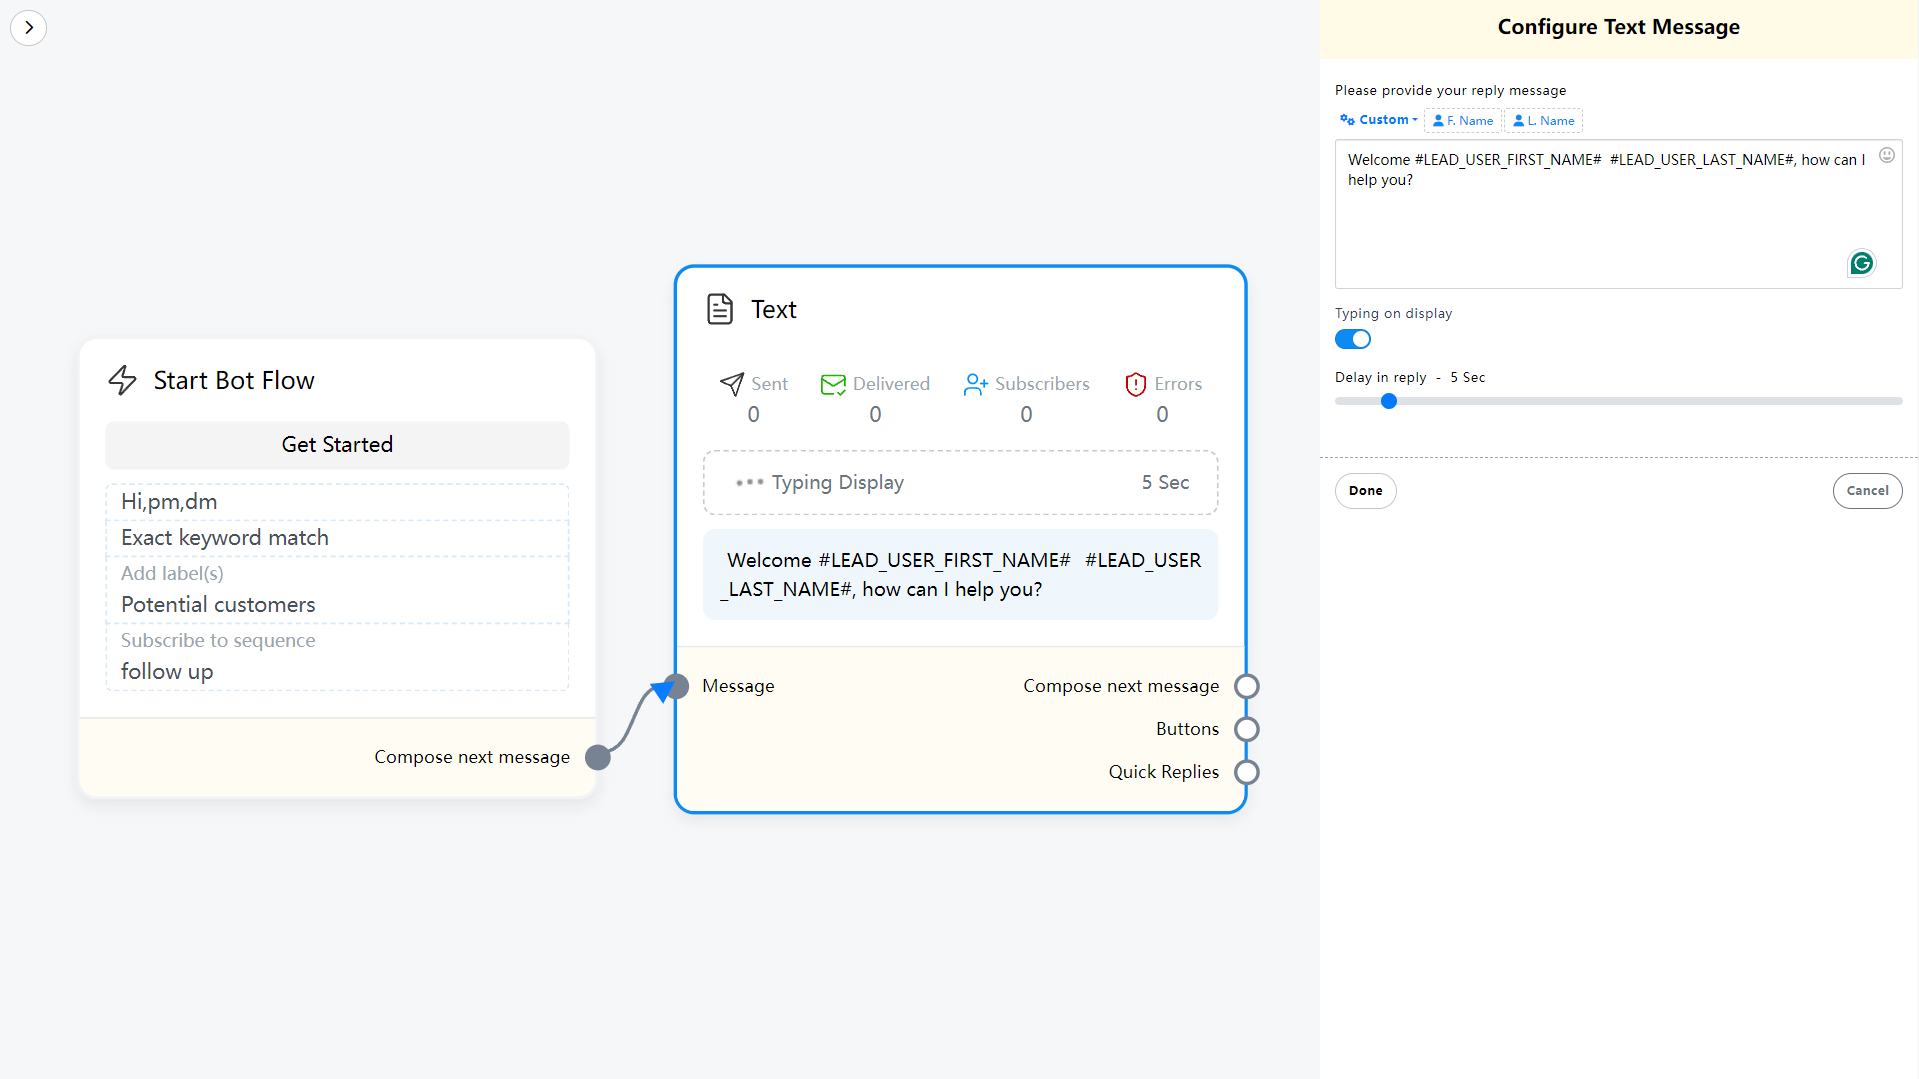
If you want to build a bot with a text element, drag the Text Component and drop it on the editor. Now double-click on the component and a sidebar called Configure Text Message will appear with a text field. In the text field, you have to provide your reply message. You can include the first name or the last name of the user in the reply message.
You can also enable typing on display by turning on the radio button. Then you can select the delay time in reply in seconds.
Now click on the Done button and the information will appear on the component. Then connect the text component with the Start bot flow component.
Include Custom variables in the reply message
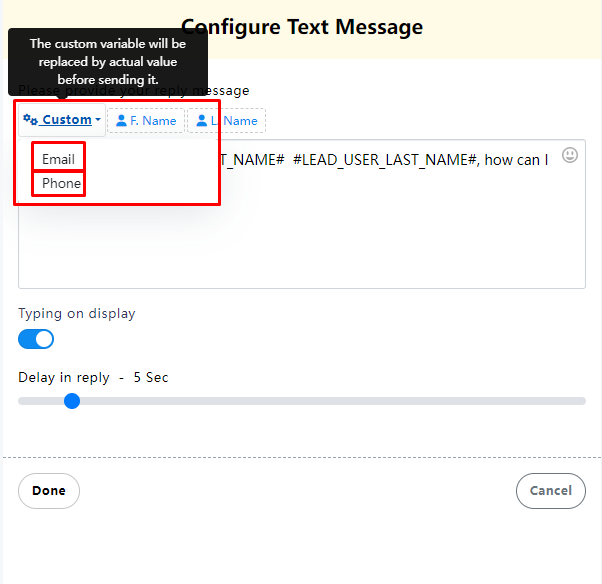
Besides, you can include custom variables in the reply message. Click on the button called custom and a drop-down menu of different variables will appear. And from the drop-down menu, select a variable. The custom variable will be replaced by the actual value before sending it.
NOTE: To learn how to create custom variables, click here
Image, Audio, Video, and File component
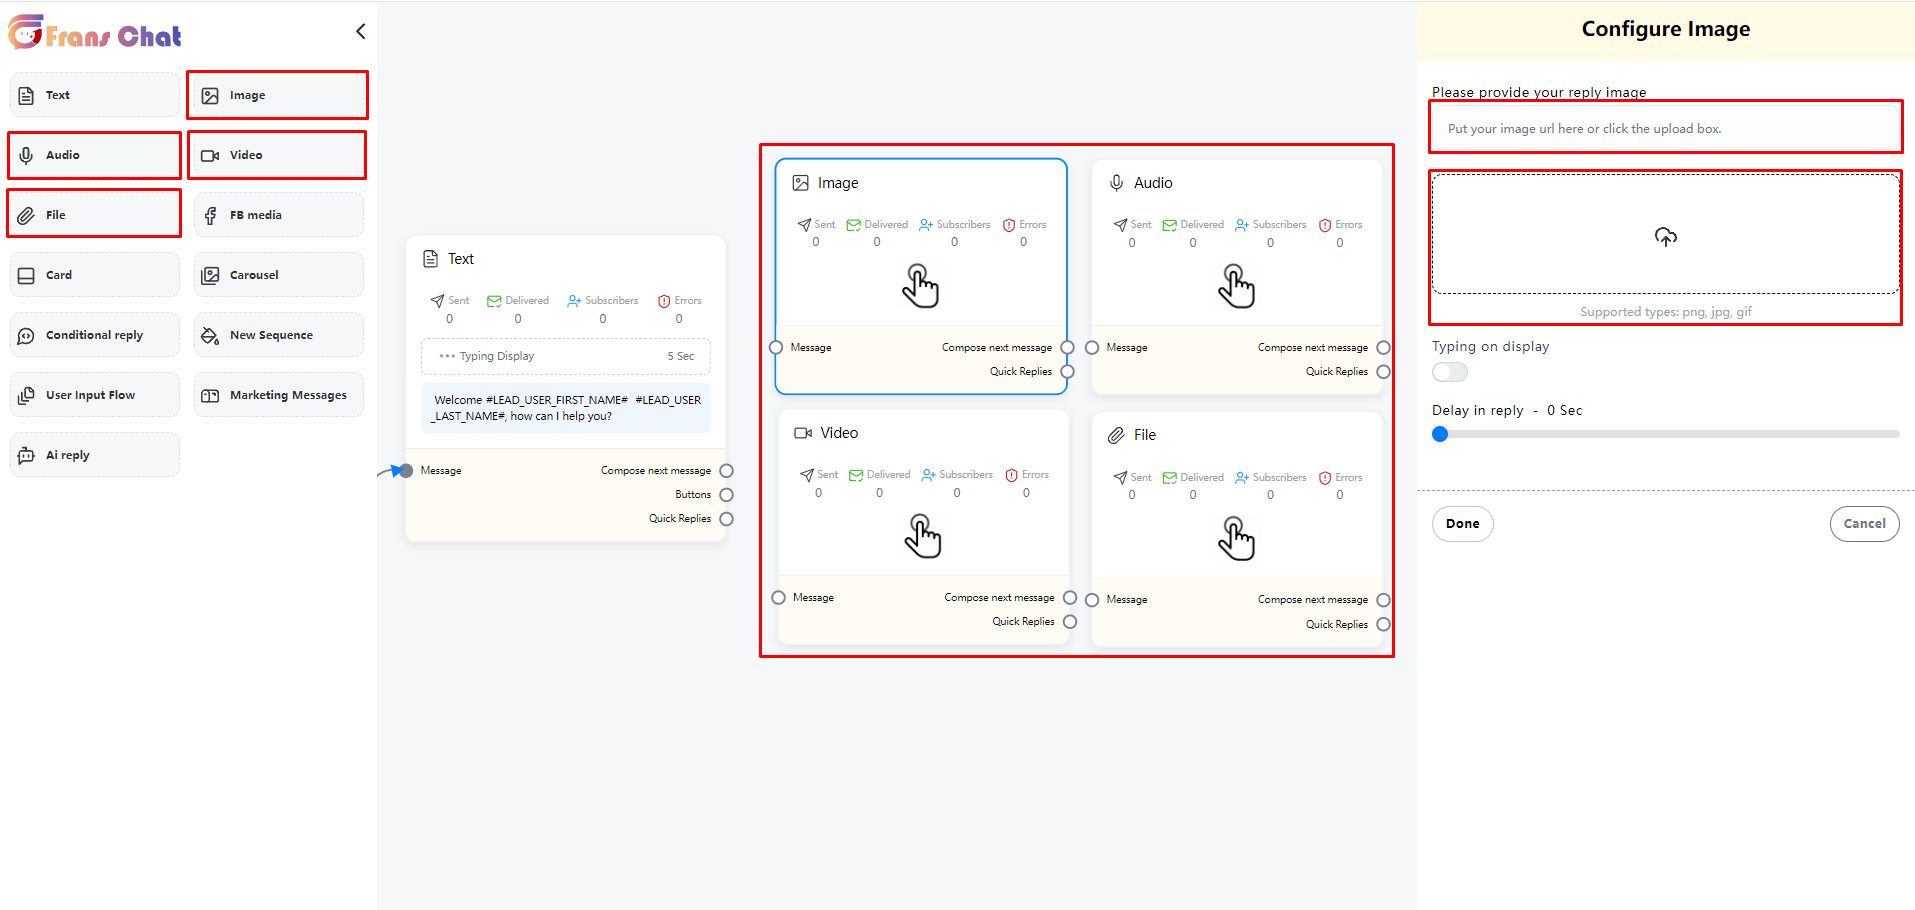
Likewise, you can add Image, Audio, Video, and File components. For these components, you have to upload an image, audio, video, and file respectively. Then you have to connect the components with other components.
Upload an image
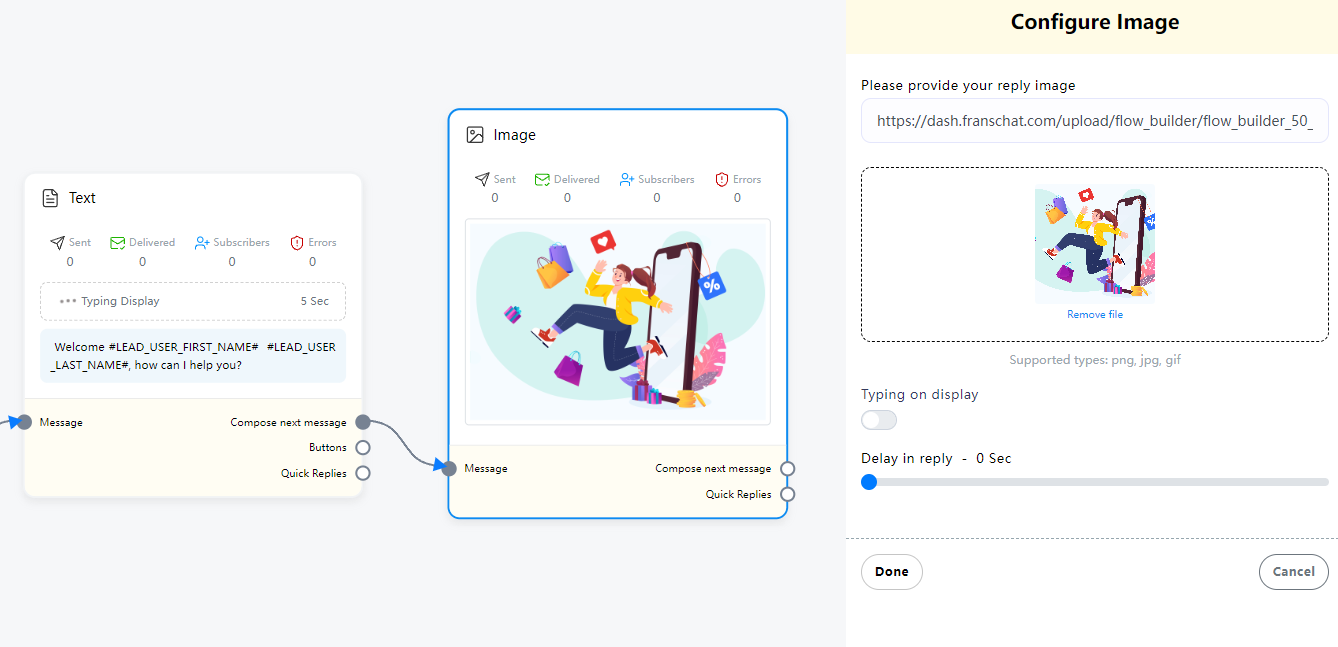
After the upload is completed, click Done to see the uploaded file in the component. In addition, you can also directly enter the file address URL in the input box without uploading.
FB Media
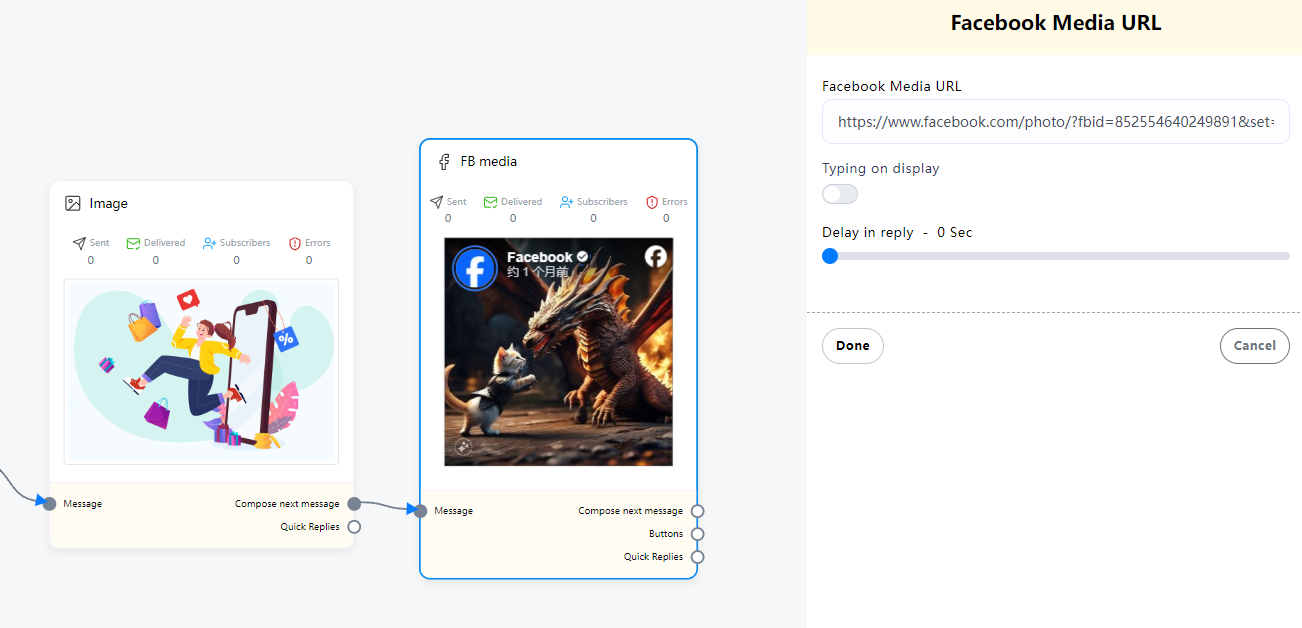
To add FB Media component, drag the FB Media component from the Doc-menu and drop it on the editor. Now double-click on the FB Media component and the right sidebar called Facebook Media URL will appear. In the Facebook Media URL field, put your Facebook Page media URL.
You can enable typing on display and select time in seconds for the delay in reply. Now click on the done button and the Facebook page media URL will appear on the component.
Card
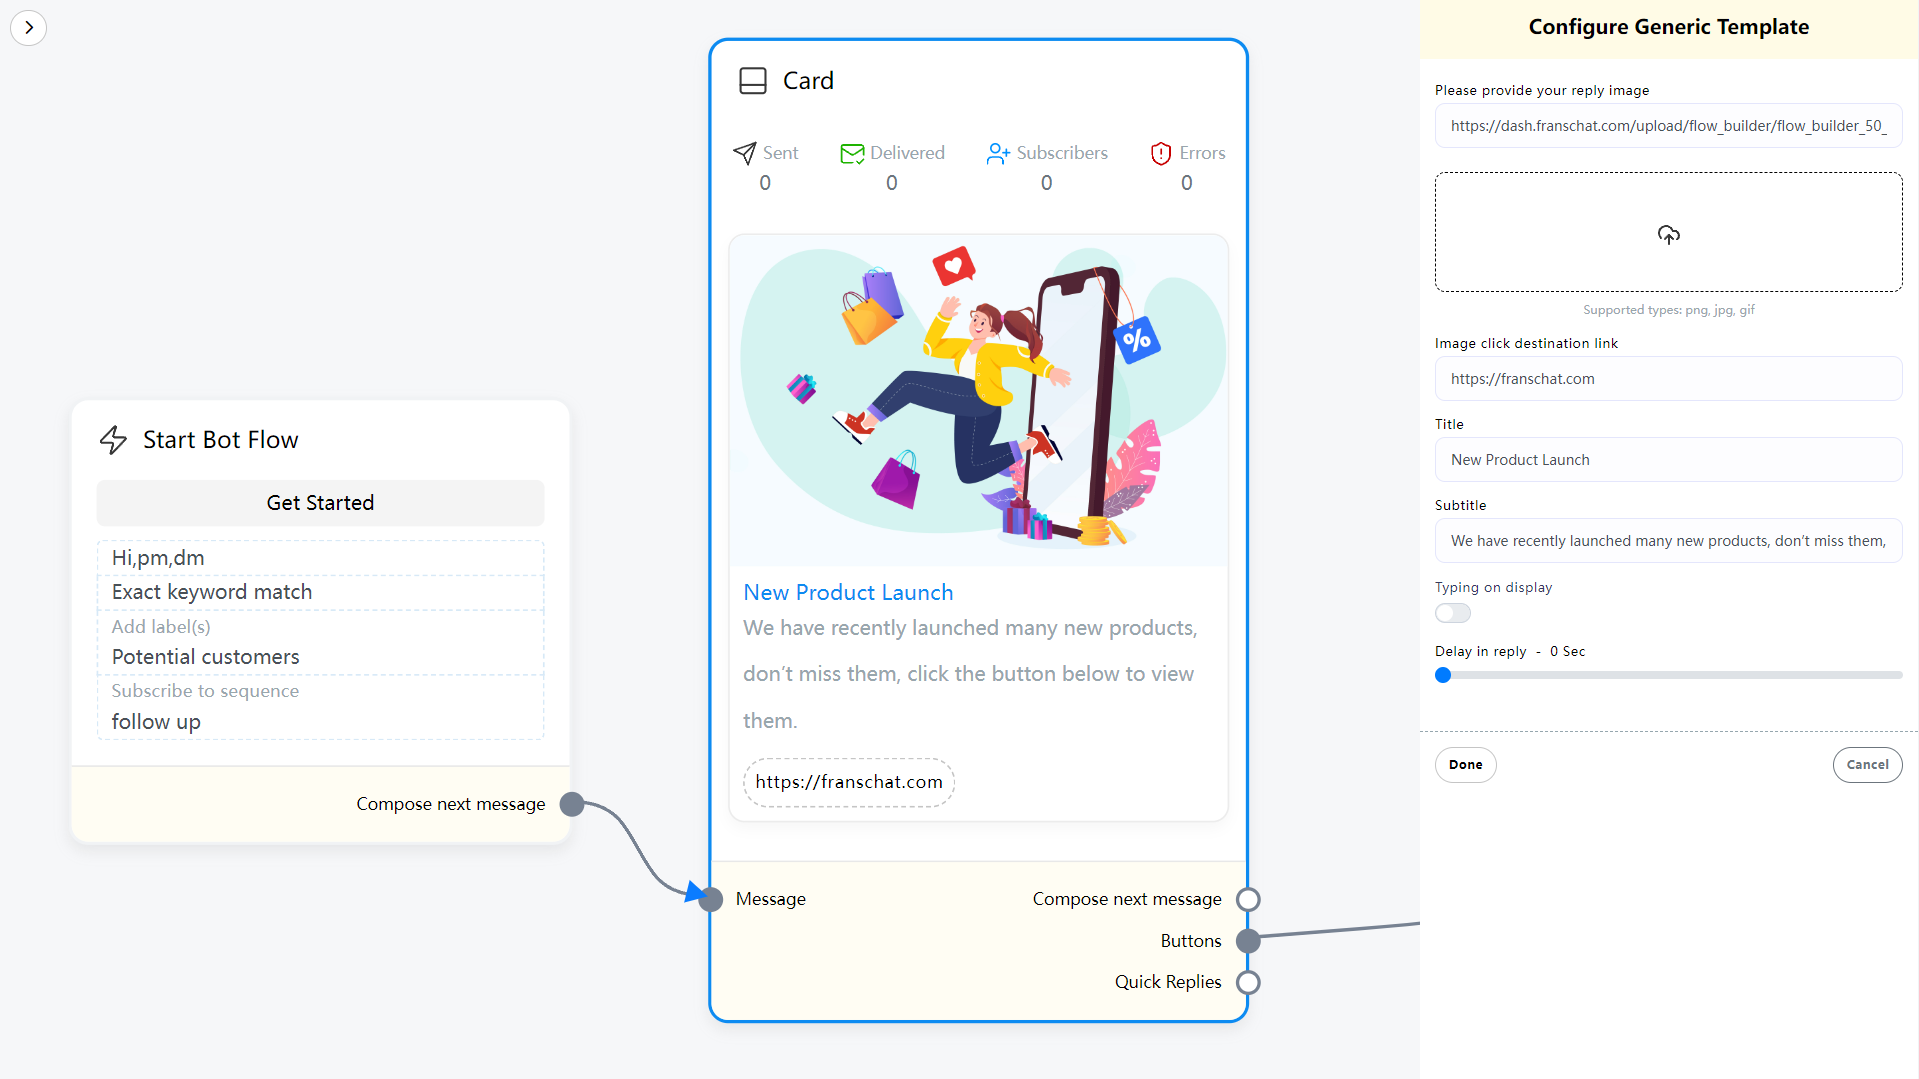
To add Card Component, drag the Card Component from the Doc-menu and place it on the editor. The Card component will appear with a button component. Well, now double-click on the Card component and a right sidebar called Configure Generic Template will appear. Now upload an image. After uploading an image, paste a link in the image click destination link field. When a user clicks on the image, the user will be redirected to the URL. Now write a title in the Title field and a subtitle in the Subtitle field.
Then you have to configure the Button Component
Read the following section to know how to add and configure the Button Component.
Button
To add Button component, drag your cursor from the button output of a component like the Text or Card component and drop. Instantly, the Button component will appear connected with the mother component.
And sometimes the button component automatically appear connected with other component, such as Card and Carousel component.
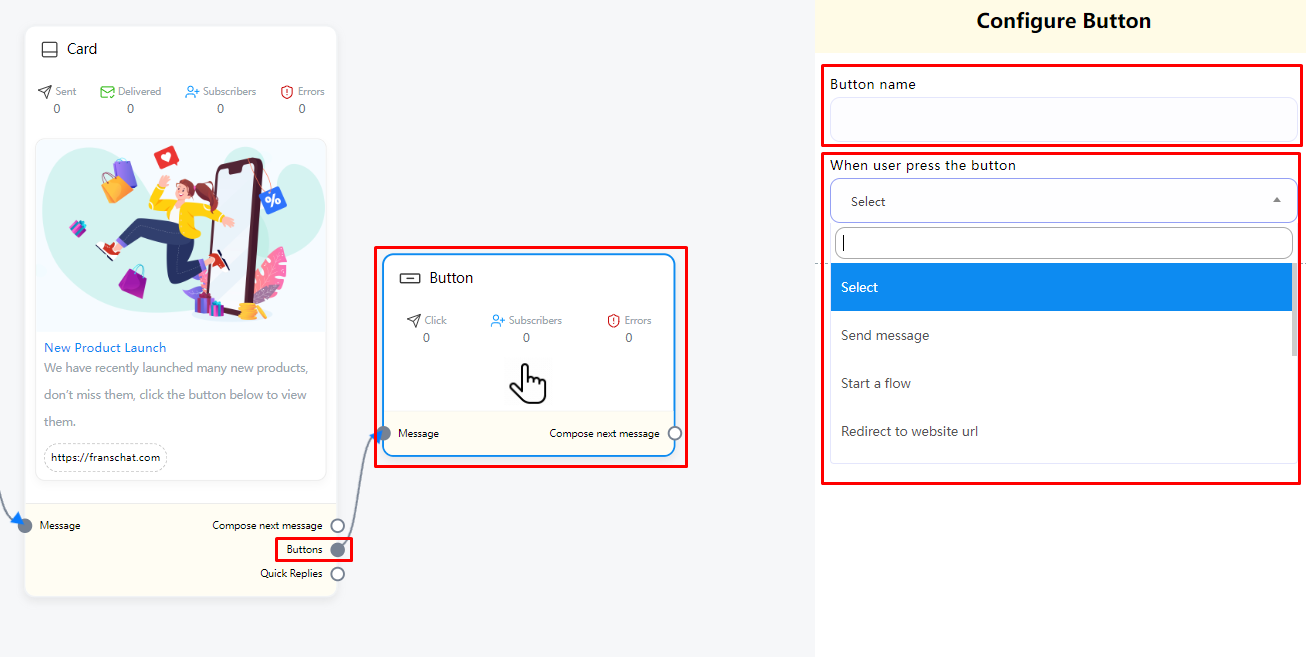
Now double-click on the button component and a right sidebar called configure button will appear. Now write a text in the button text field – the text will appear on the button.
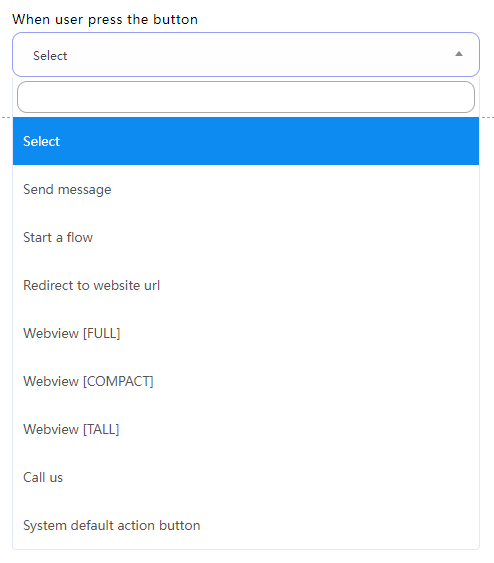
Then you have to select the button type from the “When user press the button” field. Clicking on the “When user press the button” field will display a drop-down menu – Send Message, Start a flow, Redirect to website url, Webview [full], Webview[compact], Webview[tall], Call us, Sysyem default action button
When user press the button - Button types
We’ll explain how to use each option one by one
Send message
Select “Send message” on the button type and click on the done button.
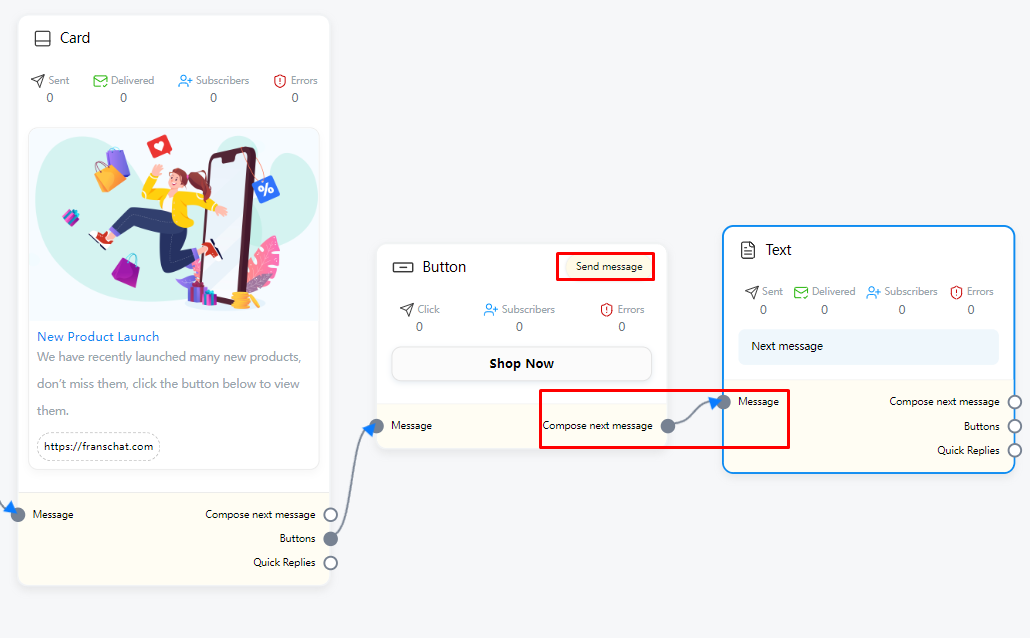
You can see that when “Send message” is selected, the configuration button is similar to “Start bot flow”. “Send message” in each button is equivalent to a new “Start bot flow”. Now we can configure the user click in the button What will be triggered after this button. For example, we can set add tags, remove tags or Subscribe to sequence. For specific settings, see the “Start bot flow” section.
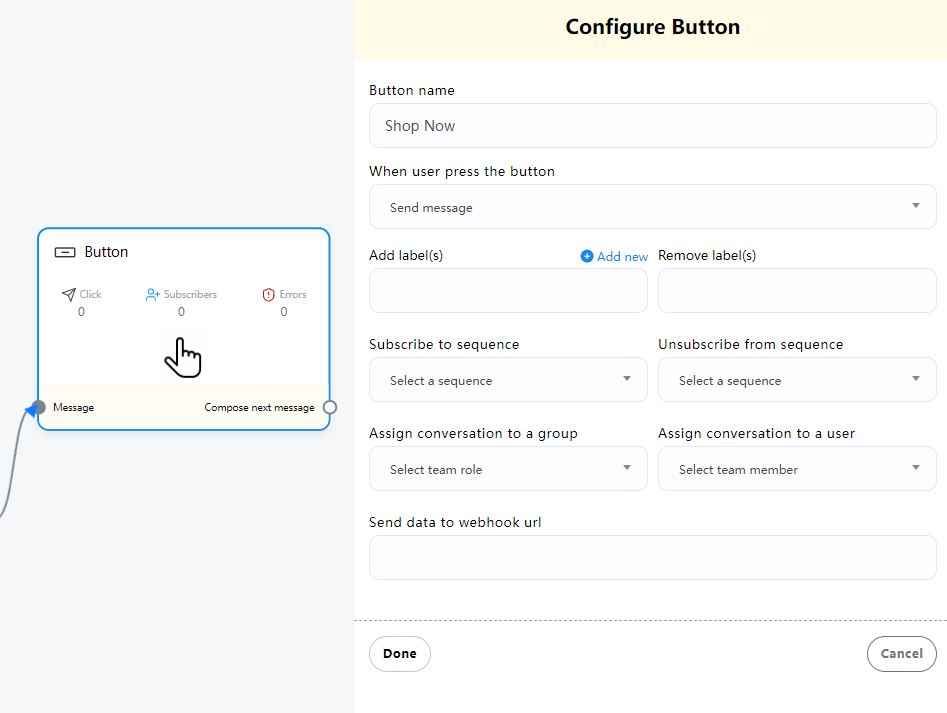
Now you can continue to connect to the next conversation after “Send message” type.
Start a flow
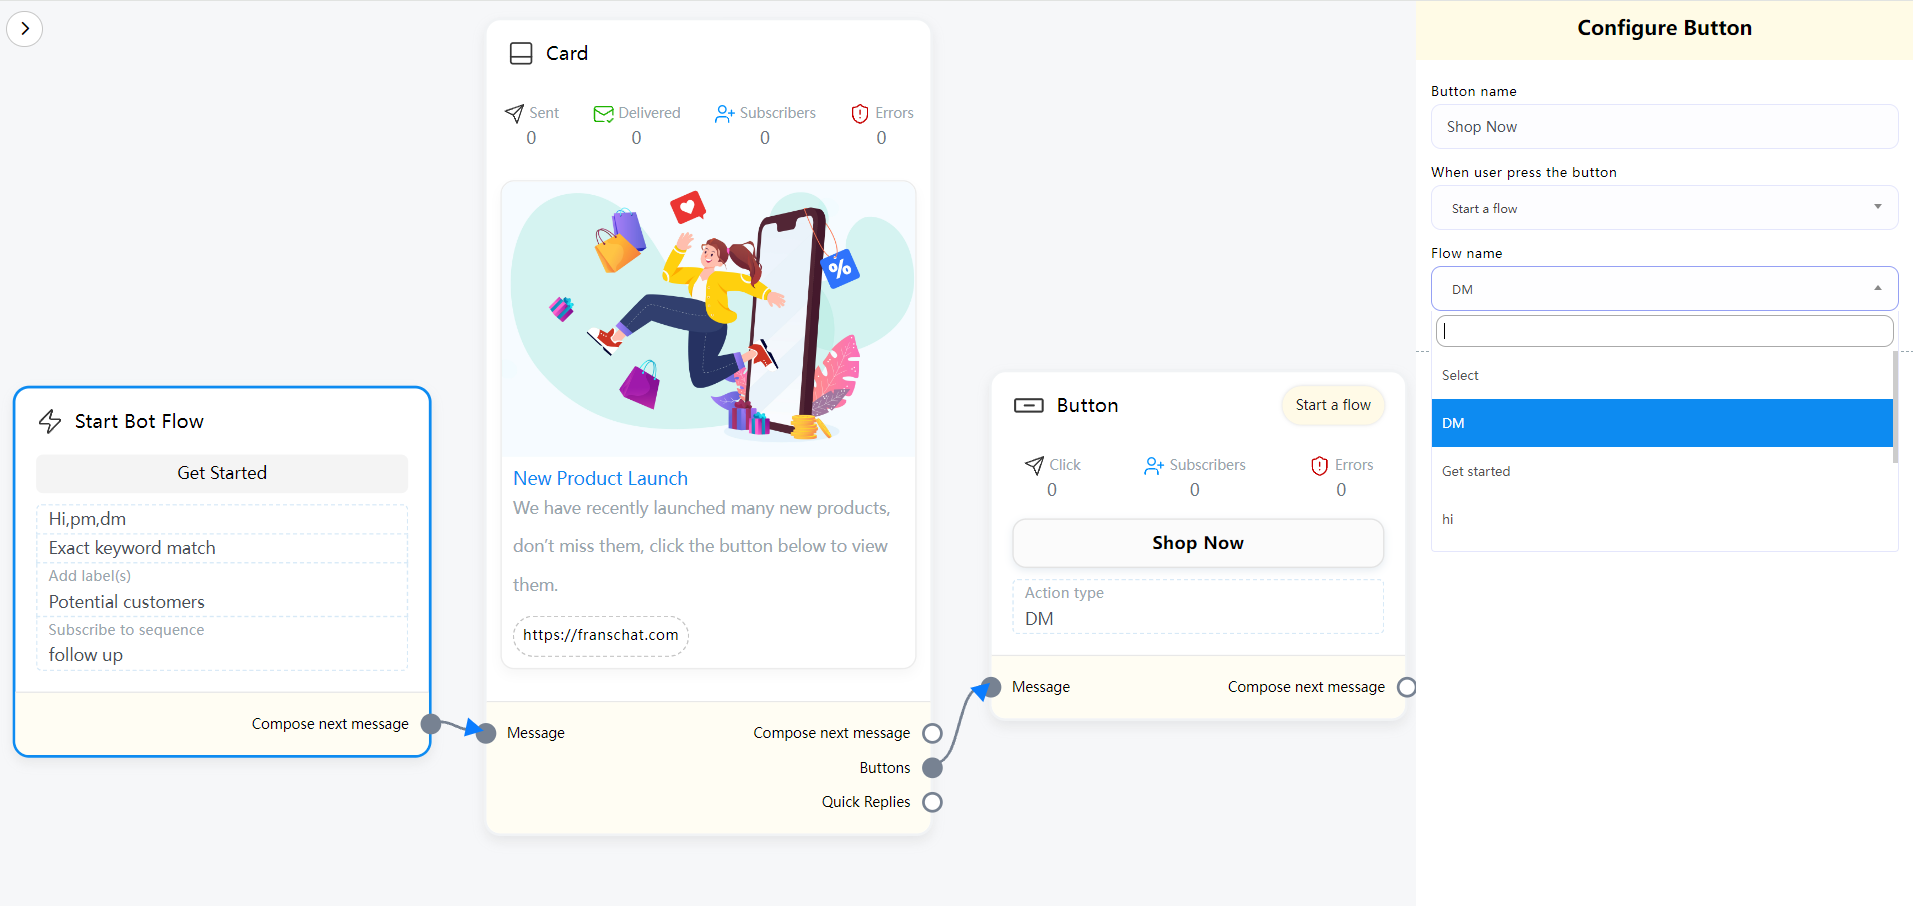
If you select “Start a flow” as the button type, a “Flow name” field will appear. You must select a Flow from the “Flow name” field. Click on the “Flow name” field and a drop-down menu of different flows will appear. Then select a Flow from the drop-down menu. Then click the “Done” button. The Flow name will appear in the Action type on the button component.
Redirect to website url
If you selectRedirect to website url, Webview [FULL], Webview [TALL], Webview [COMPACT], another field will appear. And in the field, you have to paste an URL. Now paste a URL and click on the done button. After that, the URL will appear on the Button component.
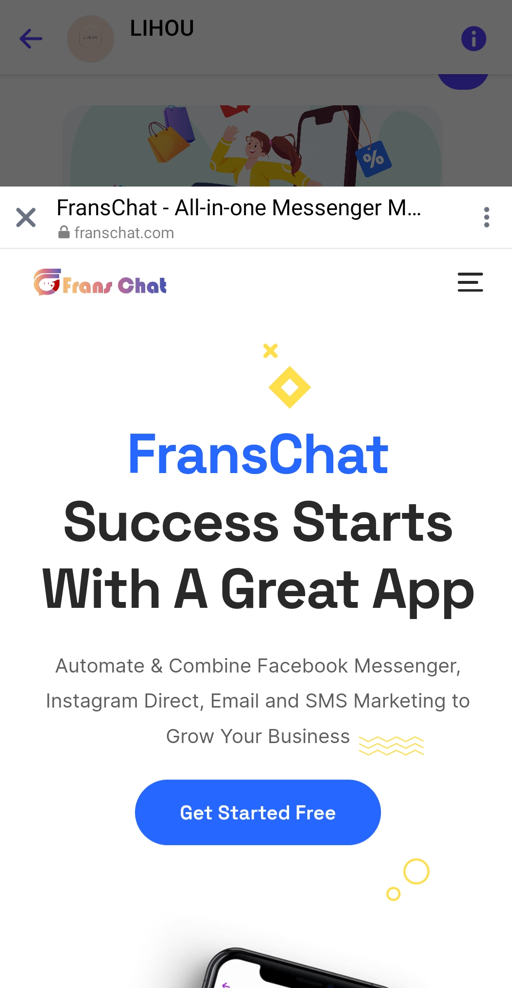
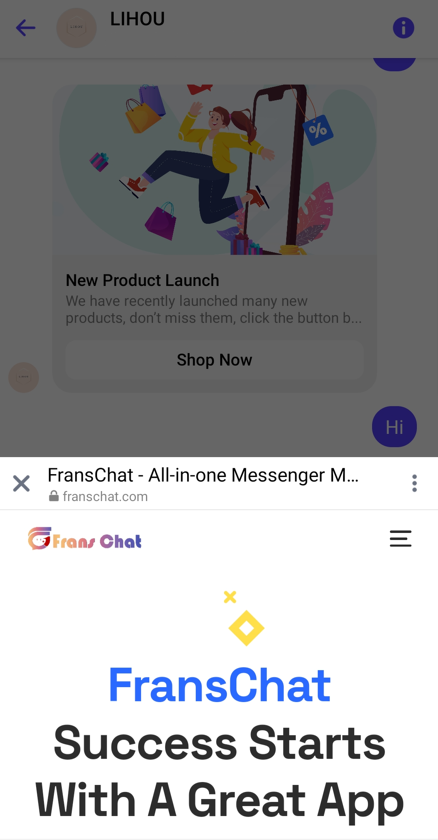
For the Webview type, your experience will appear as a layer overlaid on top of the conversation, displaying at full screen, 75% height, or 50% height, depending on your content and use case
Call us
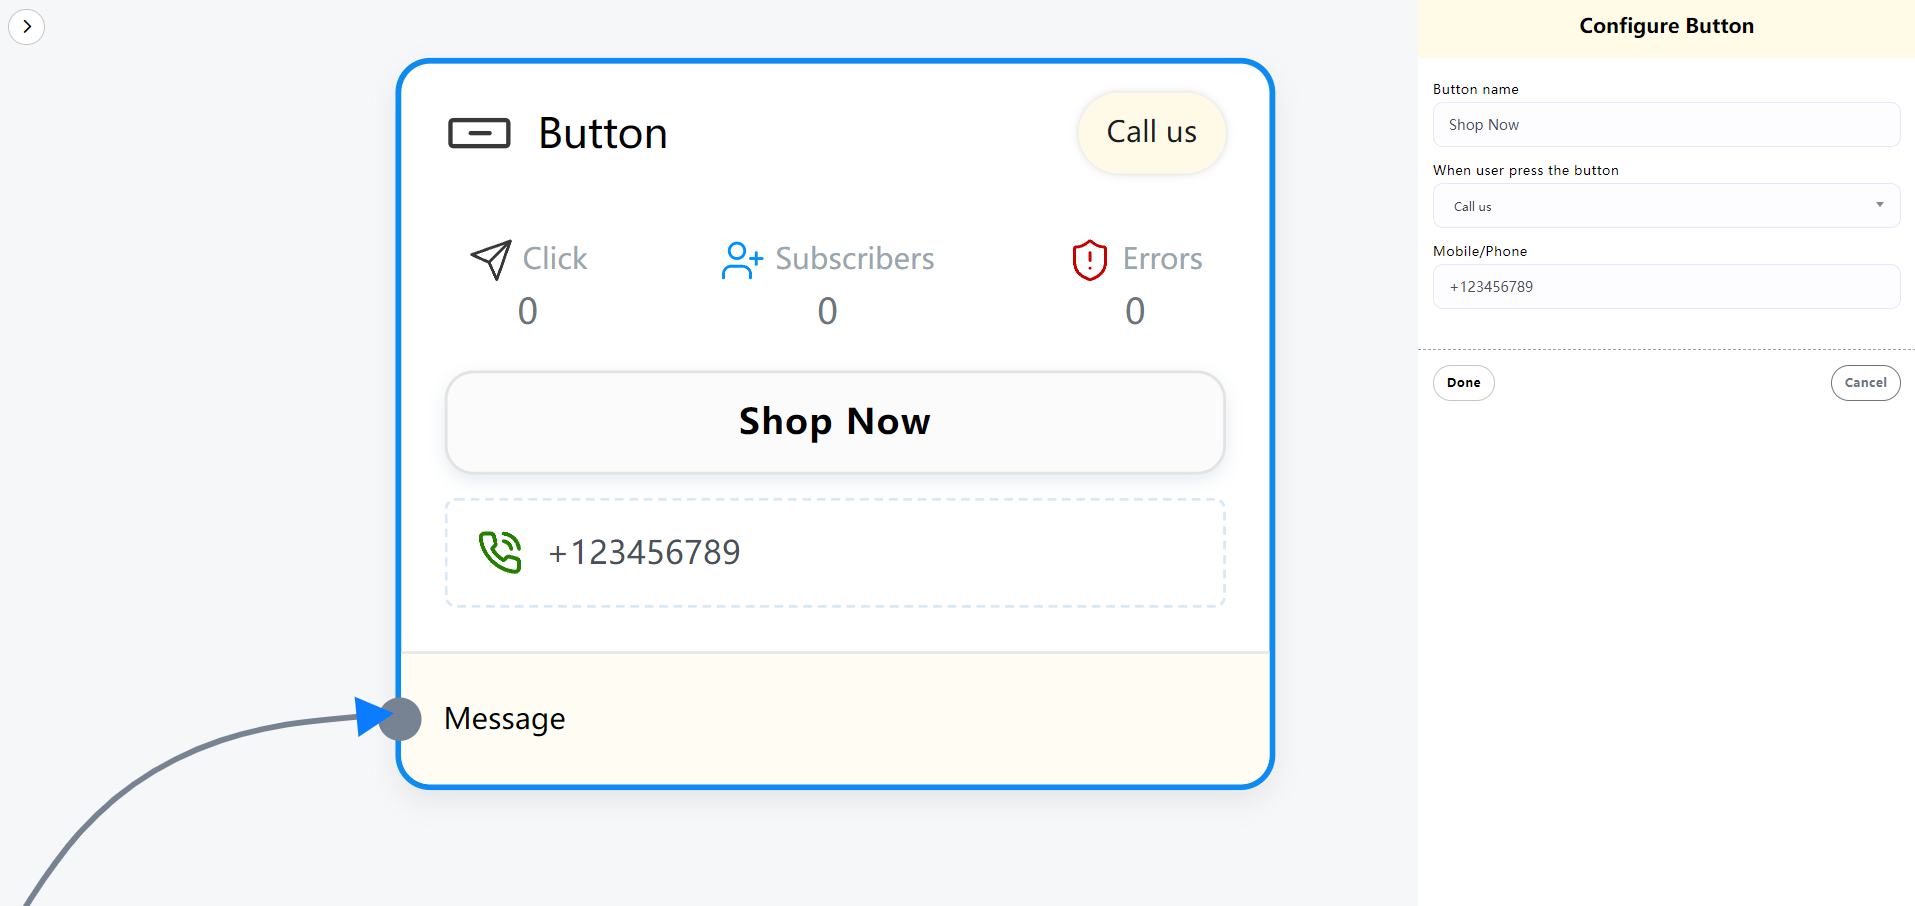
Select Call us button from the drop-down menu of different button types and instantly, another field called Mobile/Phone number will appear. Now you have to provide your phone number in the field. Then click on the done button.
System default action button
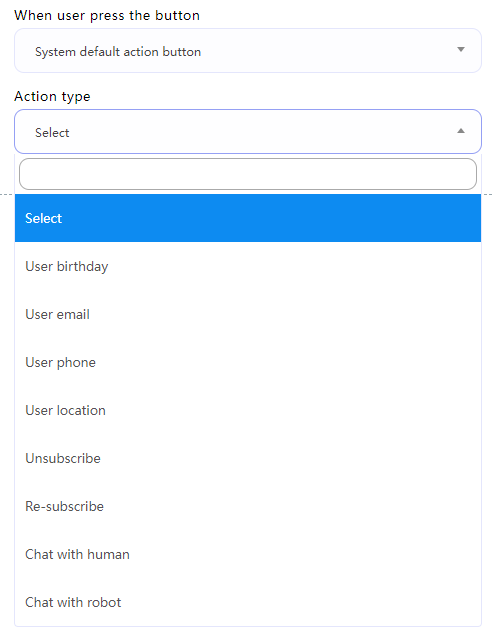
Form the “System default action button” type field, you can select User email, User birthday, User phone or User location, Unsubscribe button, Resubscribe button, Chat with human, Chat with robot. After selecting any from the button type, click on the done button. Instantly the button type will appear on the button.
For specific settings, please refer to the “Action Button” article, click here
Quick Reply
To add a quick reply component, drag and drop your cursor from the quick reply output of a component such as a text or card component. Immediately, the quick reply component will appear connected to the parent component.
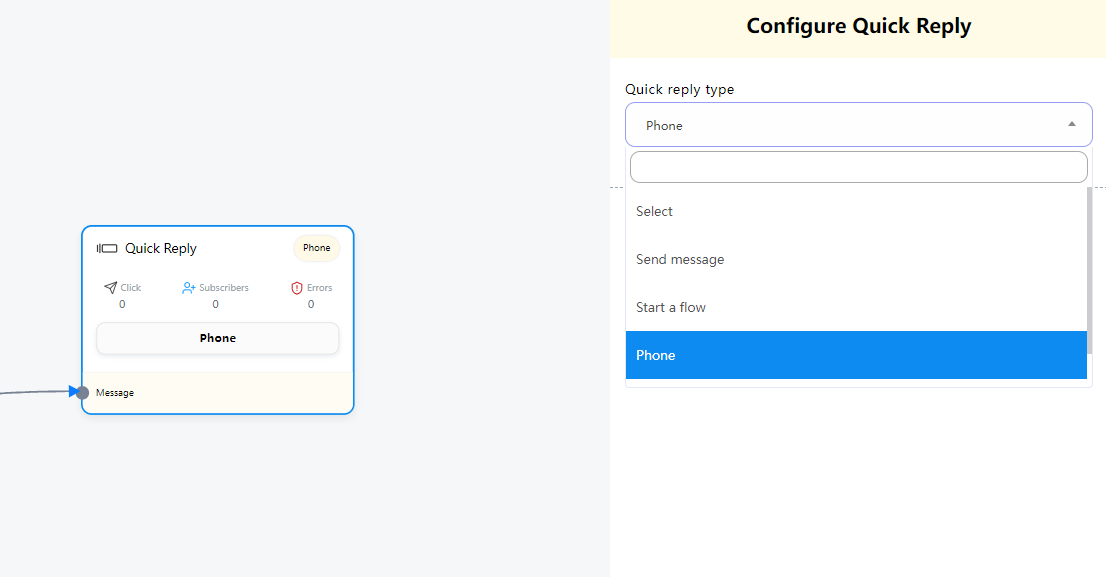
Now double-click on the “Quick Reply” component and a right sidebar named “Configure Quick Reply” will appear. Now, in the Quick Reply Type field, you have to select the Quick Reply Type. Click on the Quick Reply Type field and a drop-down menu of different types of quick replies will appear – Send message, Start bot flow, Phone, and Email.
(Note: More than 3 quick reply components can exist at the same time under the same component.)
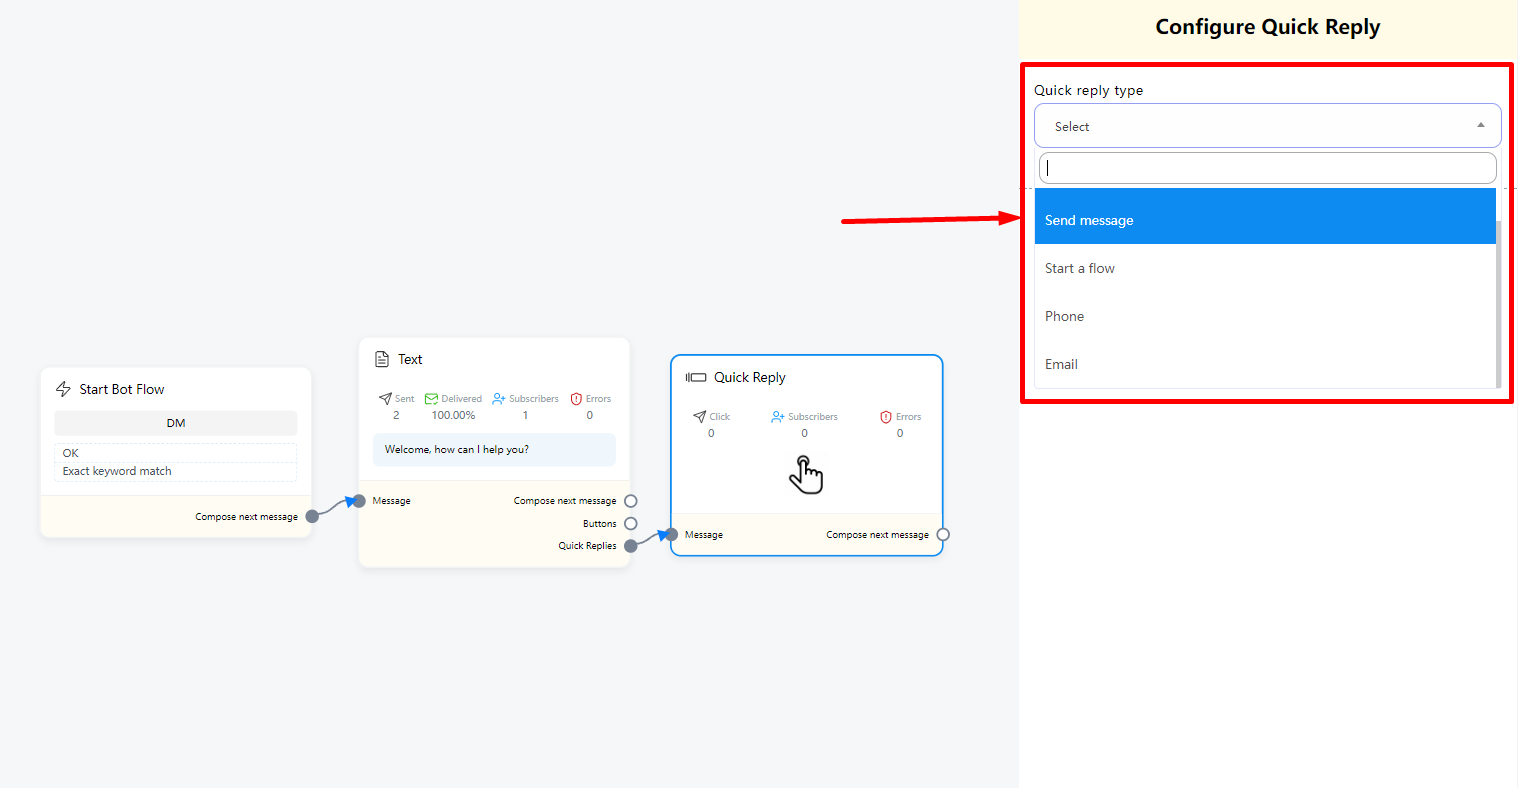
Send message as quick reply type
Select send message as the quick reply type, and instantly a field called button text will appear. Now you have to provide a text for the button in the button text field.
For labels, sequence, assignment, and webhook are basically the same as buttons.
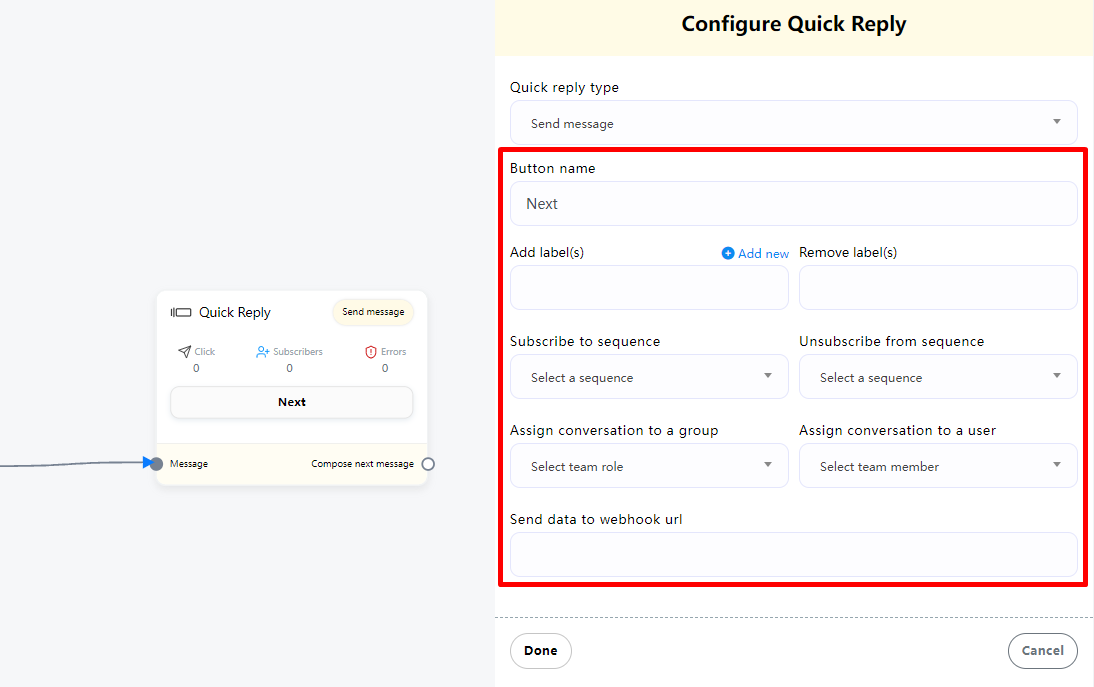
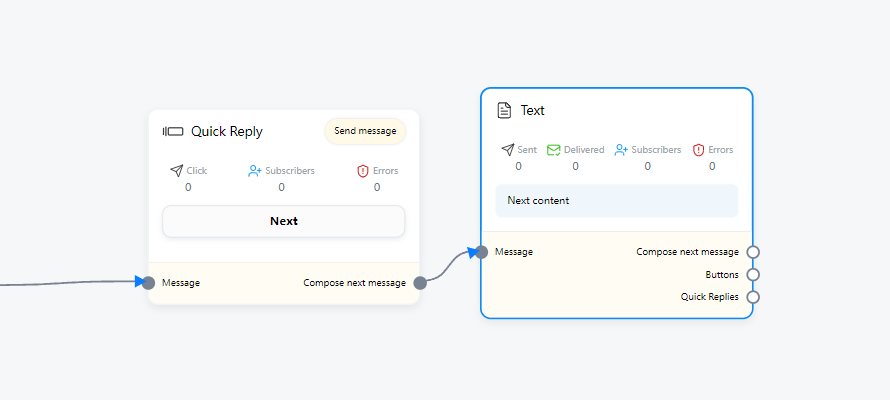
After setting the quick reply button text, we can connect a new component, such as text, below the quick reply component.
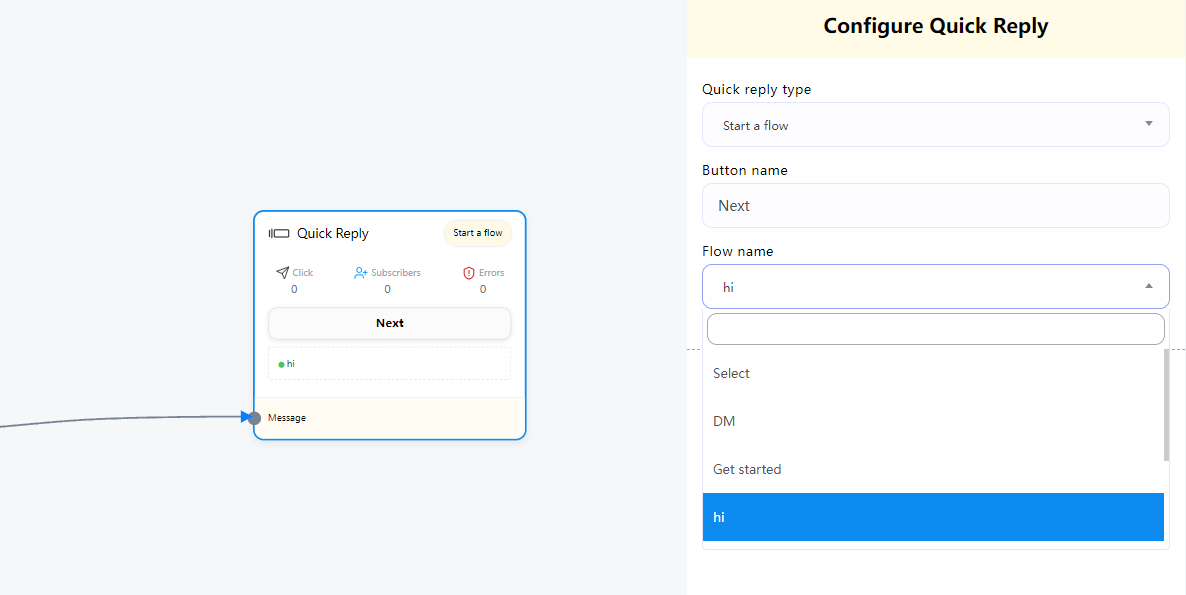
Start a flow as quick reply type
If you select Start a flow as the quick reply type, two fields – button text and postback id will appear. In the button text field, you have to write a text for the button. And from the flow id field, you have to select a flow. Click on the flow id field and a drop-down menu of different flow id will appear. And from the drop-down menu, select a flow id. And click on the Done button. And the flow id will appear on the Quick reply component
Phone as quick reply
Just select phone as the quick reply type in the quick reply type field and click on the done button. In this case, the quick reply will collect your phone number from your Facebook Profile and show in the messenger. When a user clicks on the phone number, the system will receive the phone number. And the user will get a message that the system have received your phone number.
Email as quick reply
Just select Email as the quick reply type in the quick reply type field and click on the done button. In this case, the quick reply will collect your Email address from your Facebook Profile and show in the messenger. When a user click on the phone number, the system will receive the email address. And the user will get a message that the system have received your Email address.

Carousel
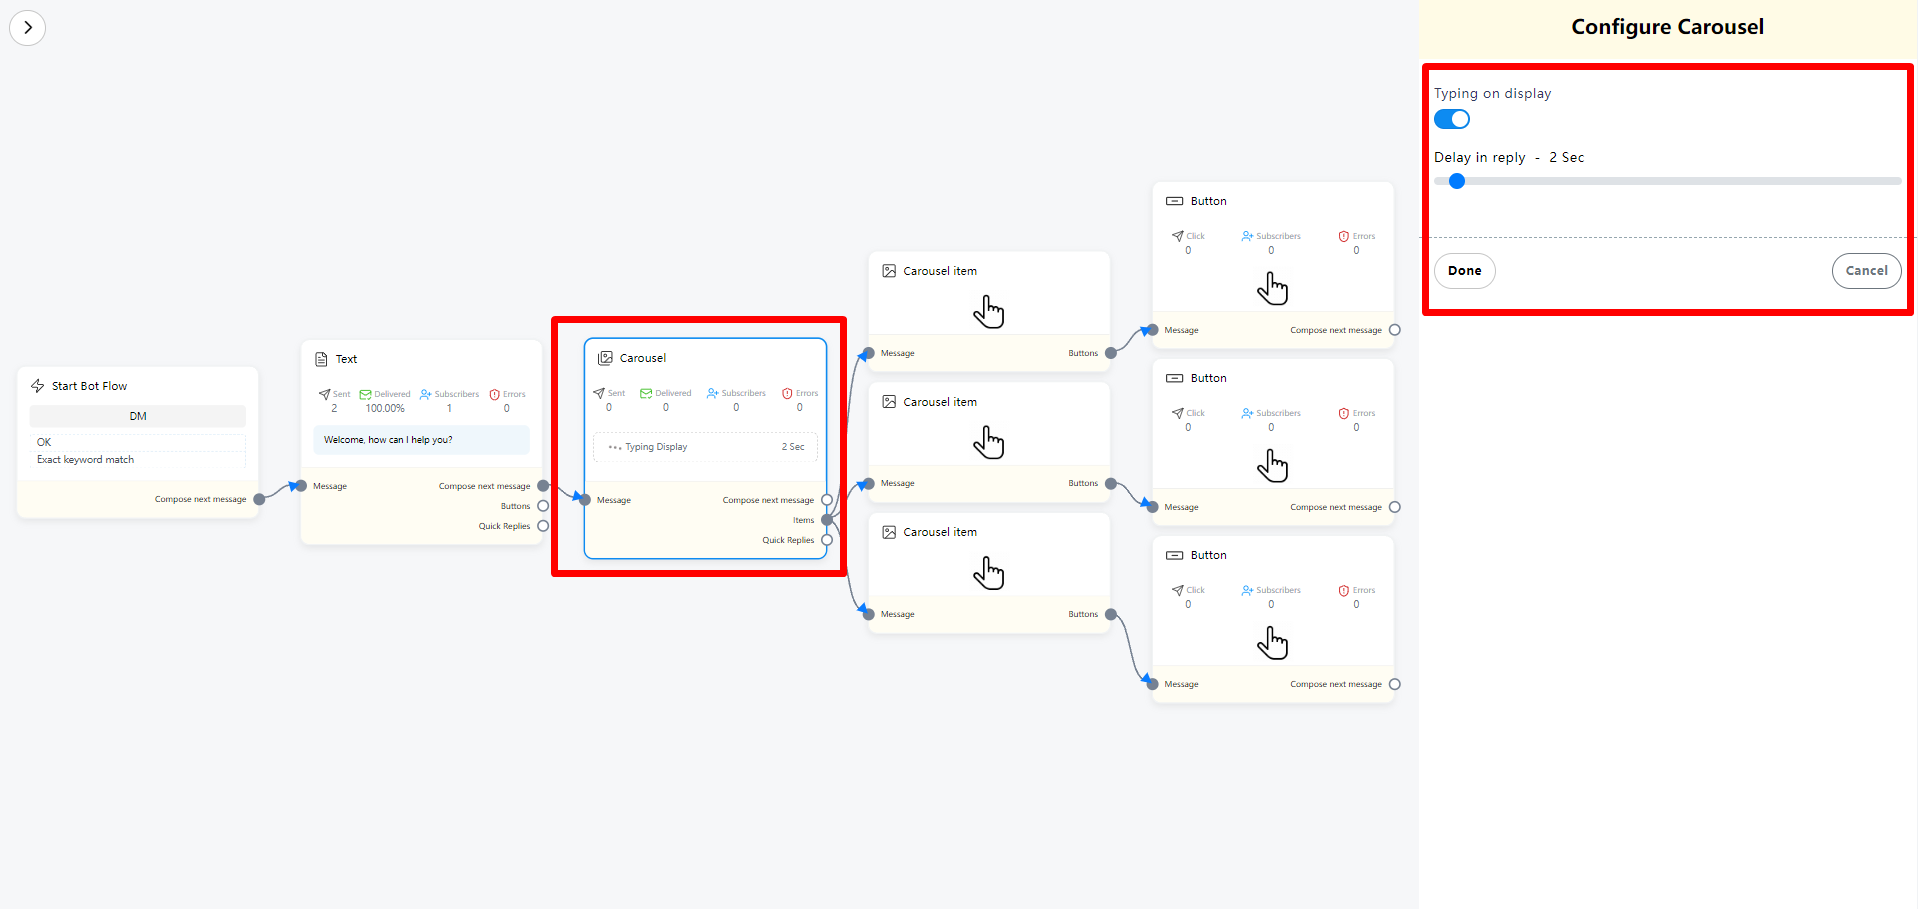
To add a Carousel component, drag the Carousel component from the Doc-menu and drop it on the editor. Instantly, the Carousel component will appear with three carousel items connected with the Carousel component and three button components connected with the three carousel components.
Now double-click on the Carousel component and the right sidebar called configure Carousel will appear. In the sidebar, you can enable typing on display and select delay in reply time in seconds. Now click on the Done button.
Carousel Item
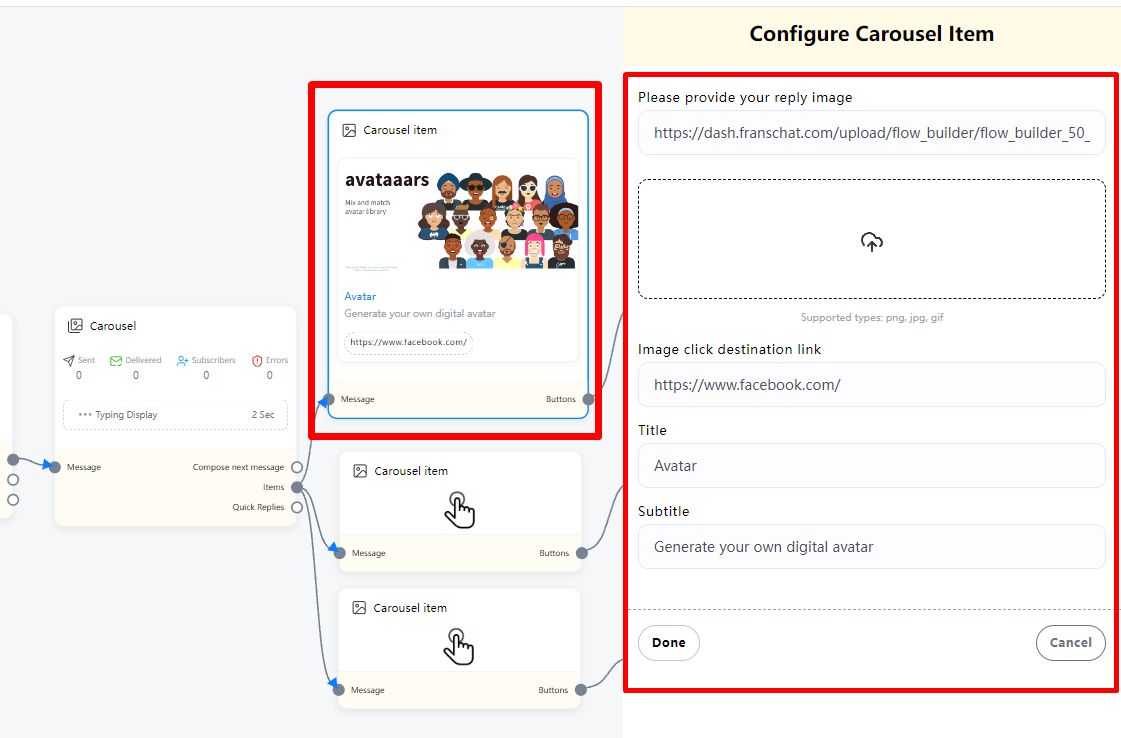
Now come to the carousel Item component. Double-click on the carousel Item button and the right sidebar called Configure Carousel Item will appear with some fields.
Now upload an image. After uploading an image, paste a link in the image click destination link field. When a user clicks on the image, the user will be redirected to the URL. Now write a title in the title field and a subtitle in the subtitle field. Enable the typing on display and select delay time in seconds.
Likewise, you have to configure the other two carousel items.
Now you have to configure buttons. You already know how to configure buttons.
You can add other components with the button components if you want.
Now click on the save button or press ctrl + S and your bot will be saved.
Conditional Reply
With the condition add-on, you can build a condition and rules-based messenger bot that can talk to people intelligently. For example, if the user is male, the bot will call him Mr. On the other hand, if the user is Female, the bot will call her Miss/Mrs. And if the system already has the email number of a specific user, the bot will inform the user that the system already has the email number. Contrarily, if the system doesn’t have the email number of a specific user, the bot will ask for the email number from the user.
In this article, I will show you how to build a condition and rules-based messenger bot on the Flow Builder.
To build a condition and rules based messenger bot, you have to use an element called condition that will work as the entry point of the conditional conversation.
Let’s see how to build condition and rules-based messenger bot.
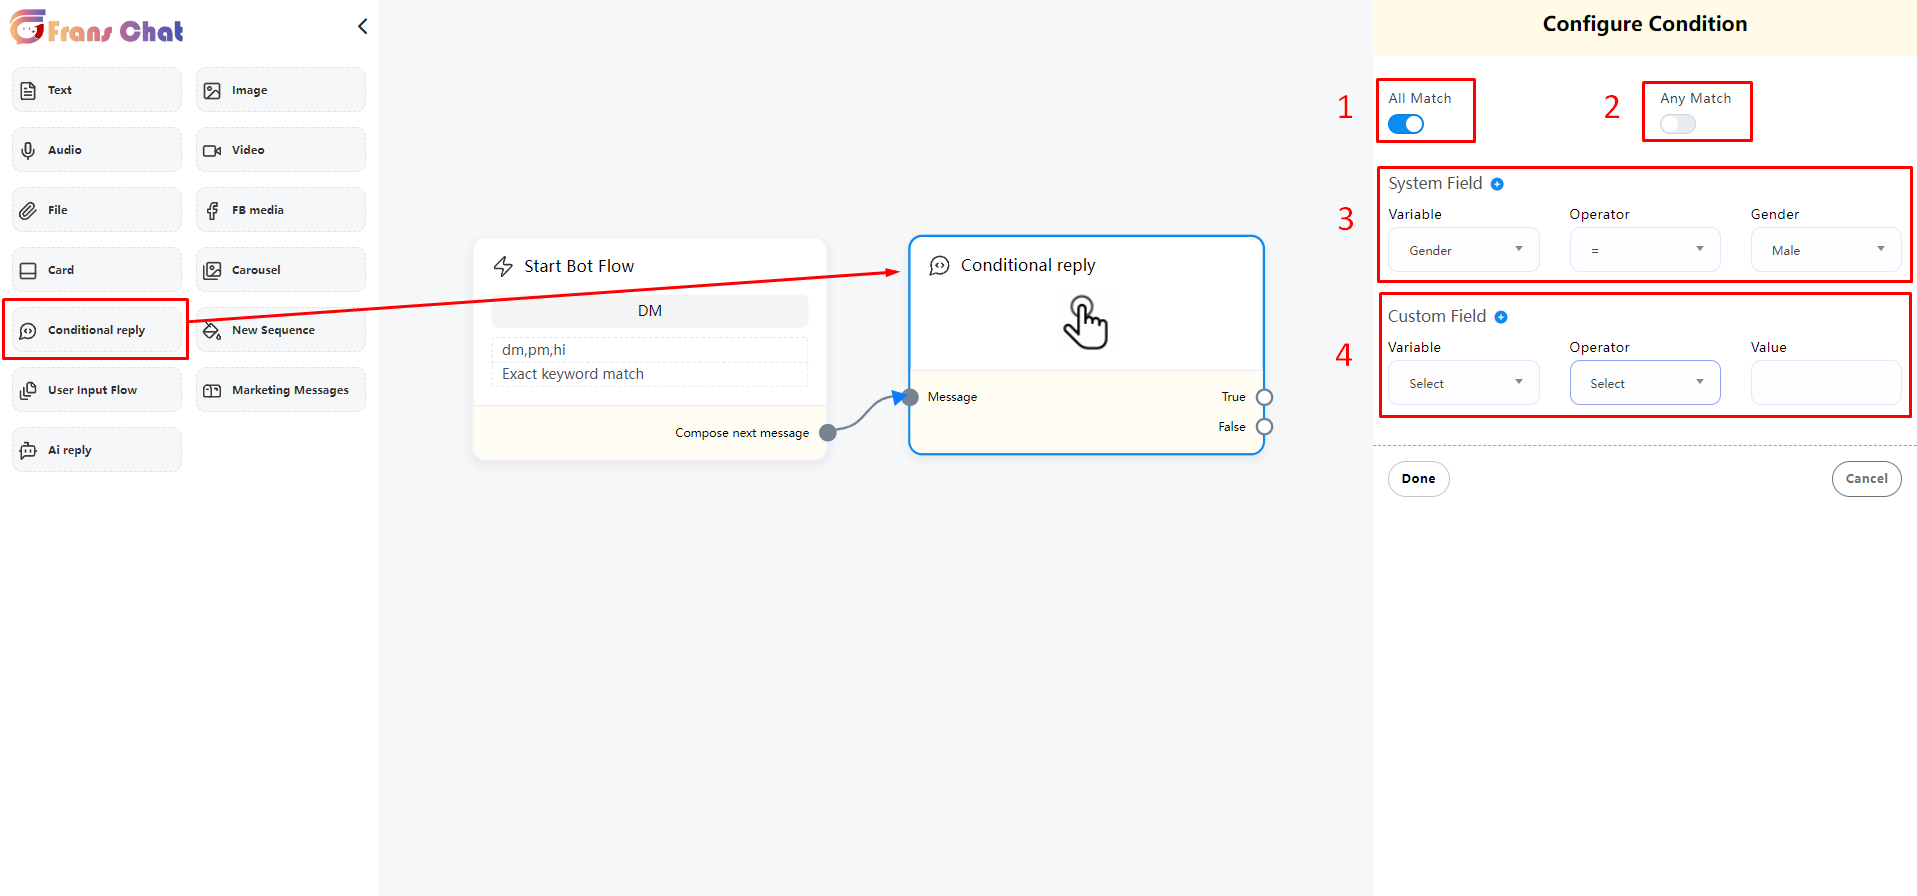
Add conditional elements via drag and drop and connect them with Start Bot Flow. Now double click on the conditional element. A form field will immediately appear on the right side of the editor. At the top of the form field, you’ll see two radio buttons – Match All and Match Any. You must select Match All or Match Any.
Please note:
1. If Match All is selected, all conditions must be true for the expression to be evaluated.
2. If you select Any Match, at least one condition must be true for the expression to be evaluated.
Since we only configure one condition, you can choose any of them.
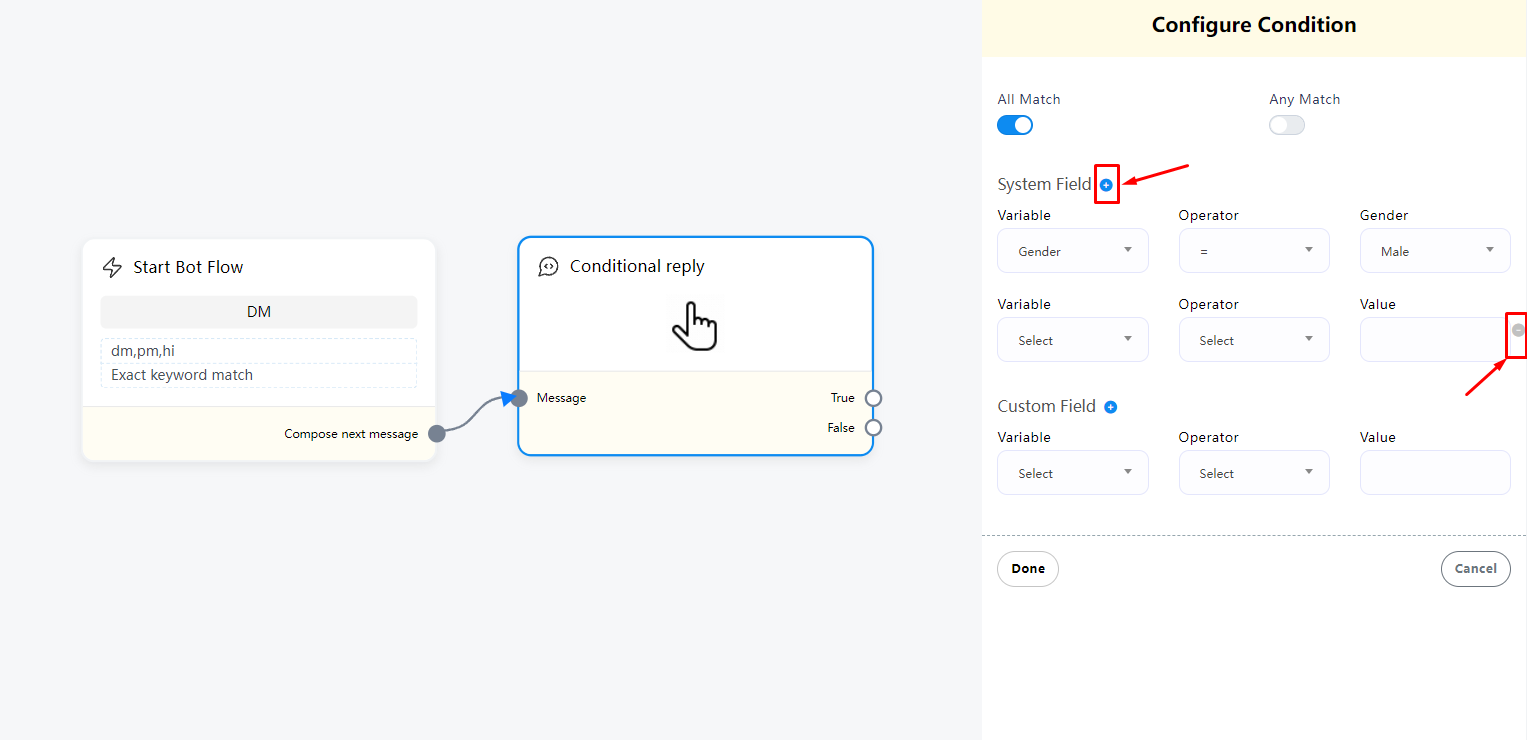
Then you will see the system field and the custom field. Both the system field and the custom field contain initial fields to configure conditions. Of course, by clicking on the plus sign next to the system field and custom field, you can add more fields to configure conditions on them. Of course, you can remove extra condition by clicking remove button.
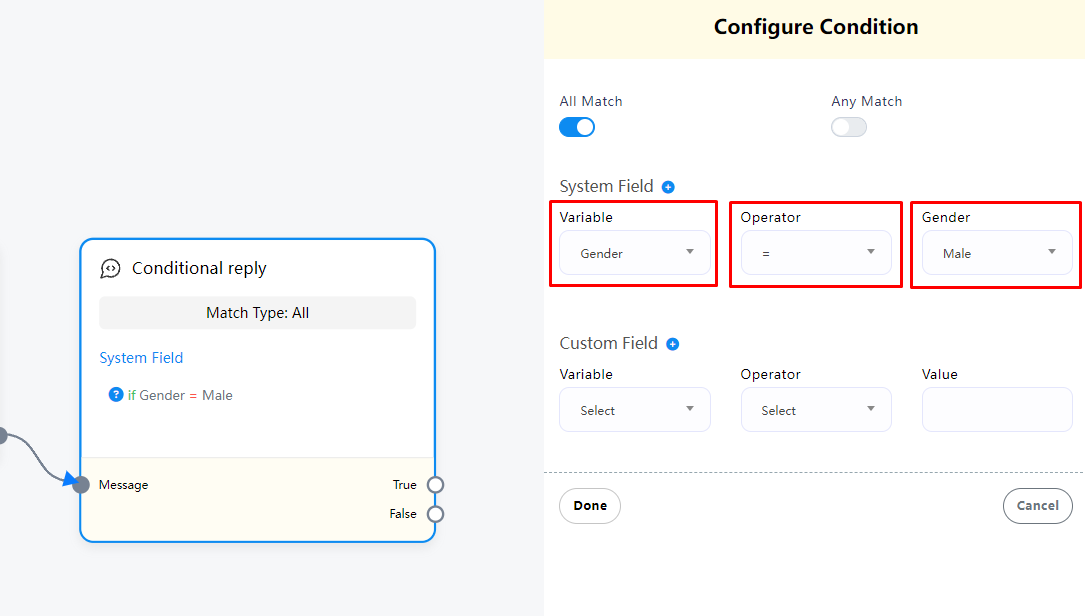
Let’s set a condition to check if the user is male or female and send messages accordingly:
Click on the Variable field and a drop-down menu of the different variables will appear. Now you have to select a variable. Likewise, you have to select an operator from the operator field and a value from the value field.
I select Gender as the variable, and Equal(=) as the operator, and Male as the value. Now I click on the ok button to insert data to the condition element.
In addition to this, you can also use Label and other conditions
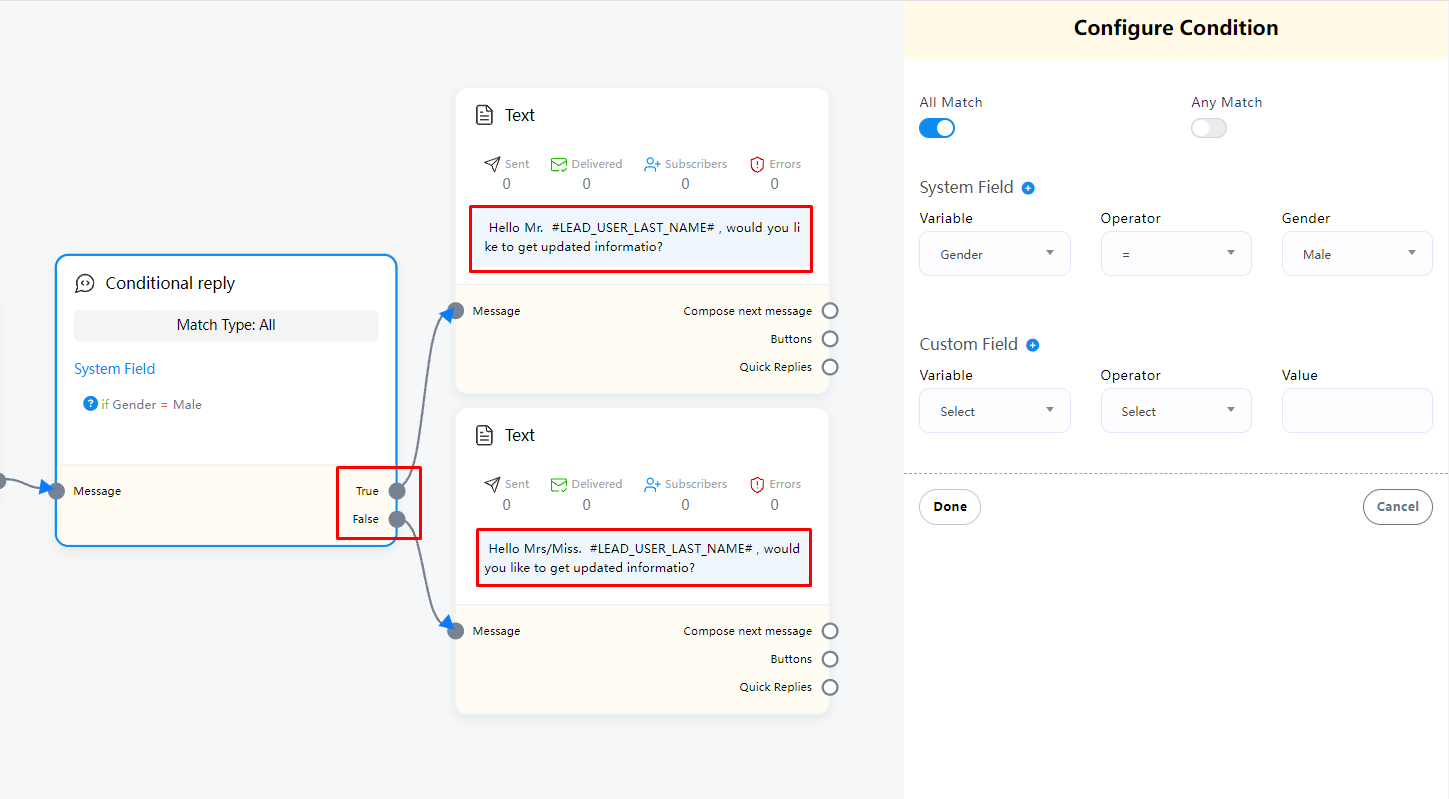
On the condition element, you will see two sockets – True and False. If the condition evaluates to true, the message connecting to the True socket will be sent. Contrary, if the condition evaluates to false, the message connecting to the False socket will be sent.
Well, now add a text element and connect it to the socket called True. Then write a message addressing the user as Mr. the message that will be sent to the male users.
Likewise, add another text element and connect it to the False socket and write a message, addressing the user as Miss/Mrs, the message that will be sent to the female users.
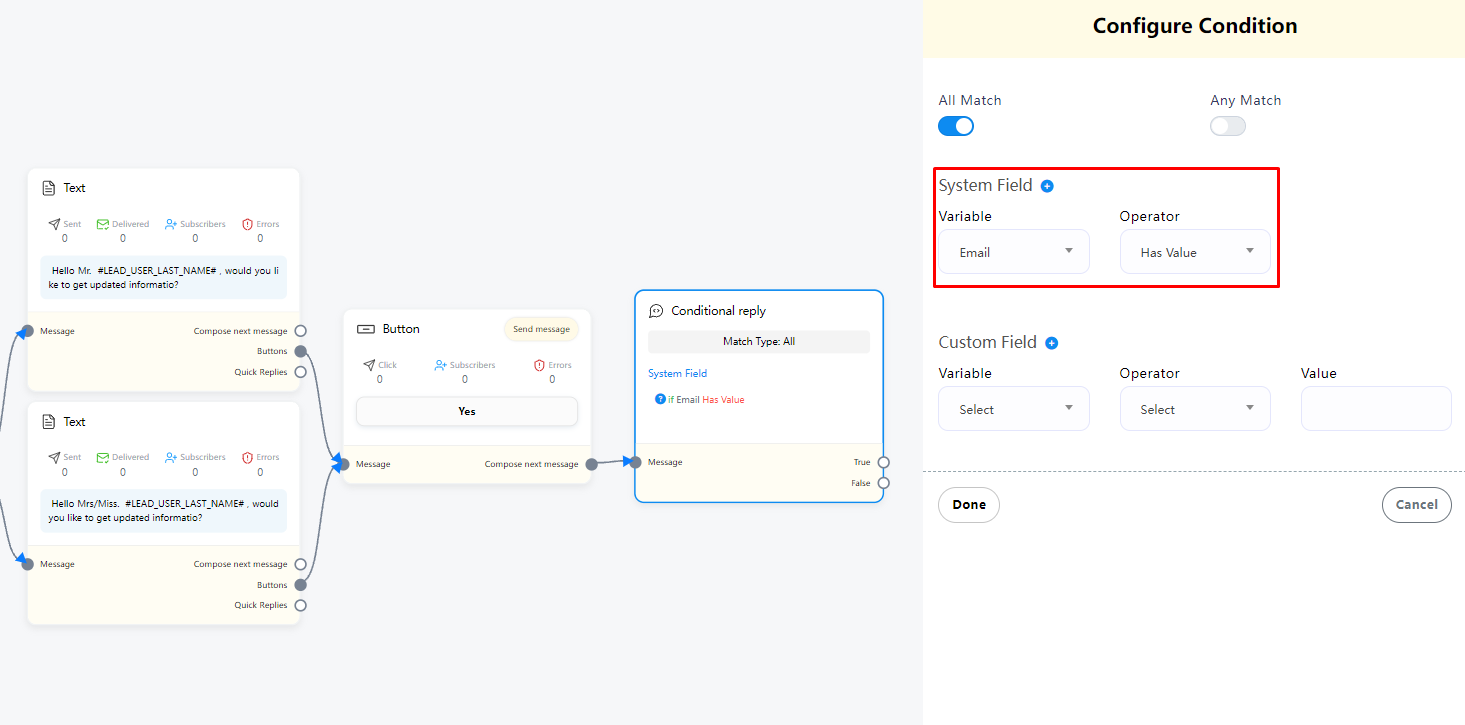
Now add a button element and connect it to both text elements. Well, write a button text and select send message as the button type and click the ok button. Instantly, a send message element connected to the button element will appear. Now give a title for the Send message.
Now I will set another condition to see whether the system has the email address of the user or not. If the system has the email address of a user, the bot will inform the user that the updated information will be sent to the email address. On the other hand, if the system doesn’t have the email address of a specific user, the bot will ask for the email address from the user.
Let’s set a condition to check if the system has the email address of a specific user or not and send messages accordingly:
Add condition element and connect it to the send message element. After that, click on the condition element to configure a condition. If you configure one condition, it doesn’t matter whether you select All Match or Any Match.
Like before, select Email as the variable and Has Value as the operator. And click on the ok button. That’s all. The condition is set.
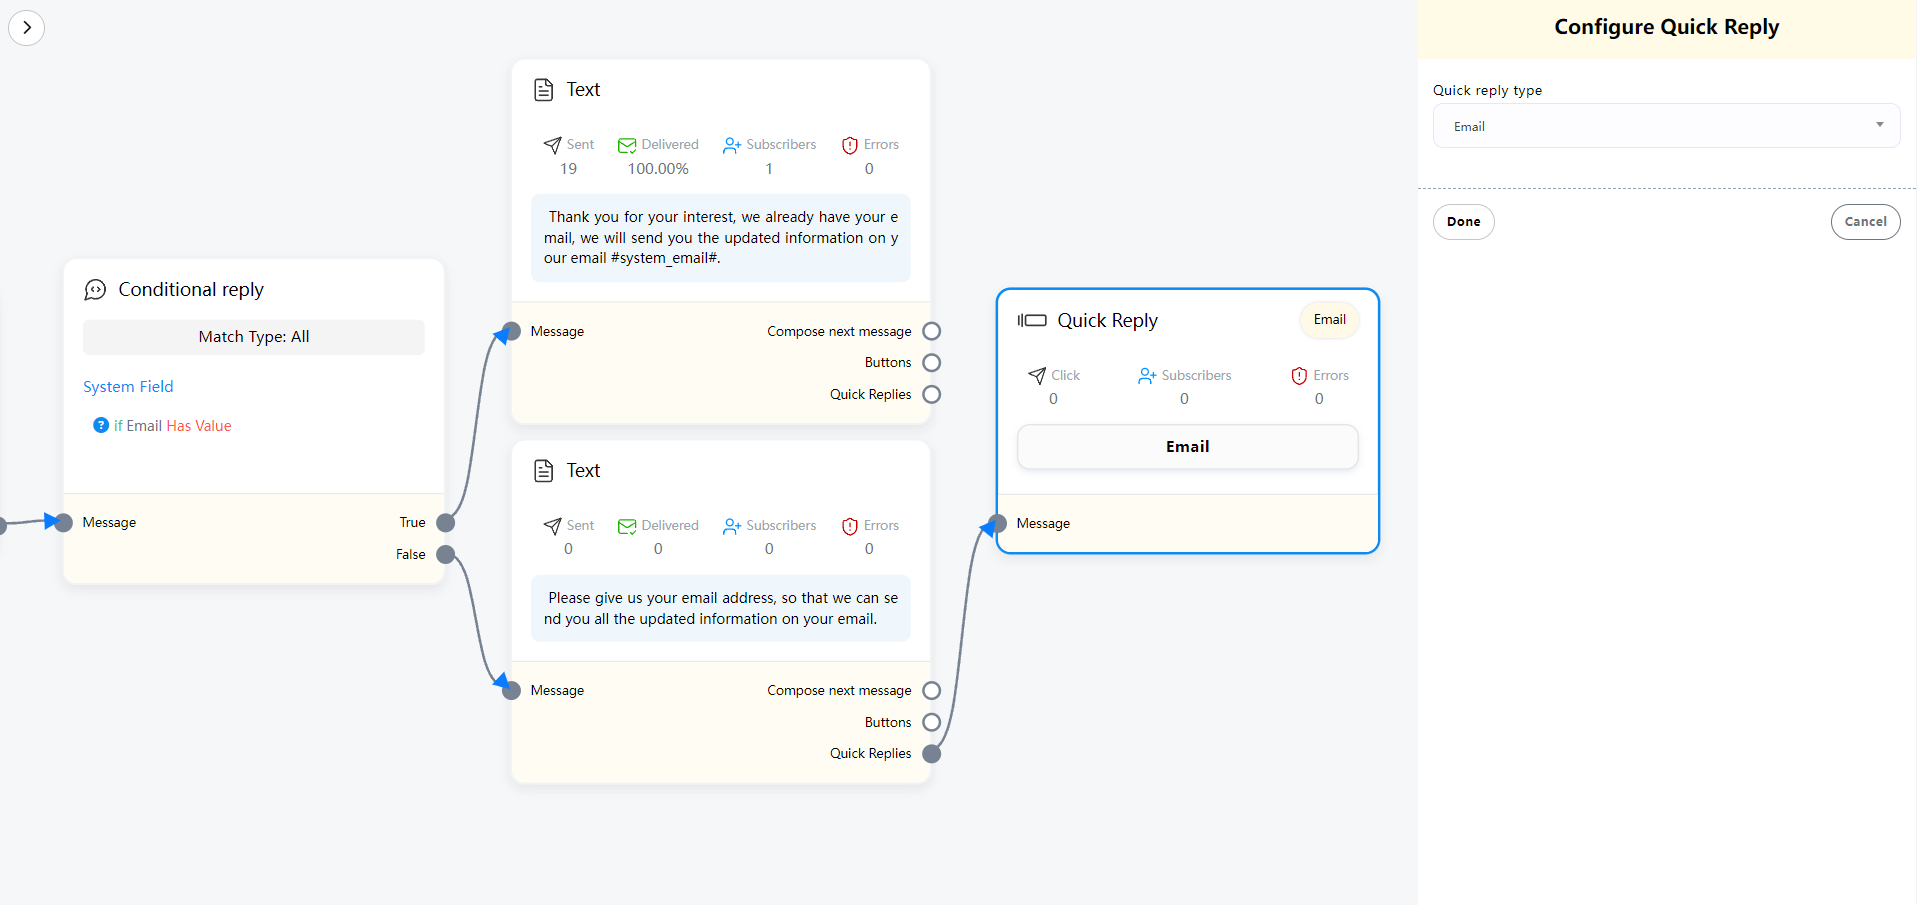
Now add two text element and connect them to the true and false sockets of the condition element. Now click on the text element connecting to the true element and write a text message to inform the user that the updated information will be emailed to the user.
Then click on the other text element connecting to the false socket and write a message to inform the user that the system doesn’t have the email address and tell the user to click on a quick reply button to send the email address.
If the condition becomes true, the text message connecting to the True socket will be sent. On the other hand, if the condition becomes false, the text message connecting to the False socket will be sent. That is if the system has the email address of a specific user, the bot will inform the user that the updated information will be sent. And if the system doesn’t have the email address of a user, the bot will ask for the email user.
Now add a quick reply button and connect it to the text element connecting to the false socket. Double-click on the quick reply element, select email as the Quick Reply type and click on the ok button. With the reply button, the bot will collect the email address from the user.
Now click on the save button or press Ctrl + s on the keyboard to save your bot.
If everything is ok, the bot will work accordingly. That is, if the user is male, the bot will address him as Mr and if the user is female, the bot will address her as Mrs/Miss. Moreover, if the system has the email address of a user, the bot will inform the user that updated information will be emailed to the user and if the system doesn’t have the email address of a specific user, the bot will ask for the email address of the user.
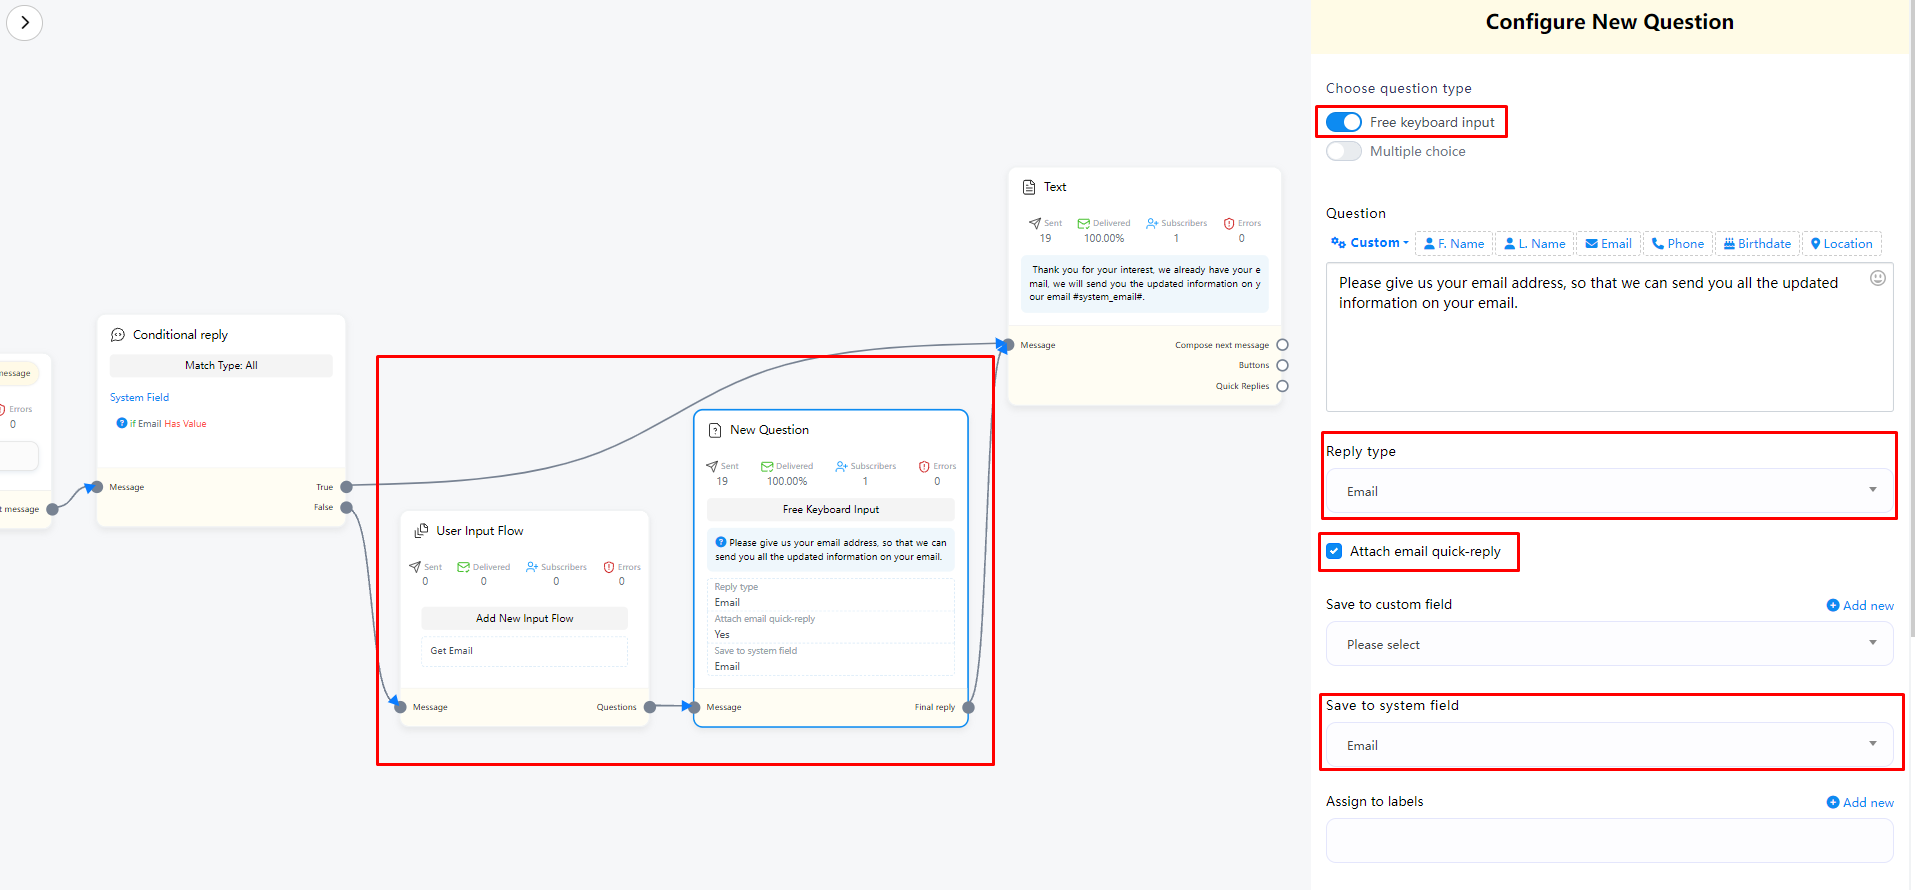
If you need to customize the next reply content when the user enters an email, you can use the (user input flow) element. Here I will make a simple demonstration. For the specific use of the (user input flow) element, you can view (user input flow) explanation.
New Sequence
Sequence, this function is mainly used to send multiple messages at different time periods.
For example: after a user registers for certain activities, segmented reminders are sent to the user after a fixed time, or it is used for product promotion and follow-up with customers.
Next, let’s take a look at how to set up Sequence
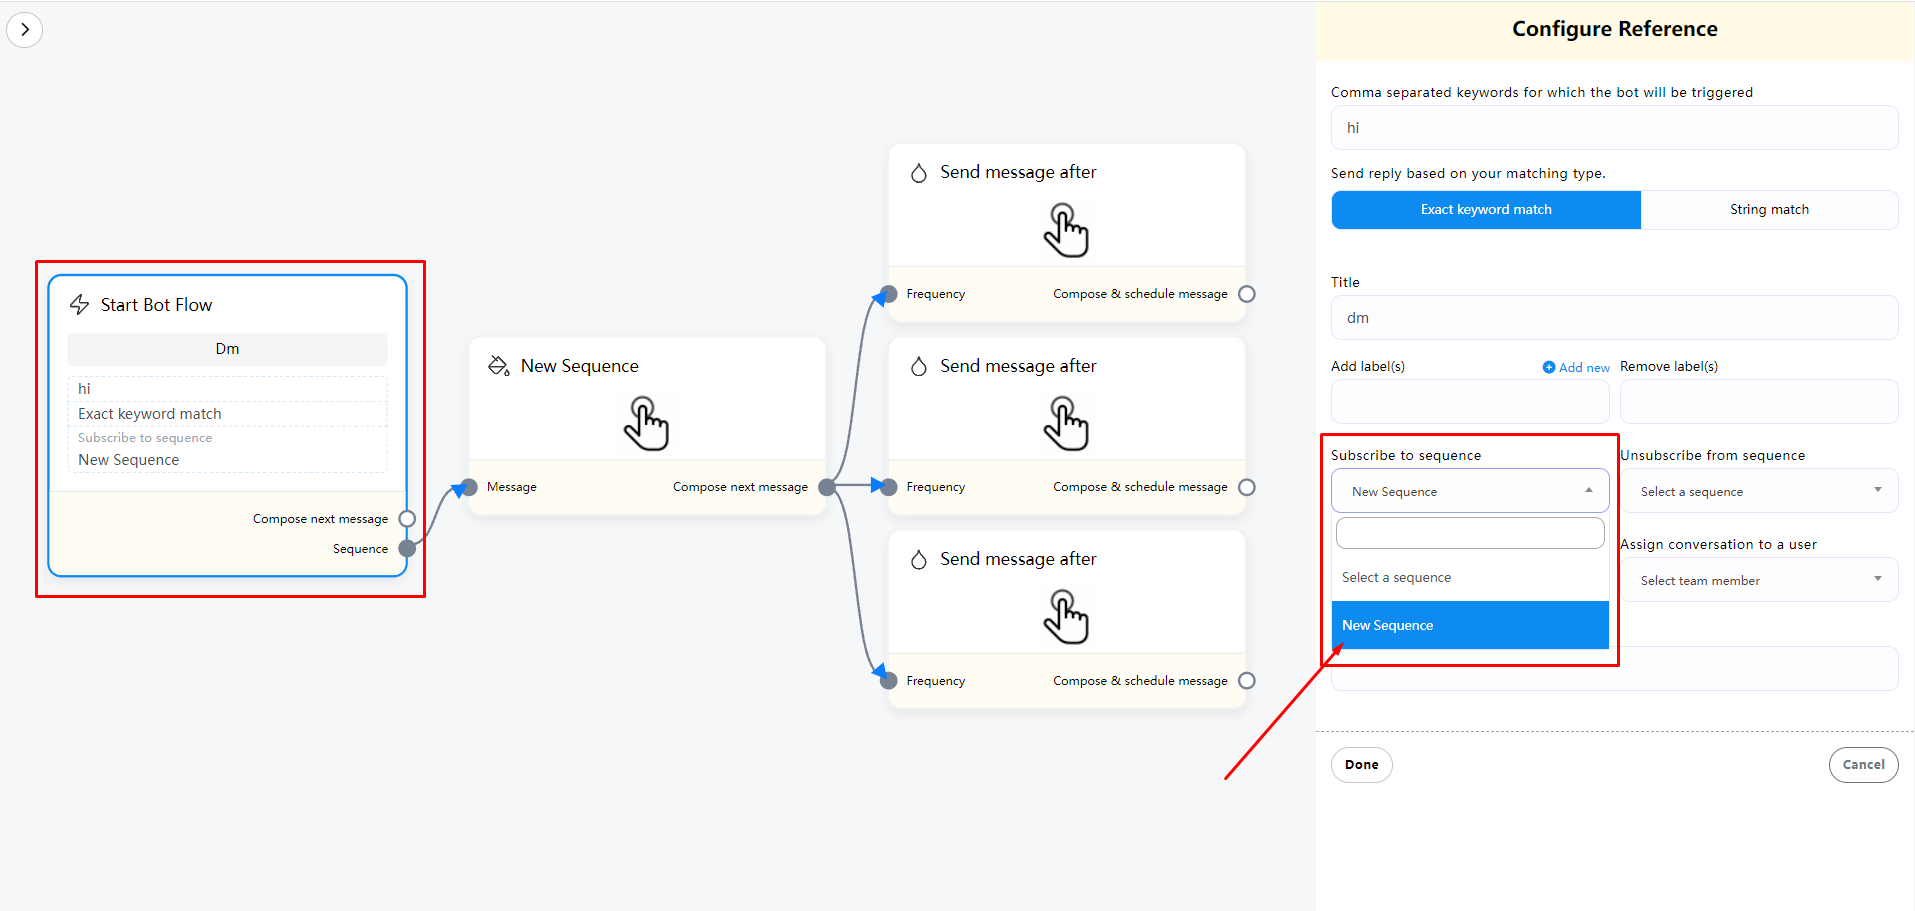
First, we need to find the Subscribe to sequence option in the Start Bot Flow element or in each button.
If you have already created a sequence, it will be displayed in the drop-down list. If you don’t have one or want to create a new one, select (New sequence). You will then see the Start Bot Flow or button automatically display an additional connection block for the sequence.
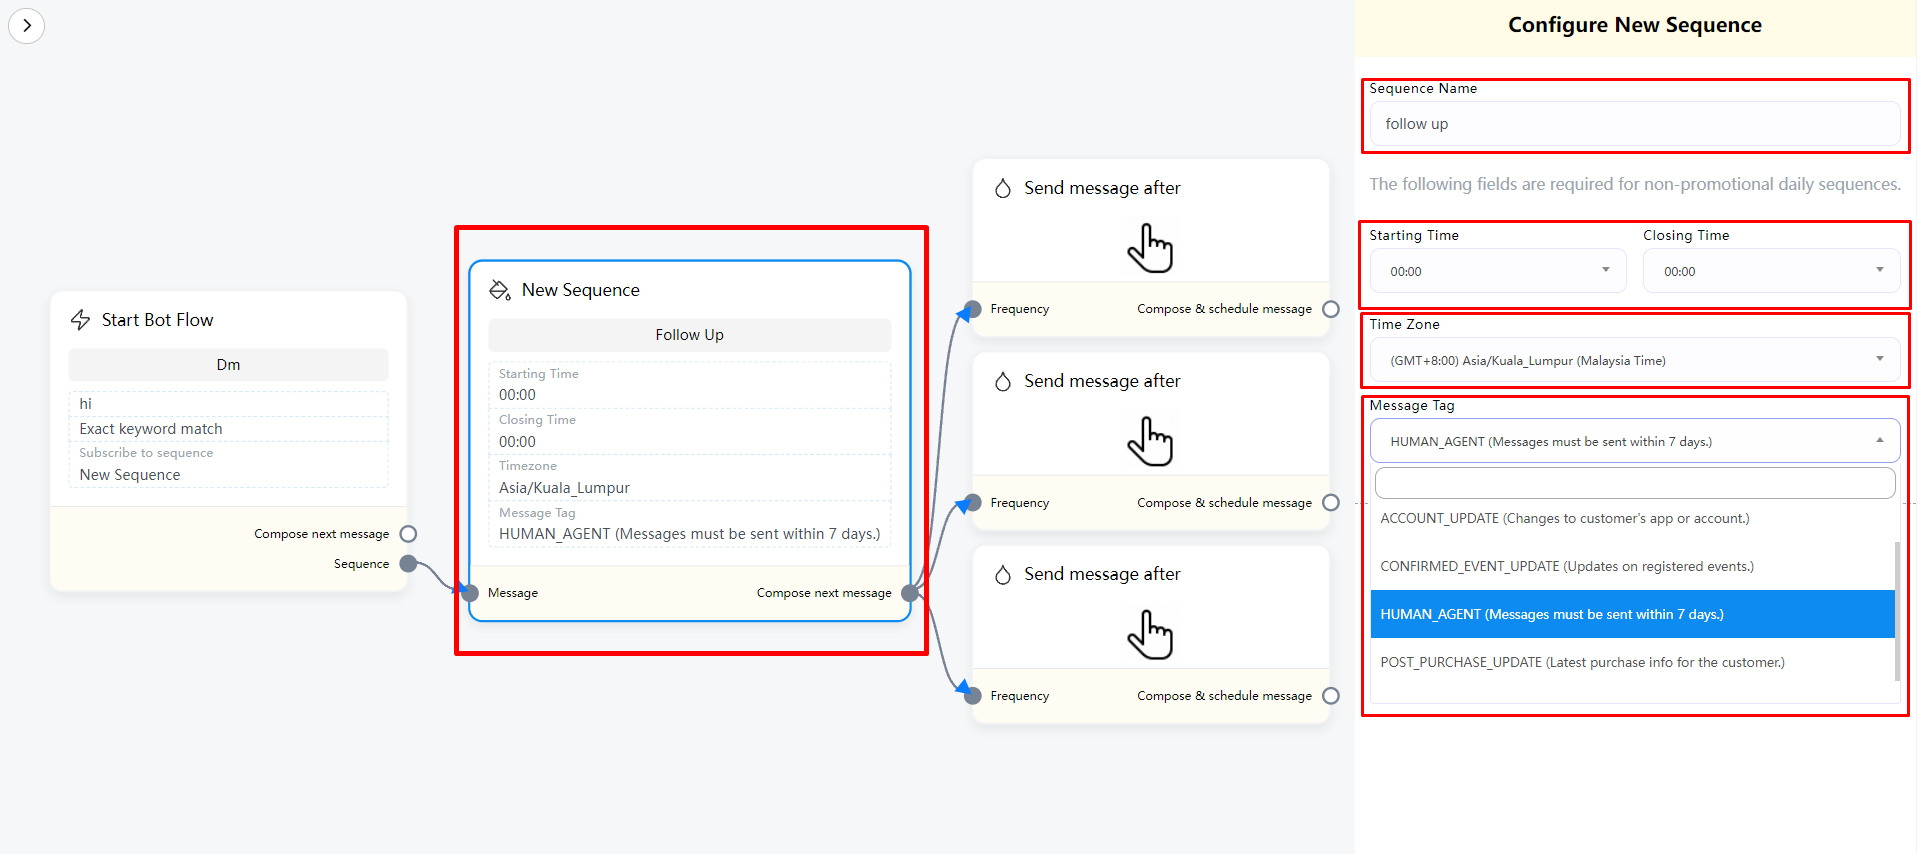
Next, we need to set it in the New sequence element. First, we double-click the New sequence element. In the menu on the right, we need to set (Sequence Name). The name is used to facilitate our understanding of the purpose of this sequence later.
Next, the following settings need to be set according to the situation.
1. First, if your sequence is about promotional information and the time to send the message is within 24 hours, then we can directly proceed to the next section (Send message after) to set the time to send the message without setting it.
2. If the message you send is more than 1 day later, then we need to set the following parts.
Starting Time and Closing Time – This time setting is about the time range when sending the Sequence message. Generally, if there is no time range required to send, select 00:00.
Time Zone – Select the time zone for sending the message according to your needs
Message Tag – Select the correct Message Tag according to the content of the message you send. For details, please refer to the following
| Message Tag | DESCRIPTION | ALLOWED | DISALLOWED (NON-EXHAUSTIVE) |
|---|---|---|---|
| Send the user reminders or updates for an event they have registered for (e.g., RSVP’ed, purchased tickets). This tag may be used for upcoming events and events in progress. |
|
|
| Notify the user of an update on a recent purchase. |
|
|
| Notify the user of a non-recurring change to their application or account. |
|
|
| Allows human agents to respond to user inquiries. Messages can be sent within 7 days after a user message. |
|
|
| News messages allow news publishers to send regular news updates to their subscribers in Messenger. This feature is only available for registered news Pages under the | Registered news Pages under the Facebook News Page Index (NPI) | Read Policy Details here |
Send message after
Two time periods can be set here
1. Promotional – limited to sending within 24 hours
2. Non-promotional – limited to sending after 1 day, and can be sent within 30 days at most
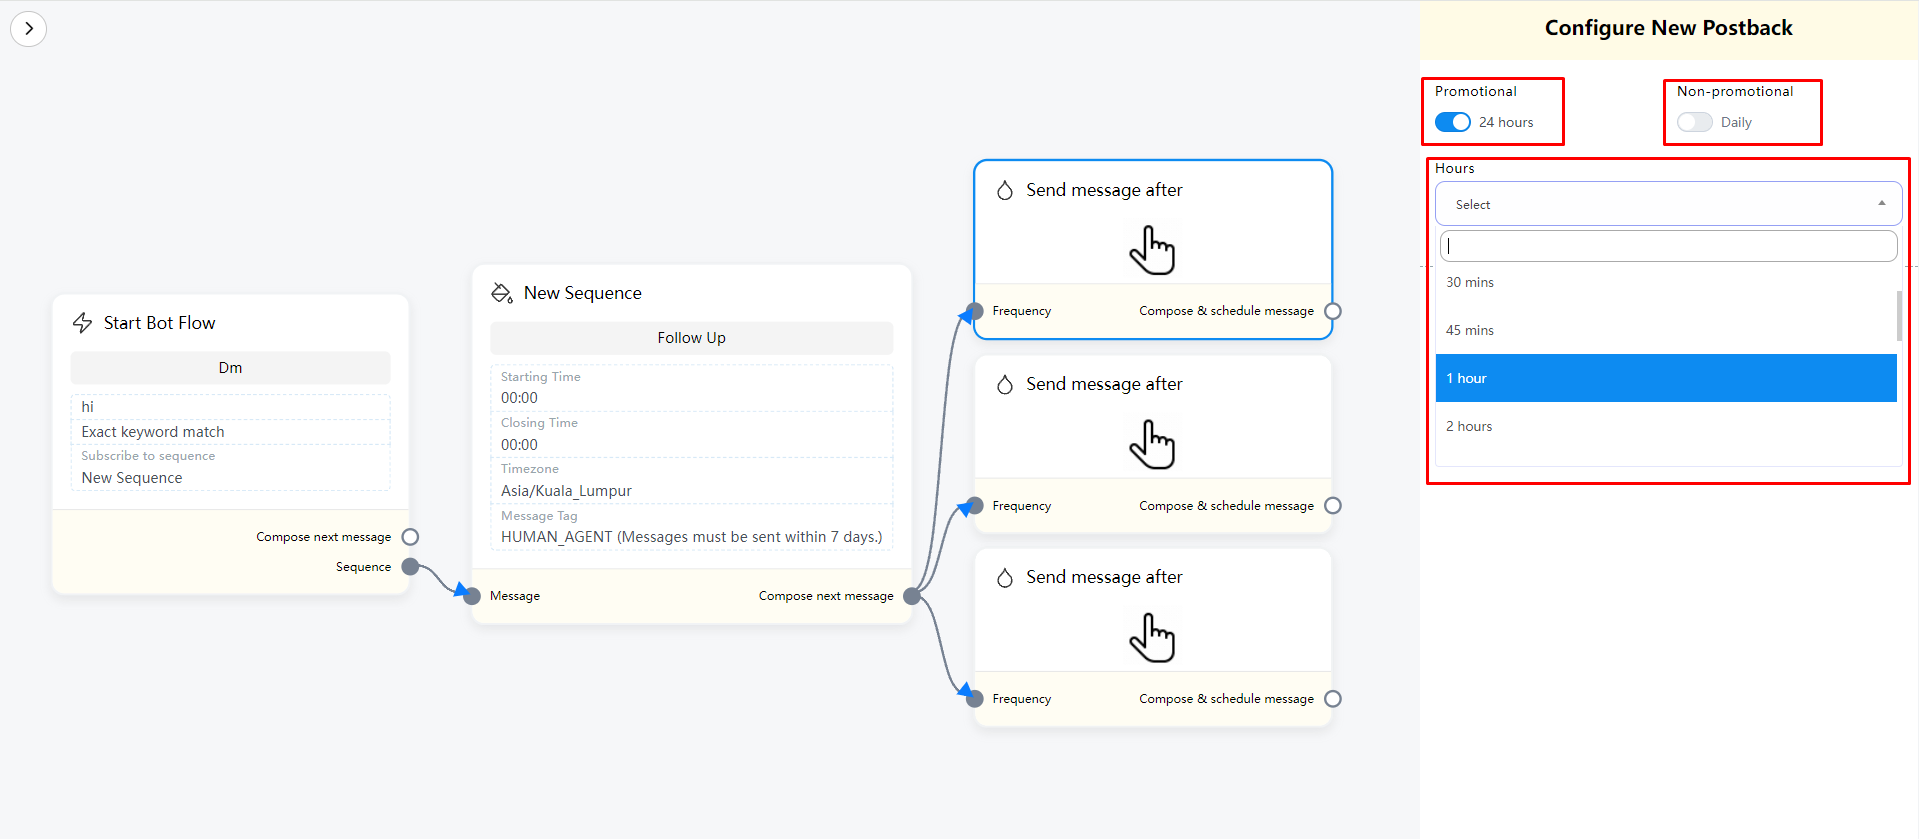
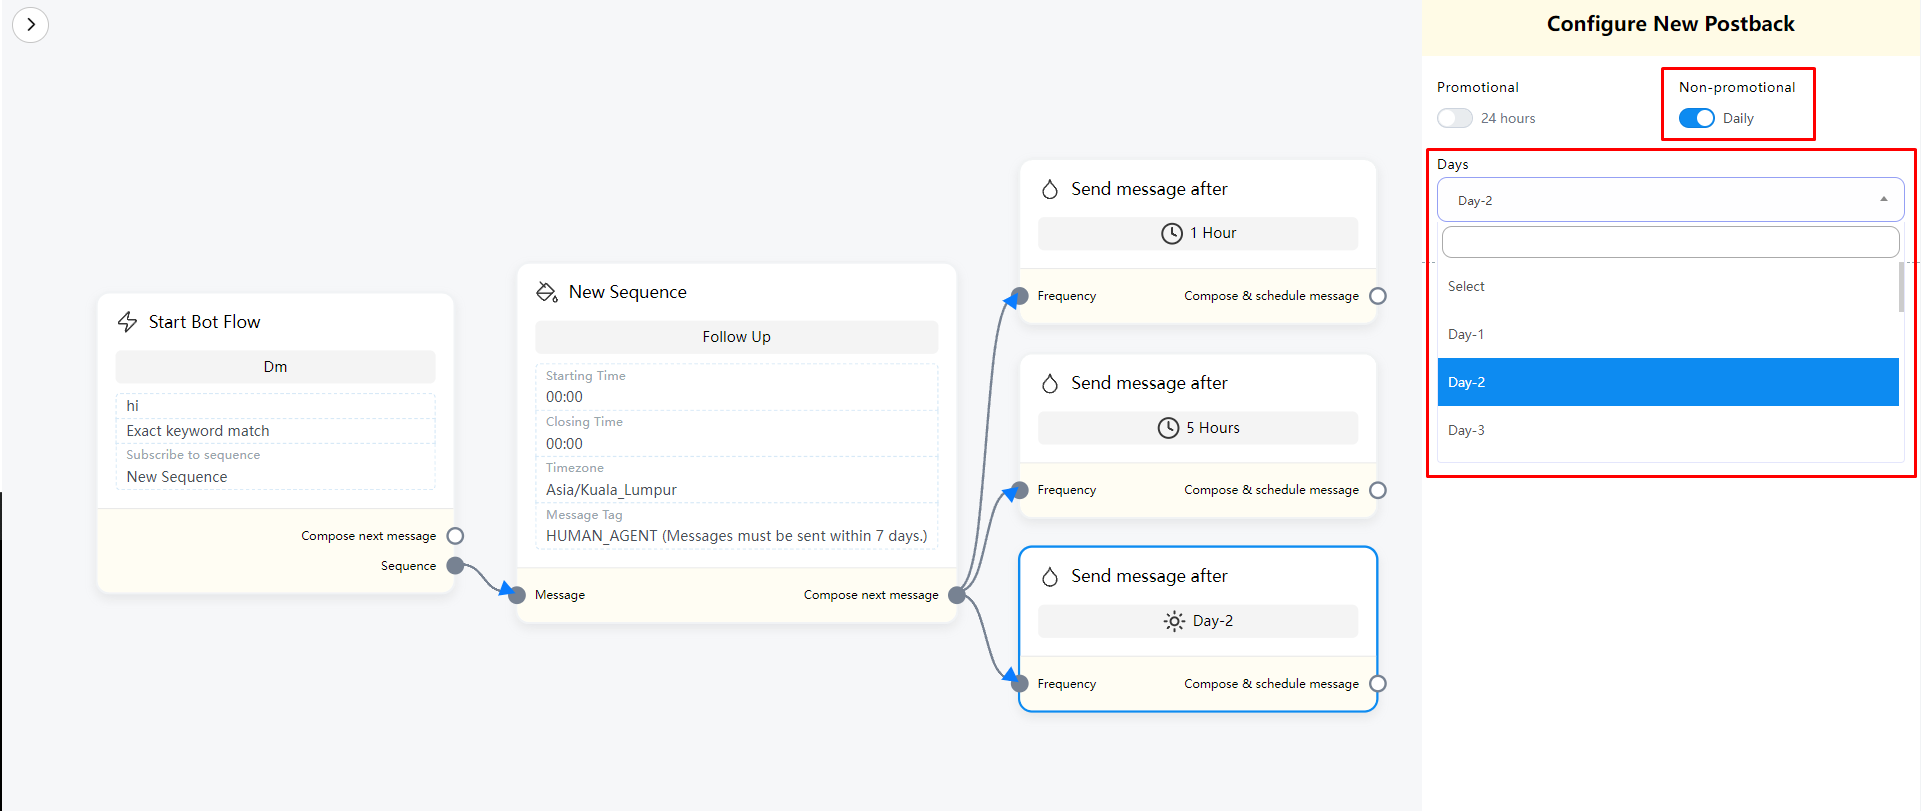
When setting the Send message after element, 3 blocks will be added by default. You can delete or add Send message after according to your needs.
After setting the completion time, we can connect the content to be sent in (Compose & schedule message) below the Send message after element
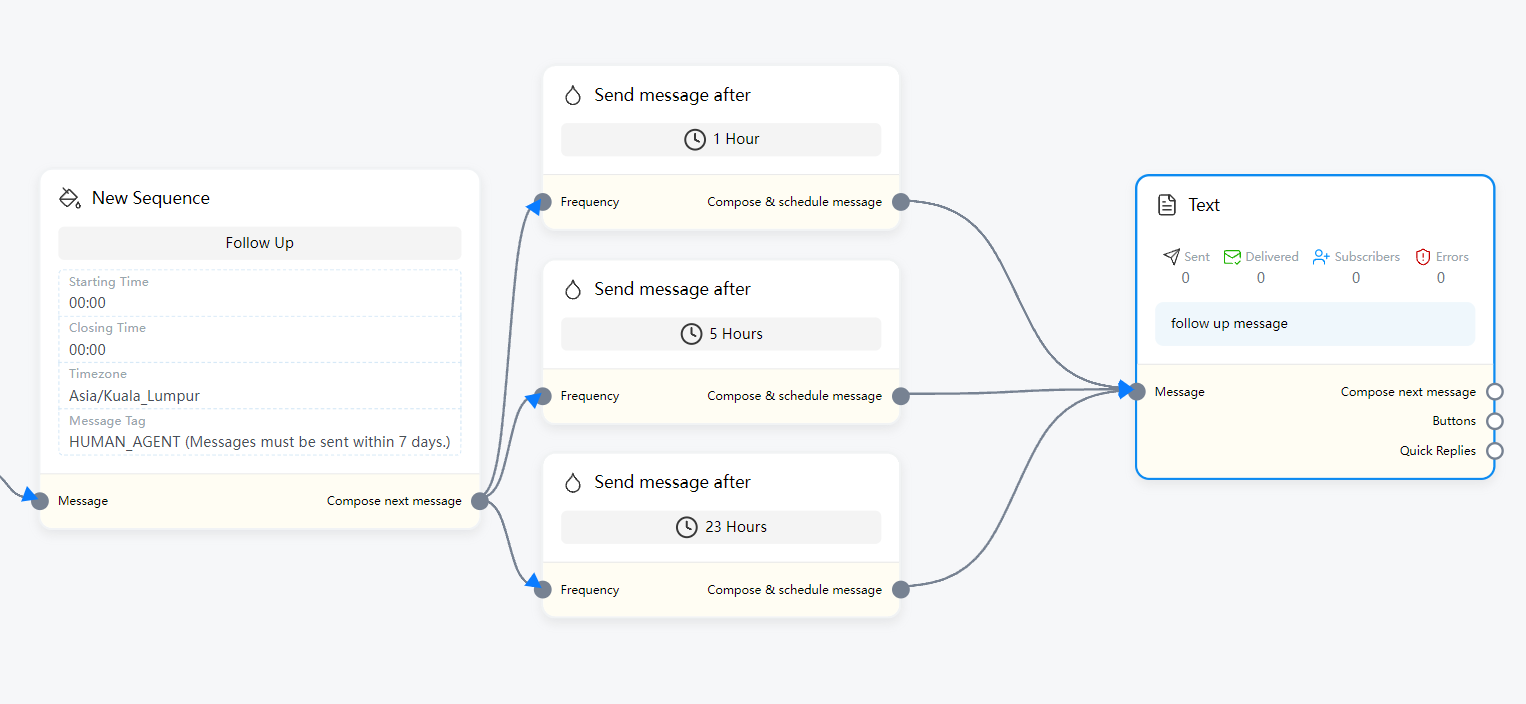
Now we can select the content to be sent. If you plan to send the same content every time period, you can connect them all in one element.
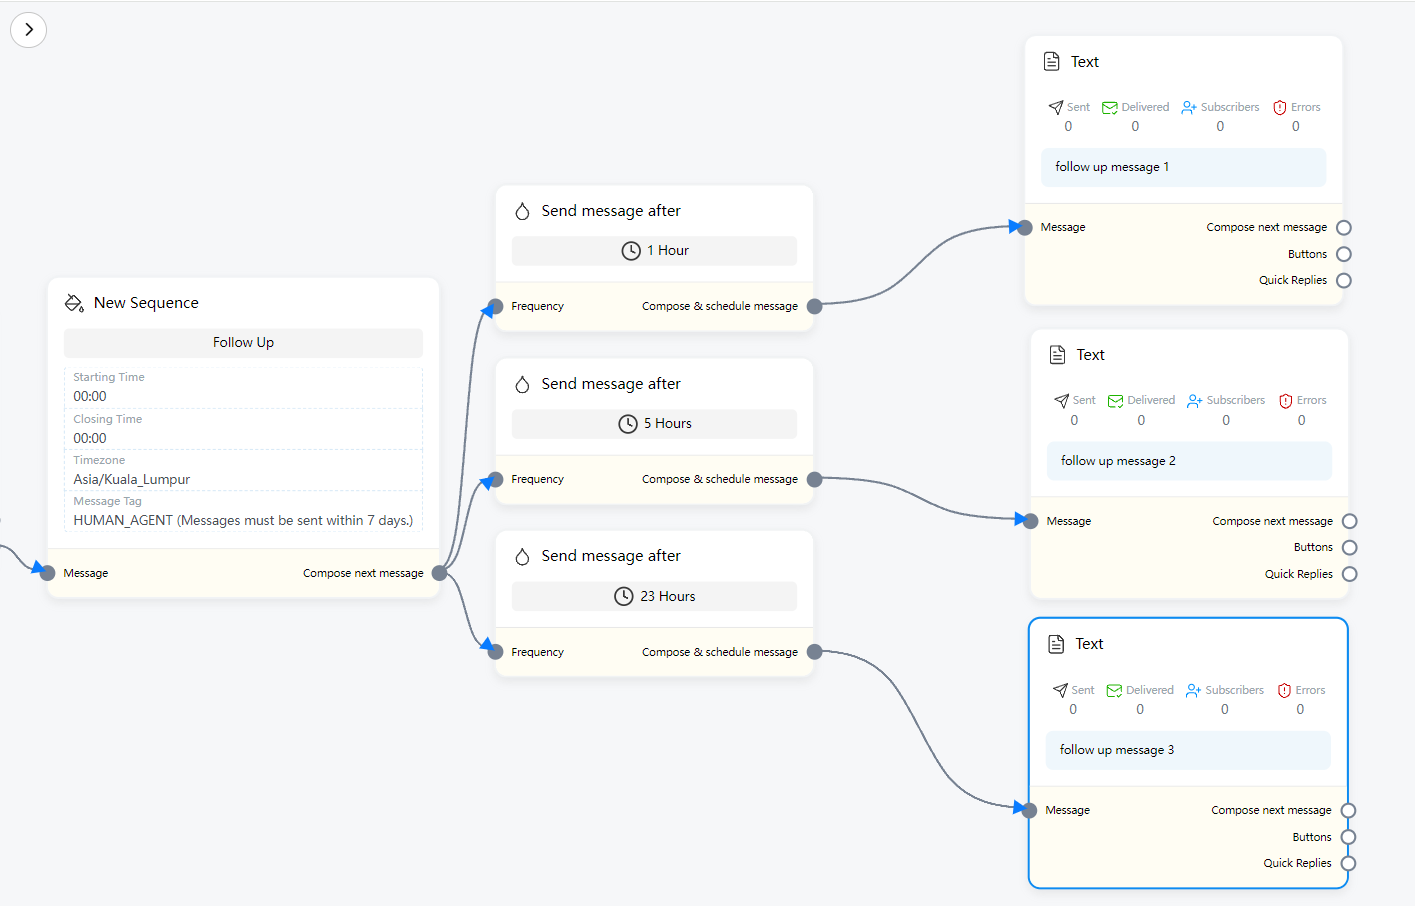
If the content sent in each period is different, you can also connect new message elements separately
Now we have completed the settings for Sequence. Now, whenever a user triggers (Start Bot Flow) or (Button), if a Sequence is set, the user who triggered these elements will be automatically subscribed to the Sequence and the sending time will start.
In addition, every time a user completes the subscription to the Sequence, the next time the user triggers (Start Bot Flow) or (Button) again, the user will not subscribe to the same Sequence again.
If you need the user to re-subscribe to the Sequence every time the (Start Bot Flow) is re-triggered, I suggest that you can set the Sequence in the button part after (Start Bot Flow), and set (Unsubscribe from sequence) in (Start Bot Flow) and select the Sequence that has been set afterwards.
In this way, every time a user triggers (Start Bot Flow), the Sequence will be unsubscribed first, and then re-subscribed in the subsequent button part.
User Input Flow
User Input Flow is a form that collects user information. I will explain the specific settings in detail below.
First, we need to add the User Input Flow element to the flow. You can choose to connect the User Input Flow after the Start Bot Flow, or connect it to any other element in the flow that can connect to the next piece of information.
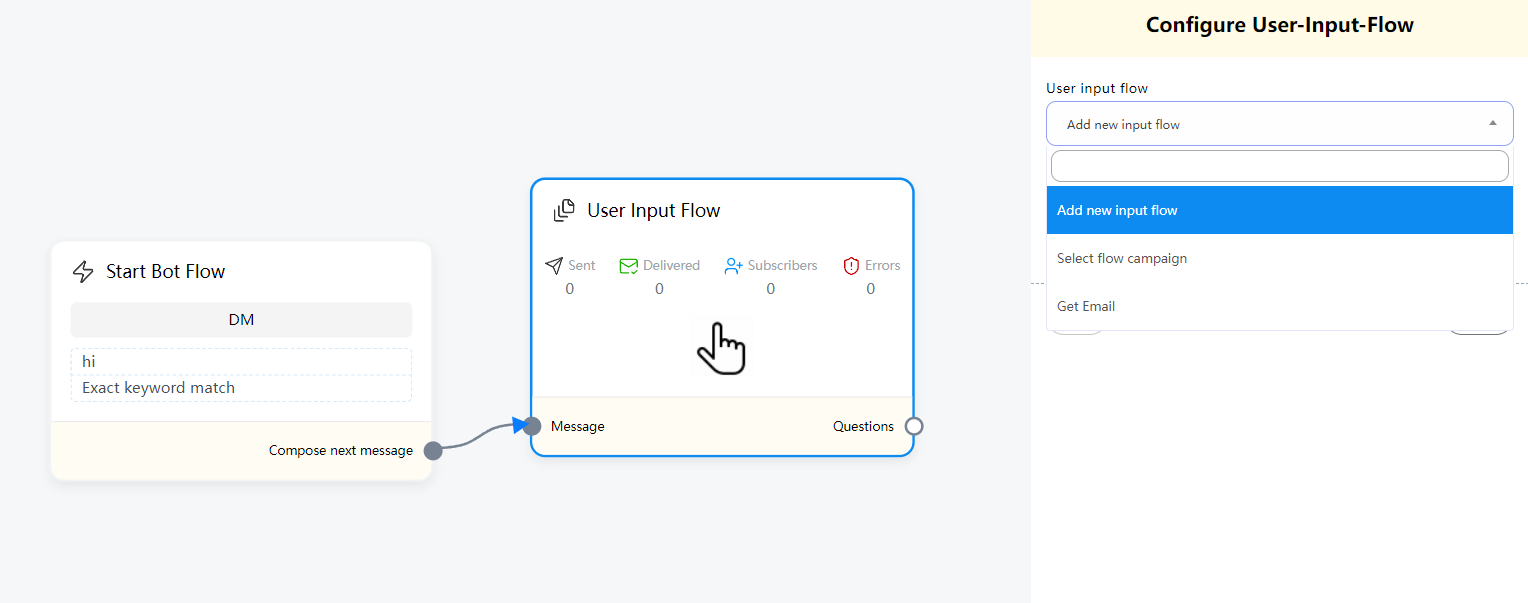
Now double-click the User Input Flow element. In the drop-down menu on the right, if you have created a User Input Flow template before, it will be displayed.
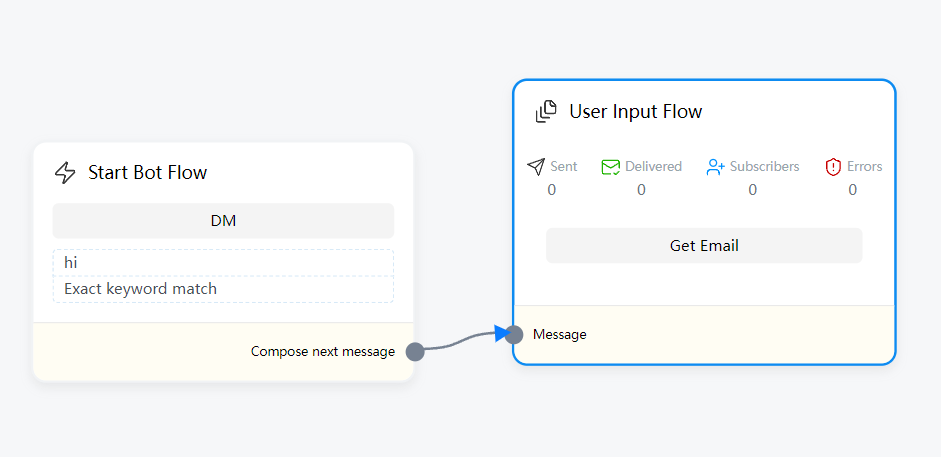
You can directly select the Campaign template you created before to use
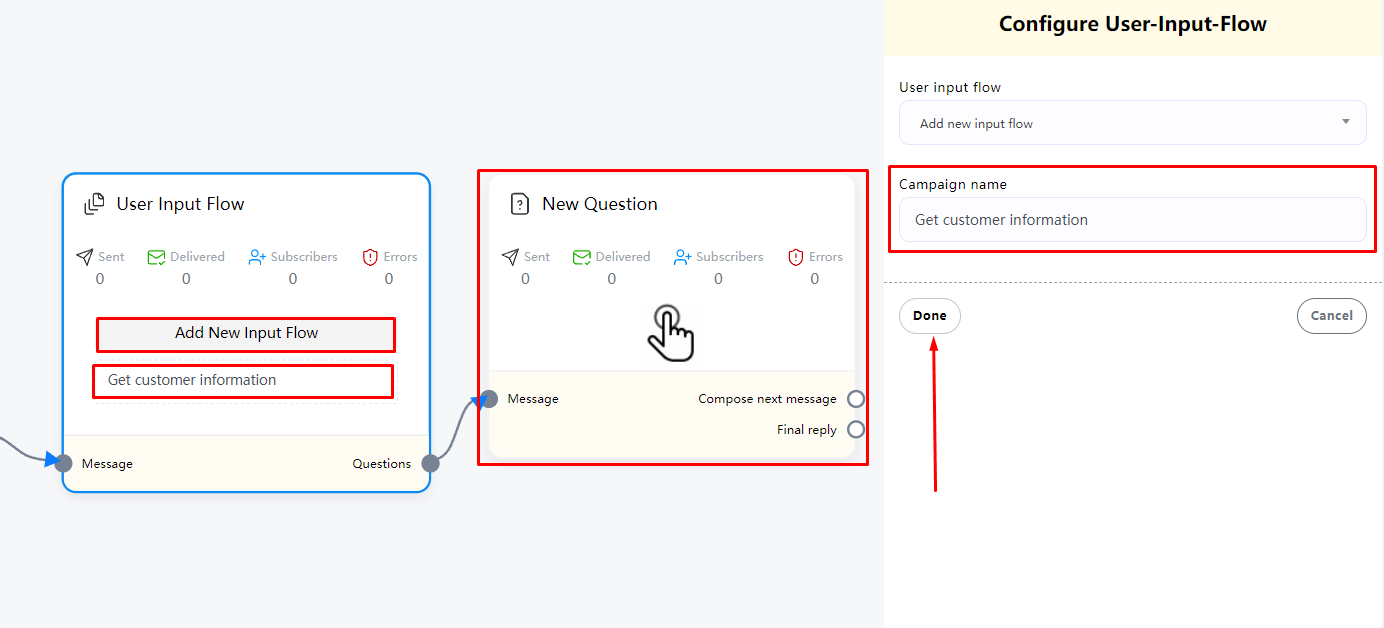
If you need to create a new one, you can select (Add new input flow).
Next, you need to set a name for this User Input Flow activity. After completion, click Done and you will see a new (New Question) element automatically added.
New Qusetion
Now we double-click the New Qusetion element to set the form questions.
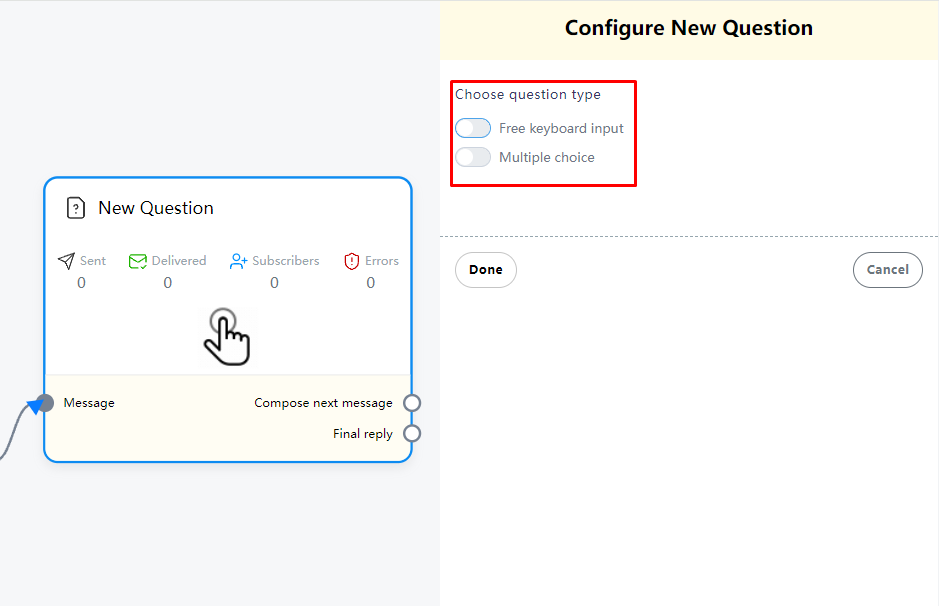
Now we can see that there are two question types in the menu on the right
1. Free Keyboard input (anything the user enters will be considered as an answer)
2. Multiple Choice (several options are set by default, and the user can only choose from the options and it will be considered as an answer)
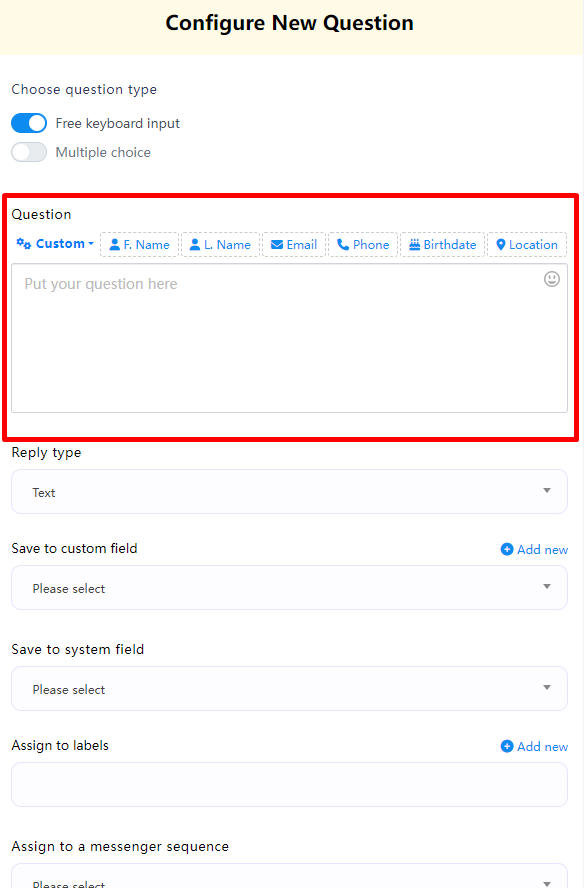
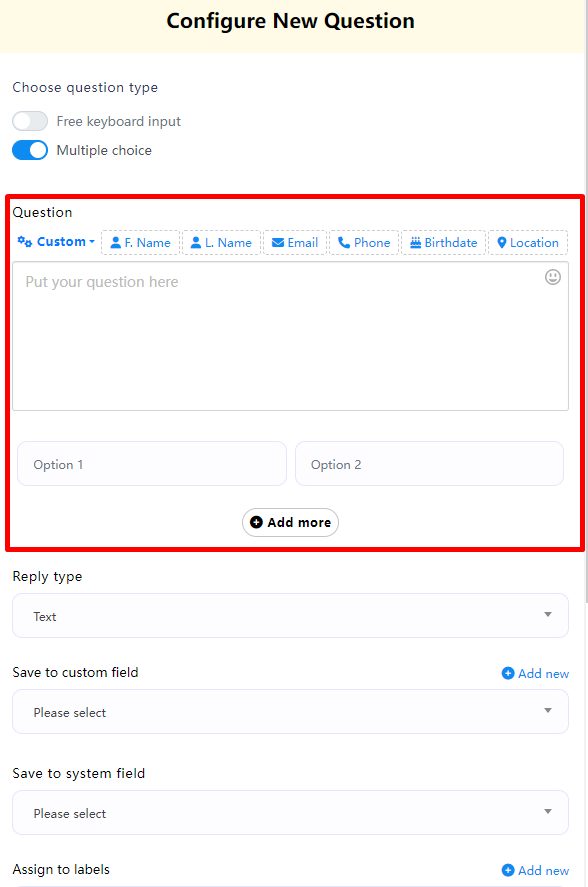
You need to choose which question type to use based on your current question. Next, we need to enter your question in Question. If you choose (Multiple Choice), you will also see two option boxes below (Option 1, Option 2). If you have more answers, you can continue to add them.
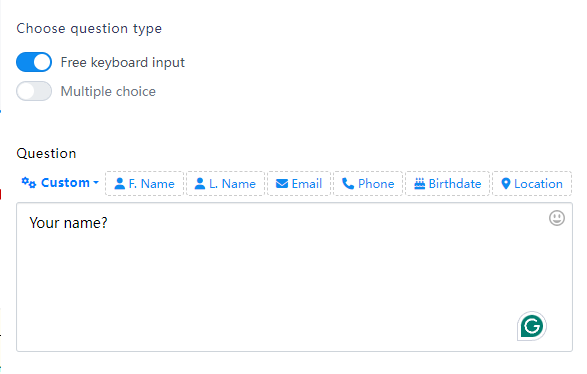
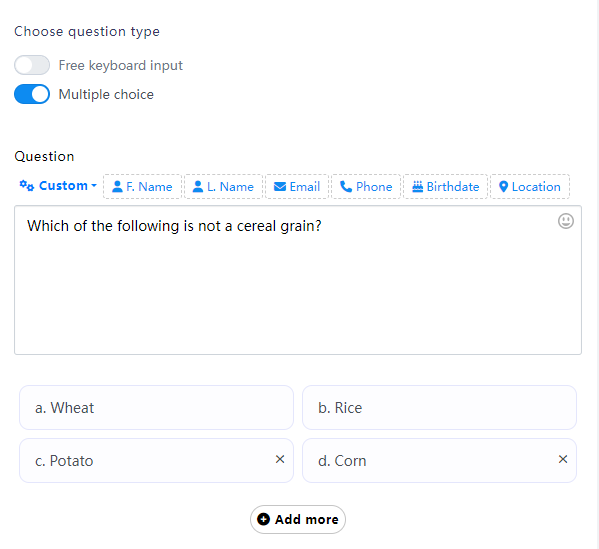
Free Keyboard input is suitable for asking users information, such as name, email, phone number, address, etc. Users can enter the answer at will.
Multiple Choice is suitable for giving an option, and users can choose one of your options as the answer.
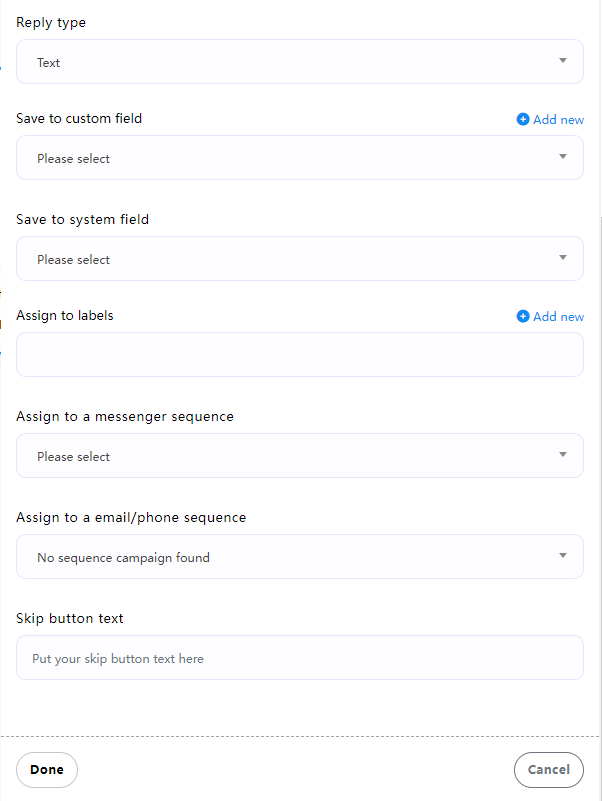
Next, let’s continue to understand the settings in the second half. The settings here are
1. Reply type
2. Save to custom field
3. Save to system field
4. Assign to labels
5. Assign to a messenger sequence
6. Assign to an email/phone sequence
7. Skip button text
Let’s explain them one by one. First,
1.Reply type
Determine the type of the user’s answer based on your question. For example, when your question is (Your Name?) This question belongs to a text reply (general answer), then we need to use Text in the reply type.
If your question is (Your Email?) At this time, the user’s reply is ([email protected]) This type, we need to set type to (Email)
Even if the user inputs the email included in a piece of information, the system will extract the correct email separately. For example, if the user’s reply is: (My email: [email protected]), the system will filter (My email:) and extract the correct ([email protected]) and save it to the system.
Currently, the reply types are as follows
Text, Email, Phone, Number, URL, File, Image, Video, Date, Time, Datetime
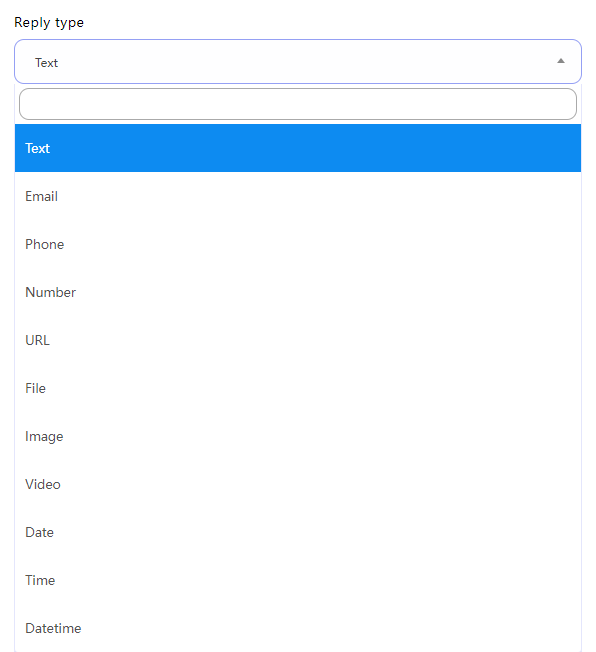
In addition, when you select Email, Phone, an additional option will be displayed
- Attach email quick-reply
- Attach phone quick-reply


When selected, when the user answers this question, Facebook will automatically obtain the user’s email and phone number as a quick-reply and automatically display it in the user interface, allowing the user to select without inputting.
Conclusion: According to your question, select the corresponding reply type according to the type of the user’s reply. Then the system will judge whether the user’s reply is correct. If it is not correct, it will send an error message to prompt the user that the current reply information format is incorrect and ask the user to answer again.
2.Save to custom field
A custom field stores the user’s answer in the corresponding field, for example: field name = User Name
We ask the user’s name, and when the user replies, we save the answer under User Name. Later, when we view the user’s answer, we can see the corresponding table
User Name | Michael Johnson
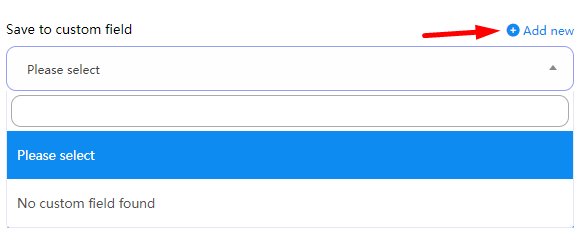
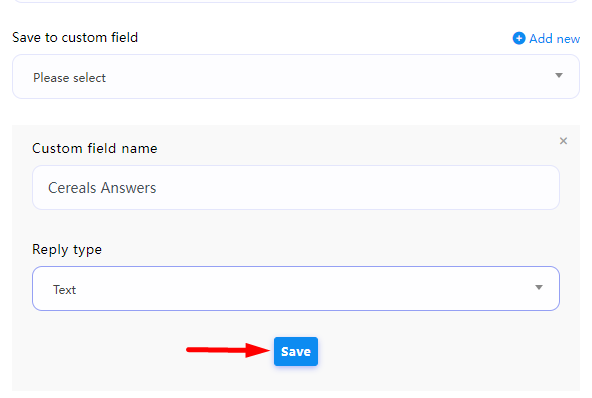
To create a custom field, click Add New, and an input box and a drop-down list will appear.
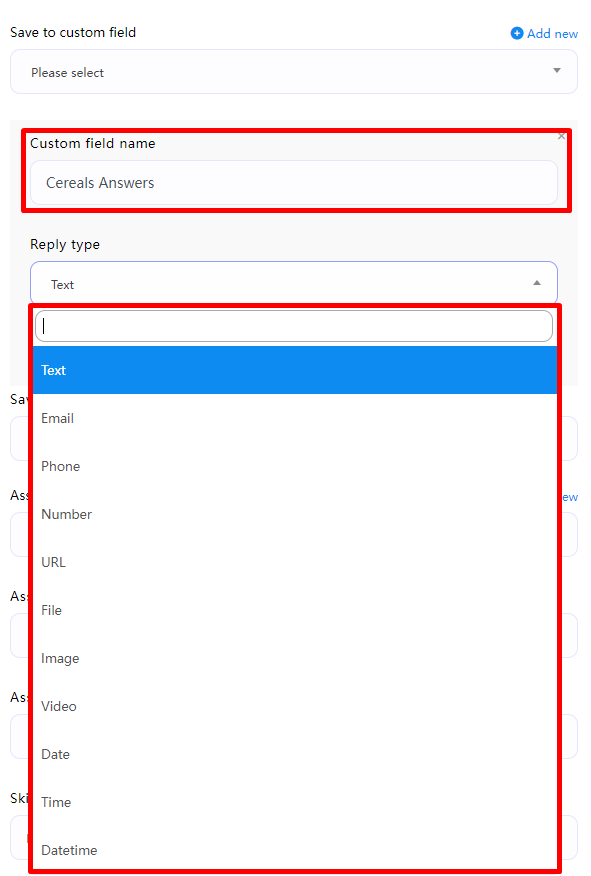
Now we need to enter a name in (Custom field name), and then select the type corresponding to this name in (Reply type). Click Save when you are done.
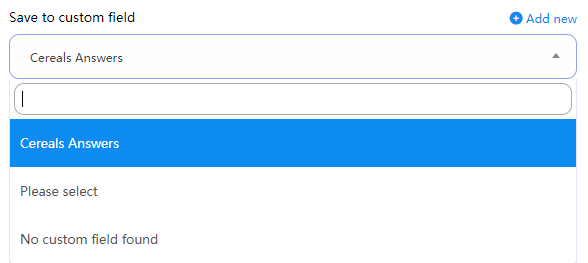
Next, we can see the custom field we just created in the selection box.
3.Save to system field
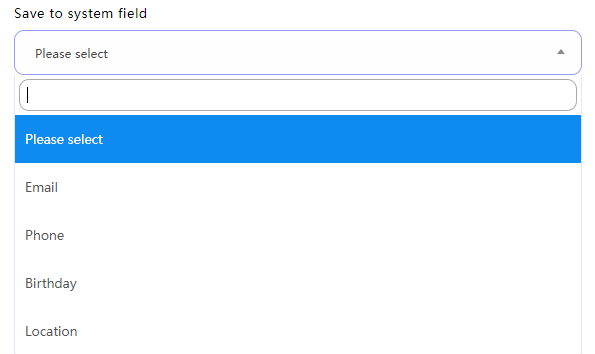
system field, this is the system default field. Currently, there are only 4 options: Email, Phone, Birthday, and Location. When these answers are obtained, they will be saved in the user’s system field. You can directly see the user’s detailed information in the subscriber details.
4.Assign to labels
When the user completes the question, you can add a label to the user

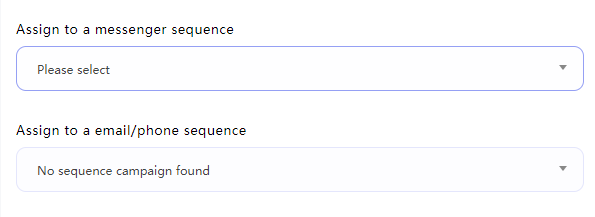
5.Assign to a messenger sequence
When the user completes this question, the user can be assigned a subscription sequence
6.Assign to a email/phone sequence
When the user completes this question, the user can be assigned to subscribe to the email/phone sequence
For more information about email/phone sequence, you can visit this article
7.Skip button text
If this question allows users to skip, you can set this button and enter the name of the skip button in the input box.
If it is not set, it means that this question cannot be skipped. If the user’s answer does not match the reply type, it will continue to ask until the correct reply type is obtained.

Next, let’s continue with the setup
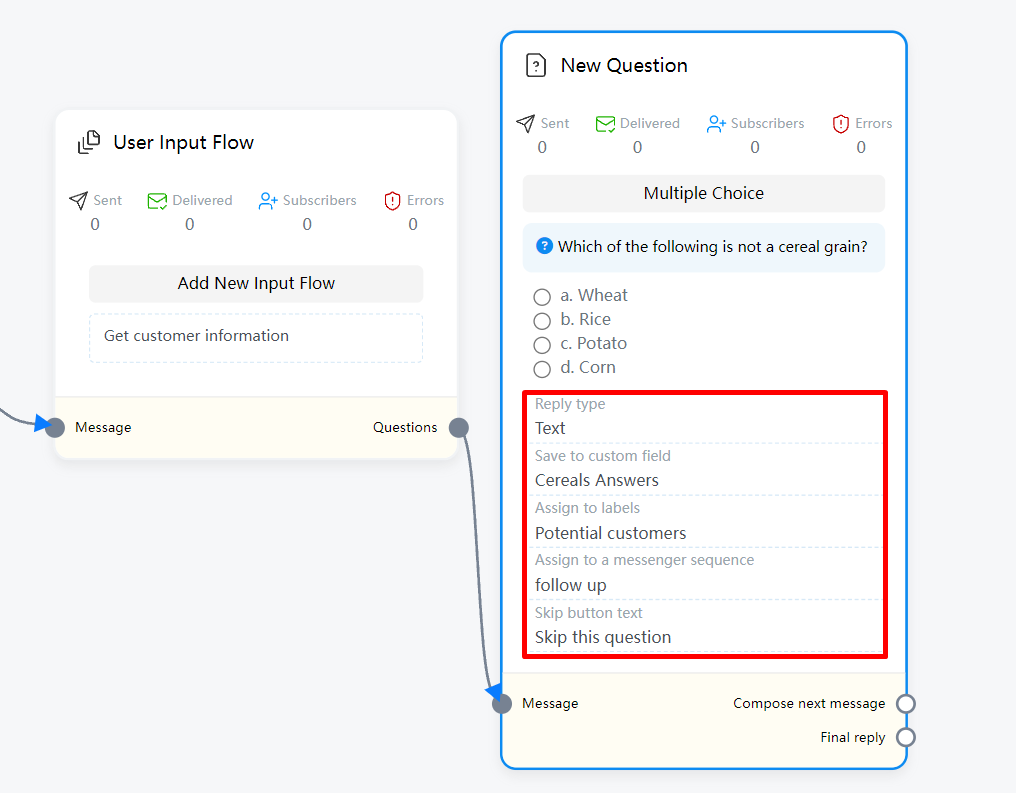
When we select Multiple Choice, after completing the settings, we can see the multiple choice questions under the question in the (New Qusetion) element, as well as other settings.
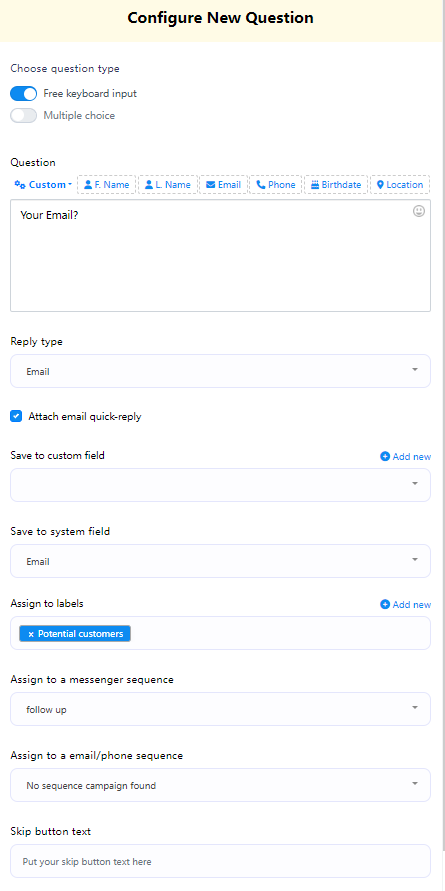
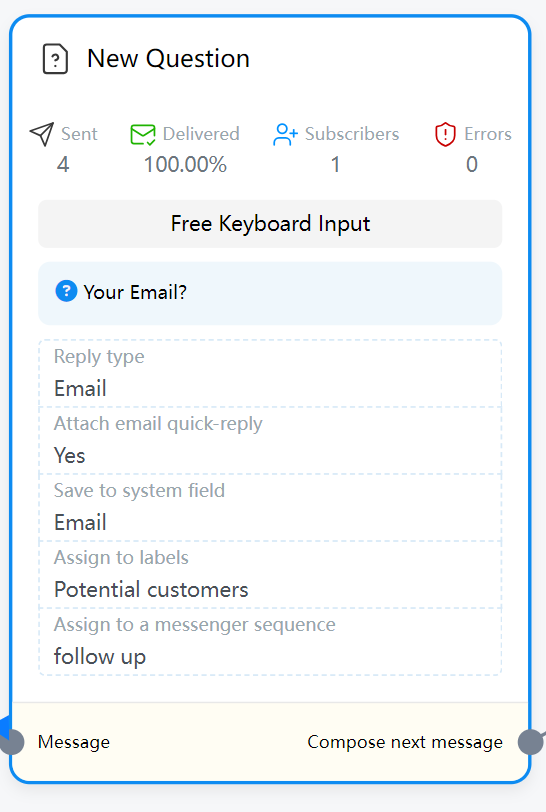
Now we use Free Keyboard input to do a complete tutorial
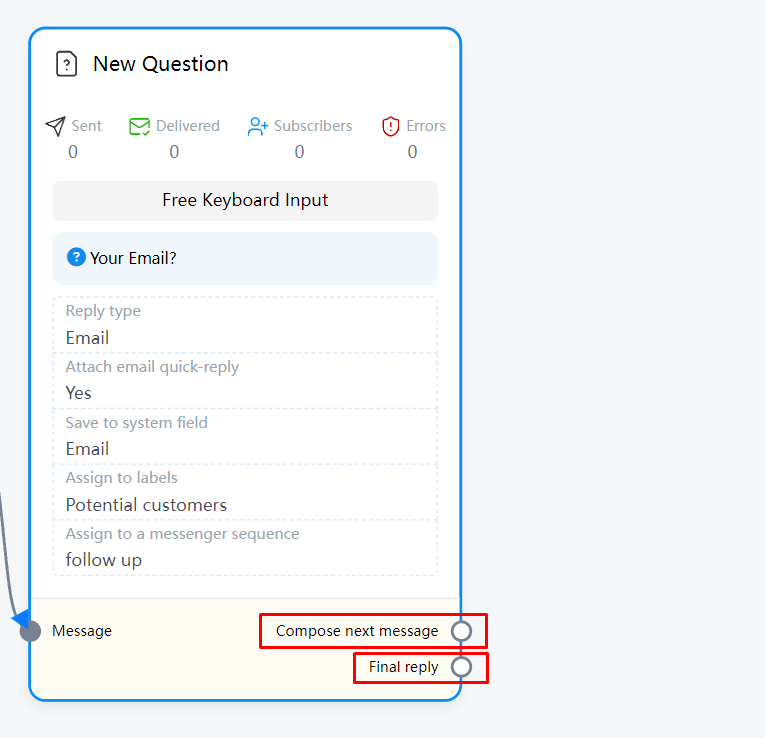
Next, you can see two options in the connection below the (New Question) element
1. Compose next message (If you have another question, you can connect this option to continue asking the next question)
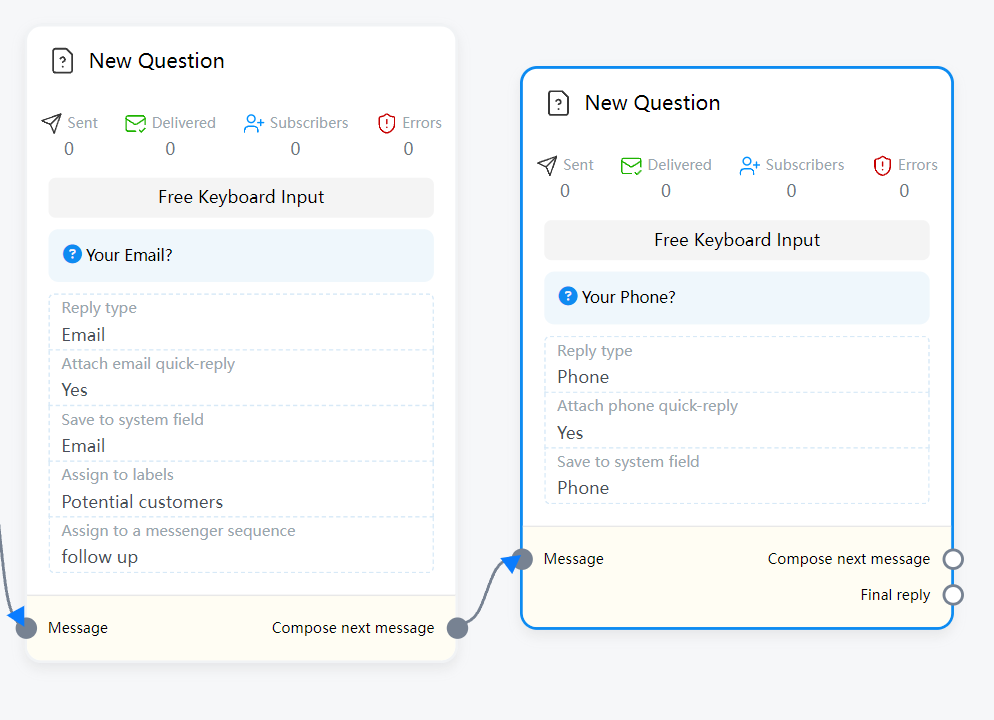
2. Final reply (If your question ends here, then connect this option to end this User Input Flow and connect to other reply elements)
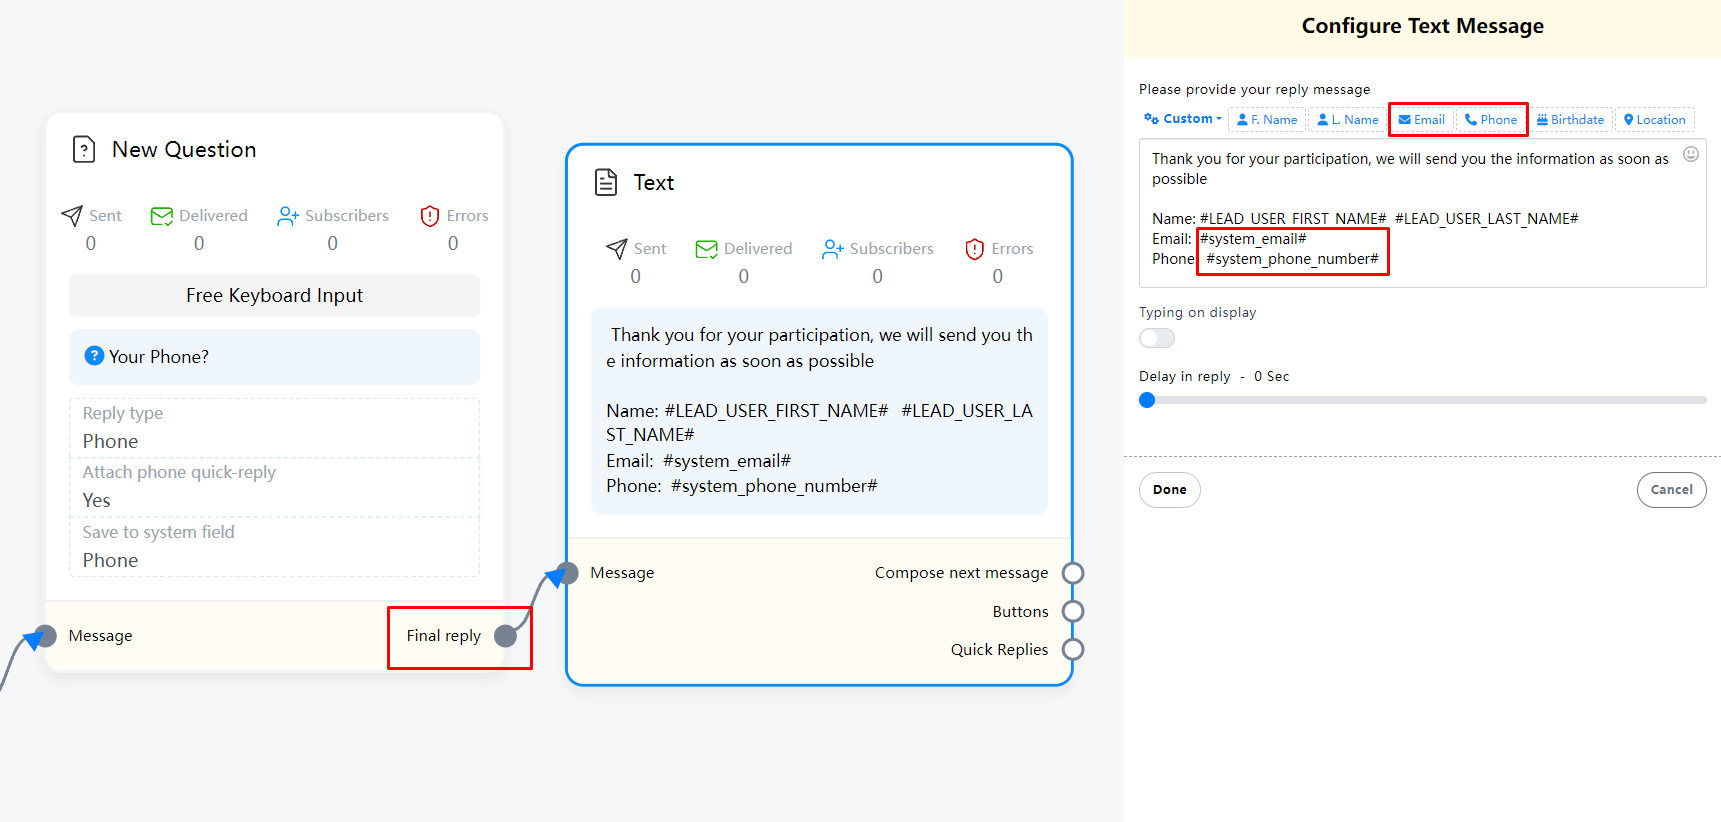
In the above demonstration, we asked two questions
- Your Email
- Your Phone
After the end, I connected the Text element to reply, and these questions were saved to the corresponding system field
We can use system variables directly in Text, and when actually replying to the user, the system variables will be converted into the user’s answer.
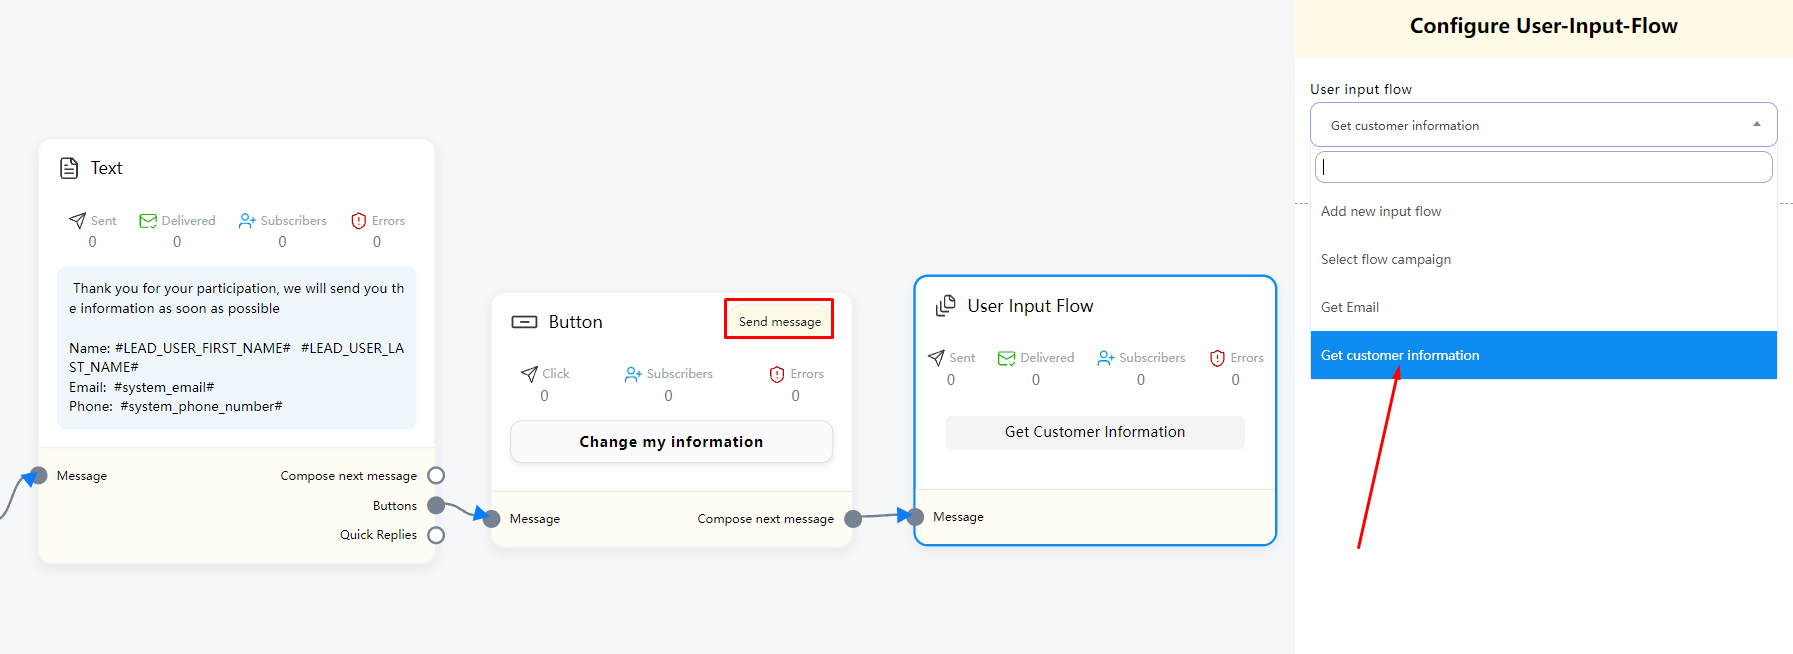
If you have a lot of questions and you are worried that the user may choose the wrong answer during the input process, you can add a button at the end and reconnect the (User Input Flow) element and select the campaign you just created.
If the user needs to re-answer the question, they can click the button and re-answer with a new answer.
Marketing Messages
Marketing messages allow a Facebook Page or Instagram professional account to send messages to a user after the standard message time frame, with the user’s permission. You can use marketing messages to build relationships with users who are interested in you or your business.
Next we will explain how to use the marketing message feature
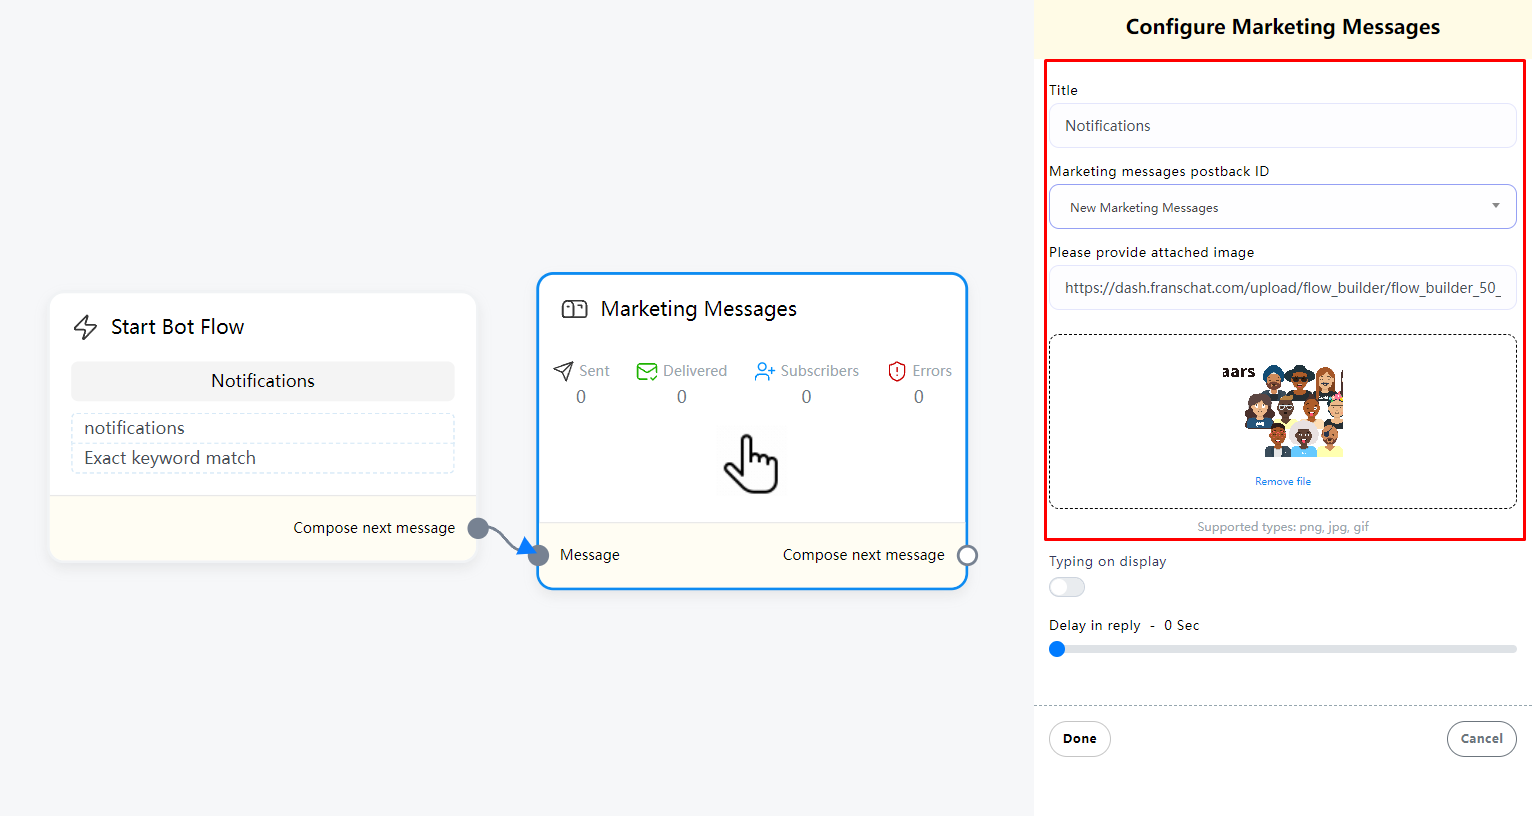
First, drag and drop the “Marketing messages” component from the menu onto the editor.
Then double-click the “Marketing messages” component. In the pop-up menu on the right, we need to make some settings.
First, “Title”, this name will be displayed in the Title of the subscription message.
Next is “Marketing messages postback ID”. If you have created Marketing messages before, it will be displayed here. If not, you can select “New Marketing messages” to create a new Marketing message.
Next, we need to select an image. You can use the image related to your Marketing messages as the cover.
After completion, we can click “Done”, and then you can see that the Marketing messages component has updated the message just set on the editor, and then a new component “New Marketing messages” will be automatically connected.
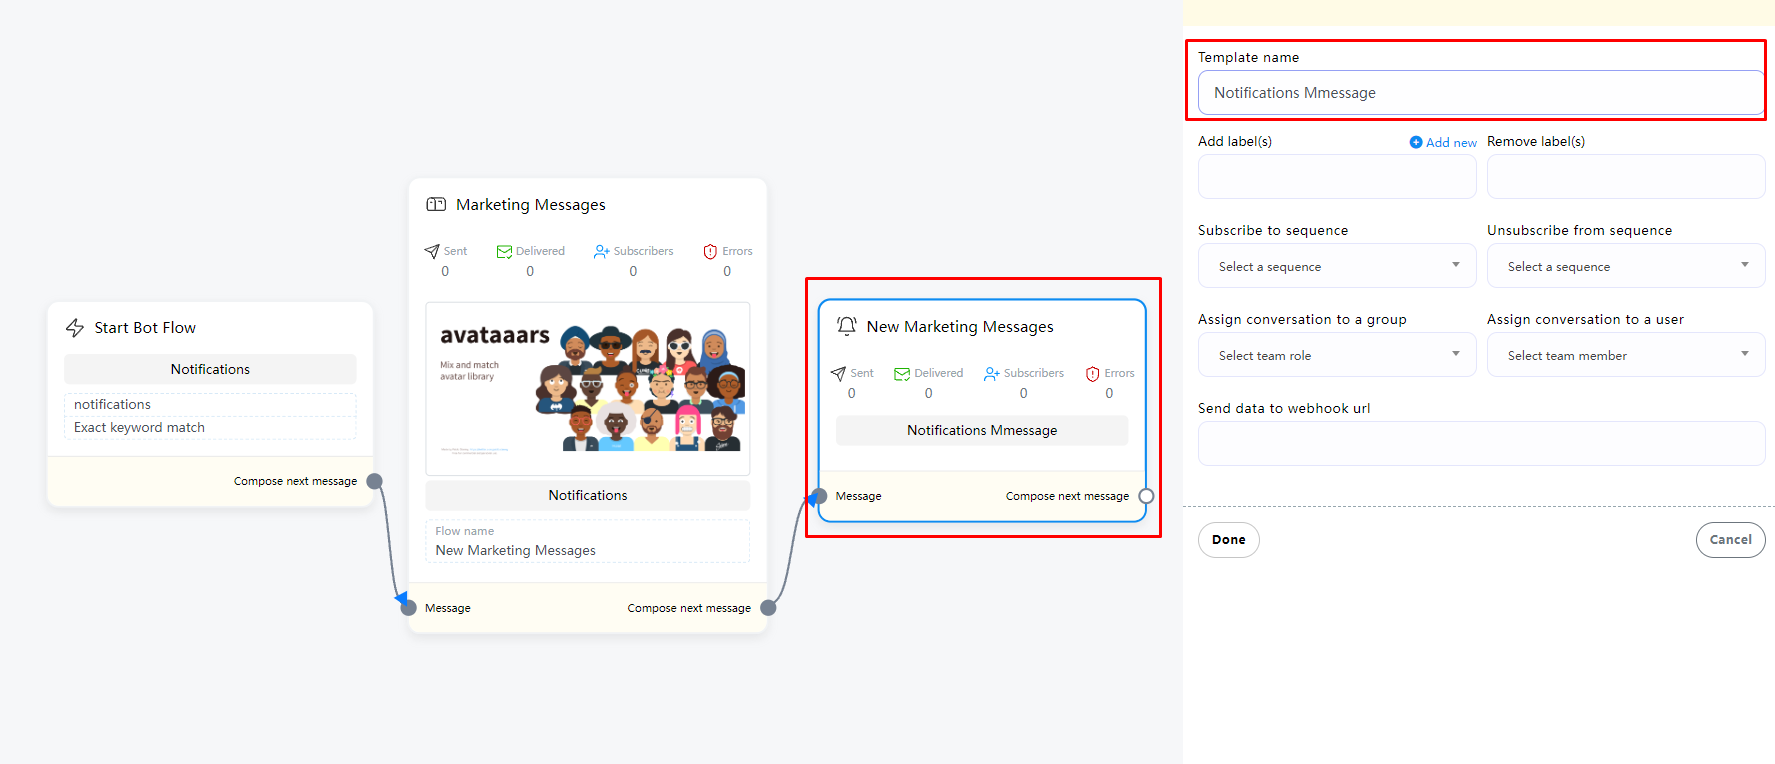
Now double-click the “New Marketing messages” component. We need to set the template name of this Marketing message in the pop-up menu on the right, so that we can know the purpose of this Marketing message later.
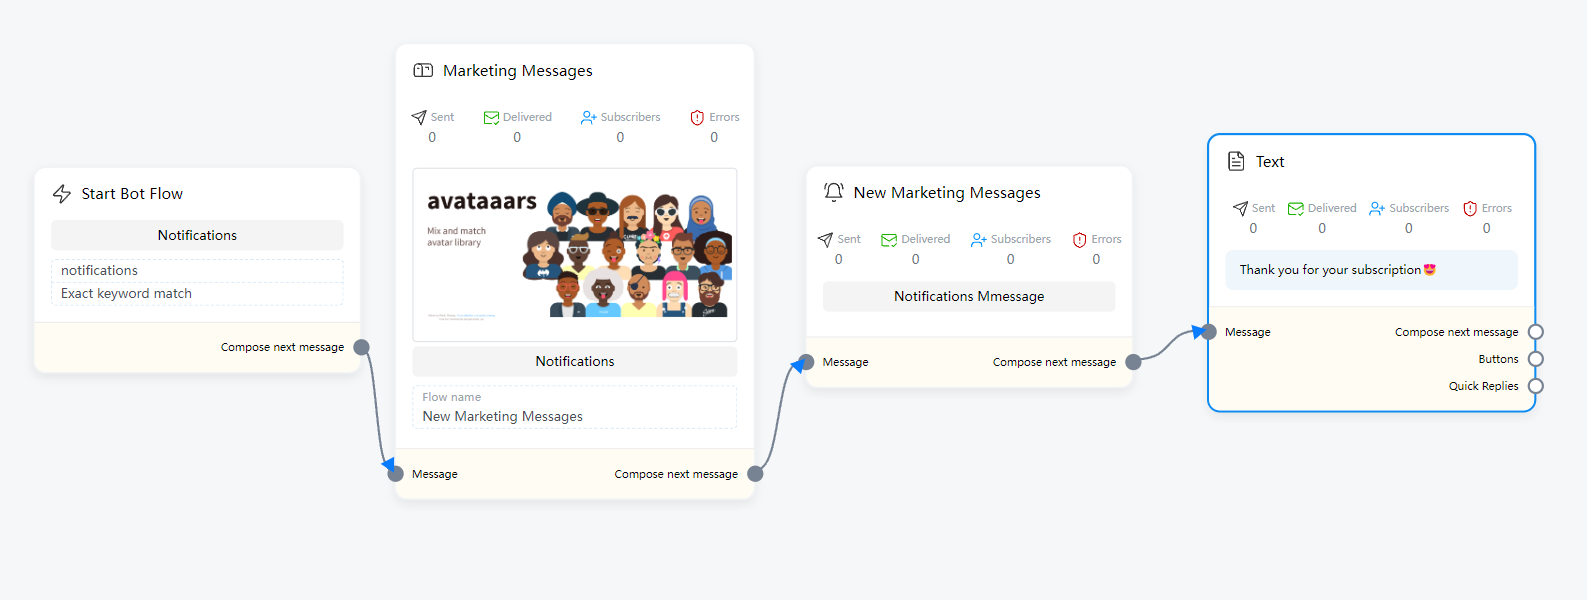
Now that we have completed this, we can connect the next reply in the next message. In the demo, when a user receives a subscription request from this Marketing messages, when the user clicks the subscribe button, we will reply to the user “Thank you for your subscription😍”
If you need to Create a campaign on Marketing Messages Broadcast, you can check out this article for details. Click here
Ai Reply
Ai Reply component is a component that can automatically reply to users using AI model. To use Ai Reply, you must first set up OpenAI API. You can check this article for more information. Click here
If you only need to use AI in a specific process, you can set it in the usual Visual Flow Builder Editor, but there are limited ways to invoke AI. You can set keywords. For example, we set a keyword “ai” in “Start Bot Flow”. When the user enters a question, append “ai” to let AI reply, for example:
1. Hello, can I learn about your product? ai
2. @ai, Hello, can I learn about your product?
This approach has certain limitations. Users must enter prompt words to wake up. In addition, if you need to use AI to reply completely, you can enable the connection of Ai Reply component when there is no matching reply. In this way, when the user inputs content that does not exist in all the keyword flows you currently set, AI reply will be enabled. You can check this article for more specific settings. Click here
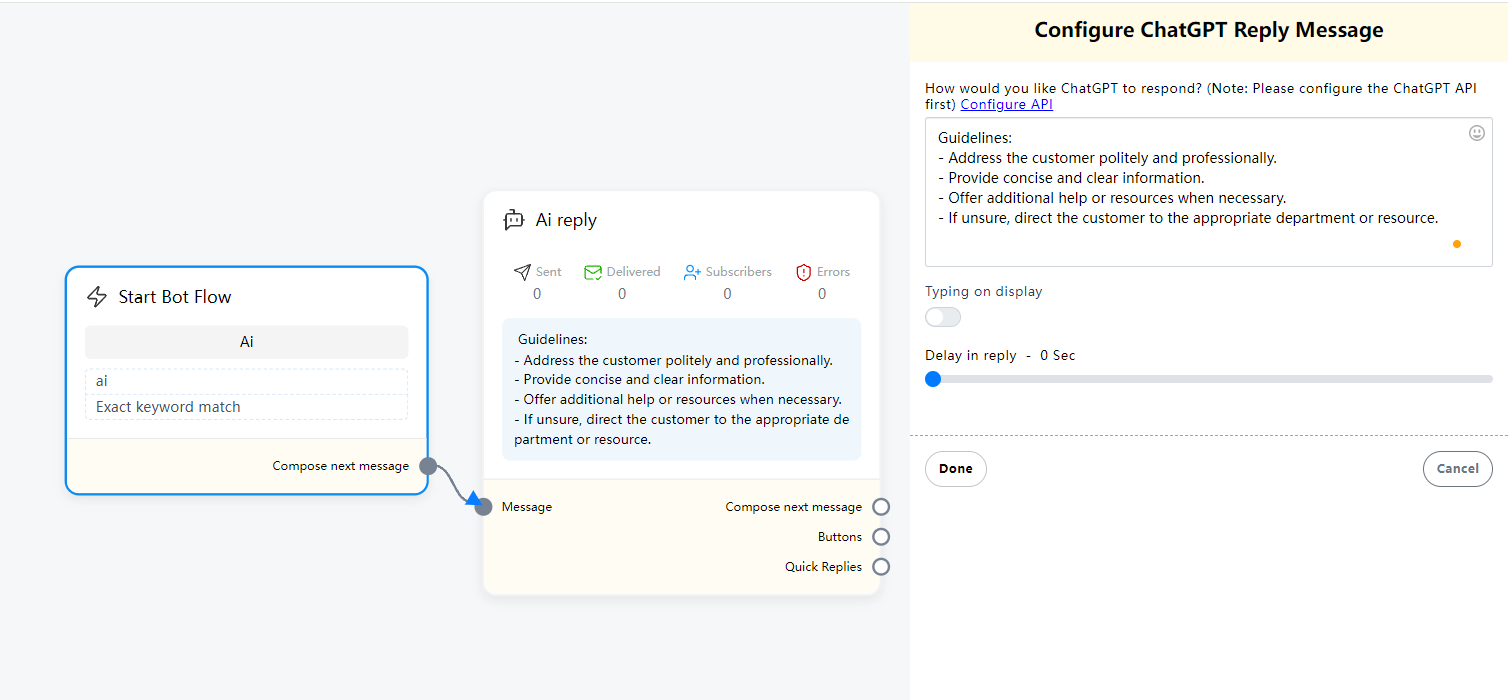
Ai Reply component, drag the Ai Reply component from the component menu to the editor, double-click the Ai Reply component, and in the text input box on the right menu, you need to enter the AI prompt word.
Generally, the prompt word entered in the Ai Reply component is how you want the AI to reply, such as what tone to use, or what content cannot be replied. When the AI receives a message other than the prompt word, how should it reply to ensure that the AI does not reply to things other than your business.
Integrations
In Integrations you can link your 3rd party accounts such as Social media, Email autoresponder APIs, SMS apis, Email APIs, WordPress, Woocommerce, OpenAI API
let’s start!
Articles
Connect Accounts
Facebook & Instagram Accounts
FransChat is primarily a marketing application based on Facebook and Instagram. So you have to import your Facebook and Instagram accounts into FransChat. Importing Facebook and Instagram accounts into FransChat is simple and straightforward. Just follow the instructions and you’ll be importing your Facebook and Instagram accounts in no time.
Import Facebook and Instagram Accounts
To import Facebook and Instagram accounts, first, go to the dashboard of FransChat. At the left sidebar of the dashboard, you will see a menu called Facebook and Instagram. Click on the menu.
Instantly, a page called connect Facebook and Instagram will appear with a button called Login with Facebook.
Not that, to import Facebook and Instagram accounts, Facebook(Logged In) has to be opened on another tab of the same browser.
Well, now click on the Login with Facebook button

Instantly, a modal form will appear on Facebook with three buttons edit settings, continue as your profile name and log into another account.
Click on the edit settings button if you want to edit the settings.

Just as you click on the edit settings button, a modal form will appear on the Facebook profile that is opened on another tab of the browser.
On the modal form, you have to select Instagram business accounts you want to use with FransChat. Of course, you can select multiple or all Instagram business accounts.
Then click on the Next button.

Instantly, another modal form will appear on the Facebook profile. On the modal form, you have to select the Facebook pages you want to use with FransChat. Of course, you can select multiple or all Facebook pages.
Then, click on the Next button.

Instantly, a modal form will appear. On the modal form, you have to select what FransChat is allowed to do. Keep every option turned on.
Then click on the Done button.

Instantly, another modal form will appear with a message that now you have linked FransChat to Facebook and the Ok button.
Now click on the OK button.

Import Account Directly
By clicking on the Continue as Profile name, you can import Facebook accounts directly.

Import Another Account
You can also import another account by clicking on the log-in into another account button.

Click on the Log in into another account button and the Facebook login page will appear.
Now Log in with the Facebook and the account will be imported into FransChat.

Successfully Imported Account
Instantly, the Connect Facebook and Instagram page will appear with a successful message and Facebook profile and Facebook page. Under the Facebook pages, you will see two buttons — the plug button and the delete button.

Enable Bot Connection
Now you have to enable bot connection for the pages. To enable bot connection for a page, click on the plug button under the page.

Instantly, a modal will appear with Cancel and OK button. Click on the OK button.

And a successful message — Bot connection has been enabled successfully — will appear.

Instead of the plug button, you will see two more buttons — the Eraser button and the Power button.

Disable Bot Connection
By clicking on the power button, you can disable the bot connection. Just as you click on the power button, a modal will appear with Cancel and OK buttons. Click on the OK button and the bot will be disabled.


And Instead of the power button, a radio button will appear.

Re-start Bot Connection
To re-start the bot connection, click on the radio button. Instantly, a modal will appear with Cancel and OK buttons. Click on the OK button and the bot will be restarted.


And instead of the radio button, the power button will appear.

Delete Bot Data
Click the eraser button on the left and immediately, a modal will appear with “Cancel” and “OK” buttons. Click the “OK” button and the robot will delete all data again.


Now the Bot will return to its initial state

Delete Page
You need to delete the Bot when it is not connected.


By clicking Delete, you will delete the connection between the page and FransChat. If you need to re-import this page, you will need to log back into your Facebook account import page
Delete Facebook Account
Deleting a Facebook account will delete all currently imported pages.
Immediately after clicking the Unlink button, a modal will appear with Cancel and OK buttons.
Click the OK button and a success message will appear. Facebook account will be deleted.

API channels
API channels
Bot Keyword
Keywords play a very important role in automated replies. When you create a Flow, you can enable a keyword for this Flow to trigger it. For example, we set one or more keywords “hi, pm, dm” in this Flow. Now when the user enters the corresponding “keyword” in the messenger, this Flow will be triggered.
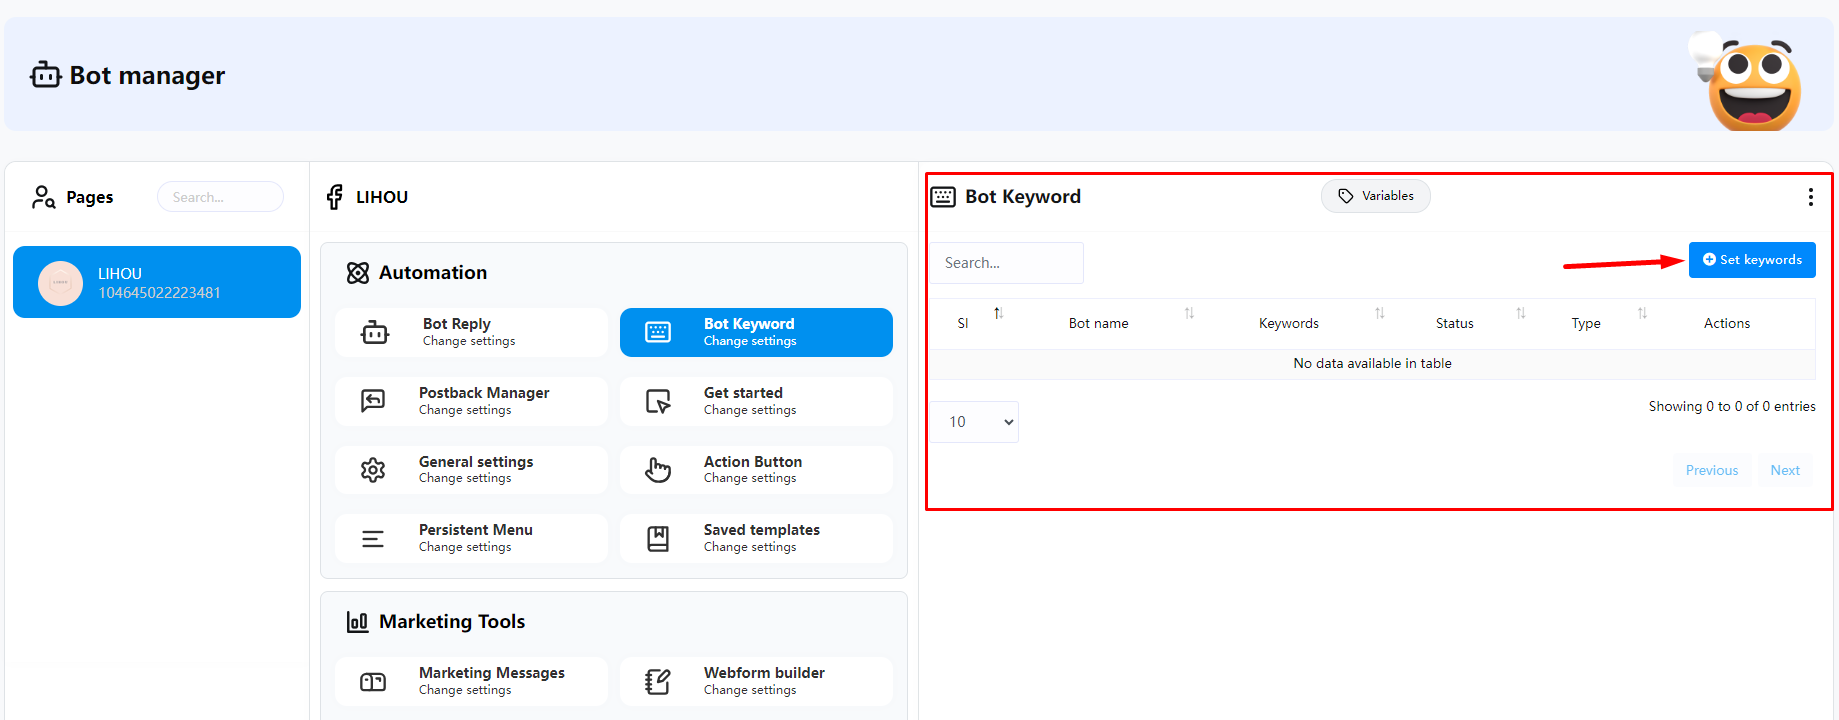
In the menu Bot manager Automation Bot Keyword , all the keywords currently created in the Flow will be displayed. You can also click the “Set Keyword” button here
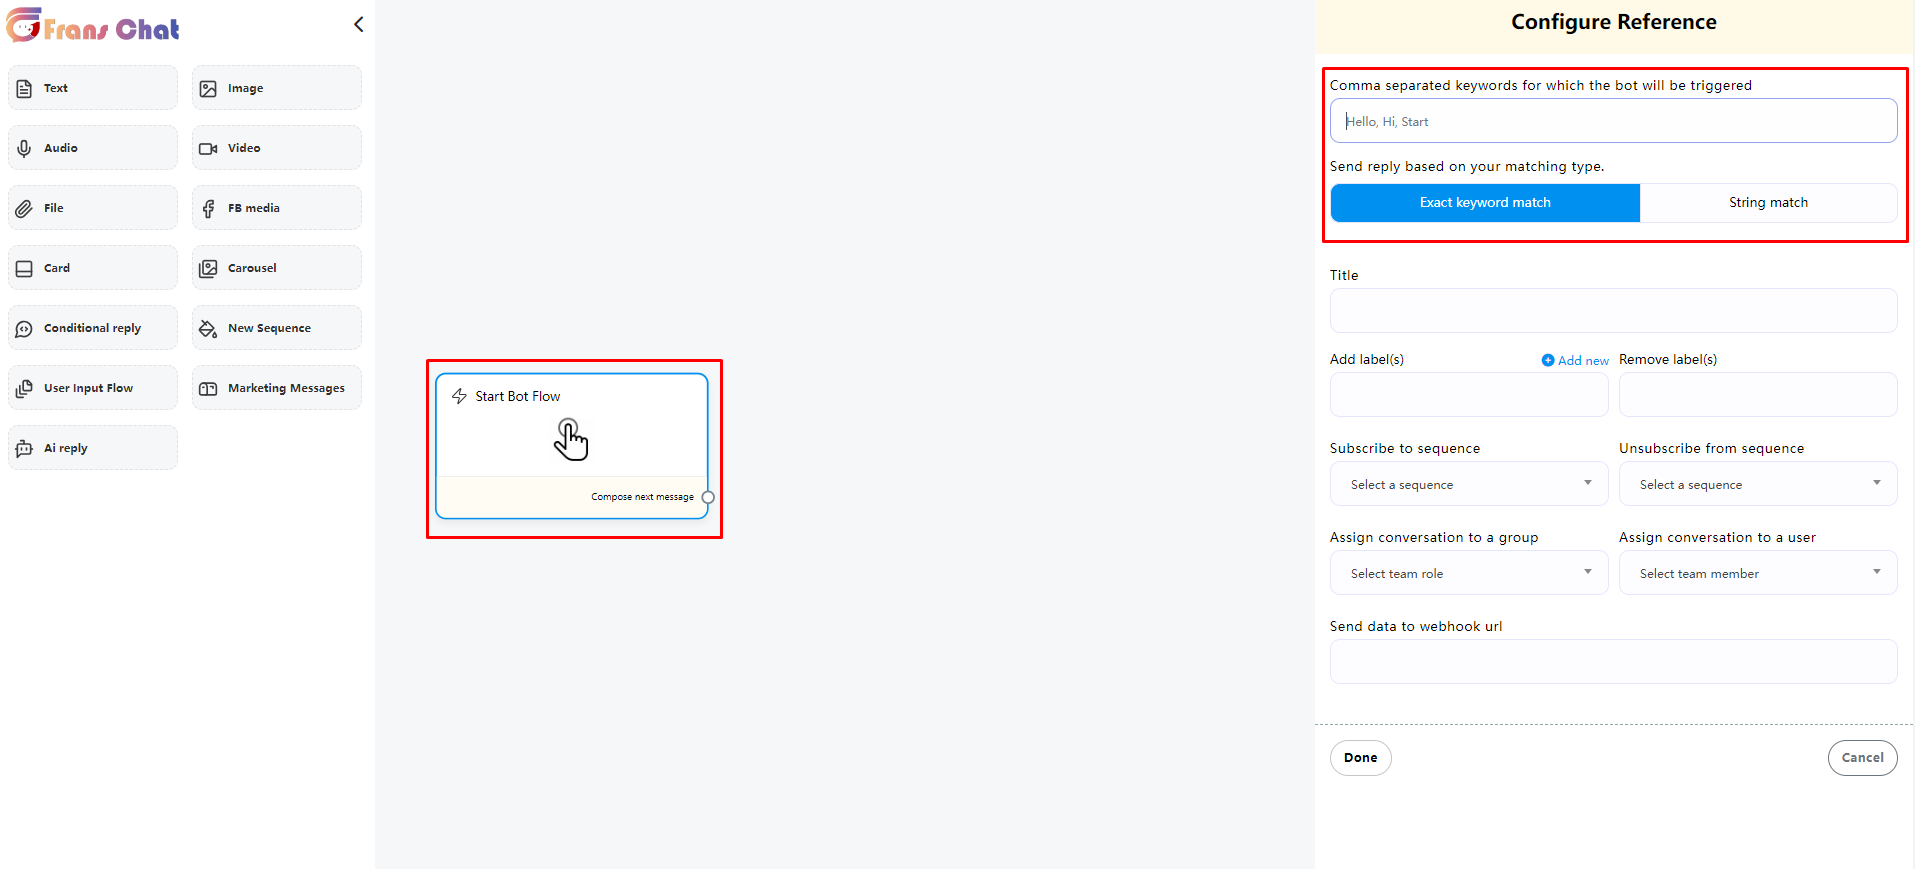
In the Visual Flow Builder Editor, you can set keywords in Start bot Flow to start this Flow.
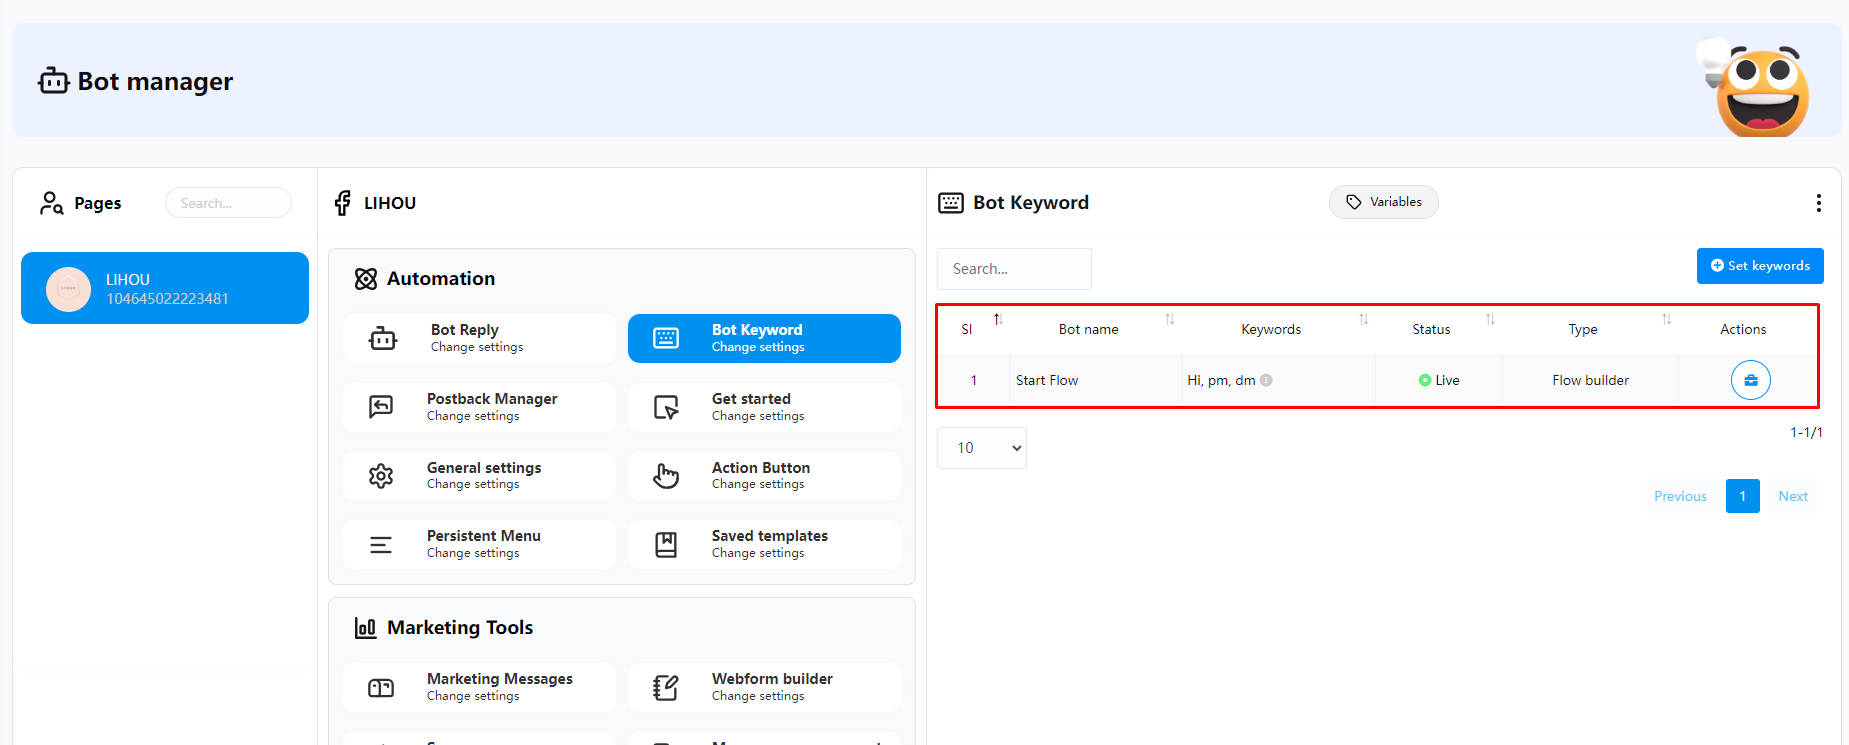
After saving the Flow, you can see the currently created “keyword” in the Bot manager Automation Bot Keyword page. In addition, the status “Live” is displayed, which means that this keyword is currently enabled.
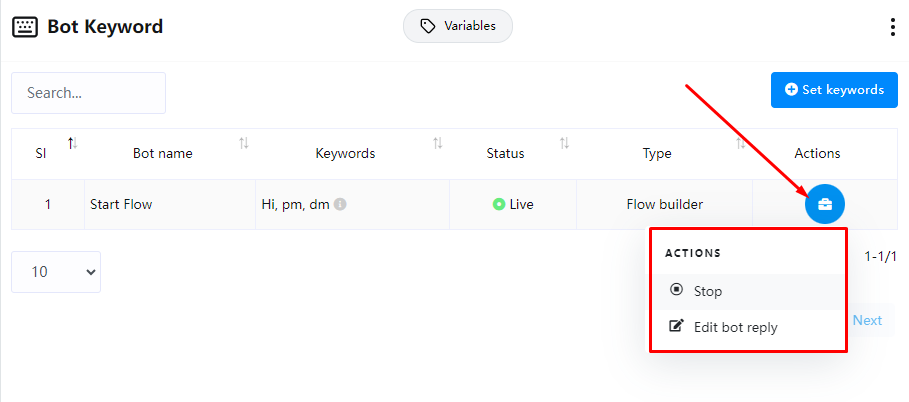
If you need to disable a keyword, you can set the keyword to “Stop” in Actions.
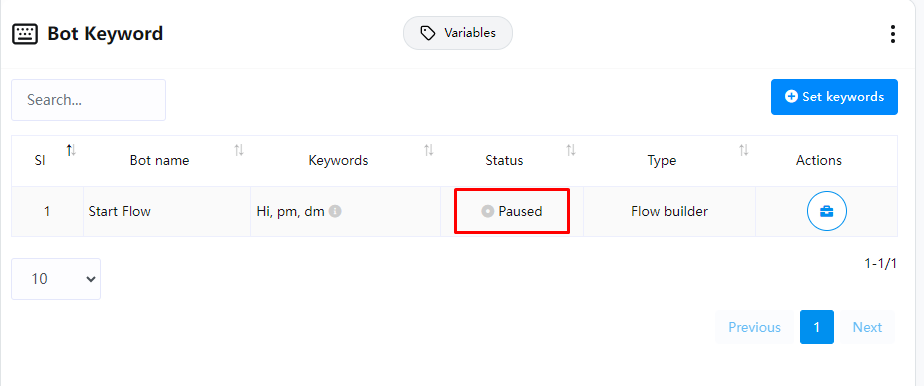
At this time, “Paused” will be displayed in the keyword status, and the keyword will not be triggered.
Postback Manager
In the menu Bot manager Automation Postback Manager , this generally displays the postbacks in all current Flows. Normally, we will not use this, but if you need to use it for Facebook click to messenger ads, then we need to get the Json Code here.
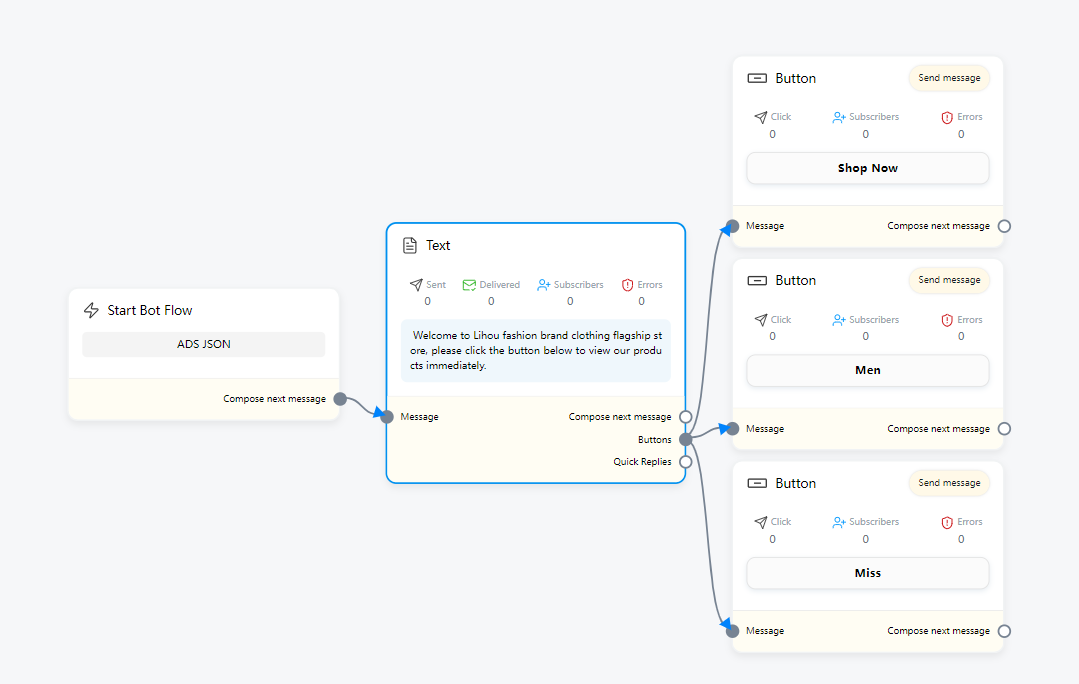
First we must create a new Flow for ADS, but make sure you have created the main Flow, which will be used for subsequent button postbacks.
In the Visual Flow Builder Editor, if you want to create a Facebook ads flow, there are some limitations
1. Only one message is allowed (can be paired with a button or quick reply)
2. For ads avoid putting first name, last name, direct link of webivew form, direct link of ecommerce store. These will not work.
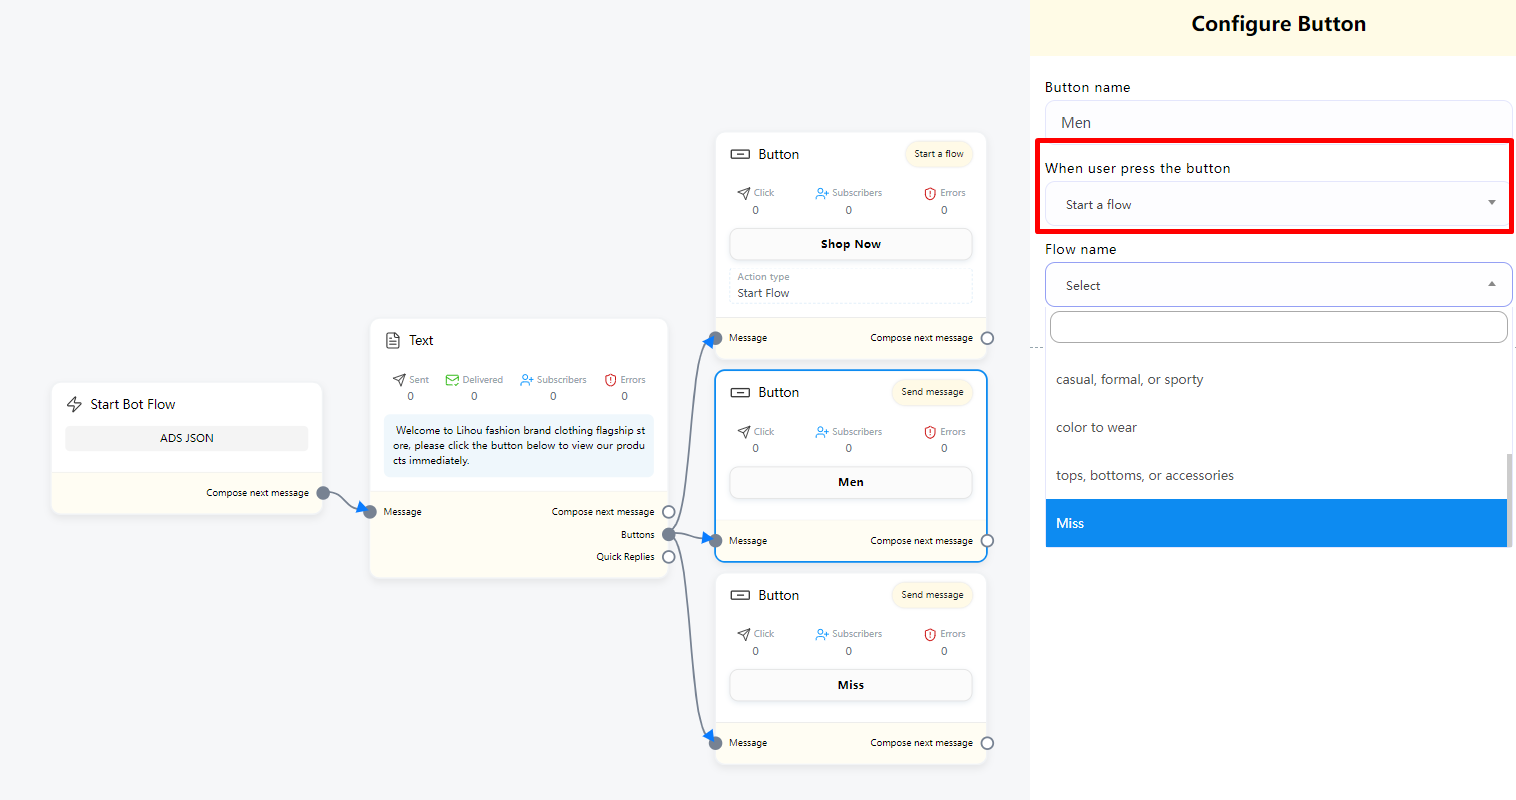
To start the entire Flow when setting up the button you can use “Start a flow” and select the button of the previously created Flow as the postback.
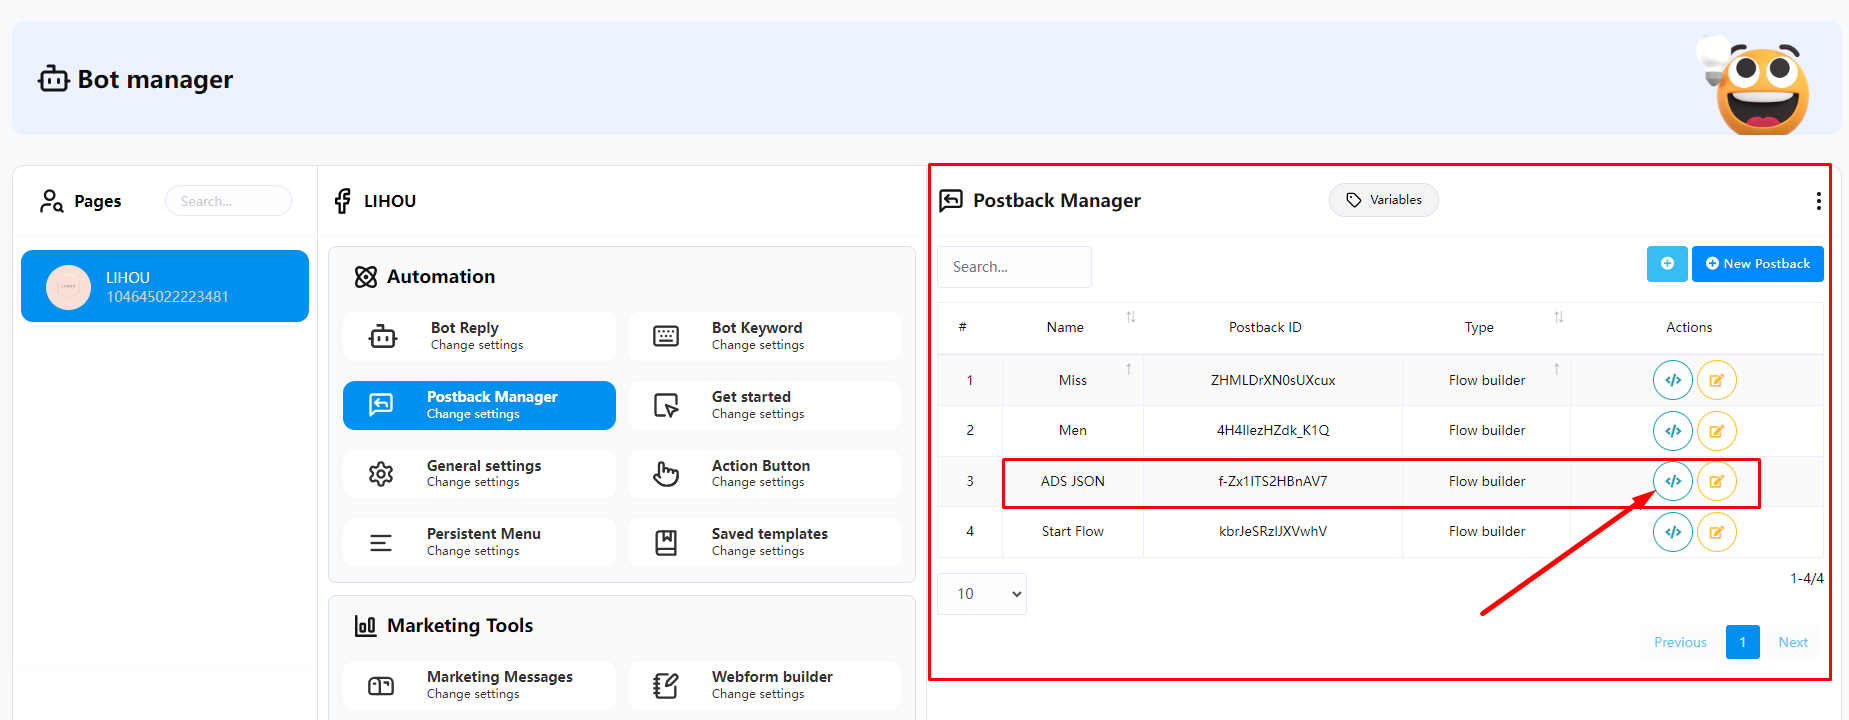
After creating the ADS Flow, you can return to Bot manager Automation Postback Manager to see the name of the Flow you just created. You can click the icon in the figure to get the Json code
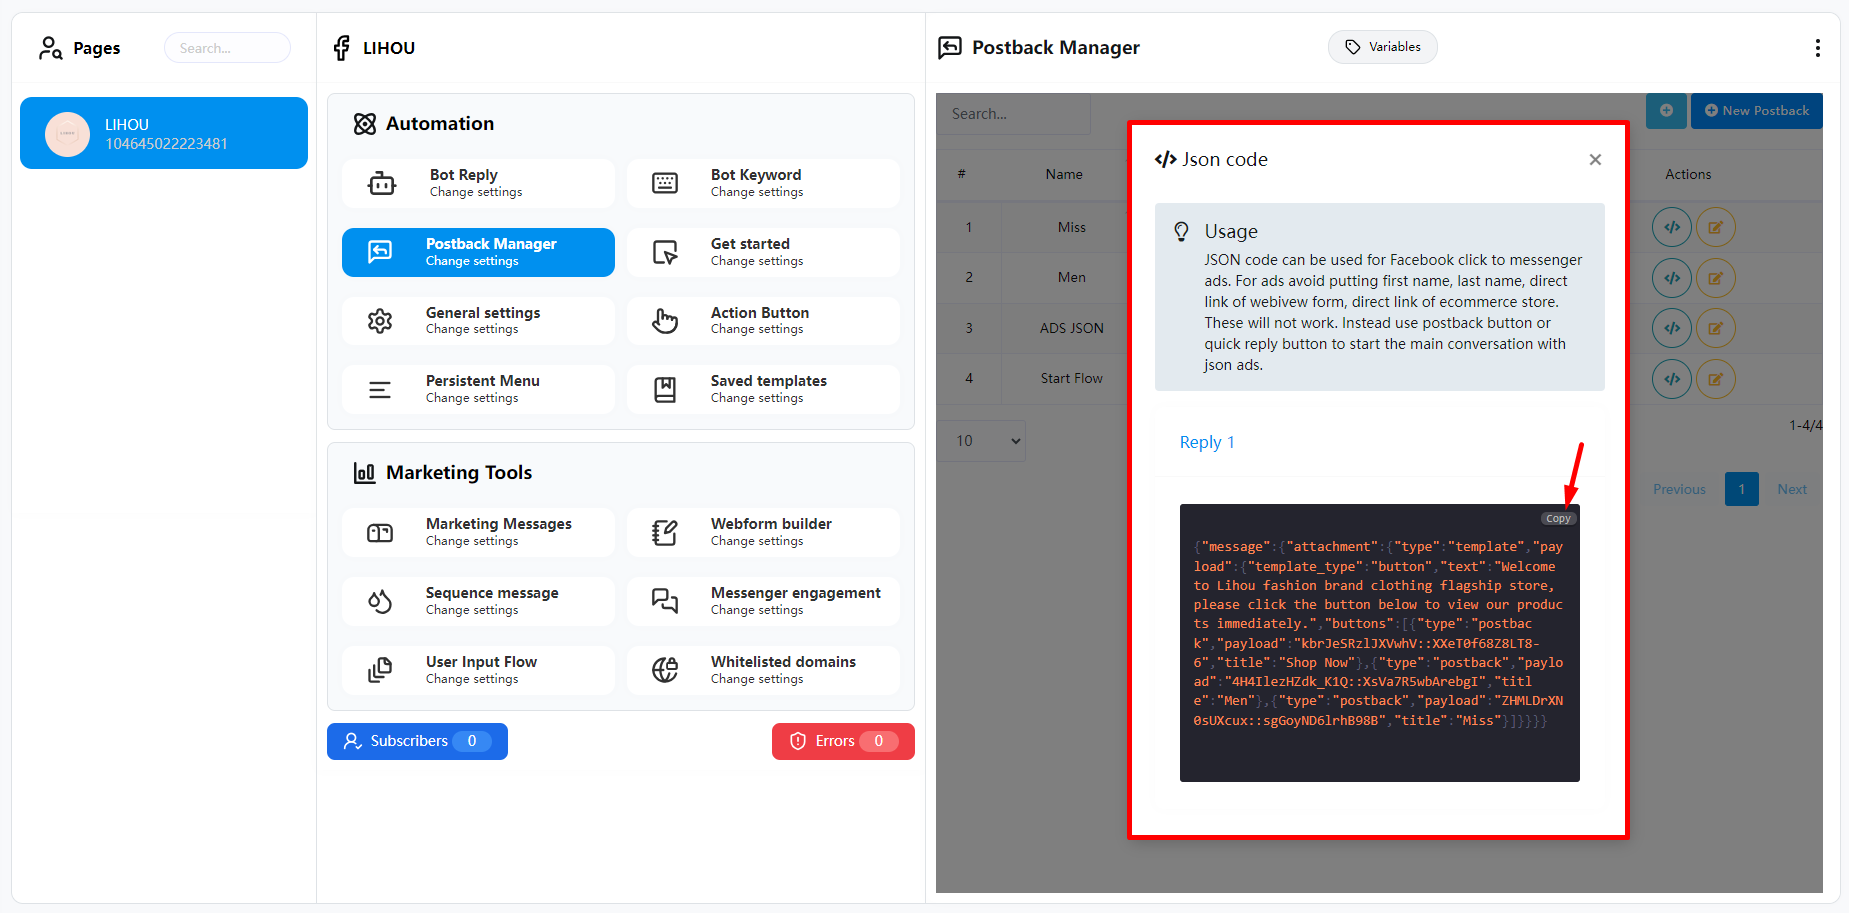
You can copy the json code and go to Facebook Ads Manager to set it up.
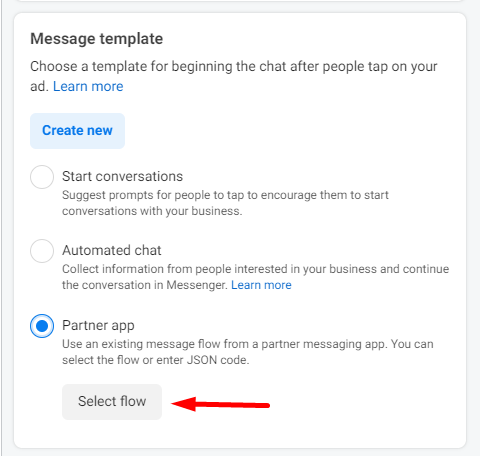
In Facebook Ads Manager, select “Partner app” in “Message template” and click Select flow
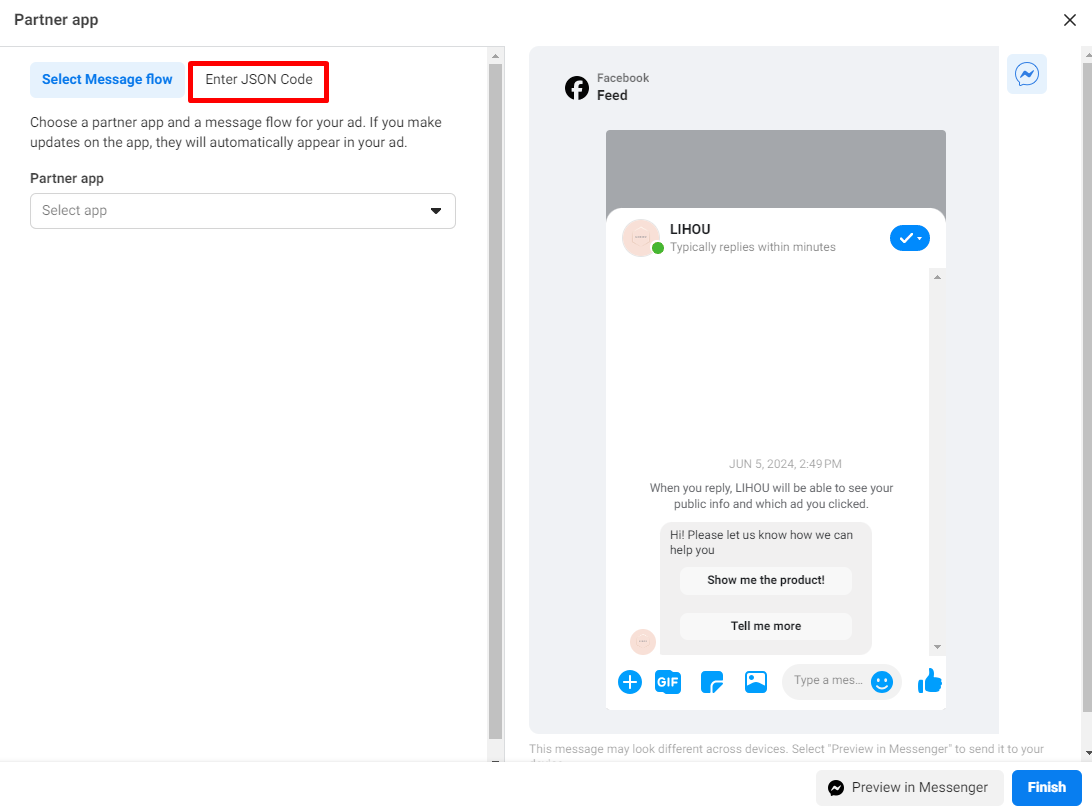
Next we click “Enter JSON Code”
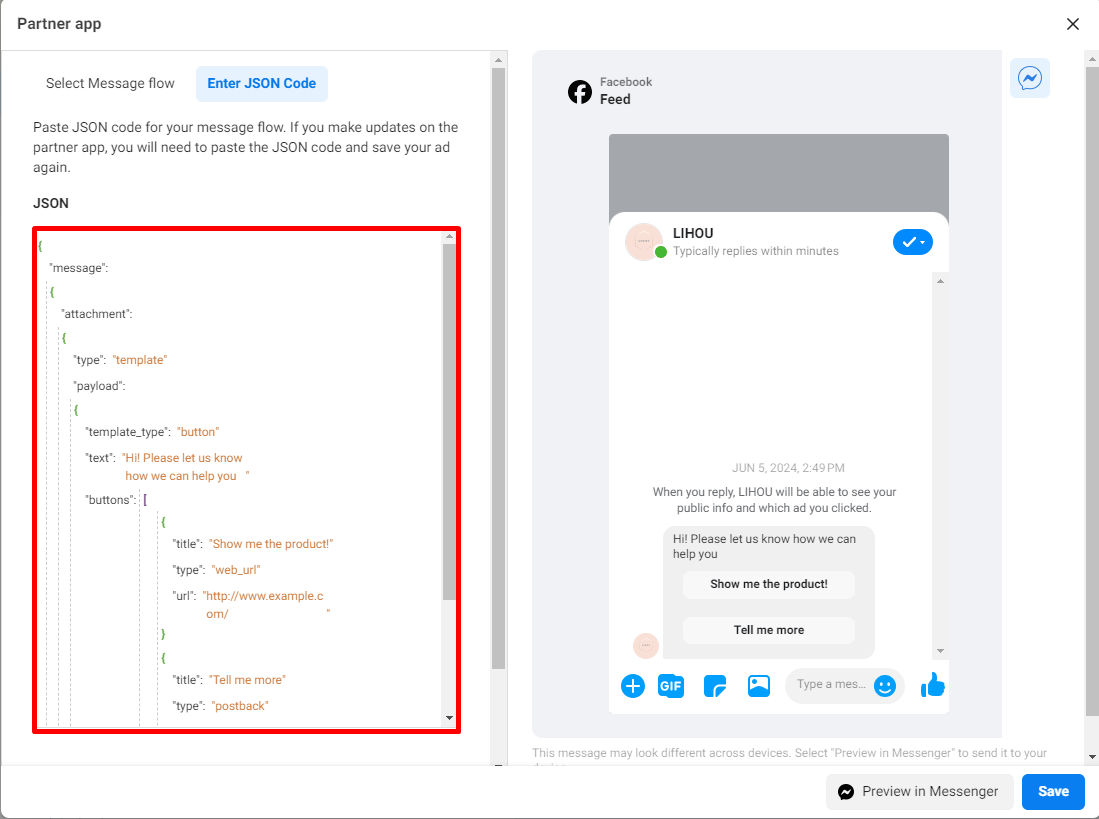
We need to delete the default Json Code
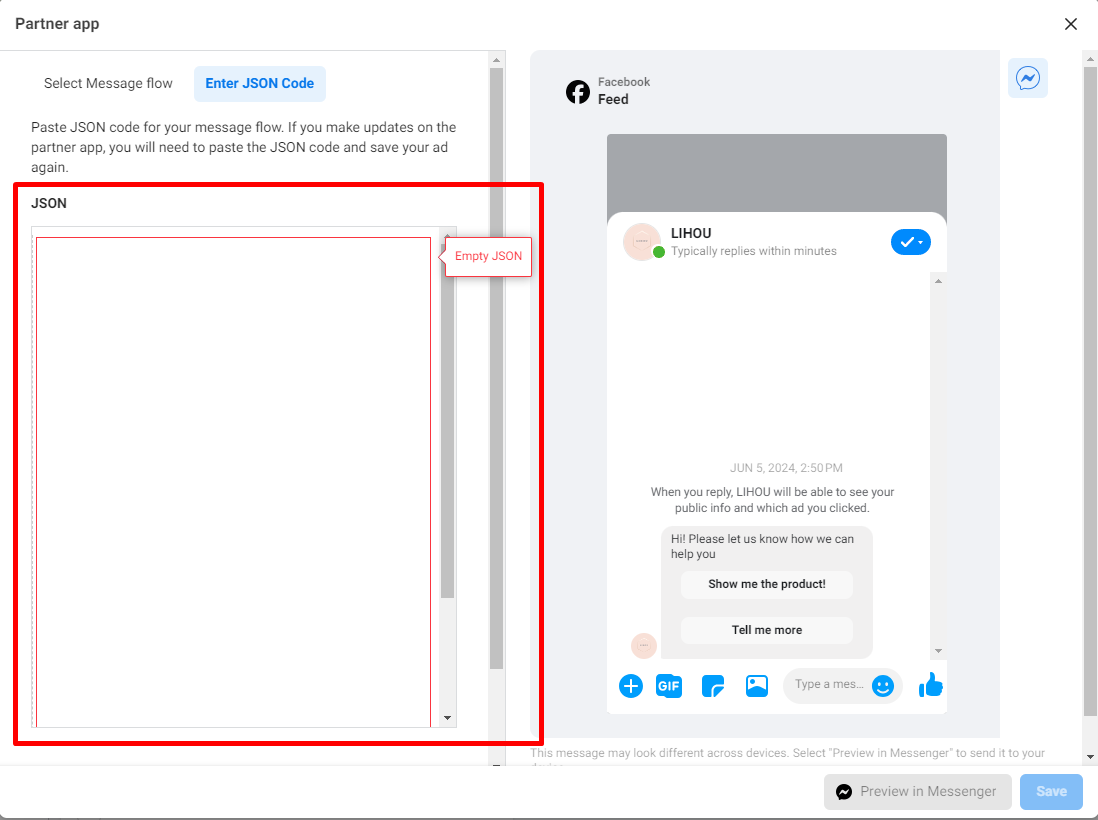
Next we need to paste the JSON Code we just copied into it
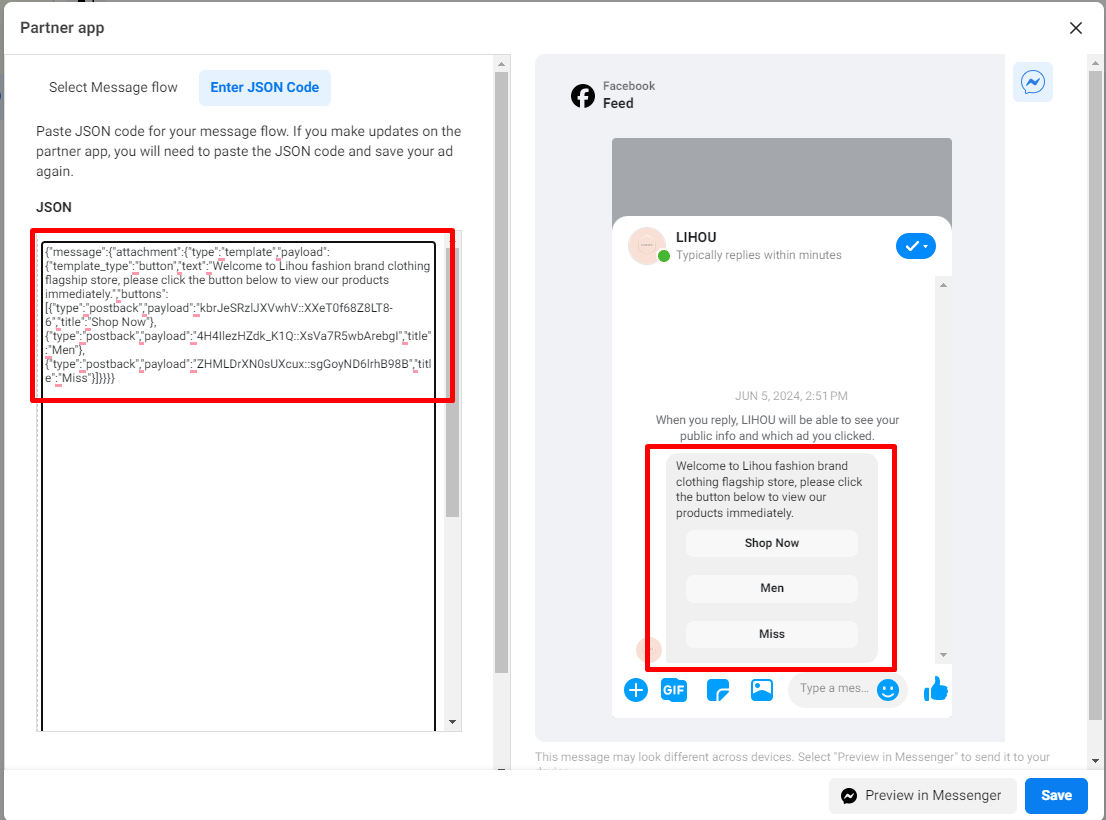
If everything goes well, you will be able to see the ads flow you just created.
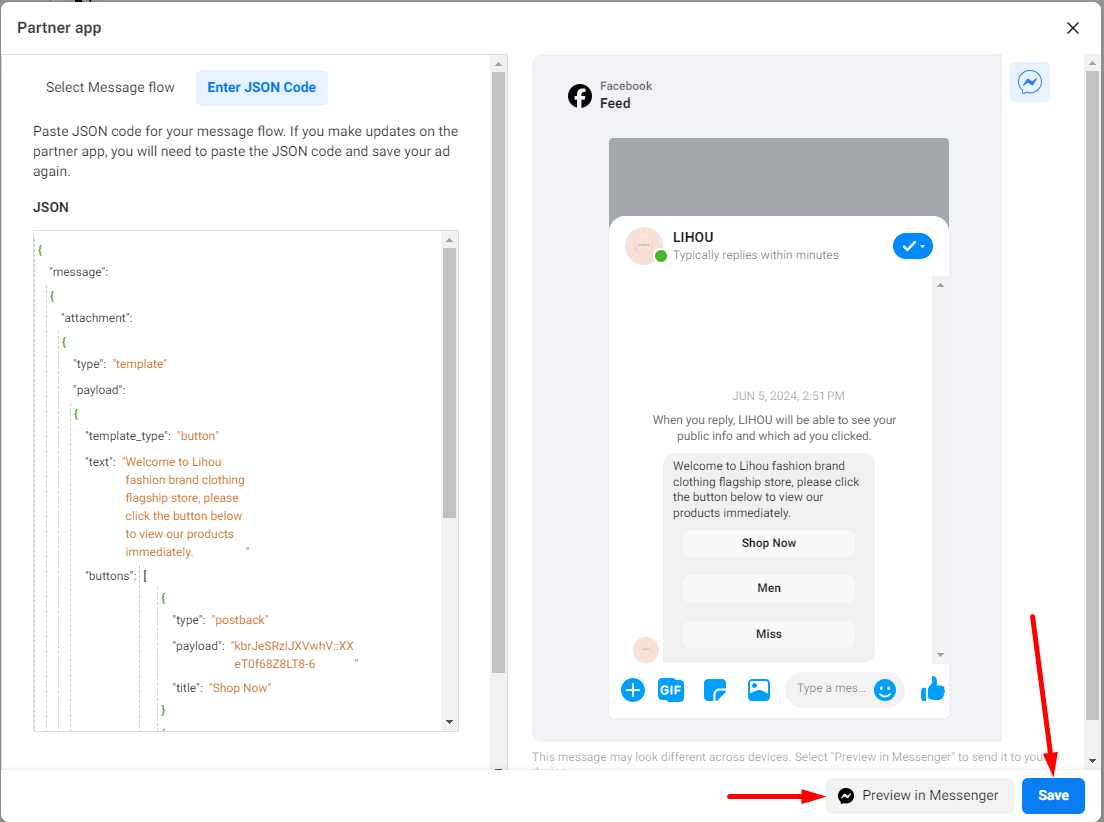
Next, click “Save” and you’re done. You can also click “Preview in Messenger” to test it.
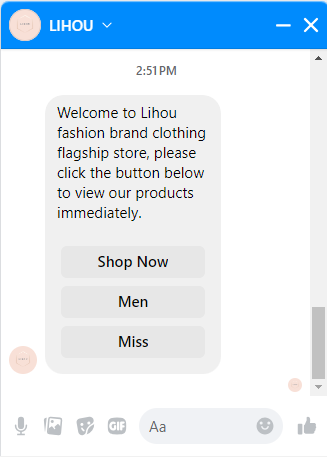
You will then receive a test message from your Page in your Facebook account.
Subscriber Manager
Subscriber Manager
With the subscriber manager feature of FransChat, you can see all of your subscribers. And you can scan subscriber lists and enable auto scan and search subscribers. Moreover, you can migrate page conversations as subscribers, download search results, assign labels to selected subscribers, and delete subscribers.Besides, you can create New labels on the page.
First, go to the dashboard of the FransChat. At the left sidebar of the dashboard, you will see a menu called subscriber manager. Click on the subscriber manager menu.
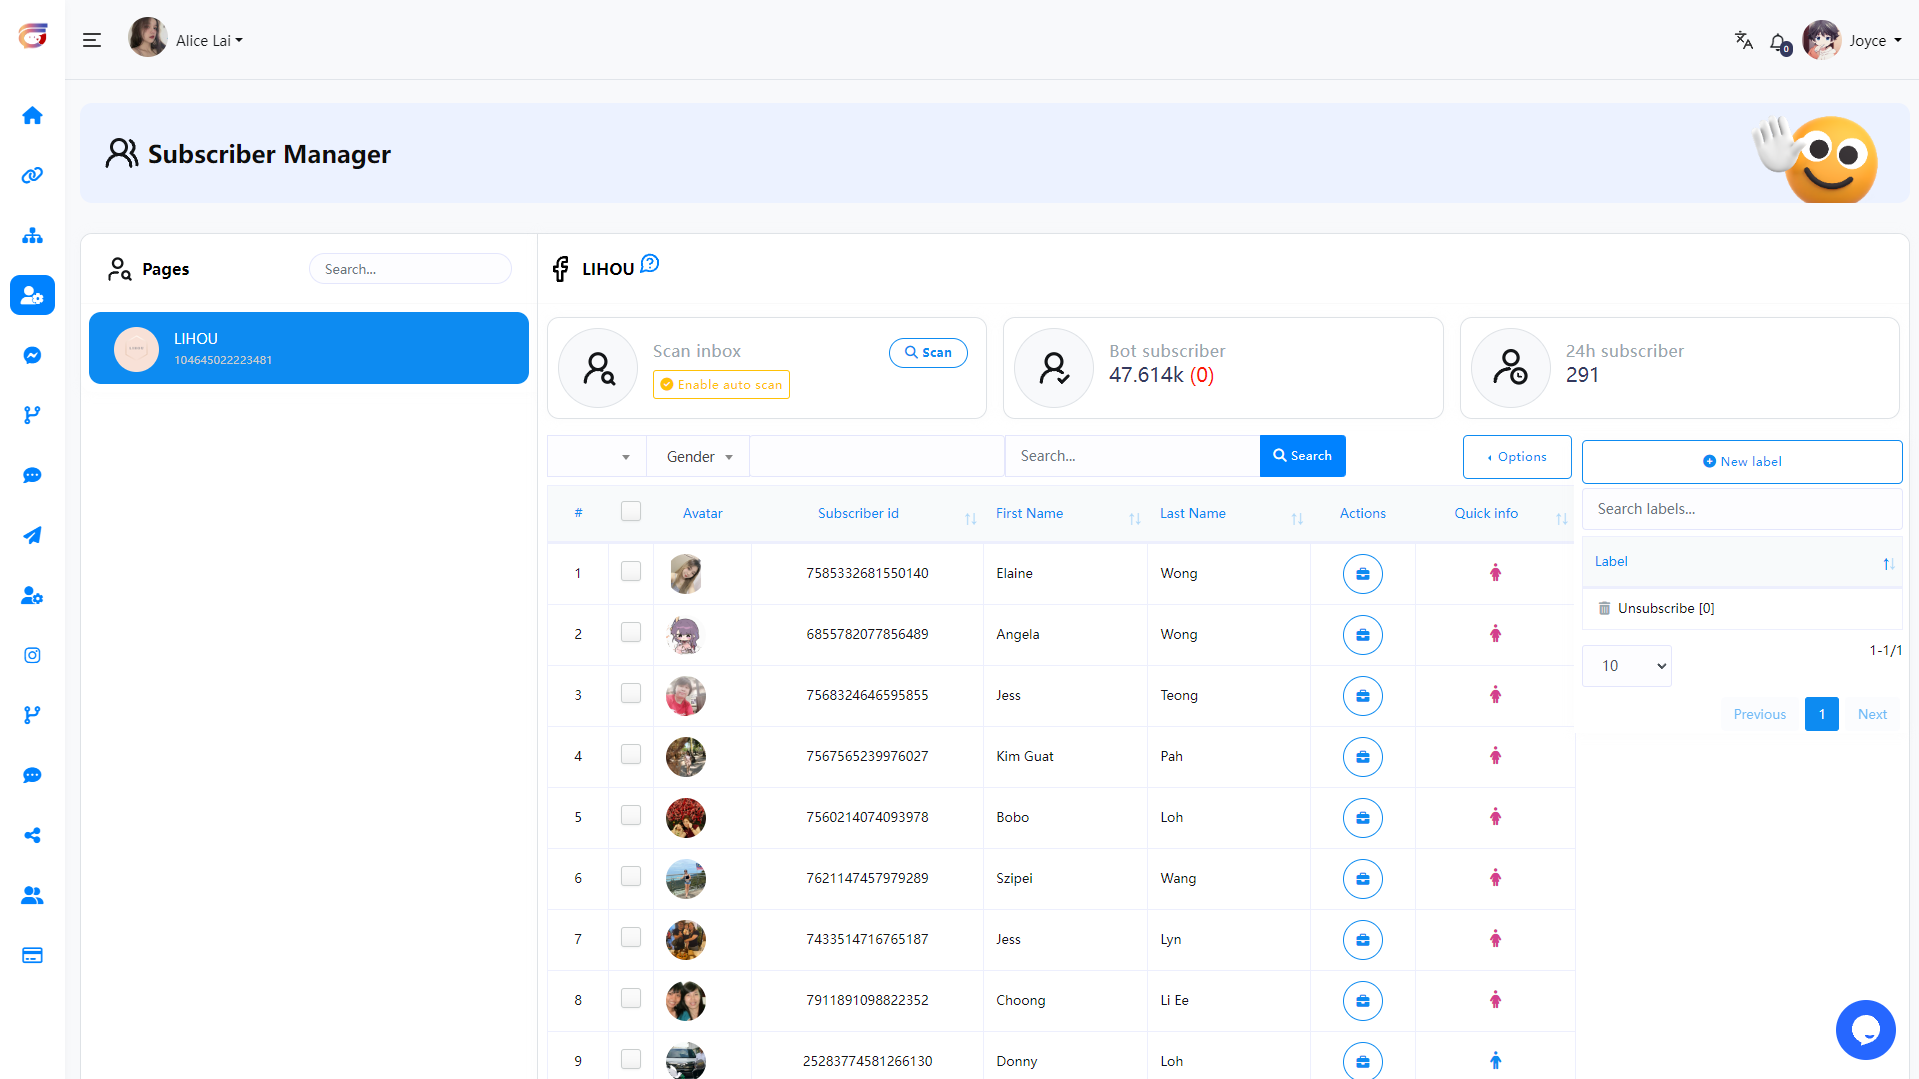
Facebook & Instagram Tools
This article will explain in detail how to create and work with automations
The setup is basically the same for both Messenger and Instagram channels.
Articles
Subscriber Manager
Subscriber Manager
With the subscriber manager feature of FransChat, you can see all of your subscribers. And you can scan subscriber lists and enable auto scan and search subscribers. Moreover, you can migrate page conversations as subscribers, download search results, assign labels to selected subscribers, and delete subscribers.Besides, you can create New labels on the page.
First, go to the dashboard of the FransChat. At the left sidebar of the dashboard, you will see a menu called subscriber manager. Click on the subscriber manager menu.

Live chat
On the live chat interface, you can view recent conversations between users and your Facebook Page or Instagram account. Of course, in live chat you can talk directly to users through their Facebook page or Instagram account. In a nutshell, you can do everything you can do on Facebook or Instagram Messenger. Additionally, you can complete other tasks such as creating labels, assigning labels to users, and setting up sequence messages.
Additionally, you can subscribe and unsubscribe users at any time. Likewise, you can pause and resume bot replies for specific users.
In this article, I will discuss how to use the live chat feature perfectly.
Using live chat is as easy as using Facebook and Instagram Messenger. That said, using live chat is very simple and straightforward.
Let’s see how to use Live Chat
First, go to the dashboard of FransChat. You will see the live chat menu at the left sidebar of the dashboard. Just click on the Live Chat option.
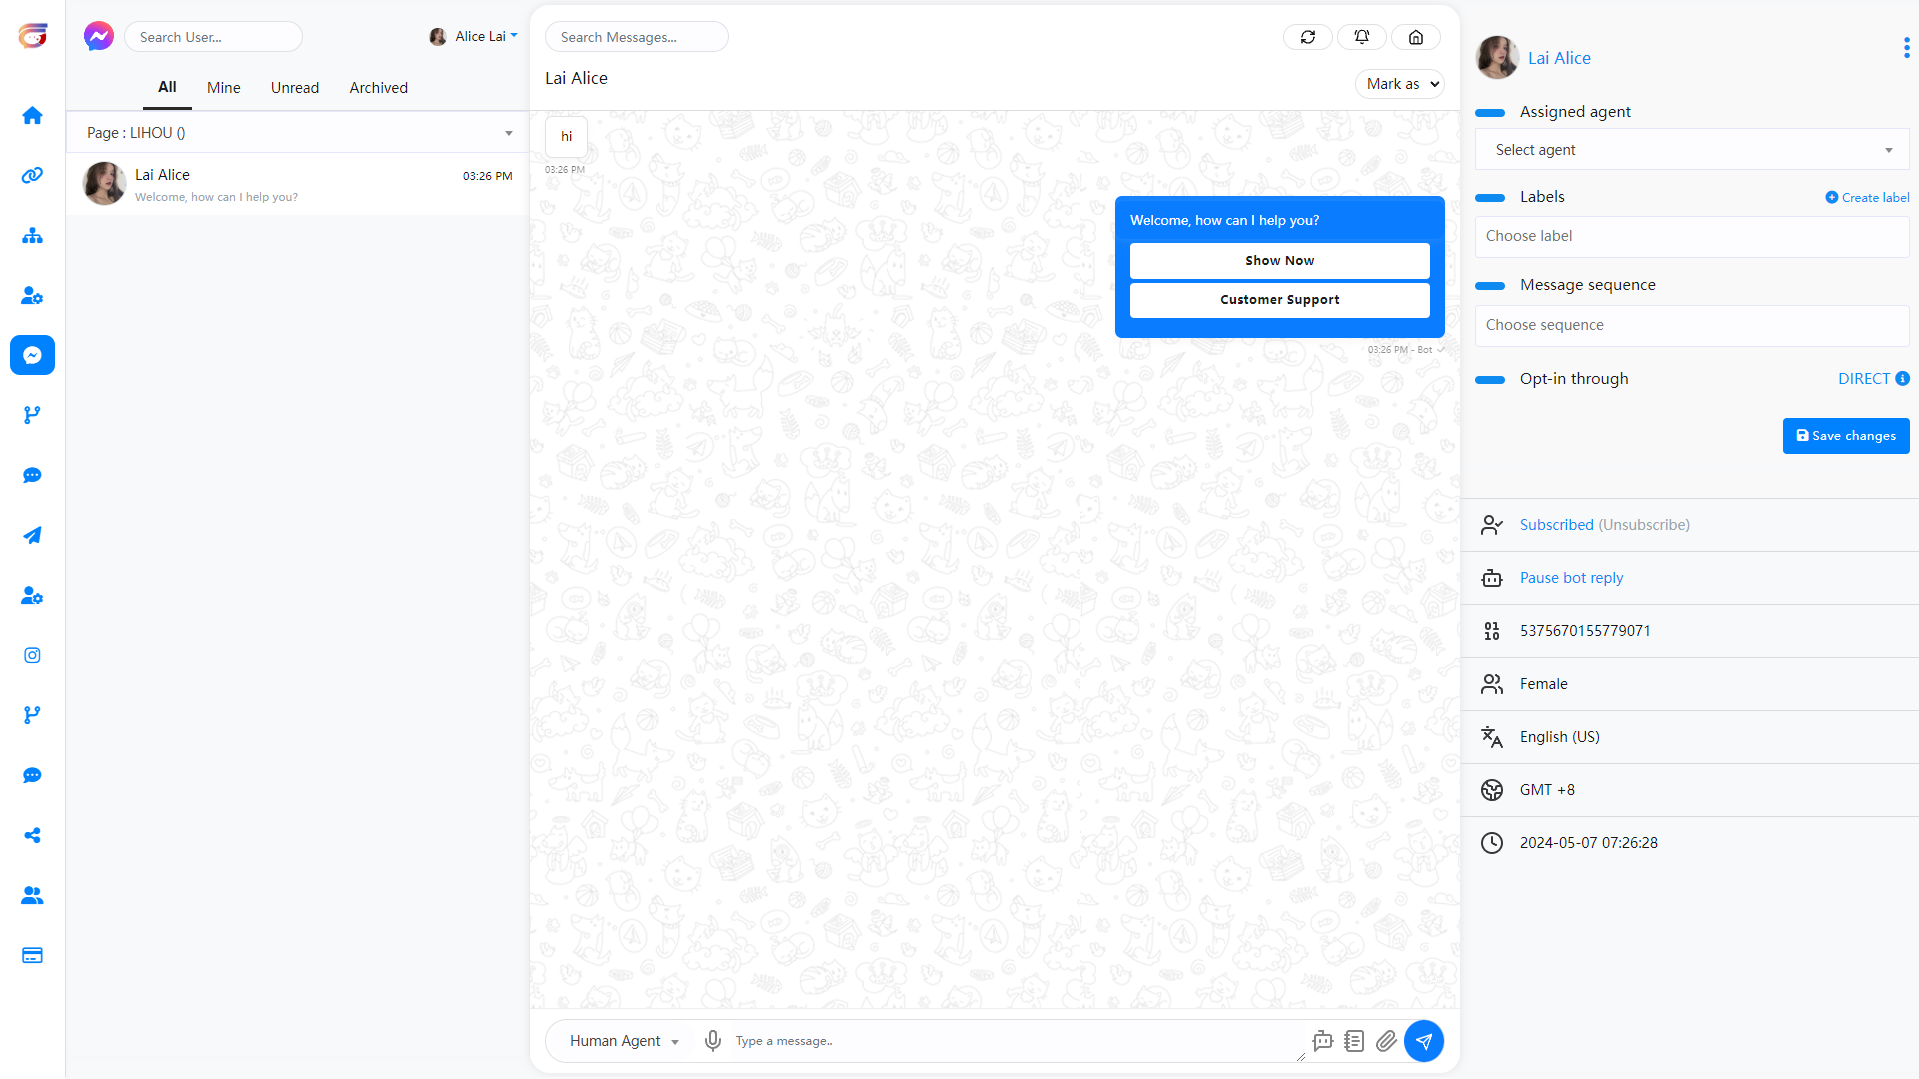
Instantly, the interface of the live chat will appear.
Live Chat interface is divided into three sections– subscribers list, messaging window, and actions.
Subscribers' list
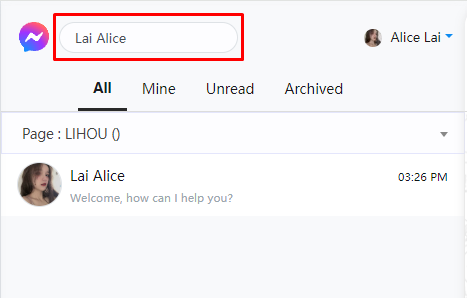
In the Subscriber List section, you can see a list of subscribers who have recently chatted with you. Additionally, you can search for subscribers on the search bar. (Note that currently when searching for subscribers, the subscriber must be loaded into the subscriber list before the target subscriber can be successfully searched)
Messaging window
The messaging window is for directly chatting with users.
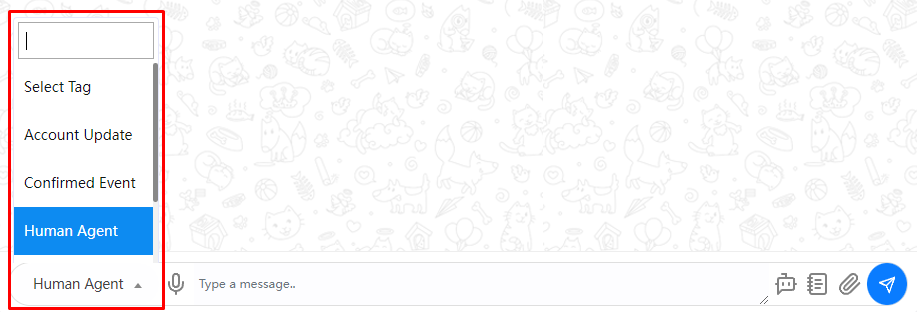
In the message tag field, you have to select a message tag. Click on the message tag field and instantly will appear a drop-down menu of different message tags such as Human agent, Account update, Confirmed Event, Post purchase Update, Non-promotional(NP registered only). If you select the human agent message tag, you have to reply to the message from users within 24 hours, otherwise, you will get an error. In this case, you have to use other message tags. If you want to know the usage of message tags, read the article by Facebook for developers.
Voice Messages
After clicking the microphone button, you can send the language. After clicking the microphone button, the icon will change to a wave, which means recording is in progress. Click it again to stop recording and send directly.

Bot Flow Messages
You can click the robot icon and a pop-up window will open. In the pop-up window, select the Bot Flow that has been created and send it to the user.
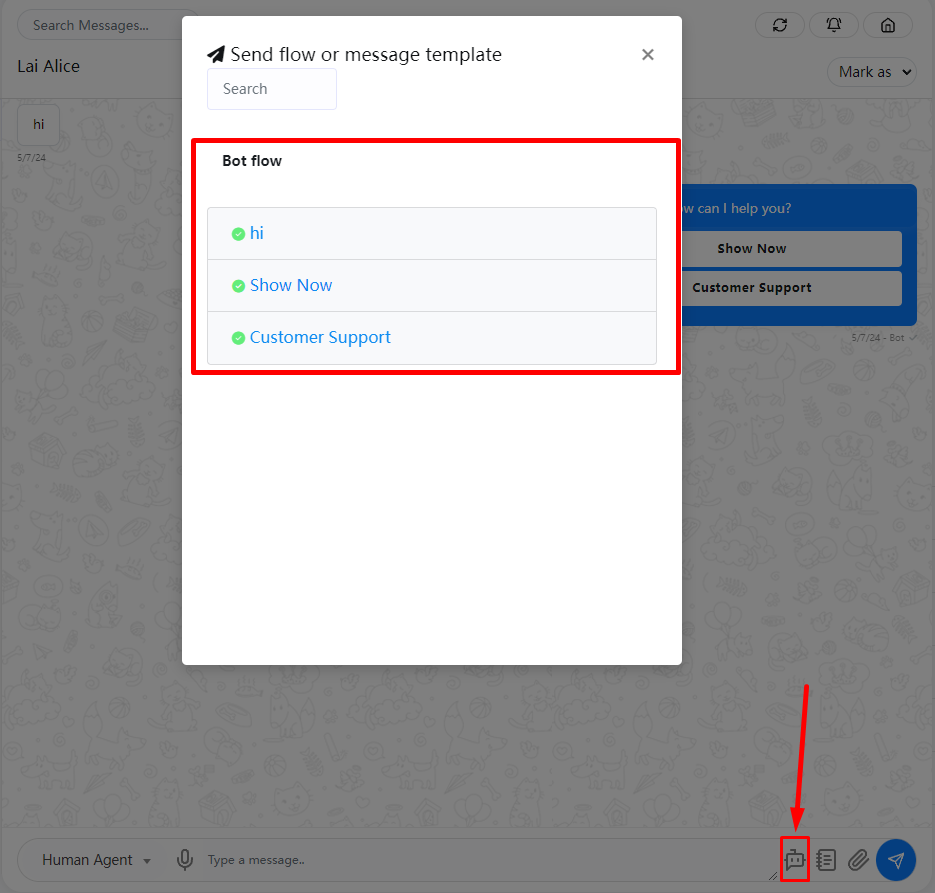
After selecting one of the flows, the robot icon will change to the loading state, and a pop-up notification will be displayed when all flwos have been sent.

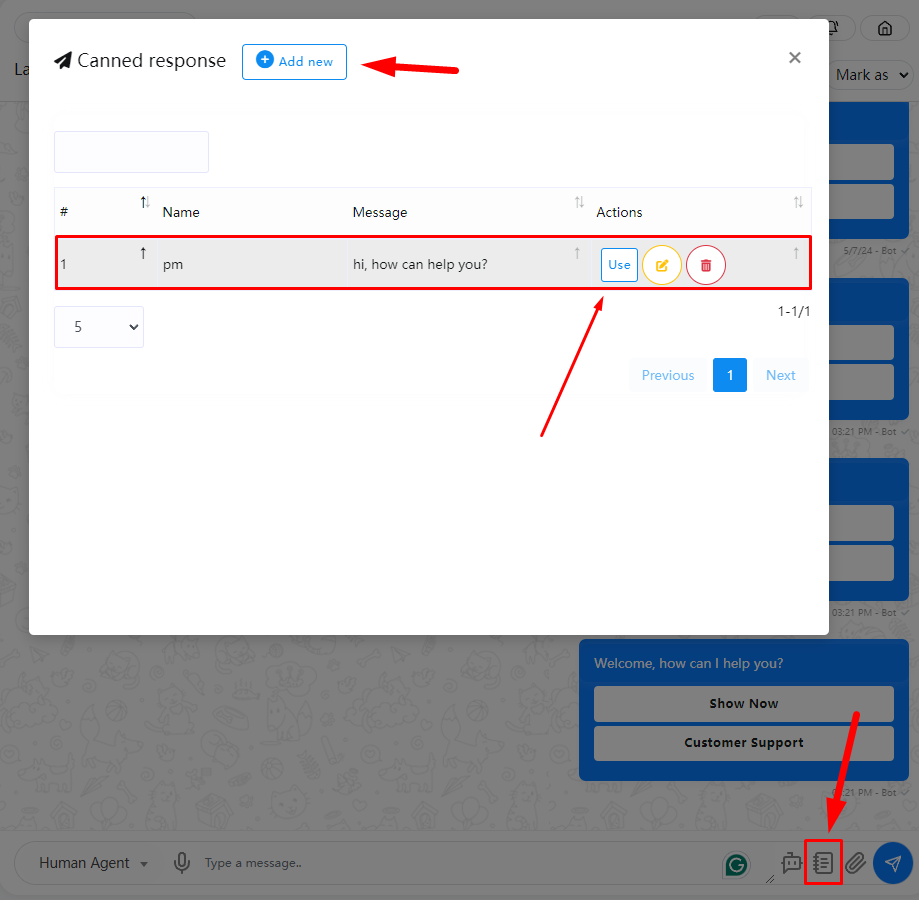
Canned Response
To use the canned reply function, you can click the notebook icon and create a new canned reply in the pop-up window, or select an already created canned reply and click (Use). The pop-up window will then close and the canned message will be automatically Fill in the message input box
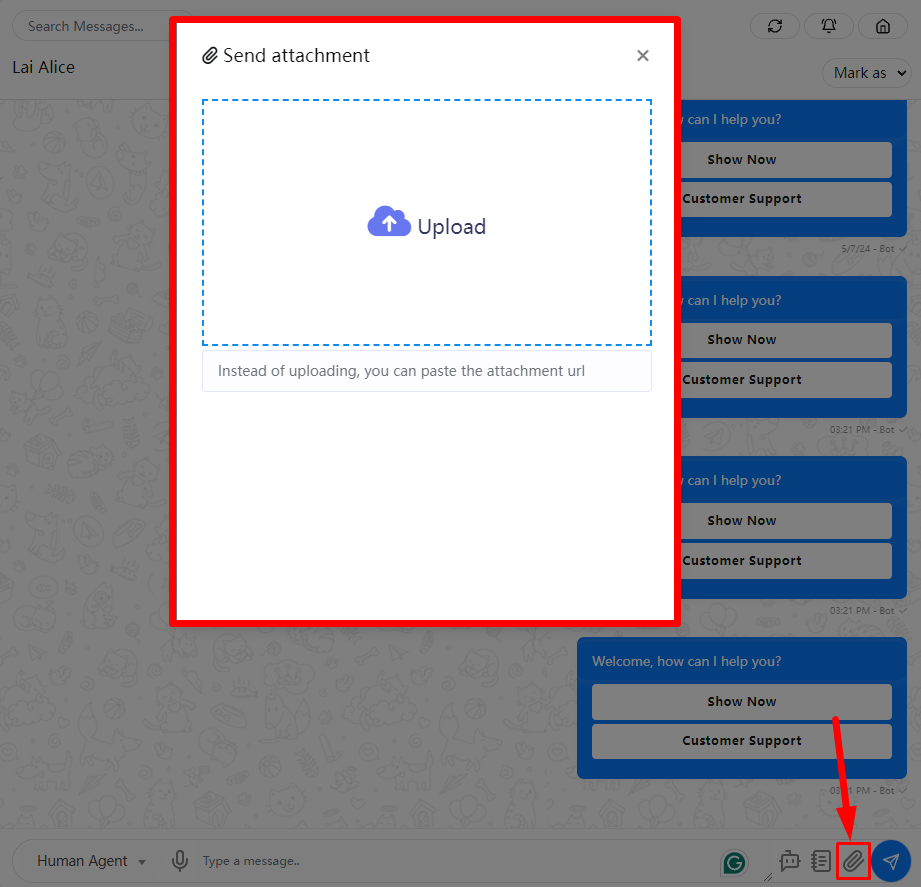
Send Attachment
To send a file or picture, you can click on the paperclip icon and then upload your picture in the pop-up window. (Note: Files will be sent as soon as upload is complete)
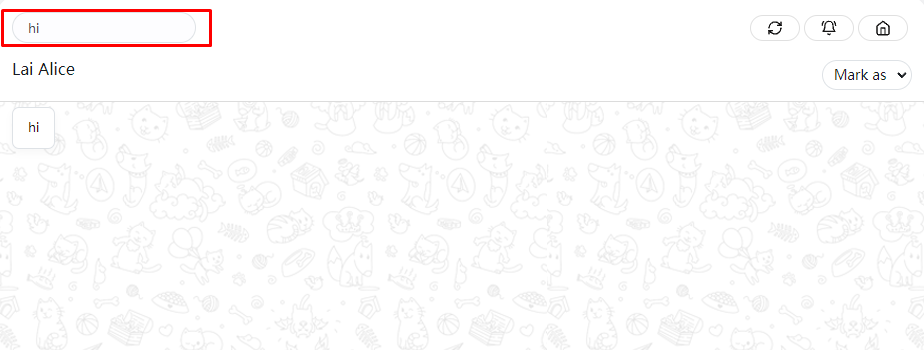
Search Information
Moreover, you can also search messages on the search bar in the messaging window.
Actions
In the action sections, you can accomplish some tasks. Moreover, you can see the primary data of users.
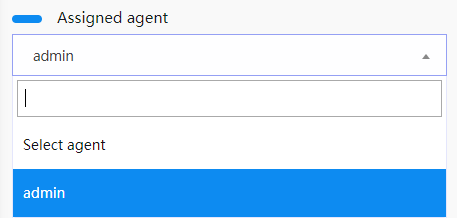
Assigned agent
You can assign the message to an agent for reply by selecting designated agent in the search box. (Note: You need to create a team role and team user before you can proceed with this step. Then you can view this article to create a team)
Select Labels
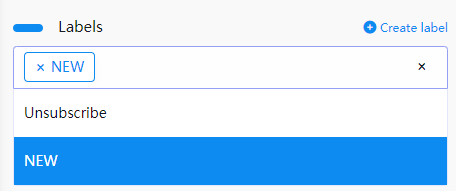
First, you will see a form called a label. From the label field, you can assign a label to a specific user. Click on the label form and instantly appear a drop-down menu of different labels you have created before. Then you have to select a label to assign the label to a subscriber list. The selected labels will appear on the label form. Well, you can select as many labels as you want for a specific user. True, you can remove labels one after another by clicking on the cross icon next to the label name. Of course, you can remove all the labels by clicking on the cross icon in the field.
Create Labels
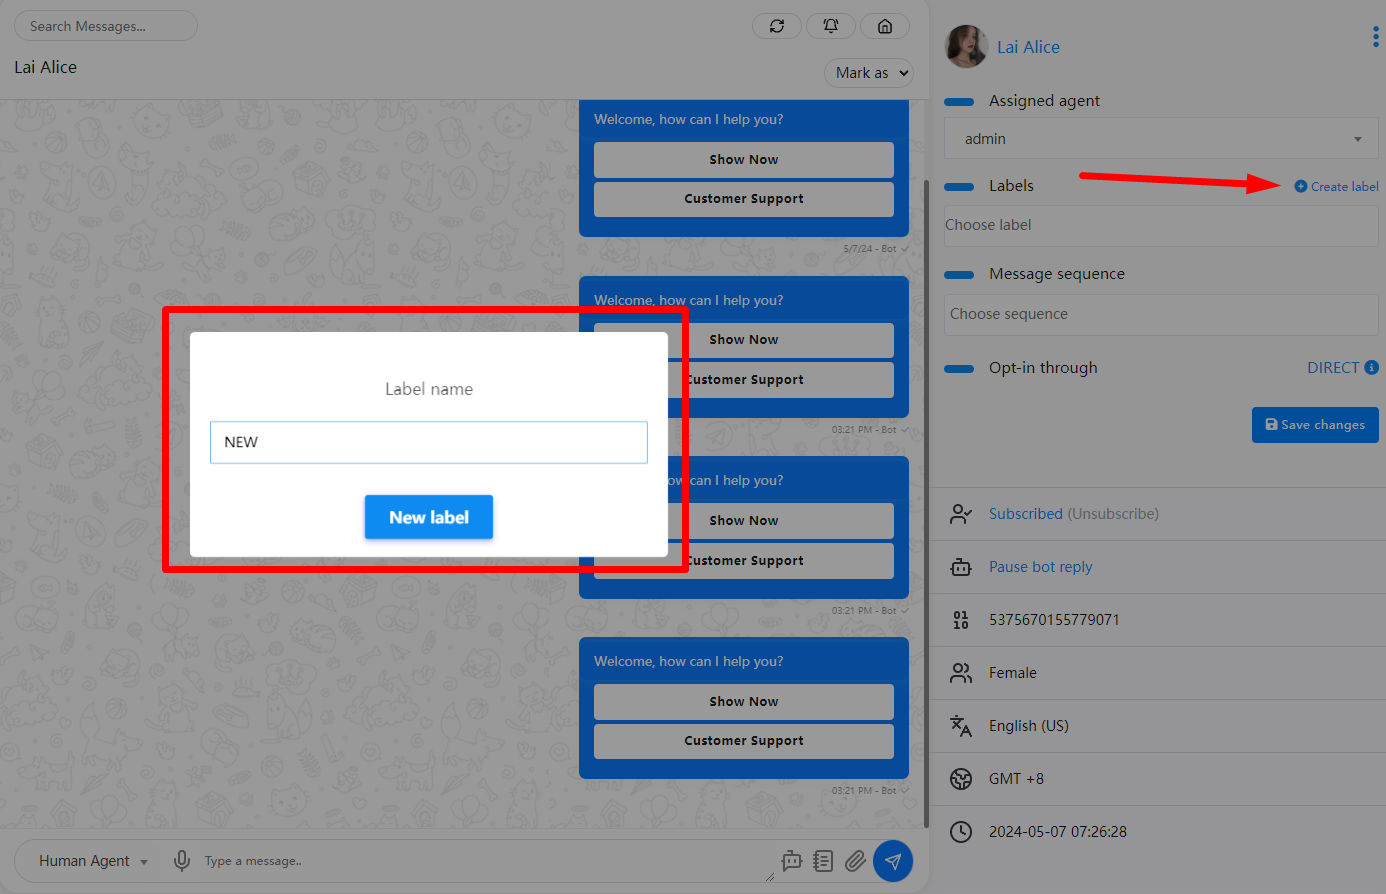
Moreover, you can create a new label from here. Click on the create label button and a modal form with one field will appear. Write the name of the new label in the field and click on the new label button, and the label will be created and selected in the field automatically.
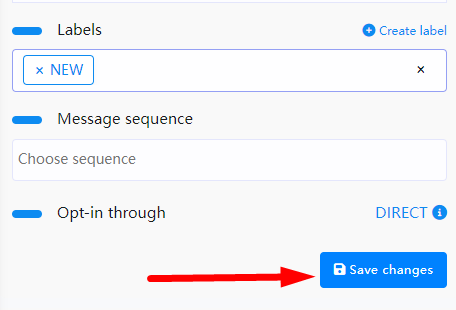
After you have selected labels in the Labels field, click on the save changes button to save the changes.
Message Sequence
Here you can custom assign Message sequences to specified subscribers, or cancel or delete their current Message sequences.
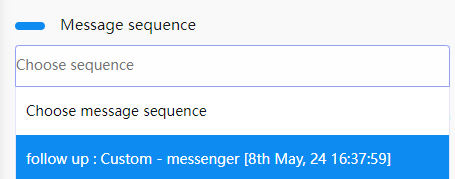
Select Message sequence and click Save
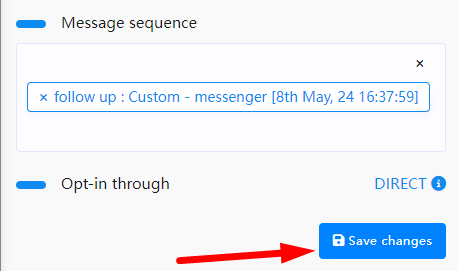
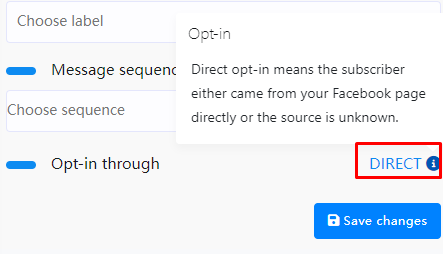
Opt-in through
Well, in the opt-in through option, you can see whether the subscriber has come directly through the Facebook page or the source is ADS. If you see the word Direct beside the opt-in through, you know that the user has come through the Facebook page or the Instagram account directly
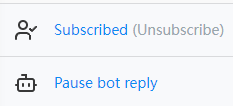
Status
By clicking on the status button, you can unsubscribe and resubscribe a user. And by clicking on the bot status button, you can pause and resume the bot reply.
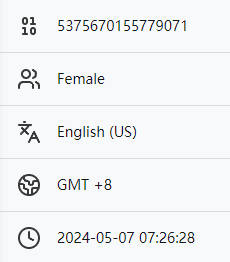
Primary Information
You can see the primary information of the subscribers– subscriber ID, gender, language, time, and date.
Bot manager
How to build bot with flow builder
In this article, you will be shown how to create a Facebook Messenger bot using FransChat Flow Builder. Follow the article’s step-by-step instructions to create an interactive Facebook Messenger bot.
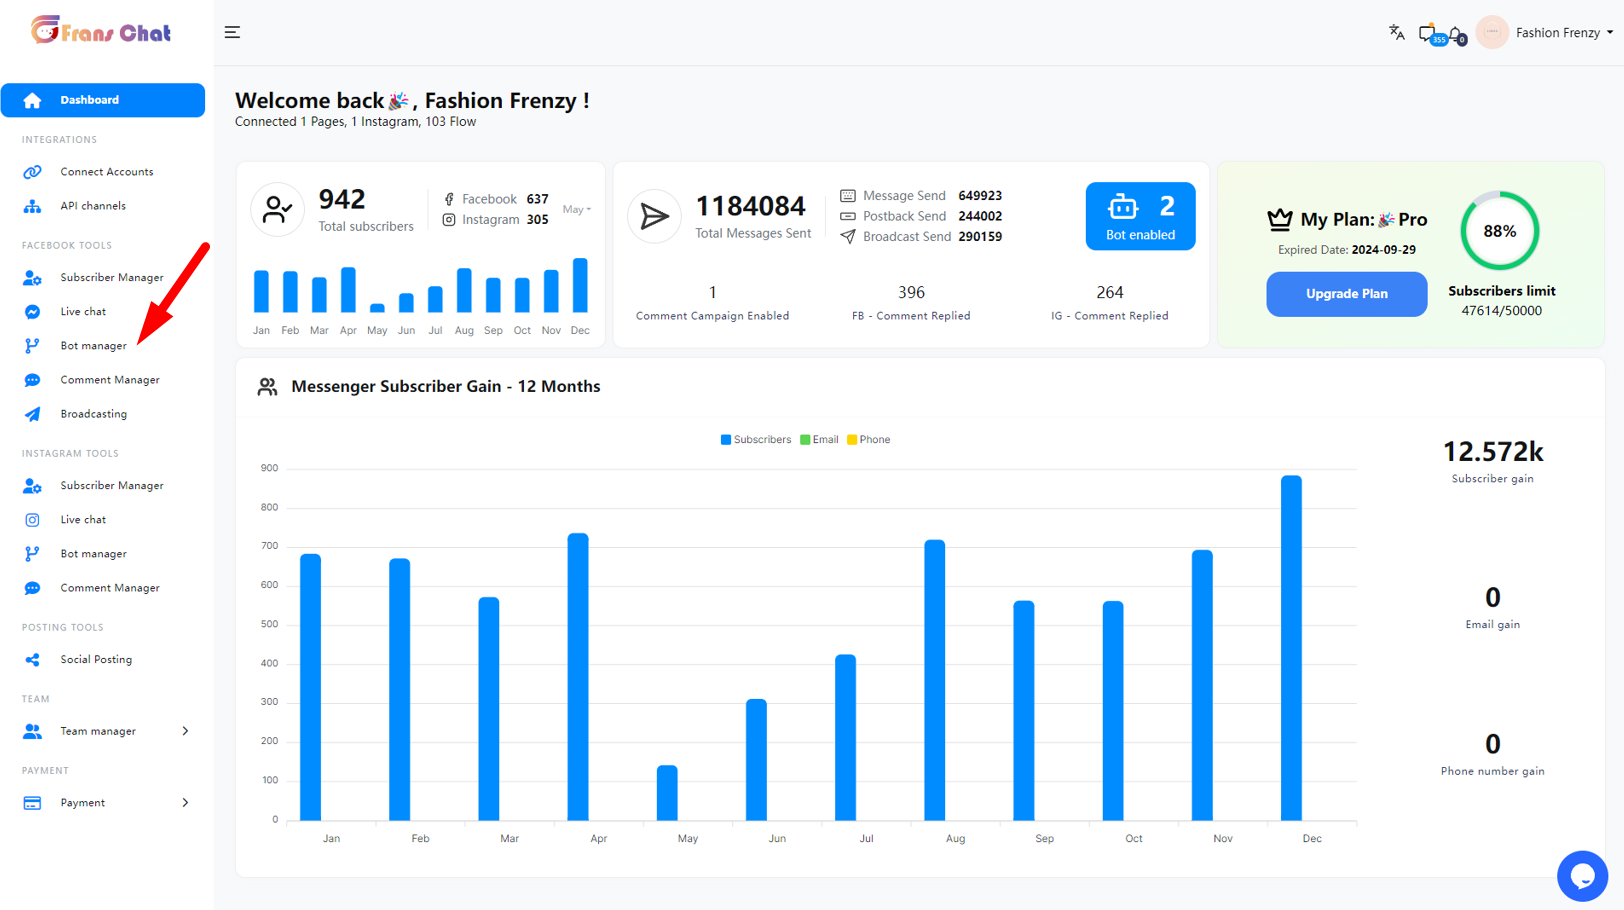
To build the bot, first, go to FransChat dashboard. Now in the Facebook Tools menu, click on the Bot Manager option in the left sidebar of the dashboard.
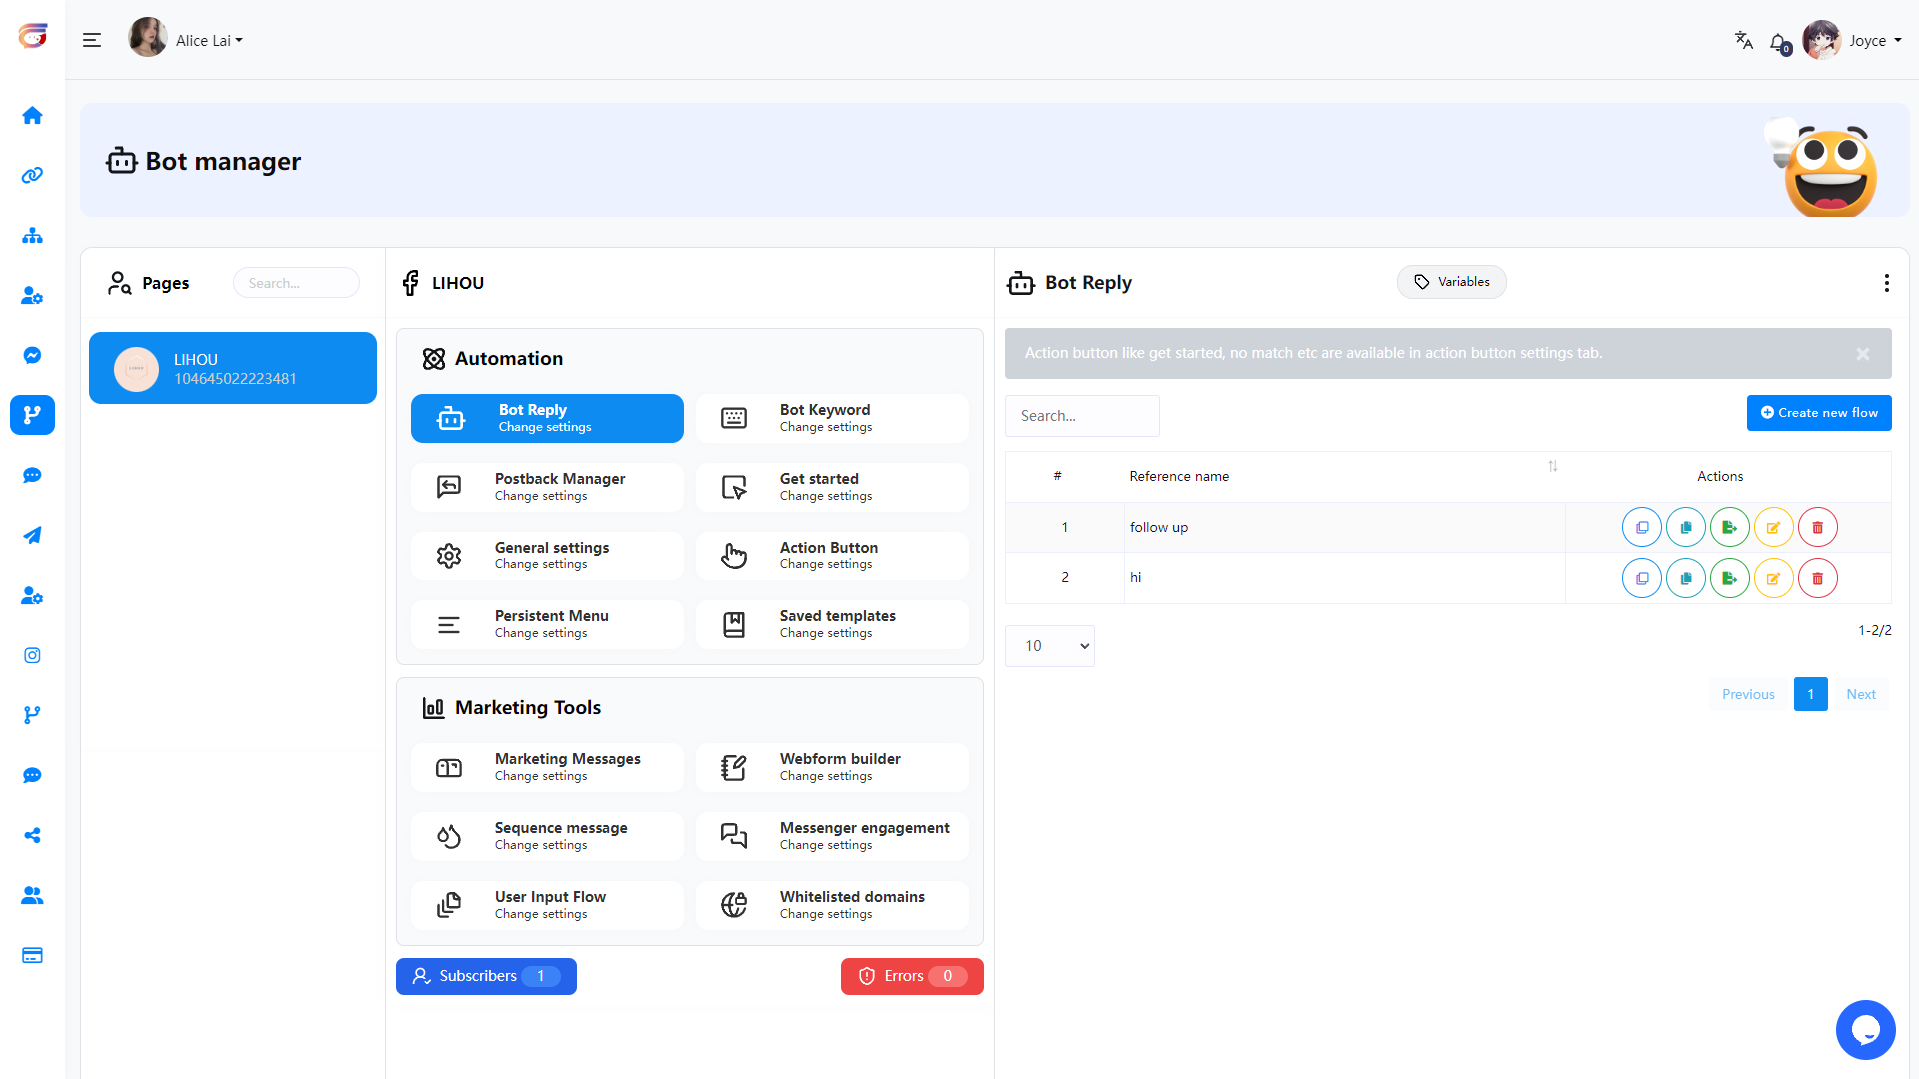
After entering the Bot Manager, you can see an interface like this, which is divided into three sections.
- The area on the left is your currently enabled Facebook Page. Select which Page to edit.
- The middle area is the menu options. When any menu item is selected, the screen will be displayed in the right area.
- The area on the right is the creation and list section, where you can create and view the currently created Flow
Now let’s follow the steps to continue to understand the function of each menu
Bot Reply
Visual Flow Builder Editor
Well, to build a bot, click on the “Create New Flow” button.

And instantly, the editor of the Flow Builder will appear. The editor is divided into two parts – Doc-menu and editor. On the Doc-menu, all the components are gathered together.

To build a bot, you have to drag components from the Doc-menu and drop them on the editor. Then you have to configure the components and connect them to each other. On the Doc-menu, there are 13 components.

Add components without dragging from Doc-menu.
You can also add components without dragging the component from the Doc-menu and dropping it on the editor. From the next output of any component, drag the cursor and drop. And instantly a menu of the different components will appear. And from the menu, select a component and the component will appear on the editor connected with the mother component.

When all components are connected, click the save button on the upper right to run.

Next, we will explain to you the use of each component in detail.
Start bot flow
On the Editor, you will see an element called start bot flow. This component is essential to building the bot. Double-click on the Start bot Flow element and the Right Sidebar called Configure Reference will appear.

The instructions in the Configure Reference of “Start bot flow” can be divided into two parts.

The first is the upper part, where you set the trigger keyword for the entire Bot Flow reply.
For example: We enter “Hi” in the input box. You can also set multiple similar keyword combinations, but you must provide keywords separated by commas, such as “Hello, Hi, Start”. When a user sends a private message to your Page Then enter the keyword “Hi” or “Hello, Hi, Start” to trigger an automatic reply behind the Start bot flow component.
You can also choose the match type – exact keyword match and string match.
- Exact keyword match – this will only be triggered when the user must enter a complete match of the keyword
- String match – triggered if the field entered by the user contains keywords

Next, the second part of the “Start bot flow” configuration is explained.
- Title – Give the “Start bot flow” a name
- Add label(s) – Add a label (when the user triggers this Start bot flow, a label will be automatically added to the user to facilitate subsequent classification of different user groups)
- Remove label(s) – Remove labels (when the user triggers this Start bot flow, a specific label currently owned by the user will be automatically removed)
- Subscribe to sequence – When the user triggers this Start bot flow, the user will automatically subscribe to the sequence (mainly used for Follow Up)
- Unsubscribe from sequence – When the user triggers this Start bot flow, the user’s current subscription sequence will be removed (when the user has subscribed to the same sequence once and completed the automatic message push, the system will not re-subscribe the user to the same sequence again. , even if the user triggers the Start bot flow again, it will not resubscribe. At this time, you can use the “Unsubscribe from sequence” method to remove the user’s sequence at a certain stage)
- Assign conversation to a group – Assign the current conversation that triggered this flow to a specific team role.
- Assign conversation to a user – Assign the current conversation that triggered this flow to a specific team user.
- Send data to webhook url – This function will be integrated with third-party applications. When the user triggers this Flow, a webhook notification will be sent to the URL address filled in. You can go here to view the currently created webhook notification.

After the settings are completed, click Done. Now you can see that the “Start bot flow” component has displayed the Title name you set, as well as tag information such as keywords.

Compose next massage – This connection point represents the next response content after triggering this component.

Text
If you want to build a bot with a text element, drag the Text Component and drop it on the editor. Now double-click on the component and a sidebar called Configure Text Message will appear with a text field. In the text field, you have to provide your reply message. You can include the first name or the last name of the user in the reply message.
You can also enable typing on display by turning on the radio button. Then you can select the delay time in reply in seconds.
Now click on the Done button and the information will appear on the component. Then connect the text component with the Start bot flow component.

Include Custom variables in the reply message
Besides, you can include custom variables in the reply message. Click on the button called custom and a drop-down menu of different variables will appear. And from the drop-down menu, select a variable. The custom variable will be replaced by the actual value before sending it.
NOTE: To learn how to create custom variables, click here

Image, Audio, Video, and File component
Likewise, you can add Image, Audio, Video, and File components. For these components, you have to upload an image, audio, video, and file respectively. Then you have to connect the components with other components.

Upload an image
After the upload is completed, click Done to see the uploaded file in the component. In addition, you can also directly enter the file address URL in the input box without uploading.

FB Media
To add FB Media component, drag the FB Media component from the Doc-menu and drop it on the editor. Now double-click on the FB Media component and the right sidebar called Facebook Media URL will appear. In the Facebook Media URL field, put your Facebook Page media URL.
You can enable typing on display and select time in seconds for the delay in reply. Now click on the done button and the Facebook page media URL will appear on the component.

Card
To add Card Component, drag the Card Component from the Doc-menu and place it on the editor. The Card component will appear with a button component. Well, now double-click on the Card component and a right sidebar called Configure Generic Template will appear. Now upload an image. After uploading an image, paste a link in the image click destination link field. When a user clicks on the image, the user will be redirected to the URL. Now write a title in the Title field and a subtitle in the Subtitle field.

Then you have to configure the Button Component
Read the following section to know how to add and configure the Button Component.
Button
To add Button component, drag your cursor from the button output of a component like the Text or Card component and drop. Instantly, the Button component will appear connected with the mother component.
And sometimes the button component automatically appear connected with other component, such as Card and Carousel component.
Now double-click on the button component and a right sidebar called configure button will appear. Now write a text in the button text field – the text will appear on the button.
Then you have to select the button type from the “When user press the button” field. Clicking on the “When user press the button” field will display a drop-down menu – Send Message, Start a flow, Redirect to website url, Webview [full], Webview[compact], Webview[tall], Call us, Sysyem default action button

When user press the button - Button types
We’ll explain how to use each option one by one

Send message
Select “Send message” on the button type and click on the done button.
You can see that when “Send message” is selected, the configuration button is similar to “Start bot flow”. “Send message” in each button is equivalent to a new “Start bot flow”. Now we can configure the user click in the button What will be triggered after this button. For example, we can set add tags, remove tags or Subscribe to sequence. For specific settings, see the “Start bot flow” section.

Now you can continue to connect to the next conversation after “Send message” type.

Start a flow
If you select “Start a flow” as the button type, a “Flow name” field will appear. You must select a Flow from the “Flow name” field. Click on the “Flow name” field and a drop-down menu of different flows will appear. Then select a Flow from the drop-down menu. Then click the “Done” button. The Flow name will appear in the Action type on the button component.

Redirect to website url
If you selectRedirect to website url, Webview [FULL], Webview [TALL], Webview [COMPACT], another field will appear. And in the field, you have to paste an URL. Now paste a URL and click on the done button. After that, the URL will appear on the Button component.
For the Webview type, your experience will appear as a layer overlaid on top of the conversation, displaying at full screen, 75% height, or 50% height, depending on your content and use case


Call us
Select Call us button from the drop-down menu of different button types and instantly, another field called Mobile/Phone number will appear. Now you have to provide your phone number in the field. Then click on the done button.

System default action button
Form the “System default action button” type field, you can select User email, User birthday, User phone or User location, Unsubscribe button, Resubscribe button, Chat with human, Chat with robot. After selecting any from the button type, click on the done button. Instantly the button type will appear on the button.
For specific settings, please refer to the “Action Button” article, click here

Quick Reply
To add a quick reply component, drag and drop your cursor from the quick reply output of a component such as a text or card component. Immediately, the quick reply component will appear connected to the parent component.
Now double-click on the “Quick Reply” component and a right sidebar named “Configure Quick Reply” will appear. Now, in the Quick Reply Type field, you have to select the Quick Reply Type. Click on the Quick Reply Type field and a drop-down menu of different types of quick replies will appear – Send message, Start bot flow, Phone, and Email.
(Note: More than 3 quick reply components can exist at the same time under the same component.)

Send message as quick reply type
Select send message as the quick reply type, and instantly a field called button text will appear. Now you have to provide a text for the button in the button text field.
For labels, sequence, assignment, and webhook are basically the same as buttons.

After setting the quick reply button text, we can connect a new component, such as text, below the quick reply component.

Start a flow as quick reply type
If you select Start a flow as the quick reply type, two fields – button text and postback id will appear. In the button text field, you have to write a text for the button. And from the flow id field, you have to select a flow. Click on the flow id field and a drop-down menu of different flow id will appear. And from the drop-down menu, select a flow id. And click on the Done button. And the flow id will appear on the Quick reply component

Phone as quick reply
Just select phone as the quick reply type in the quick reply type field and click on the done button. In this case, the quick reply will collect your phone number from your Facebook Profile and show in the messenger. When a user clicks on the phone number, the system will receive the phone number. And the user will get a message that the system have received your phone number.

Email as quick reply
Just select Email as the quick reply type in the quick reply type field and click on the done button. In this case, the quick reply will collect your Email address from your Facebook Profile and show in the messenger. When a user click on the phone number, the system will receive the email address. And the user will get a message that the system have received your Email address.

Carousel
To add a Carousel component, drag the Carousel component from the Doc-menu and drop it on the editor. Instantly, the Carousel component will appear with three carousel items connected with the Carousel component and three button components connected with the three carousel components.
Now double-click on the Carousel component and the right sidebar called configure Carousel will appear. In the sidebar, you can enable typing on display and select delay in reply time in seconds. Now click on the Done button.

Carousel Item
Now come to the carousel Item component. Double-click on the carousel Item button and the right sidebar called Configure Carousel Item will appear with some fields.
Now upload an image. After uploading an image, paste a link in the image click destination link field. When a user clicks on the image, the user will be redirected to the URL. Now write a title in the title field and a subtitle in the subtitle field. Enable the typing on display and select delay time in seconds.
Likewise, you have to configure the other two carousel items.
Now you have to configure buttons. You already know how to configure buttons.
You can add other components with the button components if you want.
Now click on the save button or press ctrl + S and your bot will be saved.

Conditional Reply
With the condition add-on, you can build a condition and rules-based messenger bot that can talk to people intelligently. For example, if the user is male, the bot will call him Mr. On the other hand, if the user is Female, the bot will call her Miss/Mrs. And if the system already has the email number of a specific user, the bot will inform the user that the system already has the email number. Contrarily, if the system doesn’t have the email number of a specific user, the bot will ask for the email number from the user.
In this article, I will show you how to build a condition and rules-based messenger bot on the Flow Builder.
To build a condition and rules based messenger bot, you have to use an element called condition that will work as the entry point of the conditional conversation.
Let’s see how to build condition and rules-based messenger bot.

Add conditional elements via drag and drop and connect them with Start Bot Flow. Now double click on the conditional element. A form field will immediately appear on the right side of the editor. At the top of the form field, you’ll see two radio buttons – Match All and Match Any. You must select Match All or Match Any.
Please note:
1. If Match All is selected, all conditions must be true for the expression to be evaluated.
2. If you select Any Match, at least one condition must be true for the expression to be evaluated.
Since we only configure one condition, you can choose any of them.

Then you will see the system field and the custom field. Both the system field and the custom field contain initial fields to configure conditions. Of course, by clicking on the plus sign next to the system field and custom field, you can add more fields to configure conditions on them. Of course, you can remove extra condition by clicking remove button.

Let’s set a condition to check if the user is male or female and send messages accordingly:
Click on the Variable field and a drop-down menu of the different variables will appear. Now you have to select a variable. Likewise, you have to select an operator from the operator field and a value from the value field.
I select Gender as the variable, and Equal(=) as the operator, and Male as the value. Now I click on the ok button to insert data to the condition element.
In addition to this, you can also use Label and other conditions

On the condition element, you will see two sockets – True and False. If the condition evaluates to true, the message connecting to the True socket will be sent. Contrary, if the condition evaluates to false, the message connecting to the False socket will be sent.
Well, now add a text element and connect it to the socket called True. Then write a message addressing the user as Mr. the message that will be sent to the male users.
Likewise, add another text element and connect it to the False socket and write a message, addressing the user as Miss/Mrs, the message that will be sent to the female users.

Now add a button element and connect it to both text elements. Well, write a button text and select send message as the button type and click the ok button. Instantly, a send message element connected to the button element will appear. Now give a title for the Send message.
Now I will set another condition to see whether the system has the email address of the user or not. If the system has the email address of a user, the bot will inform the user that the updated information will be sent to the email address. On the other hand, if the system doesn’t have the email address of a specific user, the bot will ask for the email address from the user.
Let’s set a condition to check if the system has the email address of a specific user or not and send messages accordingly:
Add condition element and connect it to the send message element. After that, click on the condition element to configure a condition. If you configure one condition, it doesn’t matter whether you select All Match or Any Match.
Like before, select Email as the variable and Has Value as the operator. And click on the ok button. That’s all. The condition is set.

Now add two text element and connect them to the true and false sockets of the condition element. Now click on the text element connecting to the true element and write a text message to inform the user that the updated information will be emailed to the user.
Then click on the other text element connecting to the false socket and write a message to inform the user that the system doesn’t have the email address and tell the user to click on a quick reply button to send the email address.
If the condition becomes true, the text message connecting to the True socket will be sent. On the other hand, if the condition becomes false, the text message connecting to the False socket will be sent. That is if the system has the email address of a specific user, the bot will inform the user that the updated information will be sent. And if the system doesn’t have the email address of a user, the bot will ask for the email user.
Now add a quick reply button and connect it to the text element connecting to the false socket. Double-click on the quick reply element, select email as the Quick Reply type and click on the ok button. With the reply button, the bot will collect the email address from the user.
Now click on the save button or press Ctrl + s on the keyboard to save your bot.
If everything is ok, the bot will work accordingly. That is, if the user is male, the bot will address him as Mr and if the user is female, the bot will address her as Mrs/Miss. Moreover, if the system has the email address of a user, the bot will inform the user that updated information will be emailed to the user and if the system doesn’t have the email address of a specific user, the bot will ask for the email address of the user.
If you need to customize the next reply content when the user enters an email, you can use the (user input flow) element. Here I will make a simple demonstration. For the specific use of the (user input flow) element, you can view (user input flow) explanation.

New Sequence
Sequence, this function is mainly used to send multiple messages at different time periods.
For example: after a user registers for certain activities, segmented reminders are sent to the user after a fixed time, or it is used for product promotion and follow-up with customers.
Next, let’s take a look at how to set up Sequence

First, we need to find the Subscribe to sequence option in the Start Bot Flow element or in each button.
If you have already created a sequence, it will be displayed in the drop-down list. If you don’t have one or want to create a new one, select (New sequence). You will then see the Start Bot Flow or button automatically display an additional connection block for the sequence.

Next, we need to set it in the New sequence element. First, we double-click the New sequence element. In the menu on the right, we need to set (Sequence Name). The name is used to facilitate our understanding of the purpose of this sequence later.
Next, the following settings need to be set according to the situation.
1. First, if your sequence is about promotional information and the time to send the message is within 24 hours, then we can directly proceed to the next section (Send message after) to set the time to send the message without setting it.
2. If the message you send is more than 1 day later, then we need to set the following parts.
Starting Time and Closing Time – This time setting is about the time range when sending the Sequence message. Generally, if there is no time range required to send, select 00:00.
Time Zone – Select the time zone for sending the message according to your needs
Message Tag – Select the correct Message Tag according to the content of the message you send. For details, please refer to the following
| Message Tag | DESCRIPTION | ALLOWED | DISALLOWED (NON-EXHAUSTIVE) |
|---|---|---|---|
| Send the user reminders or updates for an event they have registered for (e.g., RSVP’ed, purchased tickets). This tag may be used for upcoming events and events in progress. |
|
|
| Notify the user of an update on a recent purchase. |
|
|
| Notify the user of a non-recurring change to their application or account. |
|
|
| Allows human agents to respond to user inquiries. Messages can be sent within 7 days after a user message. |
|
|
| News messages allow news publishers to send regular news updates to their subscribers in Messenger. This feature is only available for registered news Pages under the | Registered news Pages under the Facebook News Page Index (NPI) | Read Policy Details here |
Send message after
Two time periods can be set here
1. Promotional – limited to sending within 24 hours
2. Non-promotional – limited to sending after 1 day, and can be sent within 30 days at most


When setting the Send message after element, 3 blocks will be added by default. You can delete or add Send message after according to your needs.
After setting the completion time, we can connect the content to be sent in (Compose & schedule message) below the Send message after element

Now we can select the content to be sent. If you plan to send the same content every time period, you can connect them all in one element.

If the content sent in each period is different, you can also connect new message elements separately
Now we have completed the settings for Sequence. Now, whenever a user triggers (Start Bot Flow) or (Button), if a Sequence is set, the user who triggered these elements will be automatically subscribed to the Sequence and the sending time will start.
In addition, every time a user completes the subscription to the Sequence, the next time the user triggers (Start Bot Flow) or (Button) again, the user will not subscribe to the same Sequence again.
If you need the user to re-subscribe to the Sequence every time the (Start Bot Flow) is re-triggered, I suggest that you can set the Sequence in the button part after (Start Bot Flow), and set (Unsubscribe from sequence) in (Start Bot Flow) and select the Sequence that has been set afterwards.
In this way, every time a user triggers (Start Bot Flow), the Sequence will be unsubscribed first, and then re-subscribed in the subsequent button part.
User Input Flow
User Input Flow is a form that collects user information. I will explain the specific settings in detail below.
First, we need to add the User Input Flow element to the flow. You can choose to connect the User Input Flow after the Start Bot Flow, or connect it to any other element in the flow that can connect to the next piece of information.

Now double-click the User Input Flow element. In the drop-down menu on the right, if you have created a User Input Flow template before, it will be displayed.

You can directly select the Campaign template you created before to use

If you need to create a new one, you can select (Add new input flow).
Next, you need to set a name for this User Input Flow activity. After completion, click Done and you will see a new (New Question) element automatically added.
New Qusetion
Now we double-click the New Qusetion element to set the form questions.

Now we can see that there are two question types in the menu on the right
1. Free Keyboard input (anything the user enters will be considered as an answer)
2. Multiple Choice (several options are set by default, and the user can only choose from the options and it will be considered as an answer)


You need to choose which question type to use based on your current question. Next, we need to enter your question in Question. If you choose (Multiple Choice), you will also see two option boxes below (Option 1, Option 2). If you have more answers, you can continue to add them.


Free Keyboard input is suitable for asking users information, such as name, email, phone number, address, etc. Users can enter the answer at will.
Multiple Choice is suitable for giving an option, and users can choose one of your options as the answer.

Next, let’s continue to understand the settings in the second half. The settings here are
1. Reply type
2. Save to custom field
3. Save to system field
4. Assign to labels
5. Assign to a messenger sequence
6. Assign to an email/phone sequence
7. Skip button text
Let’s explain them one by one. First,
1.Reply type
Determine the type of the user’s answer based on your question. For example, when your question is (Your Name?) This question belongs to a text reply (general answer), then we need to use Text in the reply type.
If your question is (Your Email?) At this time, the user’s reply is ([email protected]) This type, we need to set type to (Email)
Even if the user inputs the email included in a piece of information, the system will extract the correct email separately. For example, if the user’s reply is: (My email: [email protected]), the system will filter (My email:) and extract the correct ([email protected]) and save it to the system.
Currently, the reply types are as follows
Text, Email, Phone, Number, URL, File, Image, Video, Date, Time, Datetime

In addition, when you select Email, Phone, an additional option will be displayed
- Attach email quick-reply
- Attach phone quick-reply


When selected, when the user answers this question, Facebook will automatically obtain the user’s email and phone number as a quick-reply and automatically display it in the user interface, allowing the user to select without inputting.
Conclusion: According to your question, select the corresponding reply type according to the type of the user’s reply. Then the system will judge whether the user’s reply is correct. If it is not correct, it will send an error message to prompt the user that the current reply information format is incorrect and ask the user to answer again.
2.Save to custom field
A custom field stores the user’s answer in the corresponding field, for example: field name = User Name
We ask the user’s name, and when the user replies, we save the answer under User Name. Later, when we view the user’s answer, we can see the corresponding table
User Name | Michael Johnson

To create a custom field, click Add New, and an input box and a drop-down list will appear.

Now we need to enter a name in (Custom field name), and then select the type corresponding to this name in (Reply type). Click Save when you are done.


Next, we can see the custom field we just created in the selection box.
3.Save to system field
system field, this is the system default field. Currently, there are only 4 options: Email, Phone, Birthday, and Location. When these answers are obtained, they will be saved in the user’s system field. You can directly see the user’s detailed information in the subscriber details.

4.Assign to labels
When the user completes the question, you can add a label to the user

5.Assign to a messenger sequence
When the user completes this question, the user can be assigned a subscription sequence
6.Assign to a email/phone sequence
When the user completes this question, the user can be assigned to subscribe to the email/phone sequence
For more information about email/phone sequence, you can visit this article

7.Skip button text
If this question allows users to skip, you can set this button and enter the name of the skip button in the input box.
If it is not set, it means that this question cannot be skipped. If the user’s answer does not match the reply type, it will continue to ask until the correct reply type is obtained.

Next, let’s continue with the setup

When we select Multiple Choice, after completing the settings, we can see the multiple choice questions under the question in the (New Qusetion) element, as well as other settings.


Now we use Free Keyboard input to do a complete tutorial

Next, you can see two options in the connection below the (New Question) element
1. Compose next message (If you have another question, you can connect this option to continue asking the next question)

2. Final reply (If your question ends here, then connect this option to end this User Input Flow and connect to other reply elements)

In the above demonstration, we asked two questions
- Your Email
- Your Phone
After the end, I connected the Text element to reply, and these questions were saved to the corresponding system field
We can use system variables directly in Text, and when actually replying to the user, the system variables will be converted into the user’s answer.

If you have a lot of questions and you are worried that the user may choose the wrong answer during the input process, you can add a button at the end and reconnect the (User Input Flow) element and select the campaign you just created.
If the user needs to re-answer the question, they can click the button and re-answer with a new answer.
Marketing Messages
Marketing messages allow a Facebook Page or Instagram professional account to send messages to a user after the standard message time frame, with the user’s permission. You can use marketing messages to build relationships with users who are interested in you or your business.
Next we will explain how to use the marketing message feature

First, drag and drop the “Marketing messages” component from the menu onto the editor.
Then double-click the “Marketing messages” component. In the pop-up menu on the right, we need to make some settings.
First, “Title”, this name will be displayed in the Title of the subscription message.
Next is “Marketing messages postback ID”. If you have created Marketing messages before, it will be displayed here. If not, you can select “New Marketing messages” to create a new Marketing message.
Next, we need to select an image. You can use the image related to your Marketing messages as the cover.
After completion, we can click “Done”, and then you can see that the Marketing messages component has updated the message just set on the editor, and then a new component “New Marketing messages” will be automatically connected.

Now double-click the “New Marketing messages” component. We need to set the template name of this Marketing message in the pop-up menu on the right, so that we can know the purpose of this Marketing message later.

Now that we have completed this, we can connect the next reply in the next message. In the demo, when a user receives a subscription request from this Marketing messages, when the user clicks the subscribe button, we will reply to the user “Thank you for your subscription😍”
If you need to Create a campaign on Marketing Messages Broadcast, you can check out this article for details. Click here
Ai Reply
Ai Reply component is a component that can automatically reply to users using AI model. To use Ai Reply, you must first set up OpenAI API. You can check this article for more information. Click here
If you only need to use AI in a specific process, you can set it in the usual Visual Flow Builder Editor, but there are limited ways to invoke AI. You can set keywords. For example, we set a keyword “ai” in “Start Bot Flow”. When the user enters a question, append “ai” to let AI reply, for example:
1. Hello, can I learn about your product? ai
2. @ai, Hello, can I learn about your product?
This approach has certain limitations. Users must enter prompt words to wake up. In addition, if you need to use AI to reply completely, you can enable the connection of Ai Reply component when there is no matching reply. In this way, when the user inputs content that does not exist in all the keyword flows you currently set, AI reply will be enabled. You can check this article for more specific settings. Click here

Ai Reply component, drag the Ai Reply component from the component menu to the editor, double-click the Ai Reply component, and in the text input box on the right menu, you need to enter the AI prompt word.
Generally, the prompt word entered in the Ai Reply component is how you want the AI to reply, such as what tone to use, or what content cannot be replied. When the AI receives a message other than the prompt word, how should it reply to ensure that the AI does not reply to things other than your business.
Bot Keyword
Keywords play a very important role in automated replies. When you create a Flow, you can enable a keyword for this Flow to trigger it. For example, we set one or more keywords “hi, pm, dm” in this Flow. Now when the user enters the corresponding “keyword” in the messenger, this Flow will be triggered.

In the menu Bot manager Automation Bot Keyword , all the keywords currently created in the Flow will be displayed. You can also click the “Set Keyword” button here

In the Visual Flow Builder Editor, you can set keywords in Start bot Flow to start this Flow.

After saving the Flow, you can see the currently created “keyword” in the Bot manager Automation Bot Keyword page. In addition, the status “Live” is displayed, which means that this keyword is currently enabled.

If you need to disable a keyword, you can set the keyword to “Stop” in Actions.

At this time, “Paused” will be displayed in the keyword status, and the keyword will not be triggered.
Postback Manager
In the menu Bot manager Automation Postback Manager , this generally displays the postbacks in all current Flows. Normally, we will not use this, but if you need to use it for Facebook click to messenger ads, then we need to get the Json Code here.

First we must create a new Flow for ADS, but make sure you have created the main Flow, which will be used for subsequent button postbacks.
In the Visual Flow Builder Editor, if you want to create a Facebook ads flow, there are some limitations
1. Only one message is allowed (can be paired with a button or quick reply)
2. For ads avoid putting first name, last name, direct link of webivew form, direct link of ecommerce store. These will not work.

To start the entire Flow when setting up the button you can use “Start a flow” and select the button of the previously created Flow as the postback.

After creating the ADS Flow, you can return to Bot manager Automation Postback Manager to see the name of the Flow you just created. You can click the icon in the figure to get the Json code

You can copy the json code and go to Facebook Ads Manager to set it up.

In Facebook Ads Manager, select “Partner app” in “Message template” and click Select flow

Next we click “Enter JSON Code”

We need to delete the default Json Code

Next we need to paste the JSON Code we just copied into it

If everything goes well, you will be able to see the ads flow you just created.

Next, click “Save” and you’re done. You can also click “Preview in Messenger” to test it.

You will then receive a test message from your Page in your Facebook account.
Get started
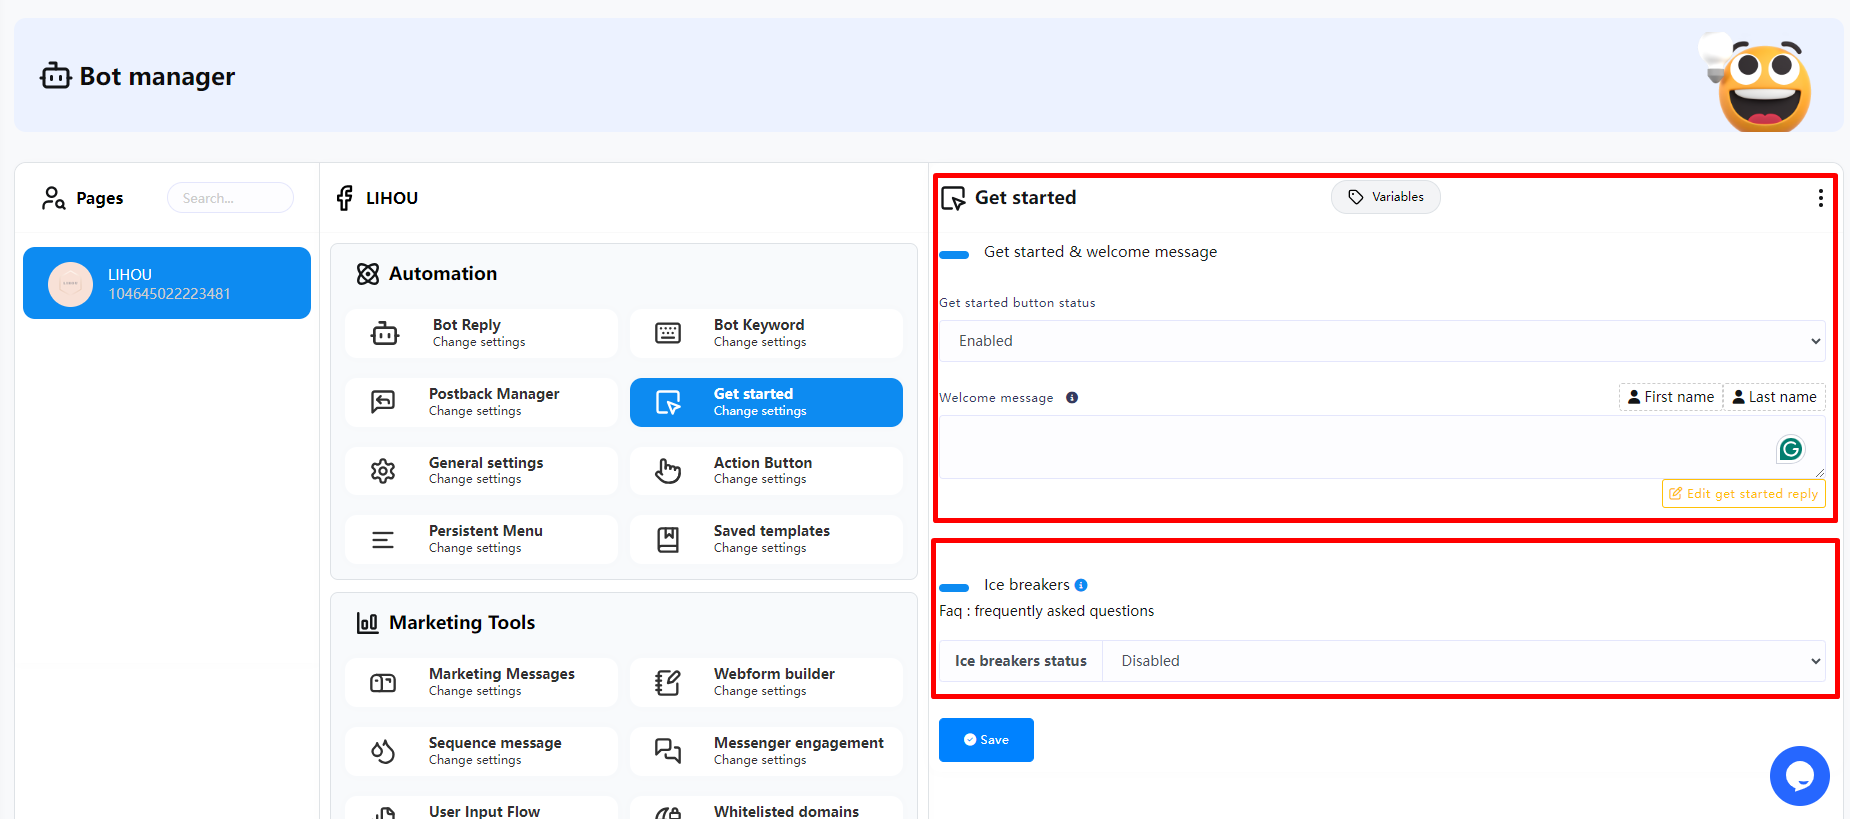
Get started & welcome message
The greeting text on the welcome screen is your first opportunity to tell a person why they should start a conversation with your messenger bot.
Some things you might include in your greeting text might include a brief description of what your bot does, such as key features,or a tagline.This is also a great place to start establishing the style and tone of your bot.Greetings have a 160 character maximum,so keep it concise.
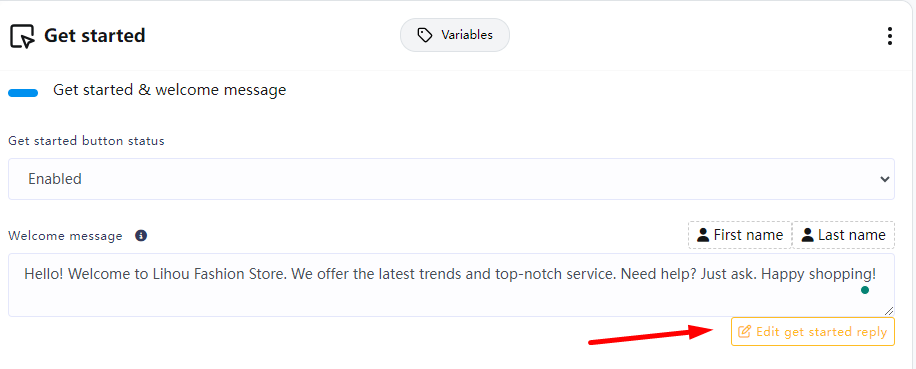
We can click “Edit get started reply” to edit the reply content when the user clicks the “Get started” button.
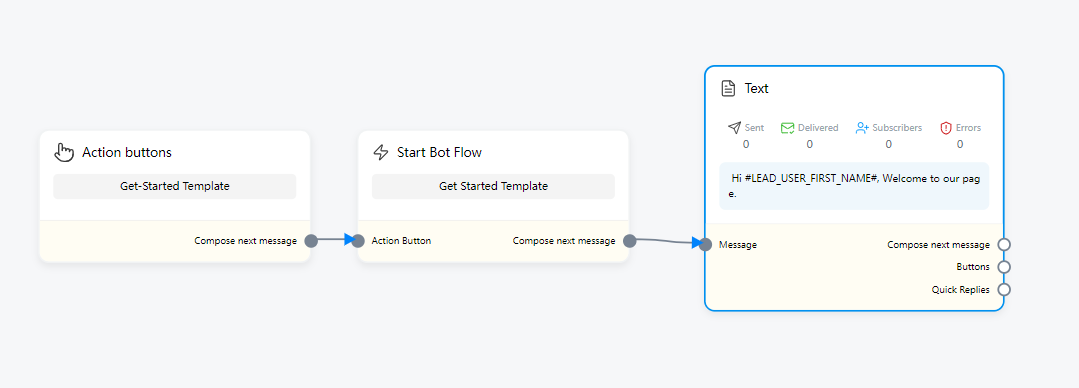
After entering the edit page, we only need to modify the content in the “Text” component. You can also add buttons, etc.
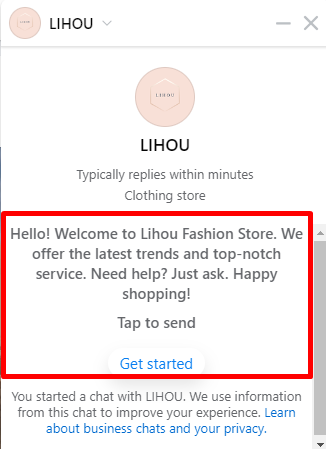
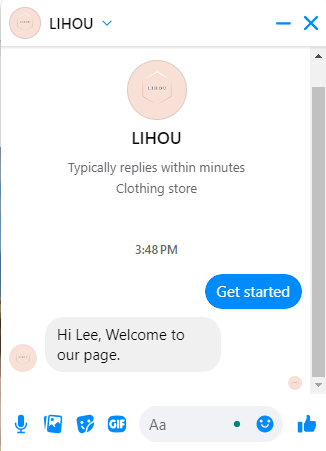
Ice breakers
In Ice breakers, you can set up some frequently asked questions about your business or products.
Page profile priority
Some of the profile elements like ice breakers and get started button are incompatible with each other. So when both are set one will take precedence over the other. Here is the priority from highest to lowest:
- Api ice breakers
- Get started button
- Custom questions set via the page inbox ui
NB: Editing custom questions from the page inbox ui is disabled when ice breakers are set via api. This is to prevent breaking the experience set by the installed app.
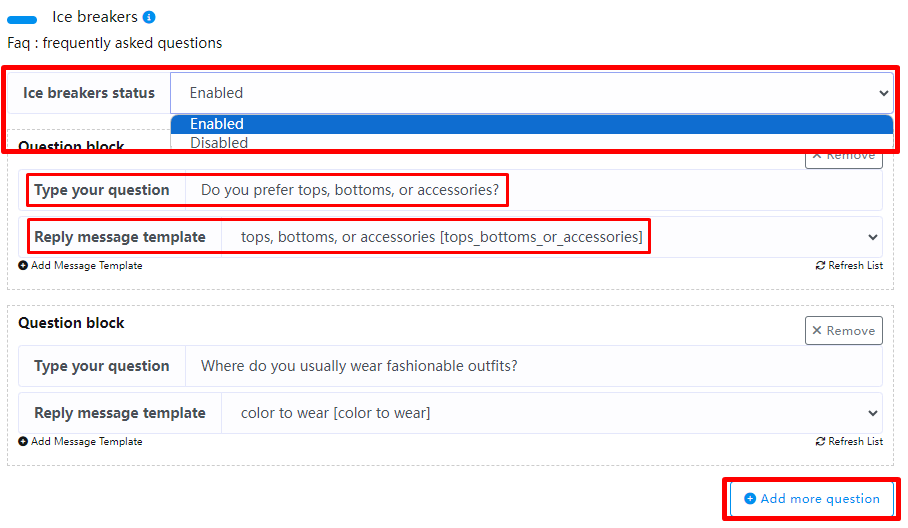
If you need to use Ice breaker, you can enable Ice breaker, then enter some common questions in the questions below, and the corresponding response flow (you need to create a response flow for the questions first)
If you need to create multiple questions, you can click the “Add more question” button below to add more common questions.
Finally, click Save
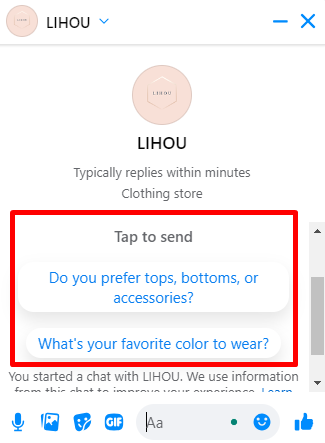
Now when new users click on your Facebook page message, the “Get started” button will not be displayed but will be replaced by the FAQ.
General settings
In General settings, we can enable some fixed settings for Facebook Page Bot.
Mark as seen status
After enabling Mark as seen status, every time a user sends a message to your Facebook Page messenger, the Bot will automatically mark the message as read.
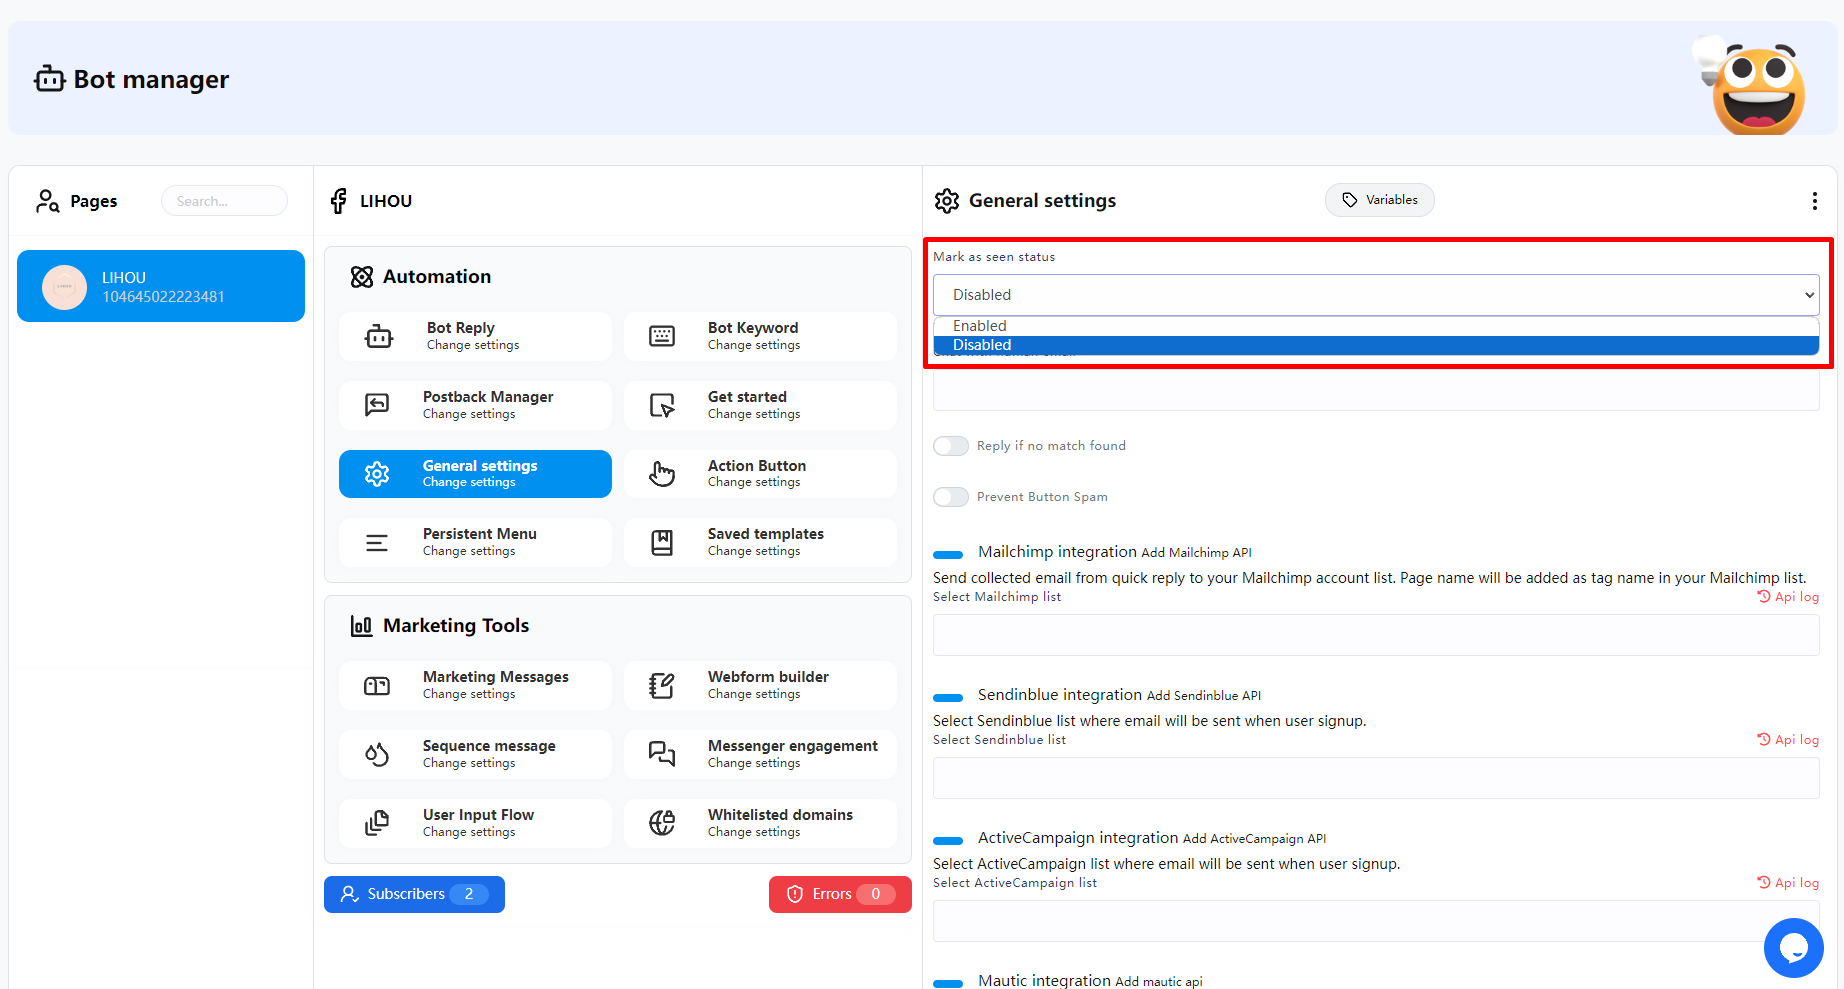
Chat with human email
When you use the “System default action button” in the button and click “Chat with human”, FransChat will send an email to the email saved in the General settings Chat with human email to remind the user that a conversation with a human customer service is needed.
For instructions on how to use the Chat with human email button, please click here
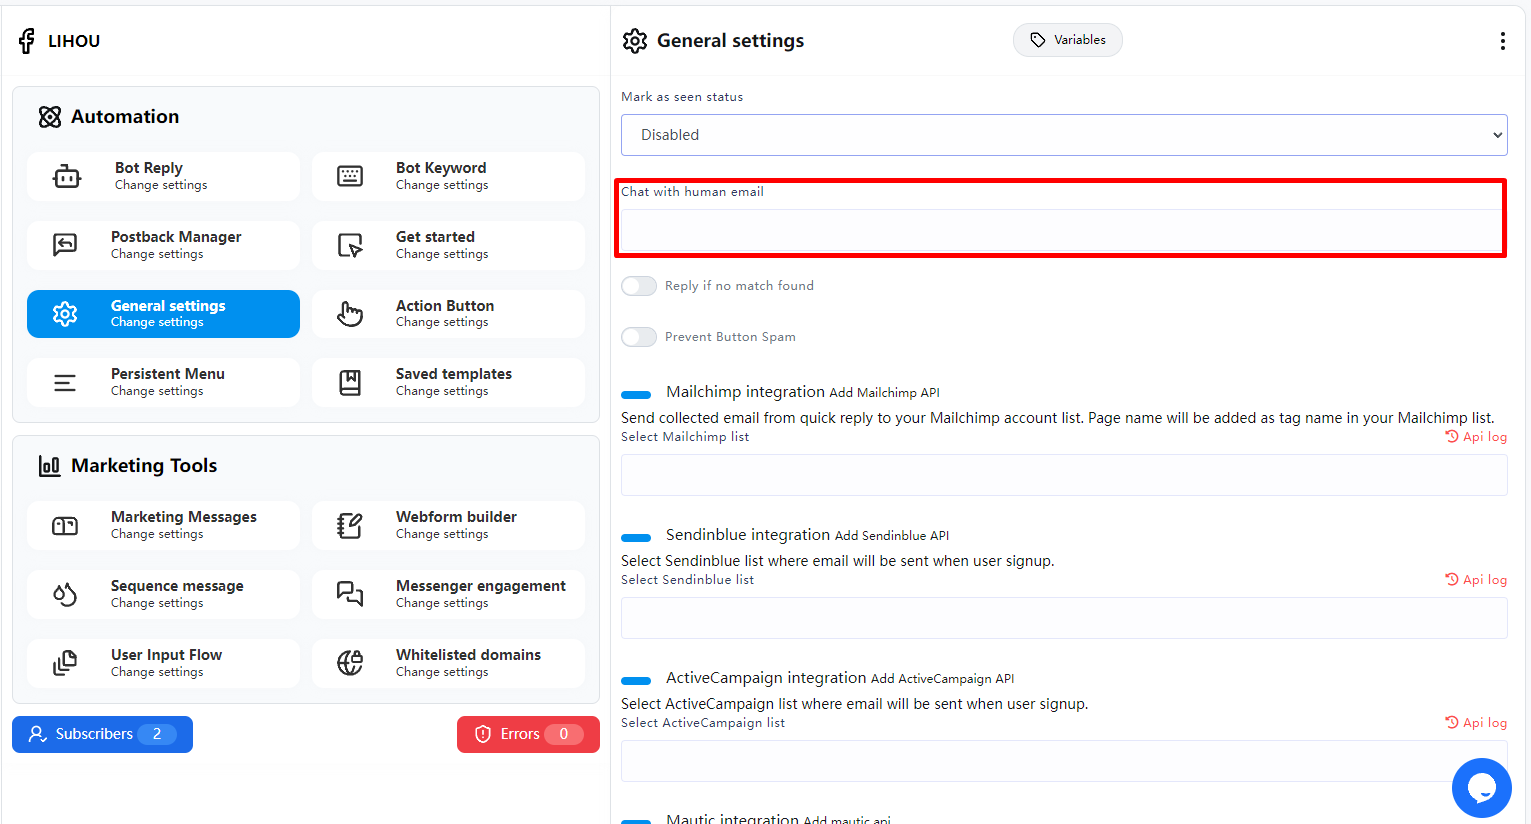
Reply if no match found
When unmatched replies are enabled, every time a user sends a message to messenger and the message does not correspond to any keywords or automated replies, a fixed unmatched reply template will be enabled.
If you want to fully use AI to respond to all user inquiries, enabling mismatch responses can be very useful.
You can click here to set the unmatched template message.
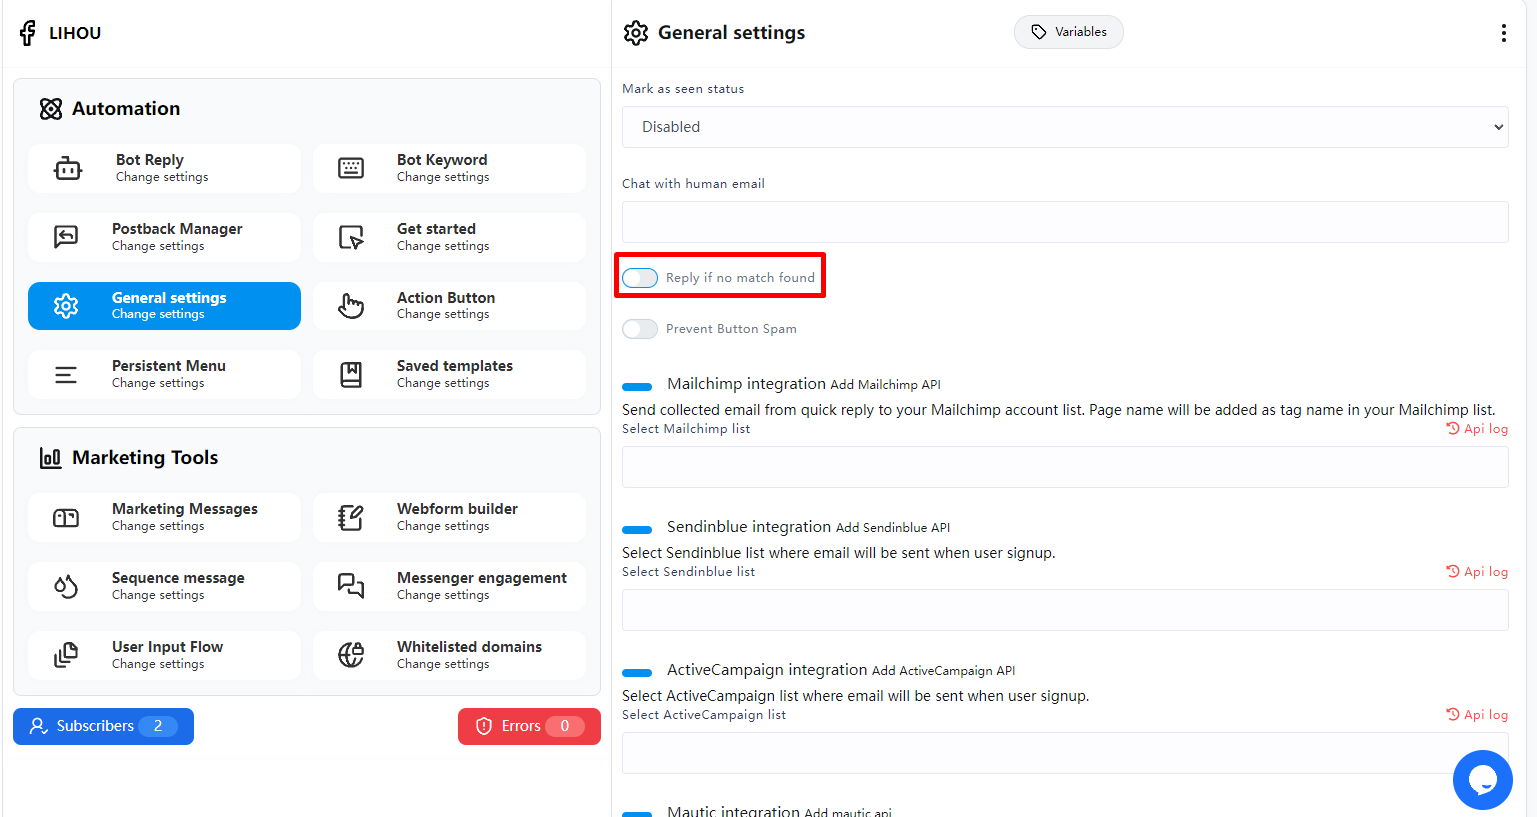
Prevent Button Spam
This feature is to prevent users from continuously clicking the button multiple times in a short period, causing the bot to repeatedly respond with the same message.
If enabled, you can set a time interval (default is 5 seconds). If the user clicks the same button more than once within this time frame, the system will not respond to the user. The system will only respond to the same button’s message once within the set time interval.
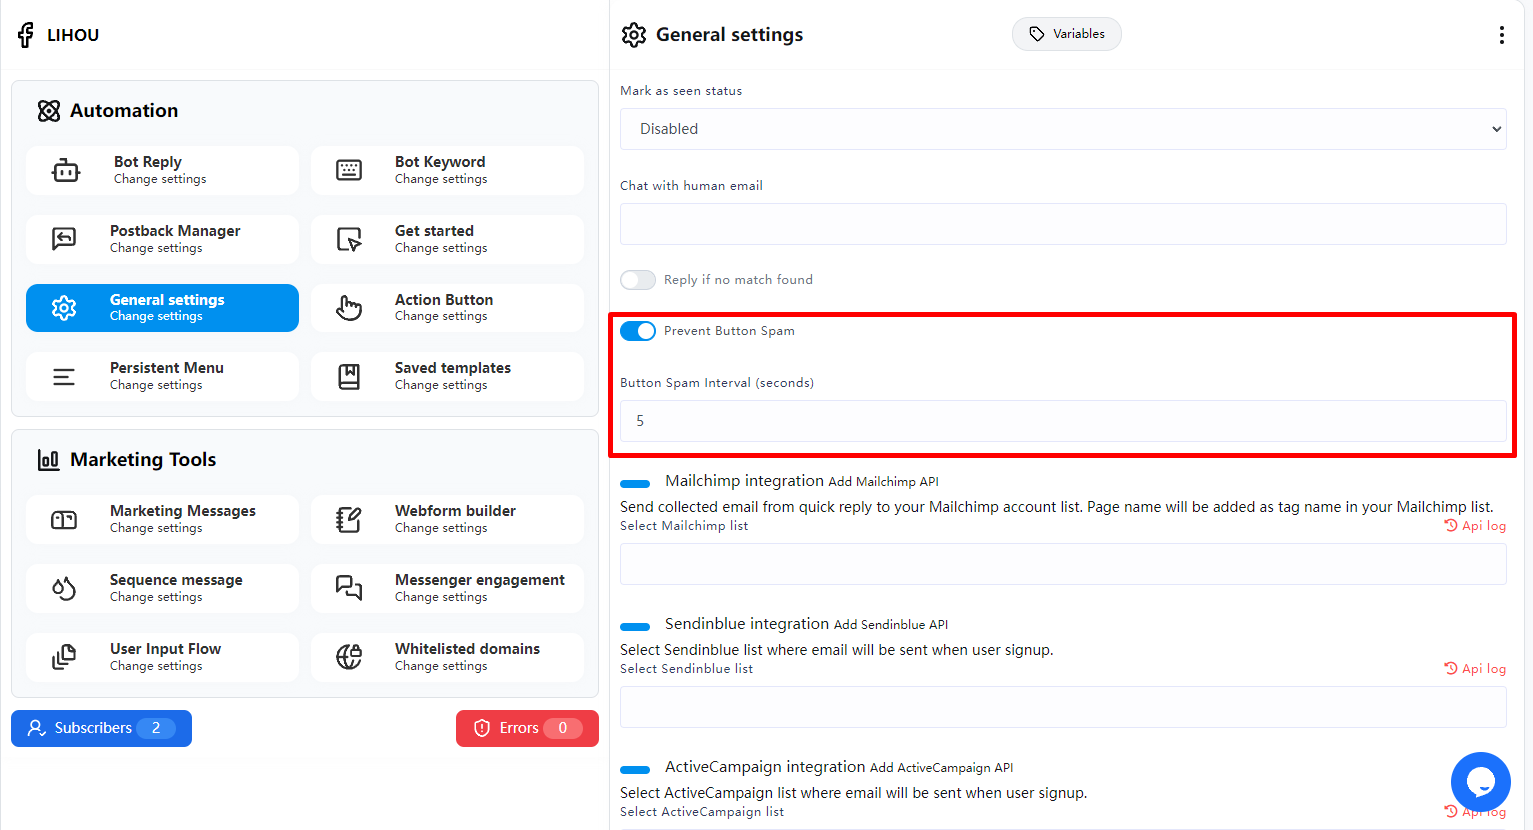
Integrate Email APIs
If you use email marketing, you can integrate the platform you are using.
Whenever you collect a user’s email through quick replies, buttons, or during the User Input Flow (emails must be stored in the system), FransChat will save the user’s email and name to the email marketing platform you have set up with Integrate email APIs.
You can integrate email api here
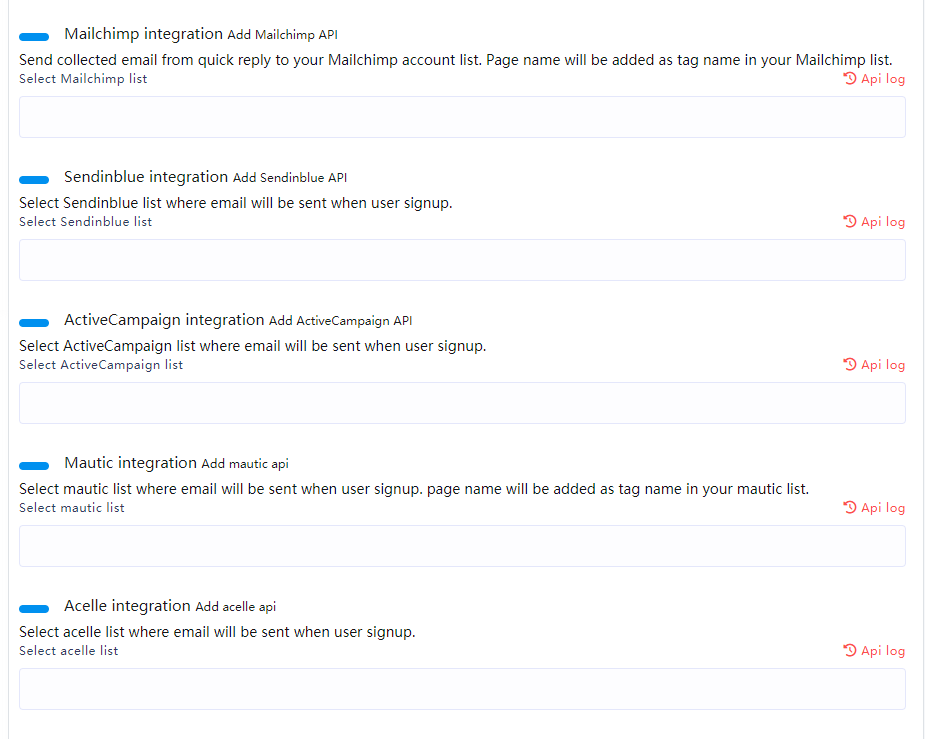
SMS integration & Email integration
Whenever you collect a user’s phone number or email through quick replies, buttons, or during the User Input Flow (phone number and email must be stored in the system), if you have set up SMS integration & Email integration, FransChat will automatically send a message to the obtained phone number or email.
You can set up SMS and email integration here
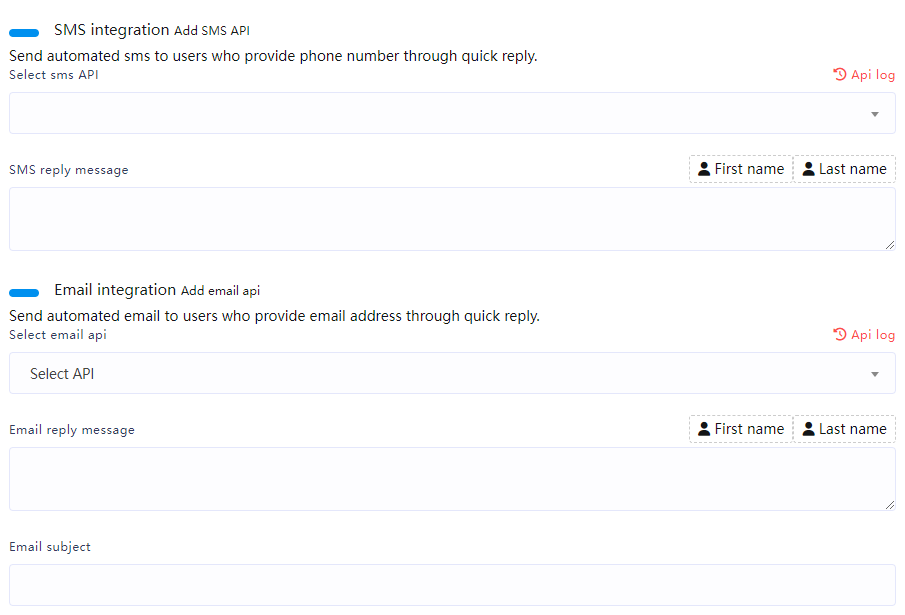
Action Button
In the Action Button settings, we can set some system-fixed trigger reply content
For example:
Get started & welcome message section, when a new user enters the message through Get started, we can set the “Get-started Template” in the Action Button to set the automatic reply content
Get-started Template
Need to trigger Get-started Template reply You must enable “Get started & welcome message“
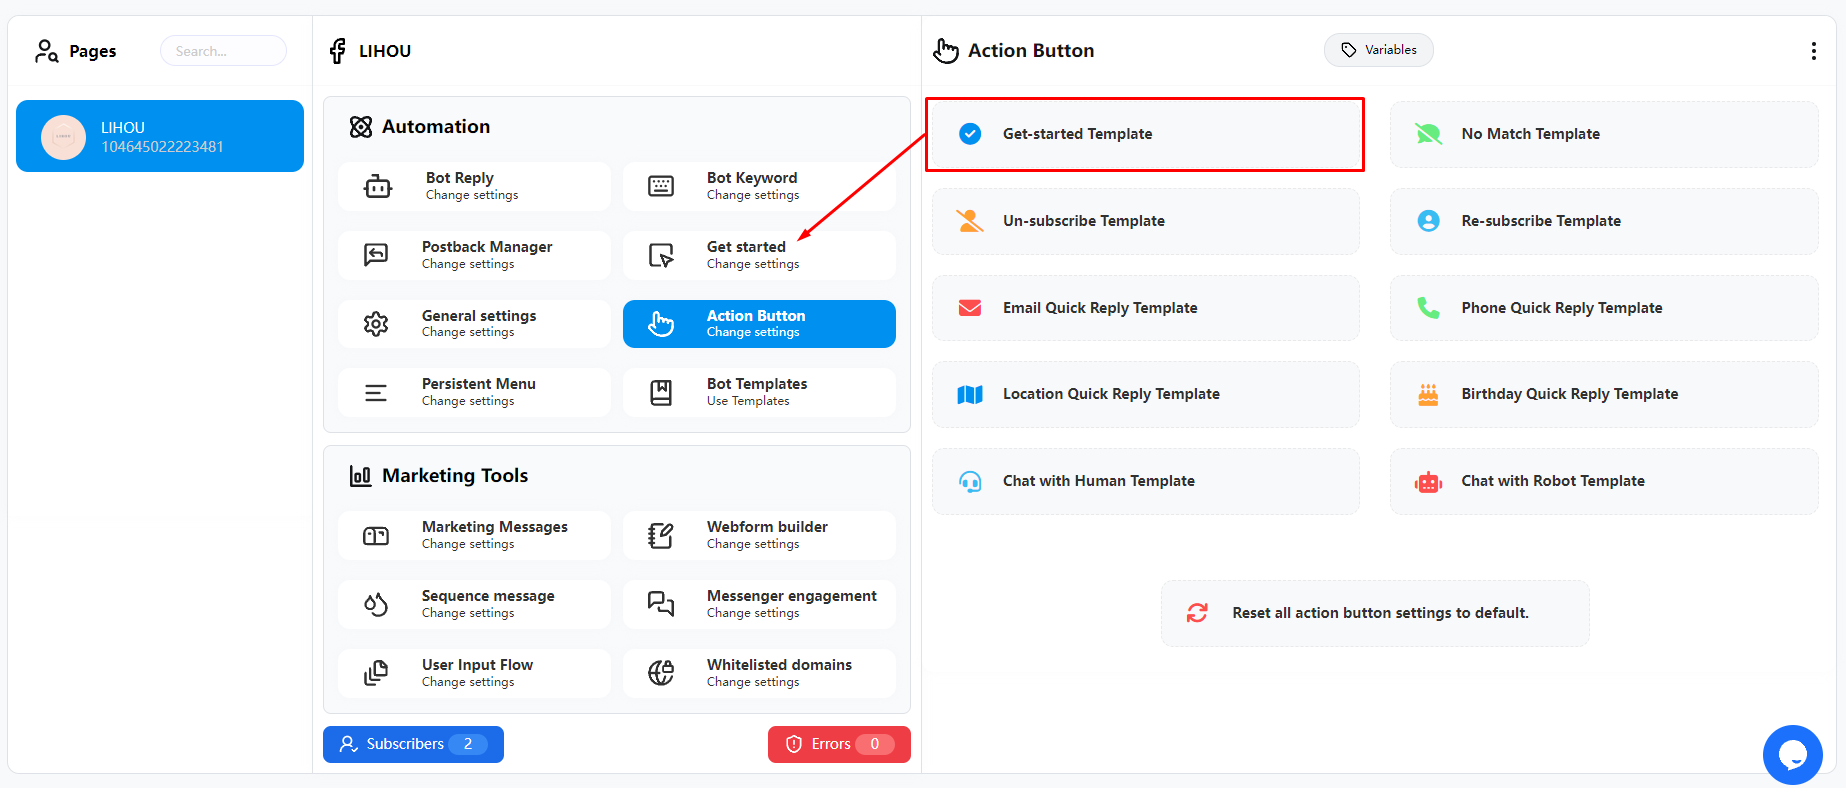
Now we click on “Get-started Template” and you will be taken to the edit page. Here we only need to edit the text part. You can modify the content in the original text component and add buttons to set the flow of the next reply.
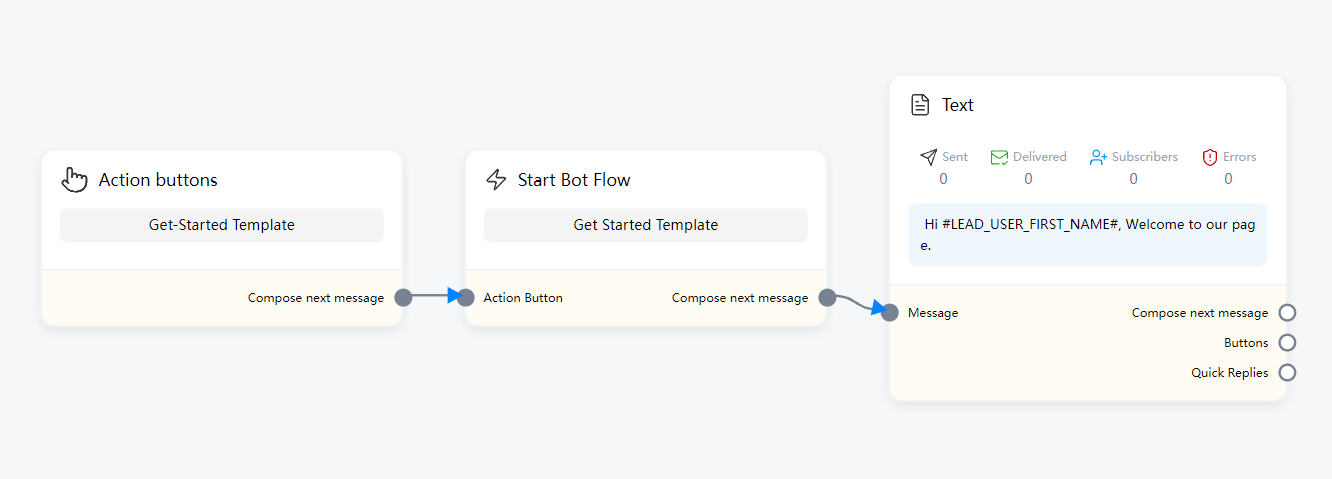
No Match Template
To use the No Match Template, you must enable the “Reply if no match found” feature in the “General settings“
Note: After enabling the “Reply if no match found” feature, all subsequent messages will use this template to reply unless the keyword triggers the automatic reply flow.
If “Reply if no match found” is not enabled, users will not be replied to topics other than keywords.
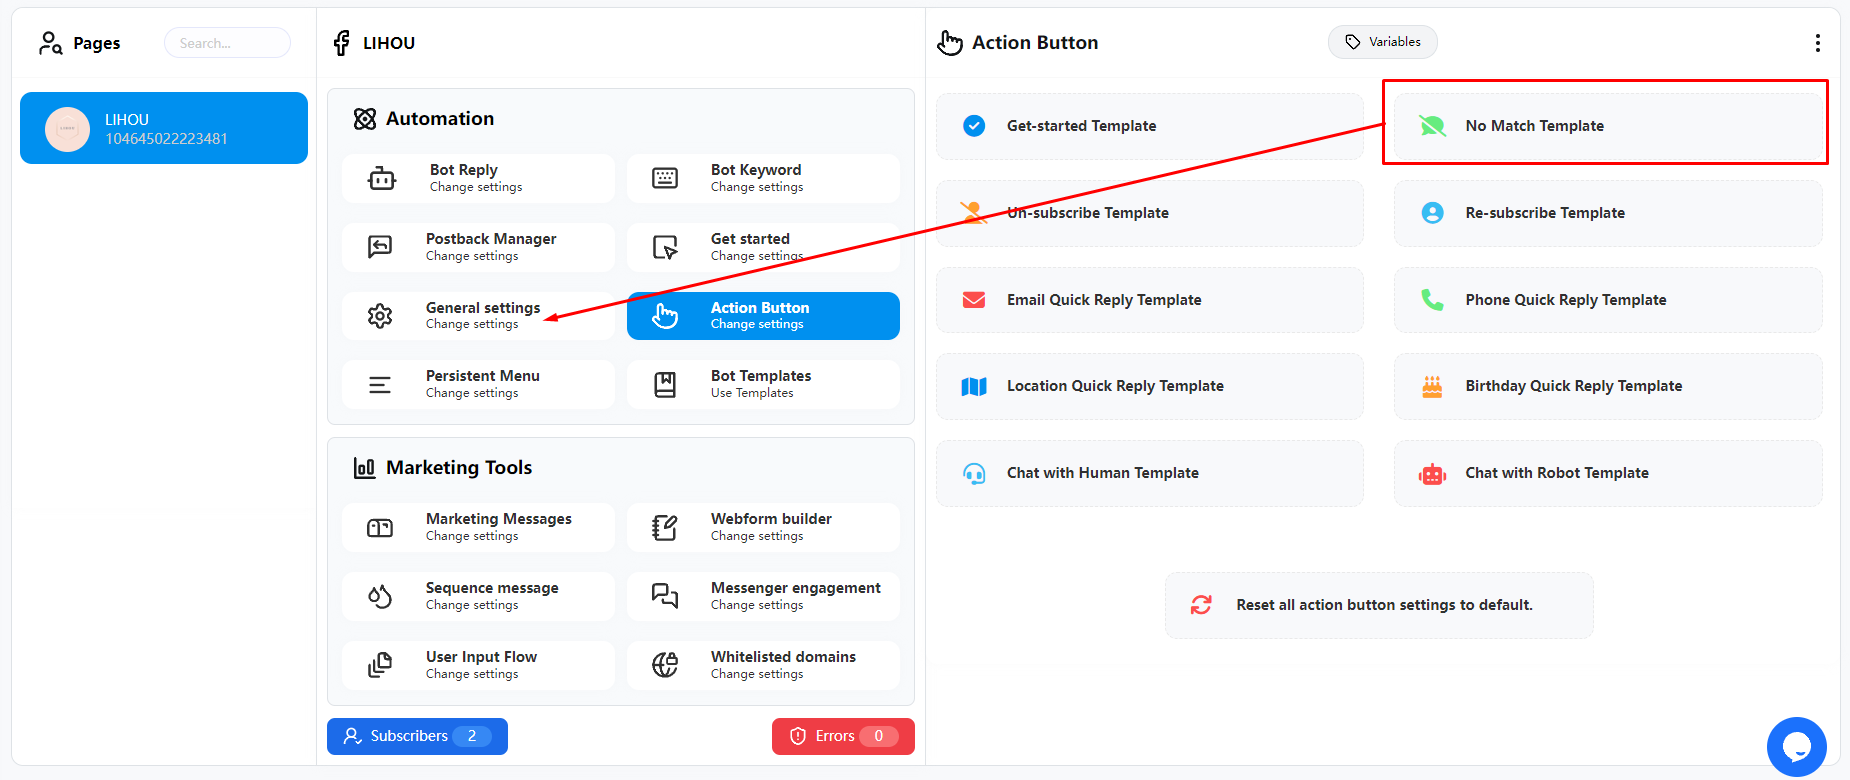
Now we click “No Match Template” to edit it. By default, you can modify the content in the default Text component and add more information or buttons.

If you want to fully automate the conversation with the user, you can use the AI component
Note: You only need to use one AI component. You must configure the ChatGPT API first. For details, please refer to here
Now you just need to enter some keywords in the Ai reply component to tell the AI how to reply to the user, what to answer, etc.
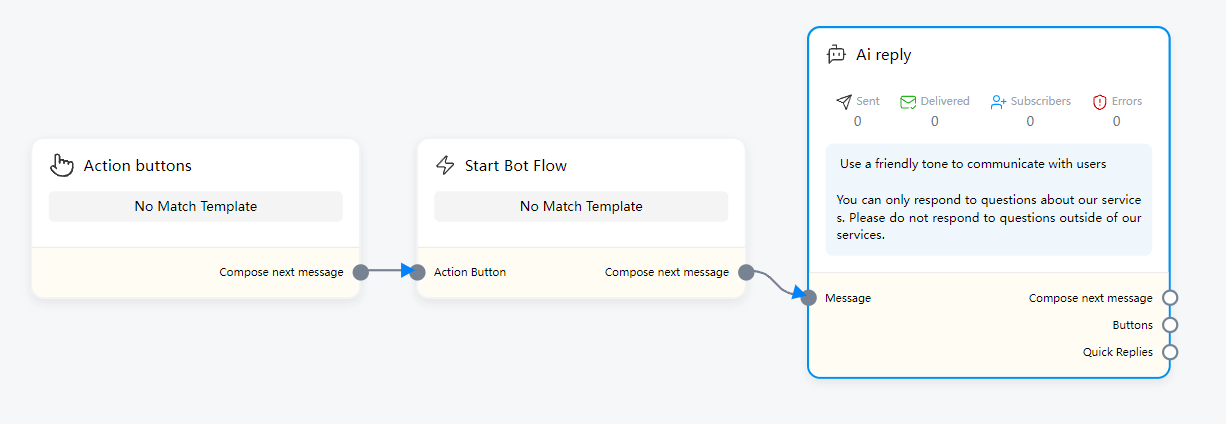
Button Reply Template
The following 8 template types all belong to the template content of the next reply after the user completes the button click or completes the operation using the “System default action button” in the “Button component”
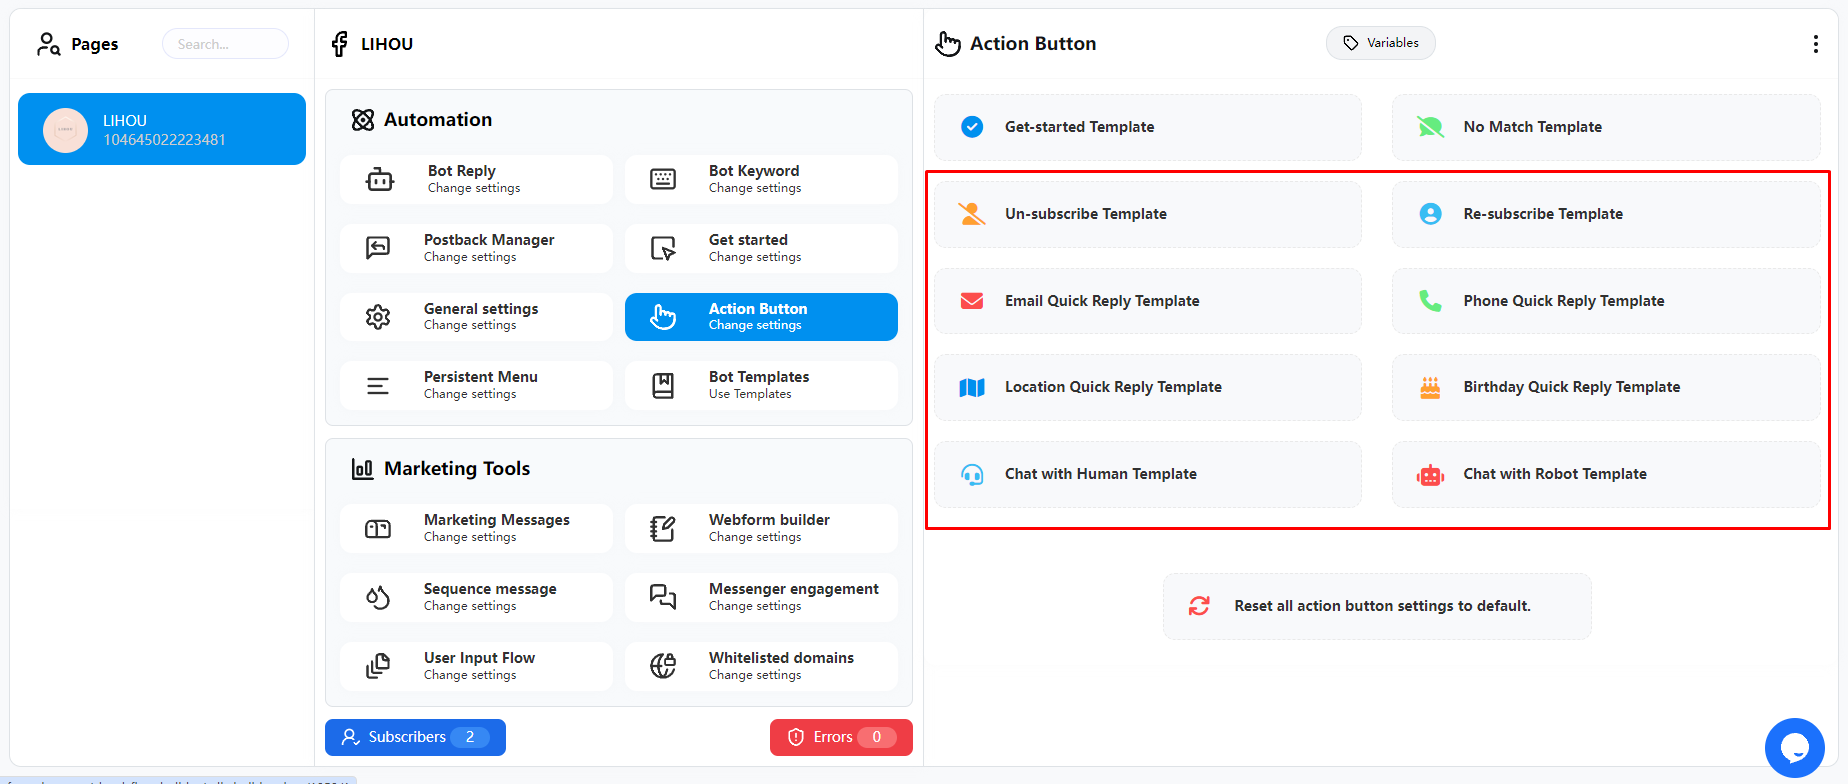
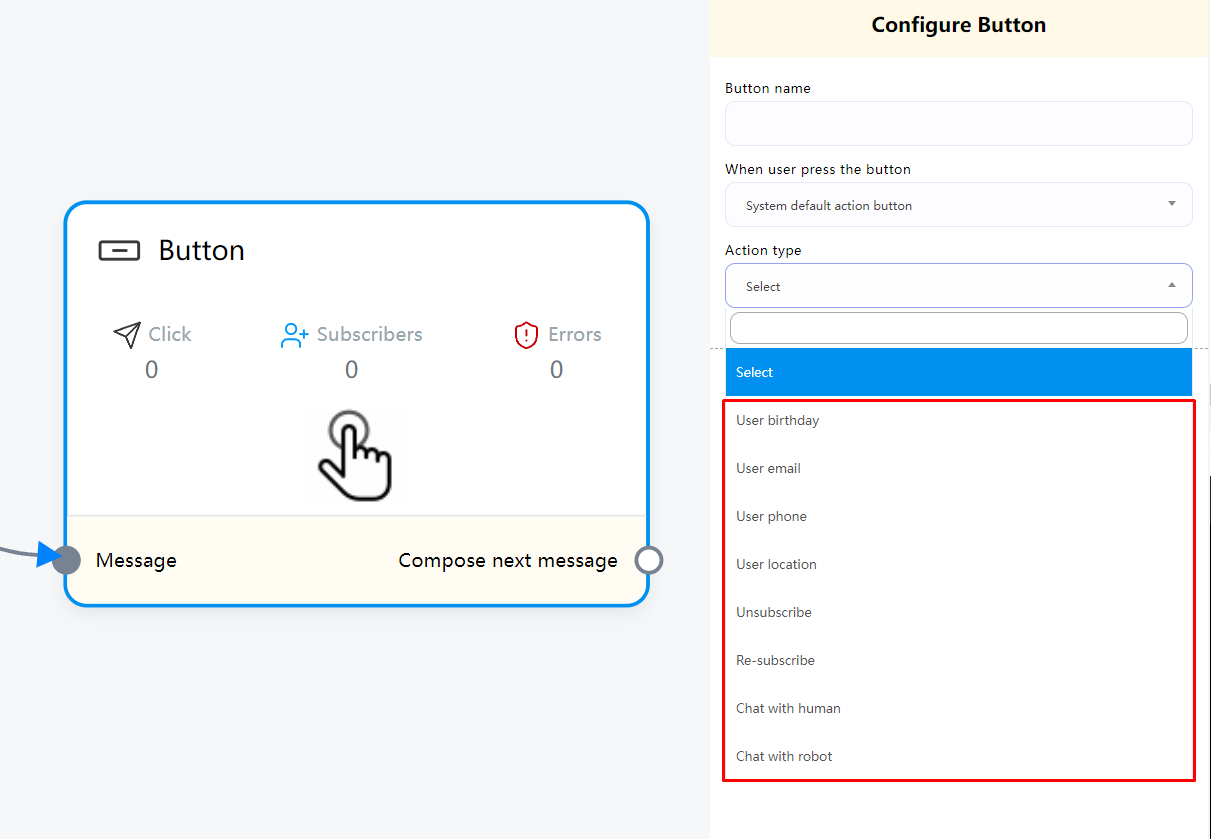
Four of the templates are for obtaining user information, such as Birthday, Email, Phone, Location
When obtaining user information, the system will save the user information in the user configuration.
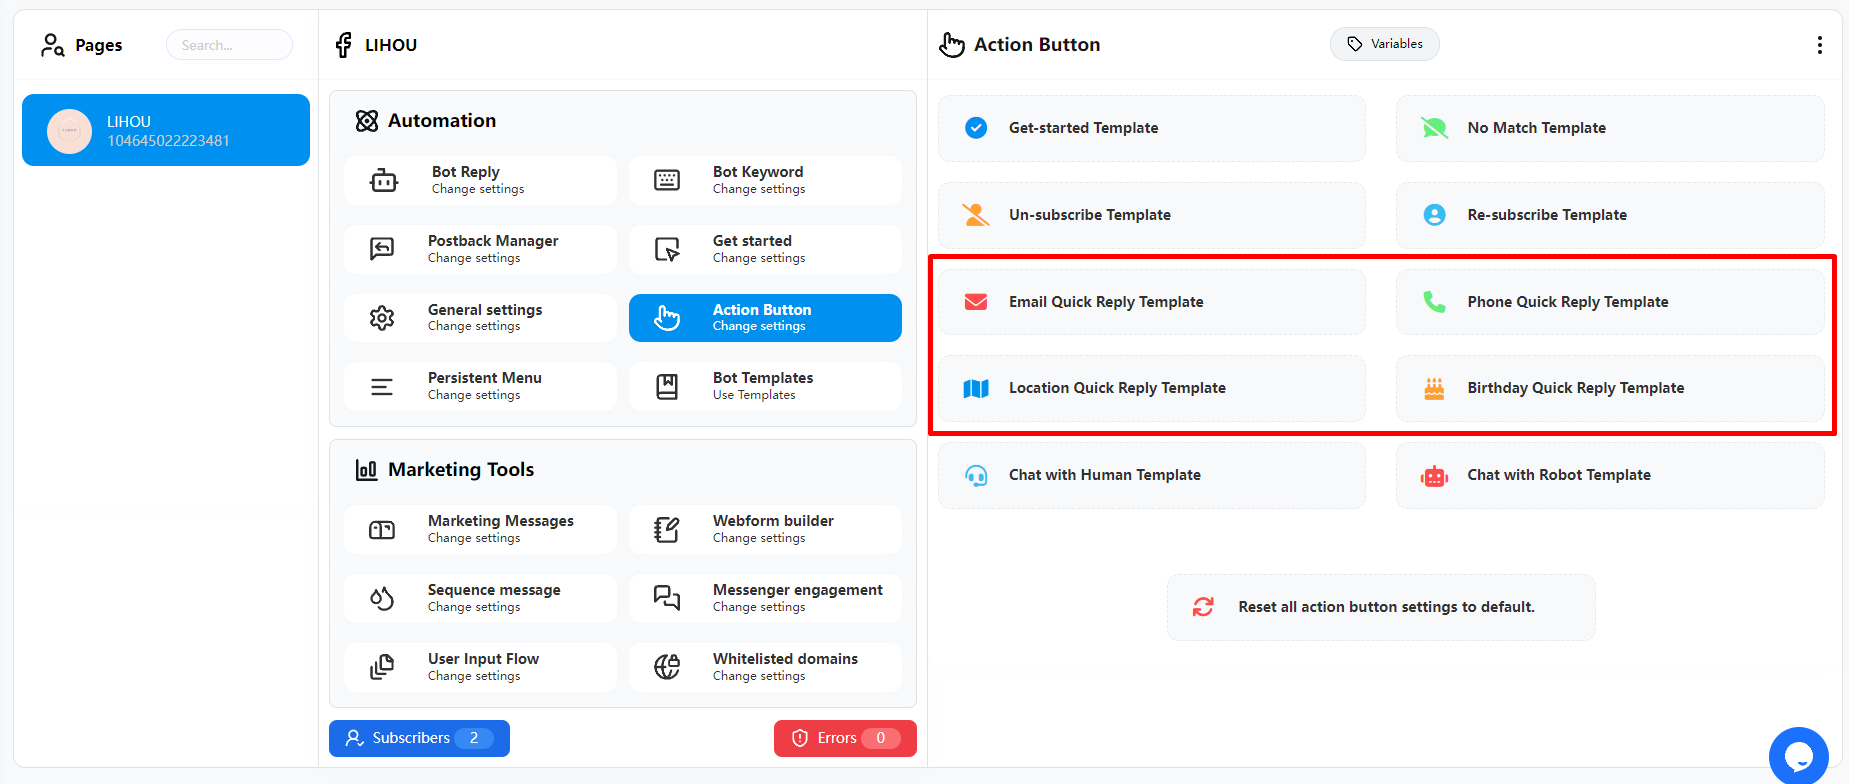
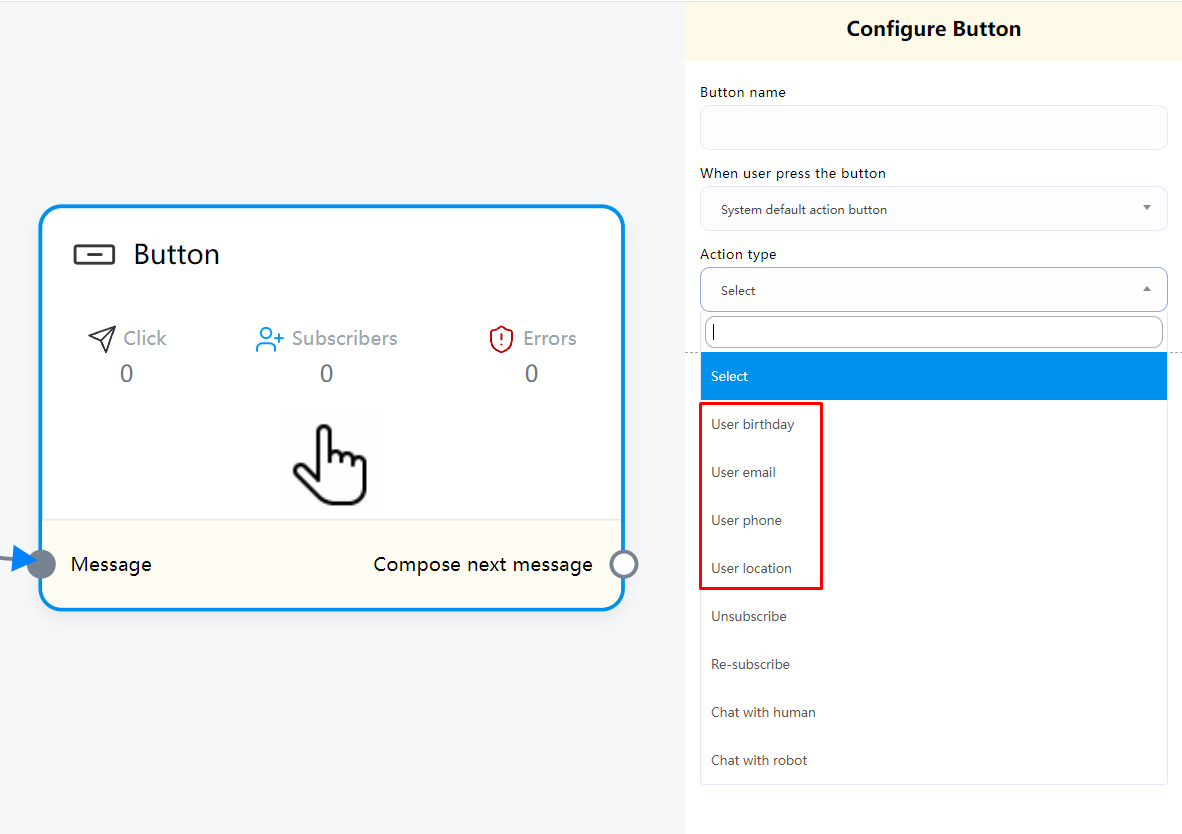
When you use “System default action button” and now Email via a button, the specific process is as follows:
First, we set the corresponding template message in the “Action Button”
In the reply content, we use the variable #system_email#, which will attach the email provided by the user in the next reply when the user provides an email
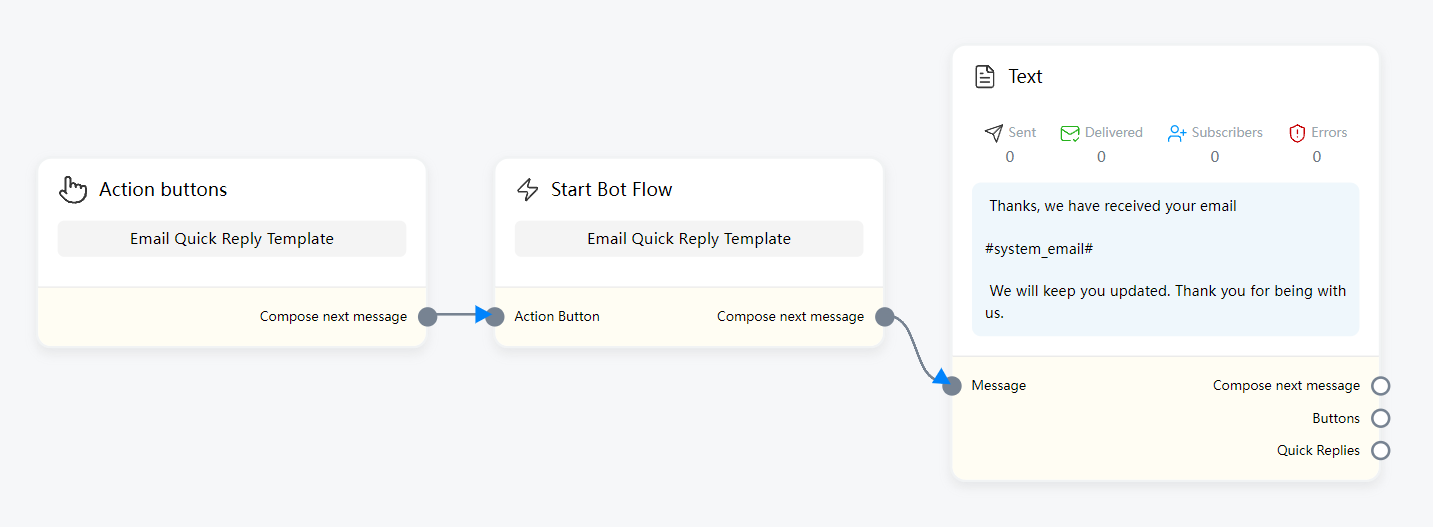
Next, we need to use the button in any get user flow and select “System default action button” , “user email”
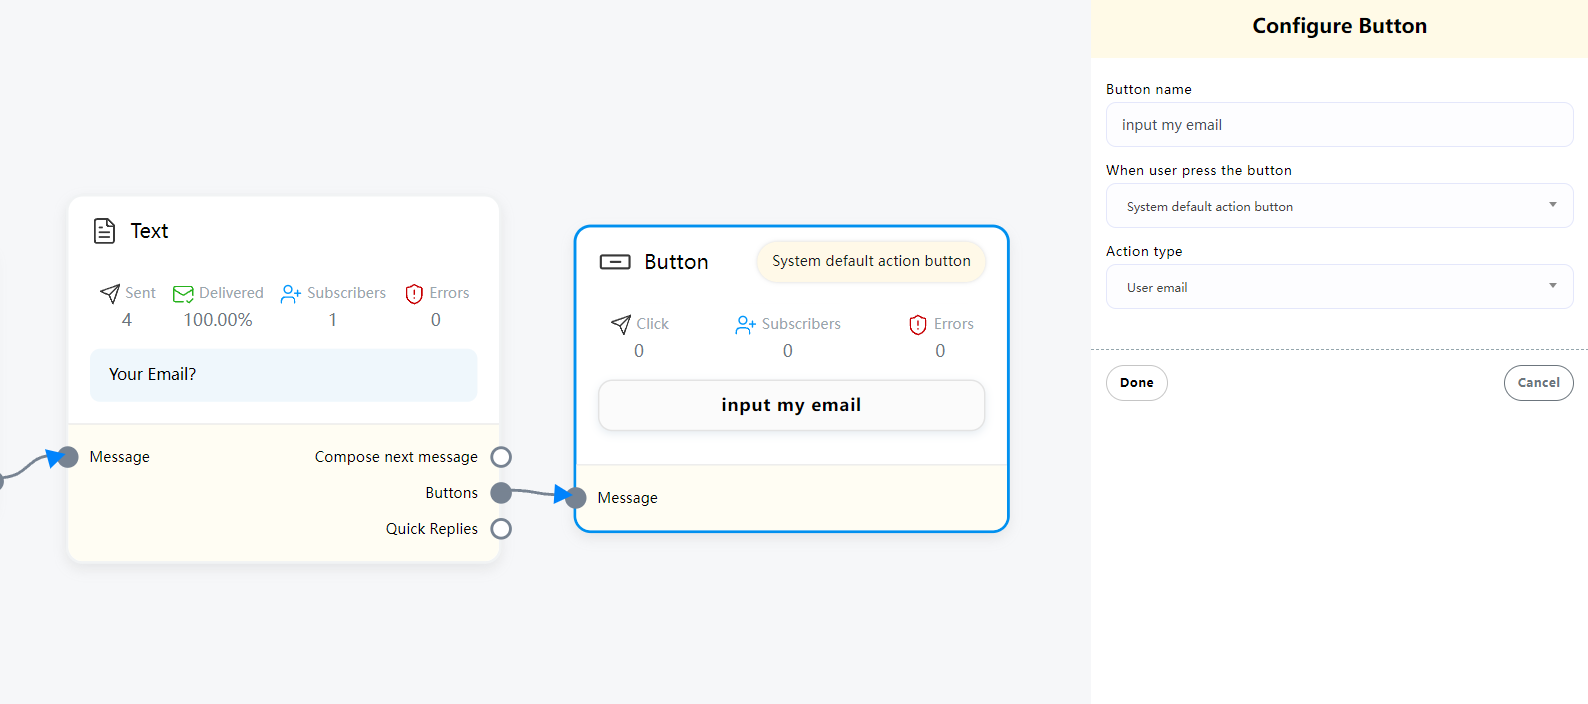
Now when this flow is triggered, a button to get email will be displayed. When the user clicks it, a half-window web page will be opened to enter the user’s email

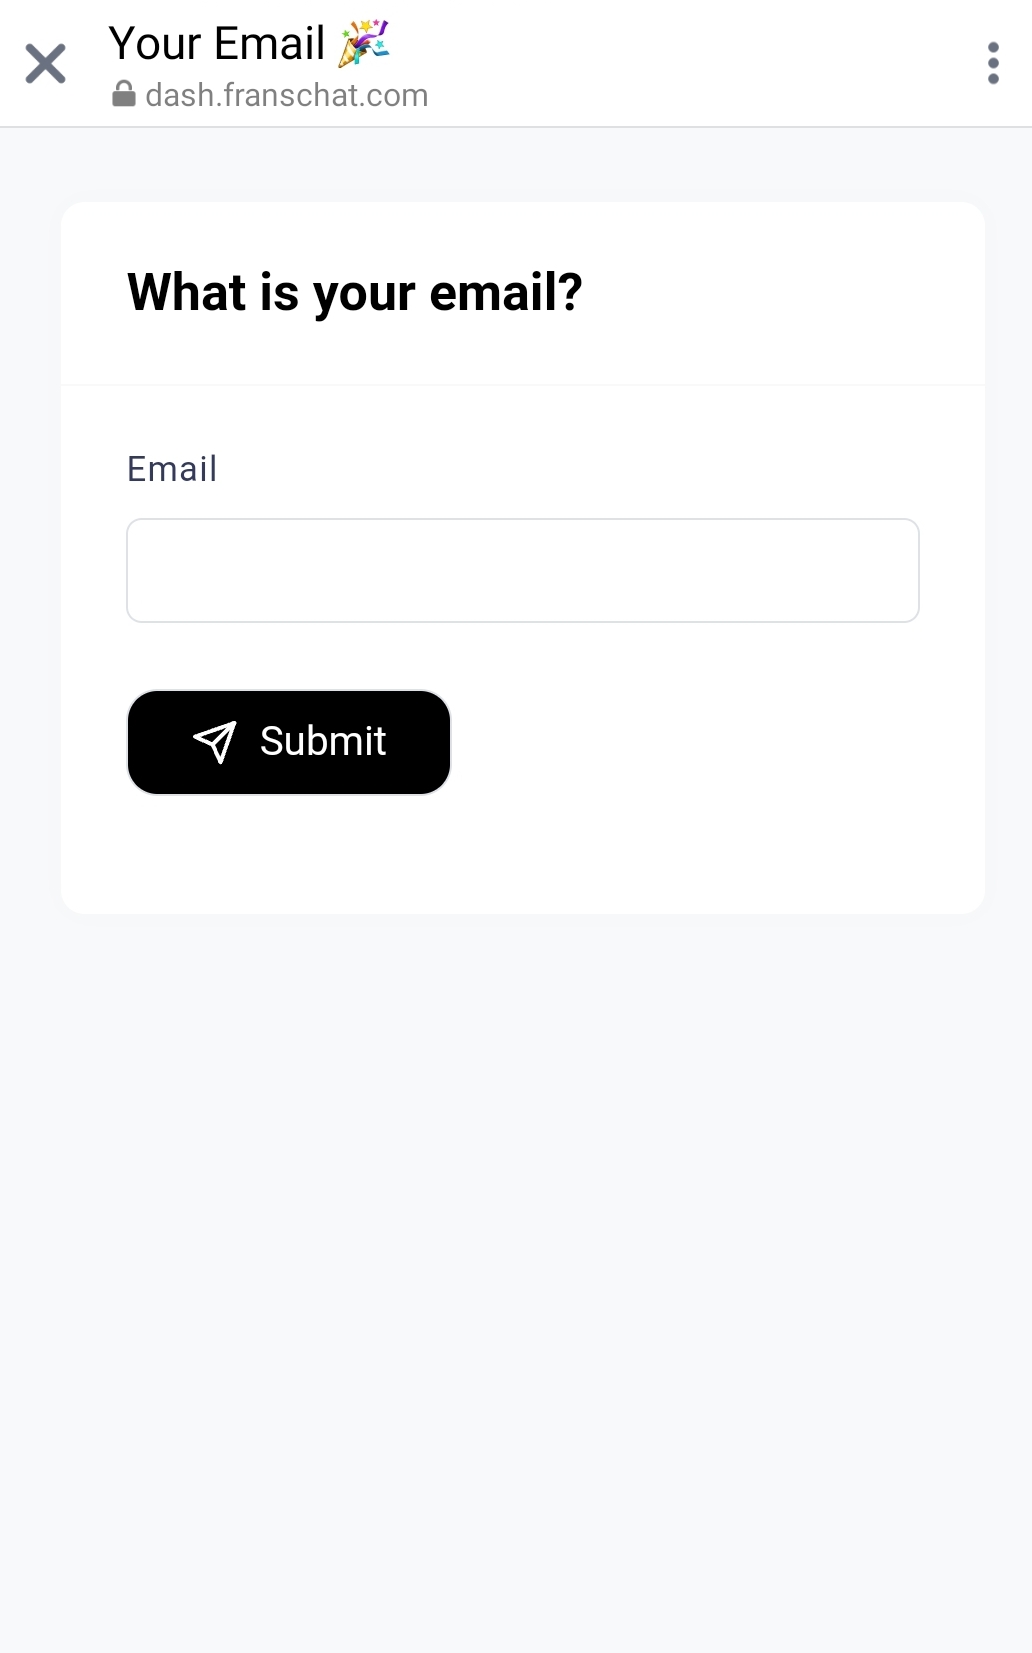
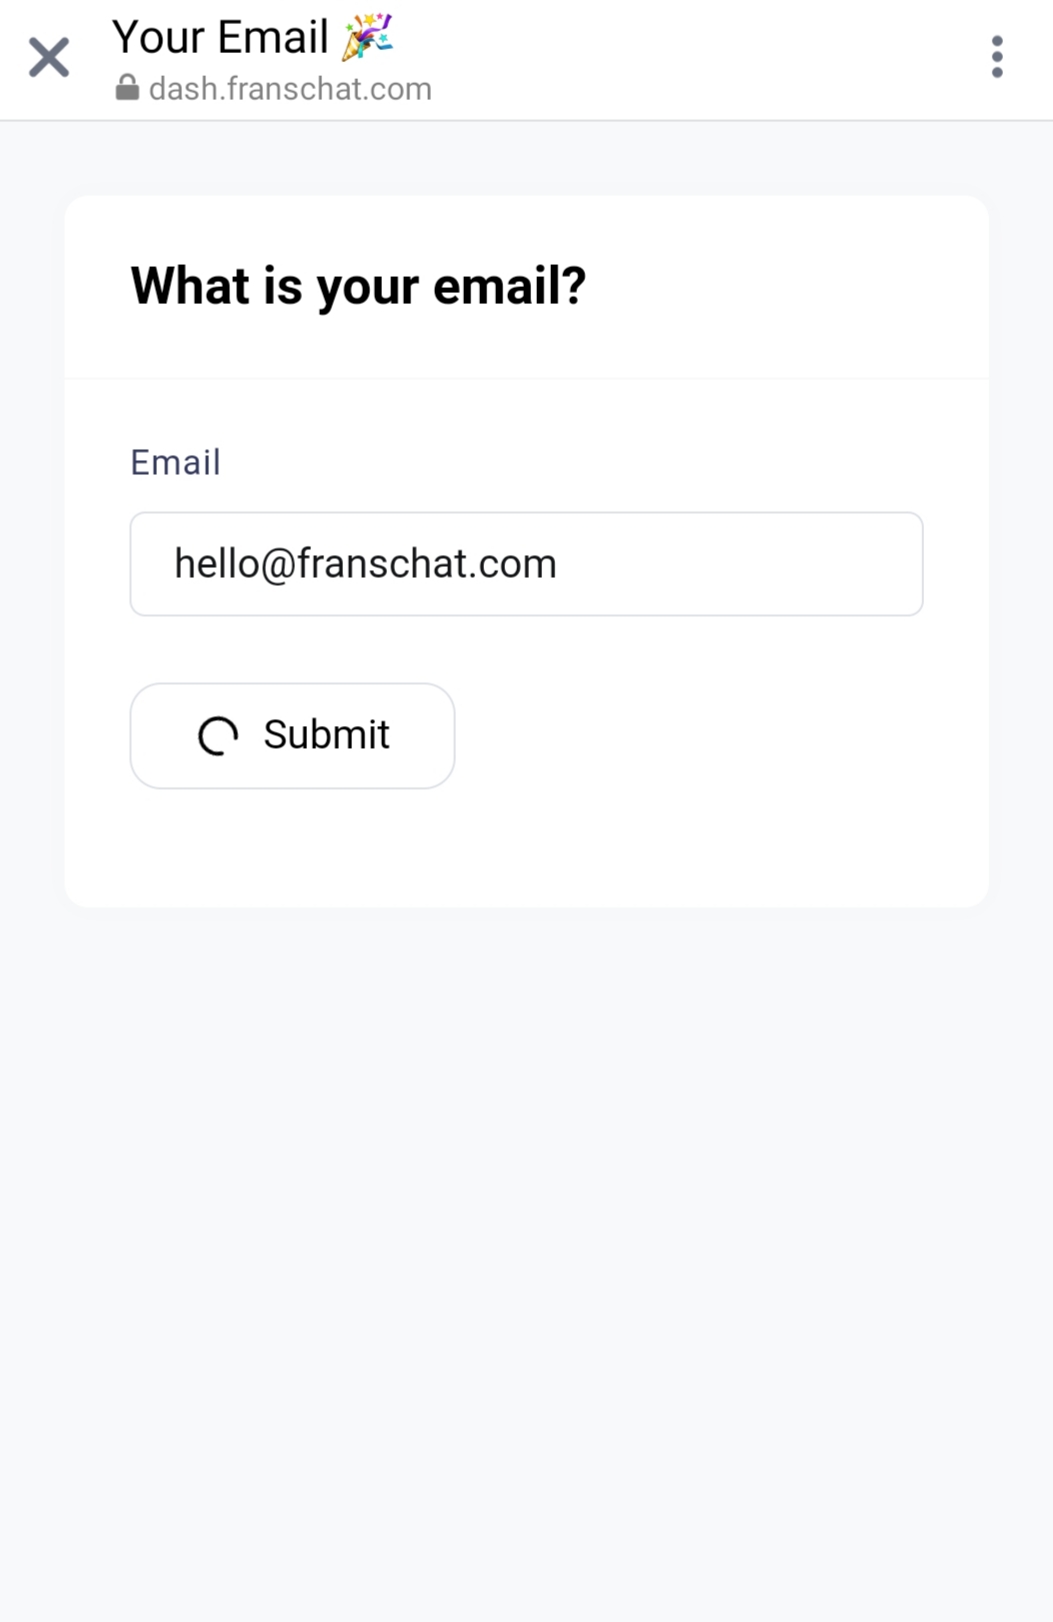
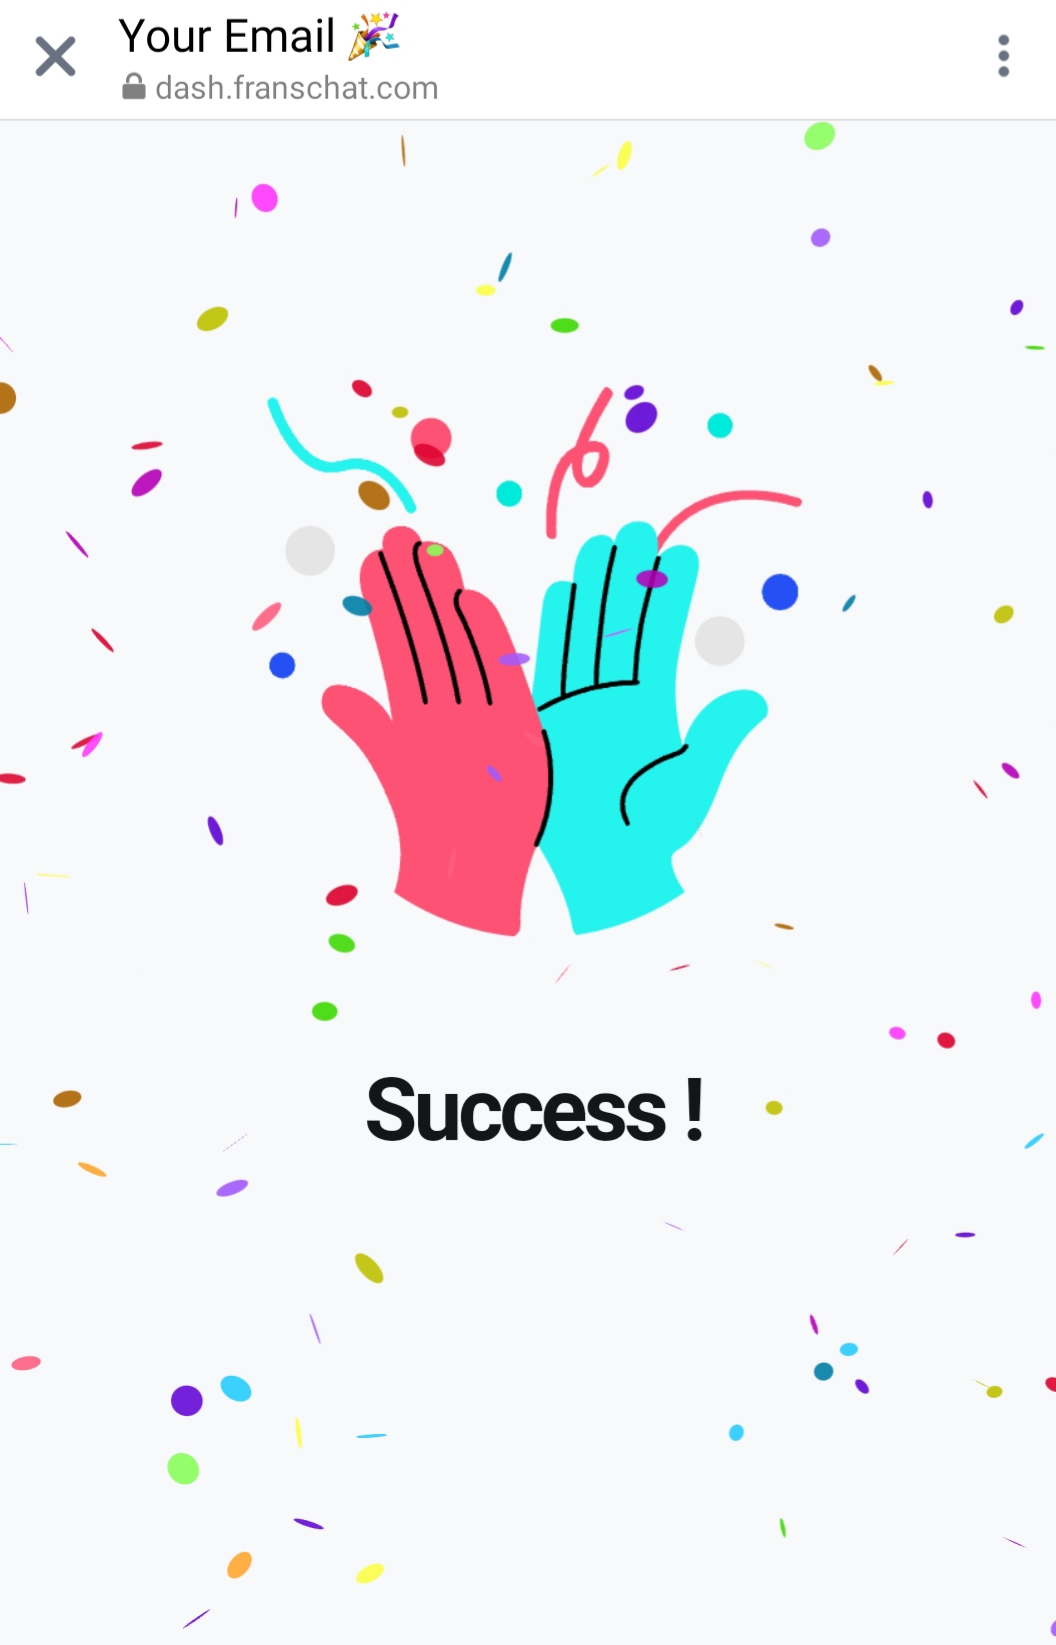
When the user submits the completed email, the window will automatically close after the message “Success!” is displayed.
And reply to the message of the corresponding template in “Action Button”
And we can see here that the variable #system_email# in the original message is successfully replaced with the Email entered by the user
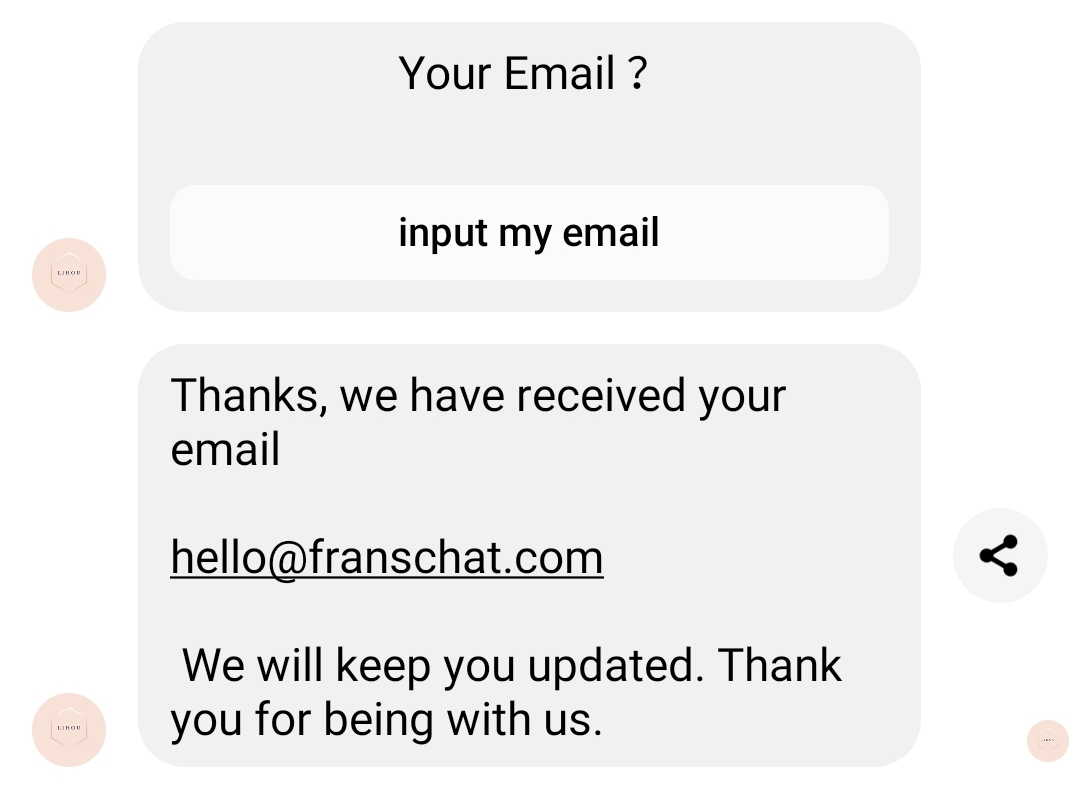
Subscribe Template
For “Un-subscribe Template” and “Re-subscribe Template”
After the user clicks the button, the system will cancel the user’s subscription status or re-subscribe. This will be used when sending Broadcasting to the user. If you can click to unsubscribe, you will not be able to send Broadcast to the user again.
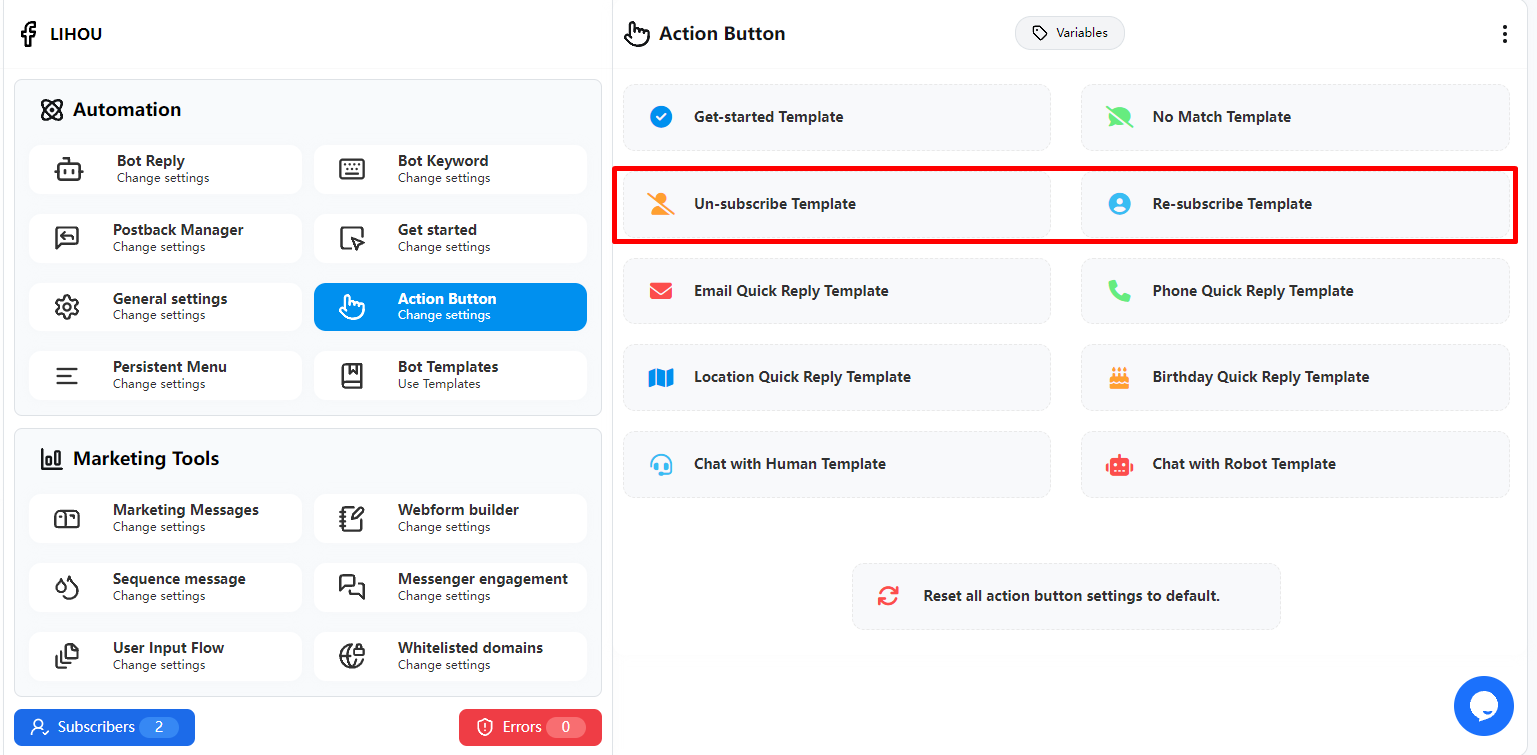
Chat with Human & Robot
When “System default action button” is selected in the button and “chat with human” is used, this will pause the automatic reply for that user, and the user will not be able to reply even if he enters keywords.
The user can restore the automatic reply by clicking the “Chat with robot” button again.
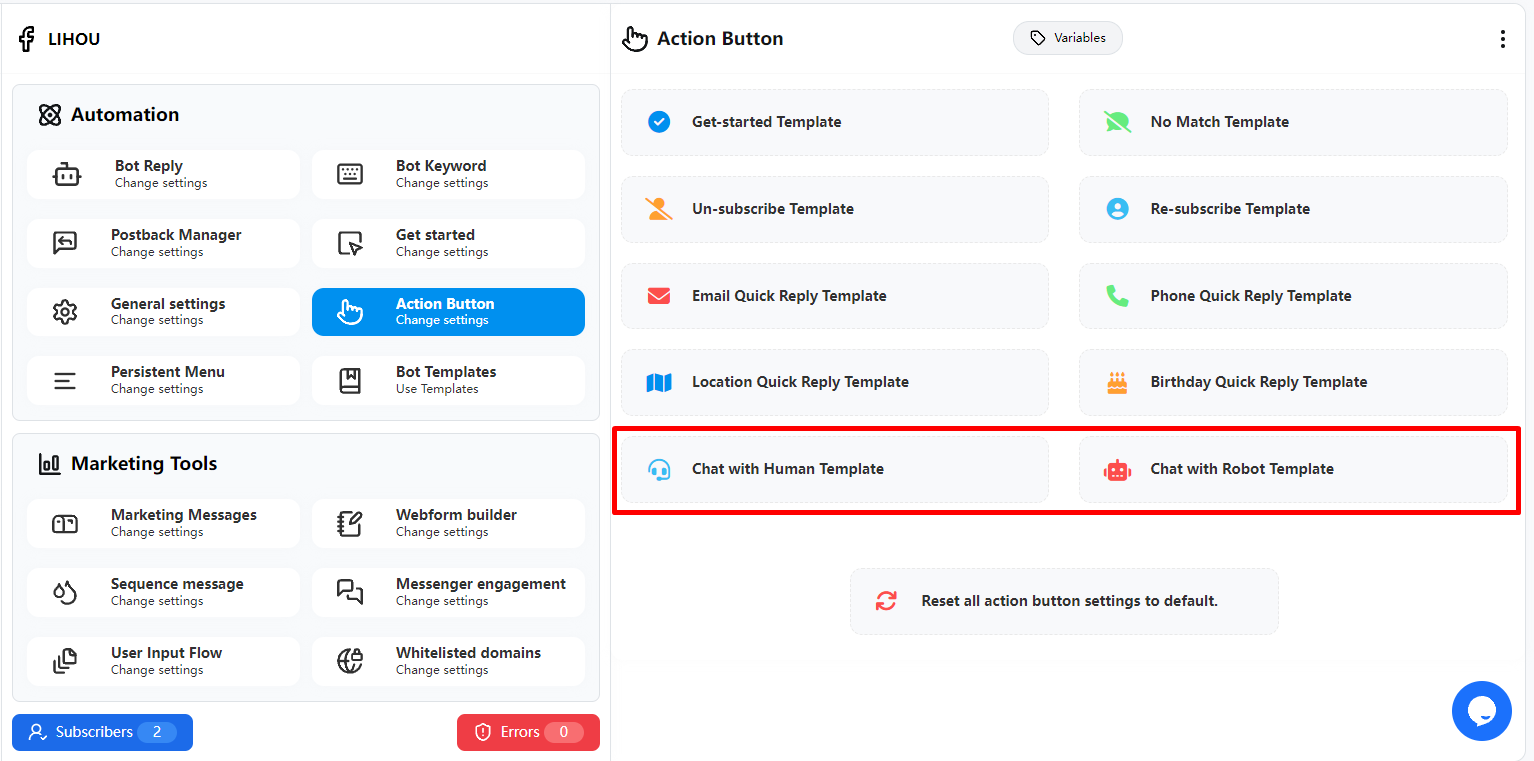
If you need to be notified after a user clicks “Chat with Human”, you can set a notification email address in General settings Chat with human email . Every time a user clicks “Chat with Human”, the system will send a notification email with the user’s name and basic information to the email address, informing you that a user needs a human reply.
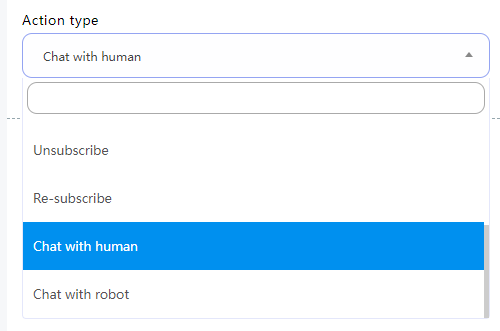
Persistent Menu
How it works
With a persistent menu, you can create and send a menu of key business features (like hours, store locations, and products) that always appears in people’s Messenger conversations with your business.
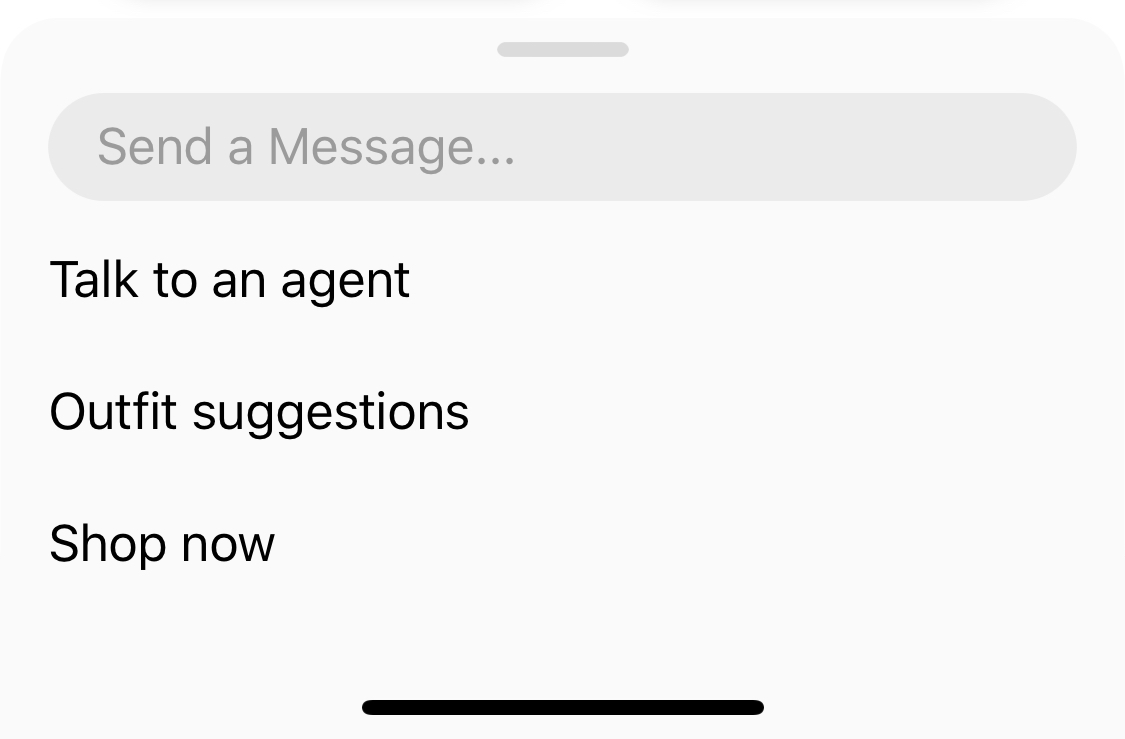
Create Persistent Menu
After entering the Persistent Menu, click the “Create persistent menu” button in the list.
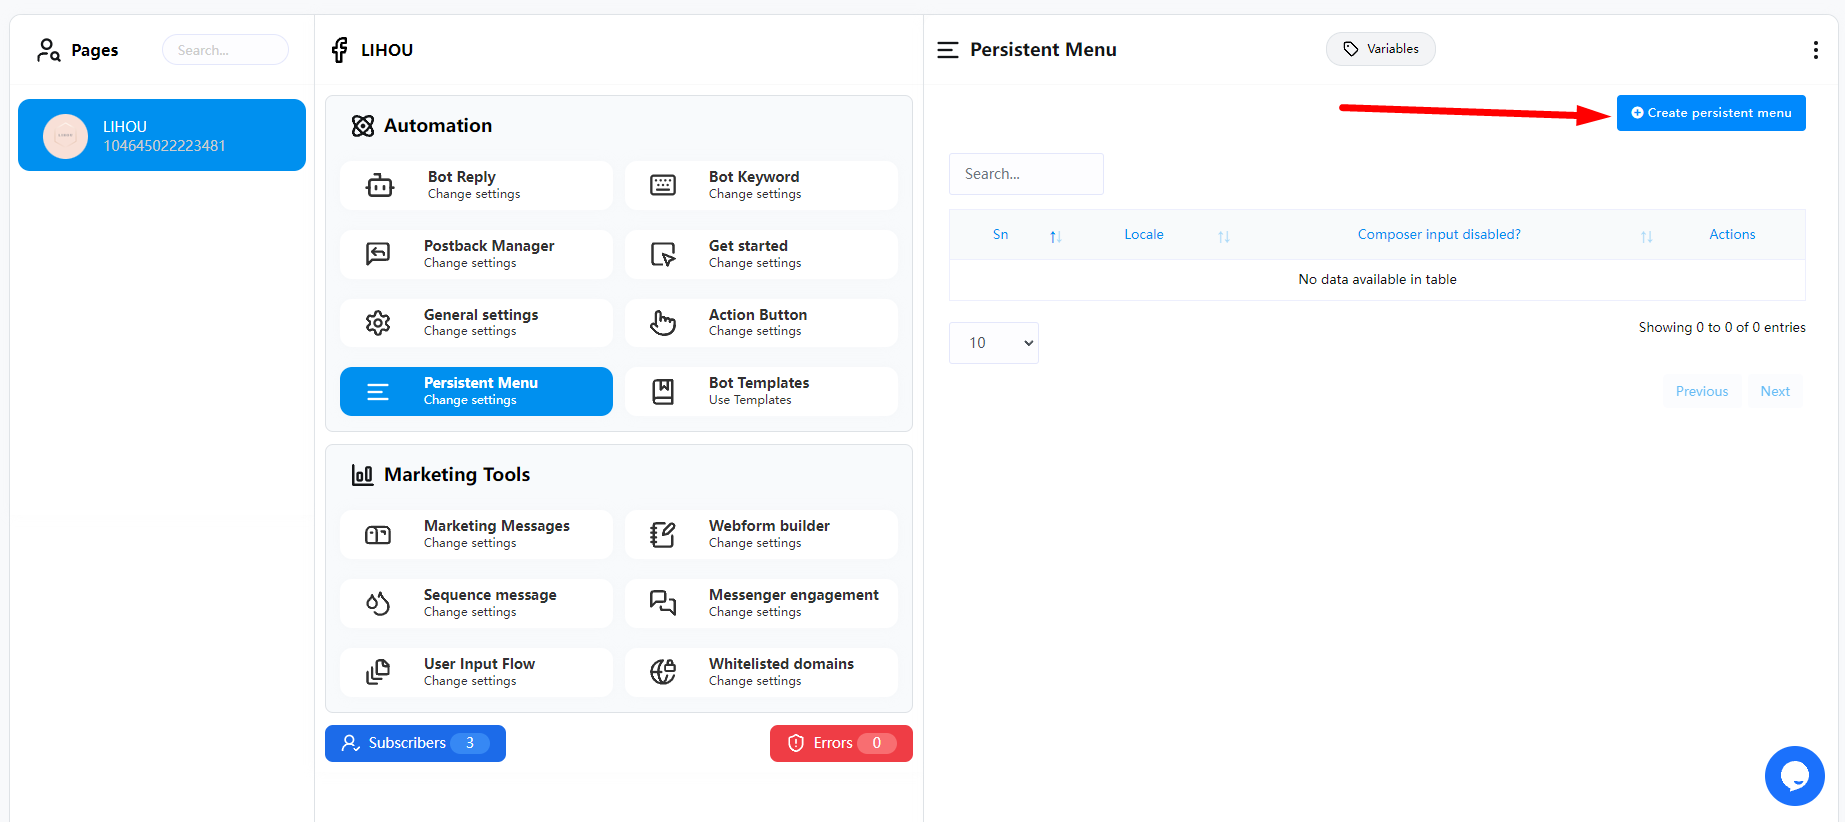
Now you will enter the edit page of Create persistent menu, where there are several options
1. Locale (This is the language used for selecting persistent menu, usually the default is OK)
2. Composer input disabled? (If enabled, users will not be able to enter any text in messenger, which is usually used in fully automated and unmanned situations)
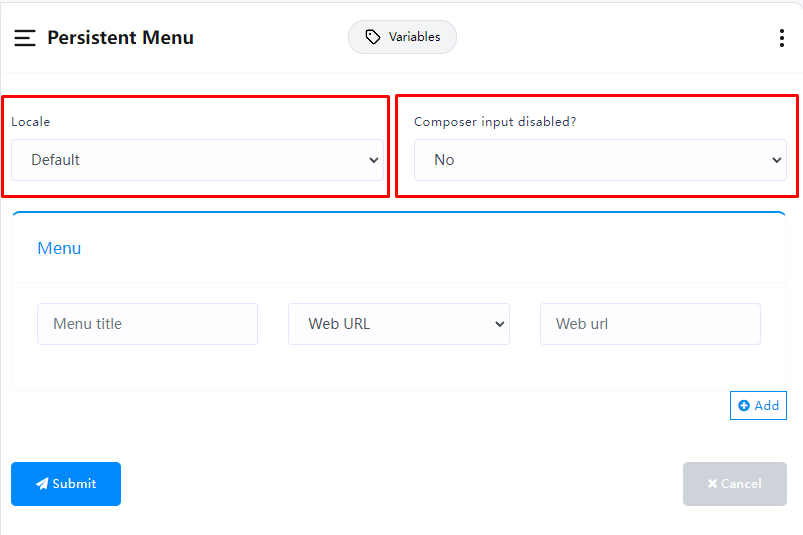
Menu
This section is for creating menus
1. Menu Title (menu name)
2. Web URL / Postback (action after clicking the menu)
3. Set the action target after clicking the menu. If you choose Web URL, enter your URL link
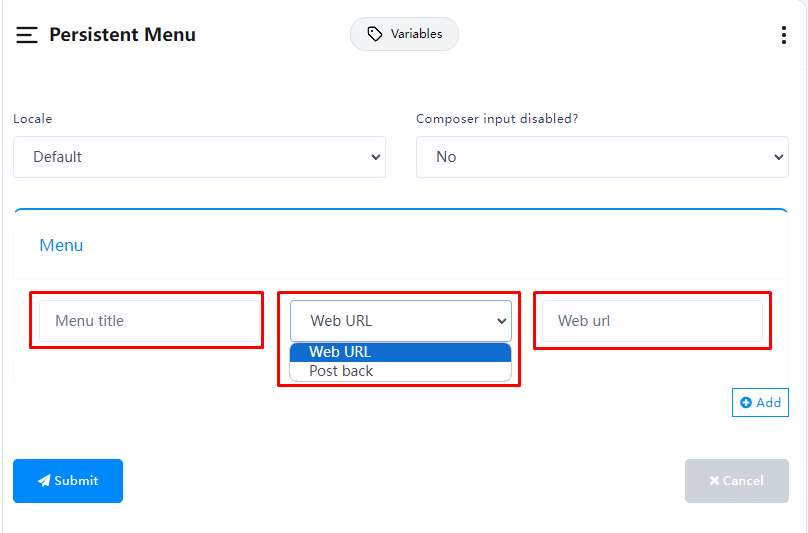
When you select Postback, the third option will show all your current flows. You can choose which flow will be triggered when clicking this menu. You can also click Add to create a new one.
If you need to create more menus, you can click the “Add” button below to create more menus.
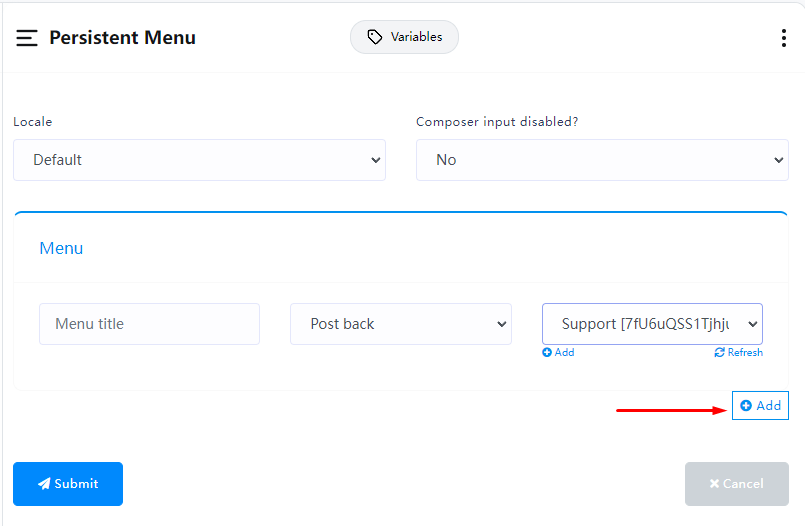
After finishing, click Submit. After saving, you will see the currently created persistent menu in the list.
It may take some time for the persistent menu to update in Messenger. If you don’t see it update, you can try deleting your current Facebook account and the current Page Messenger conversation history and resending a new message to see if the persistent menu is displayed.
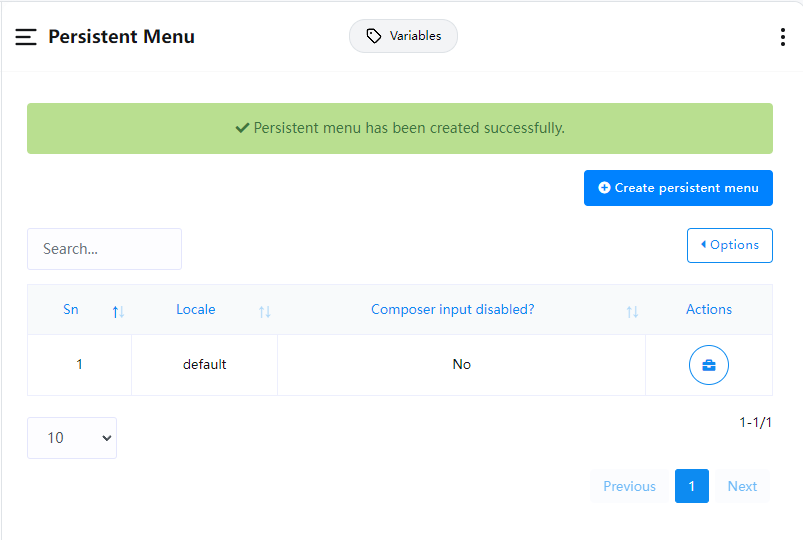
Marketing Messages
If you have created Marketing Messages in any Flow, they will be displayed in the list. You can refer to here for how to create Marketing Messages.
In the list, you can clearly see how many subscribers each Marketing Message currently has. If you need to view detailed subscriber details, you can click the user icon button in “Actions” and you will see who the current subscribers are in the pop-up window.
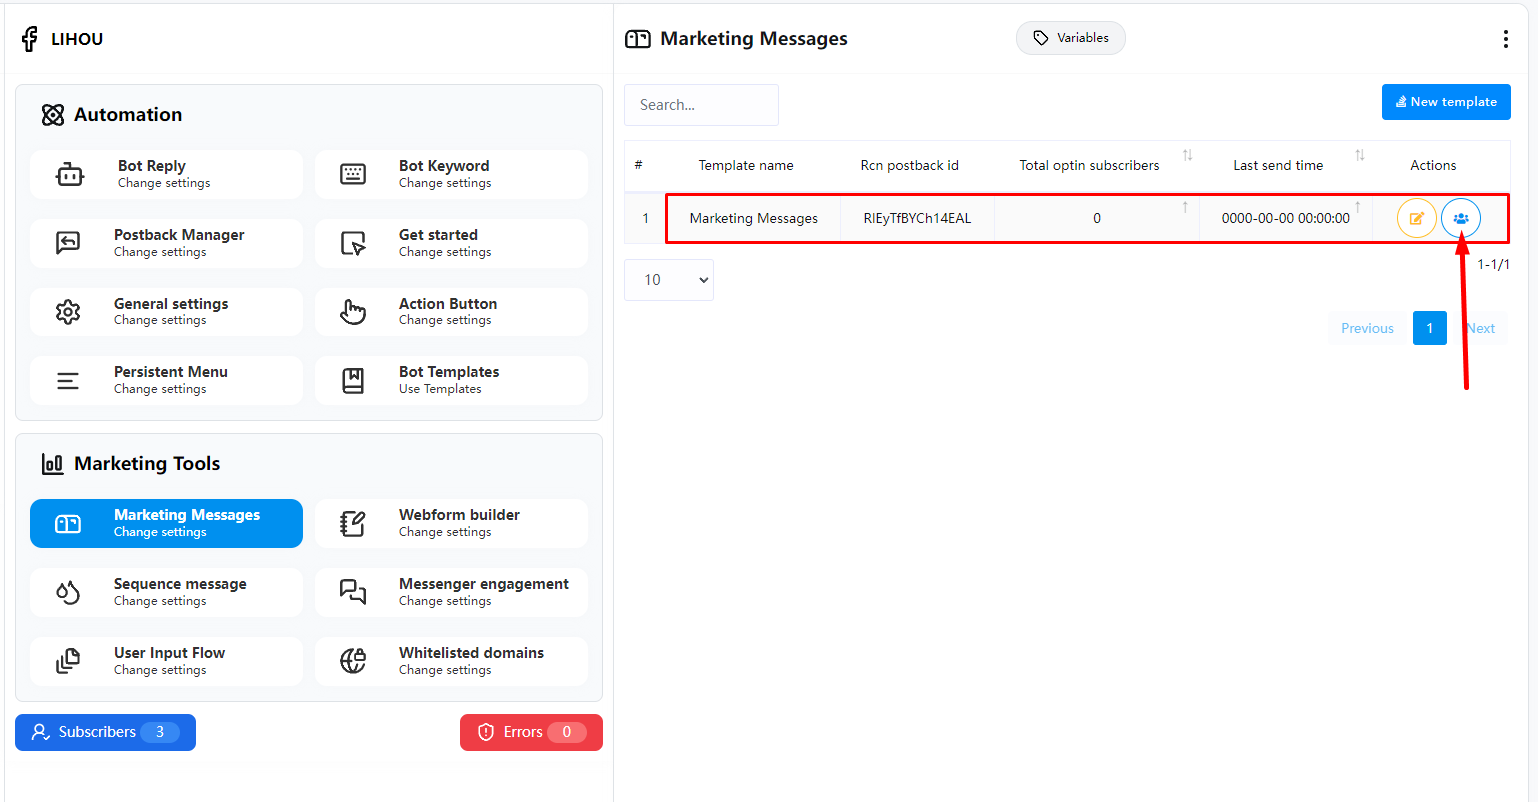
ADS Welcome Message Flow
When creating Click-to-Messenger or Click-to-Instagram Direct ads, you can enhance user engagement by connecting message flows from messaging partner applications. These message flows can include text, images, emojis, and button message types.
This guide explains how to manage welcome message flows using FransChat.
Navigate to Bot Manager Marketing Tools ADS Welcome Message , and select “Create New Flow.”
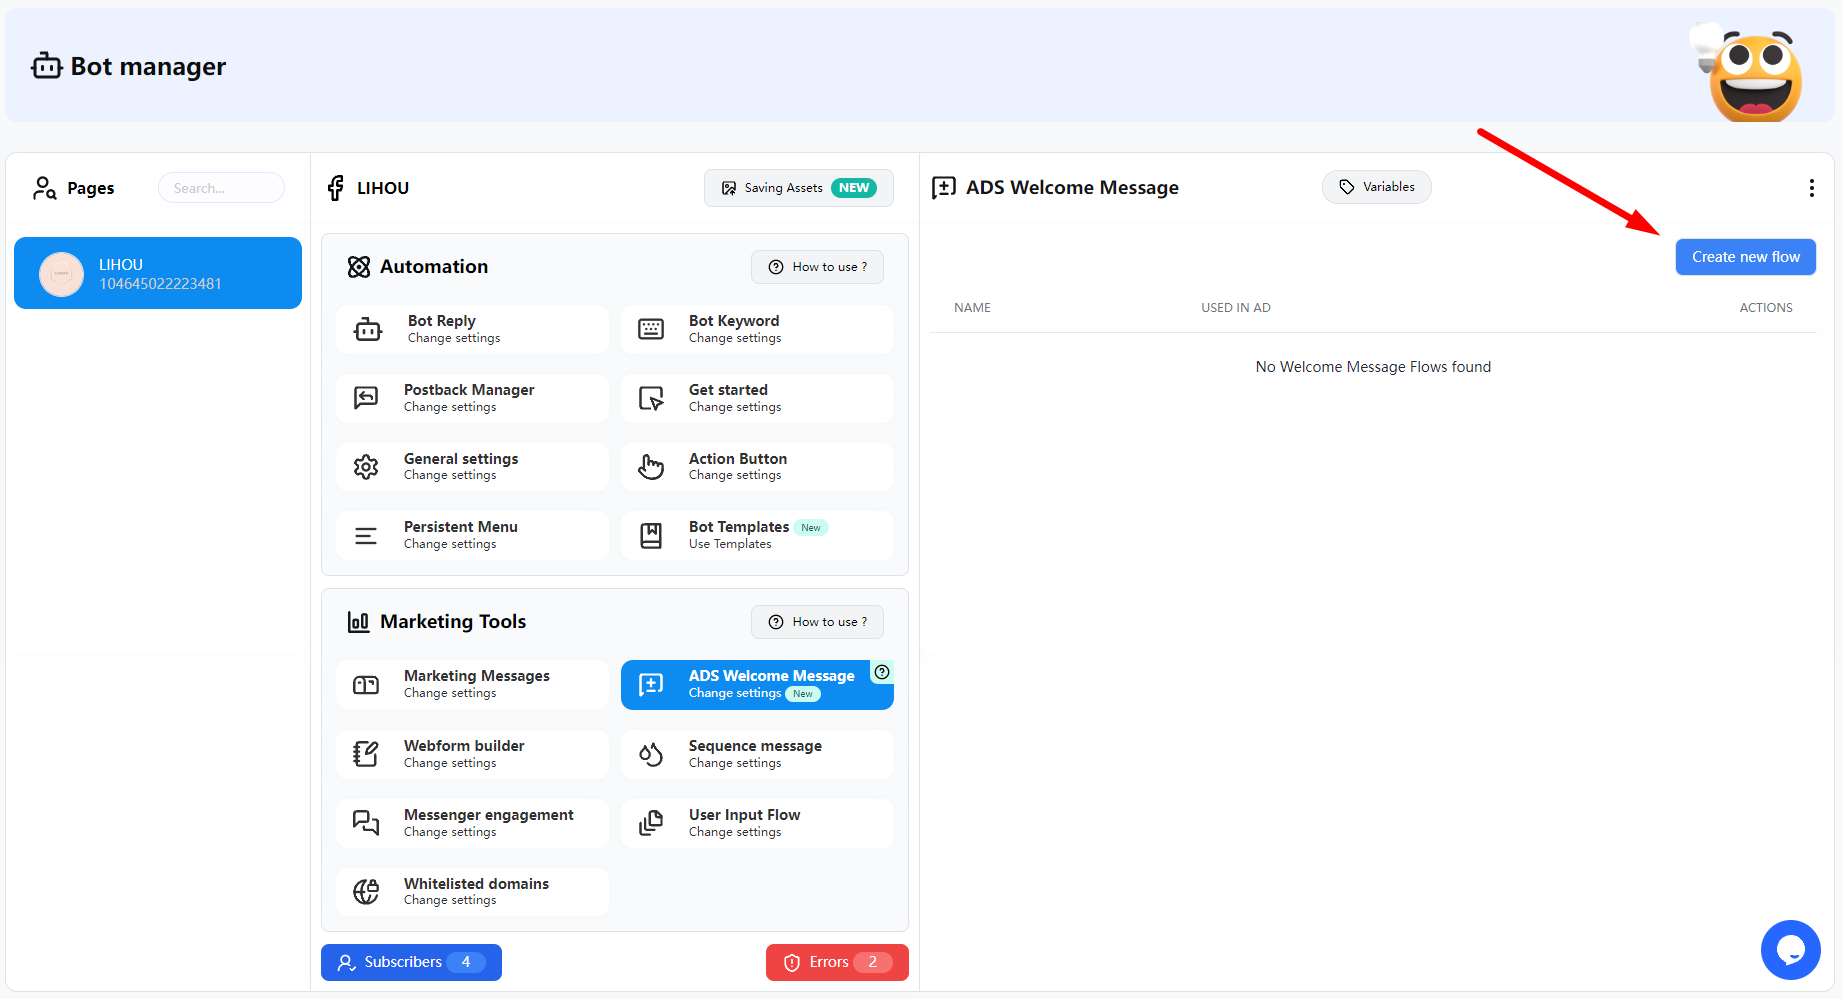
Next, you will see a pop-up window. Here, you must enter the Flow Name and select Eligible Platforms. If your page is linked to Instagram, you will see both Messenger and Instagram as options. You need to choose which platform this ads welcome message flow will be used for.
Note:
- If you select the Instagram platform and choose Text under Messenger Type, you can only select either Buttons or Quick Replies, not both.
- If it’s for the Messenger platform, you can choose both Buttons and Quick Replies.
- If Messenger Type is set to Card and you’re using the Instagram platform, you won’t be able to select Quick Replies.
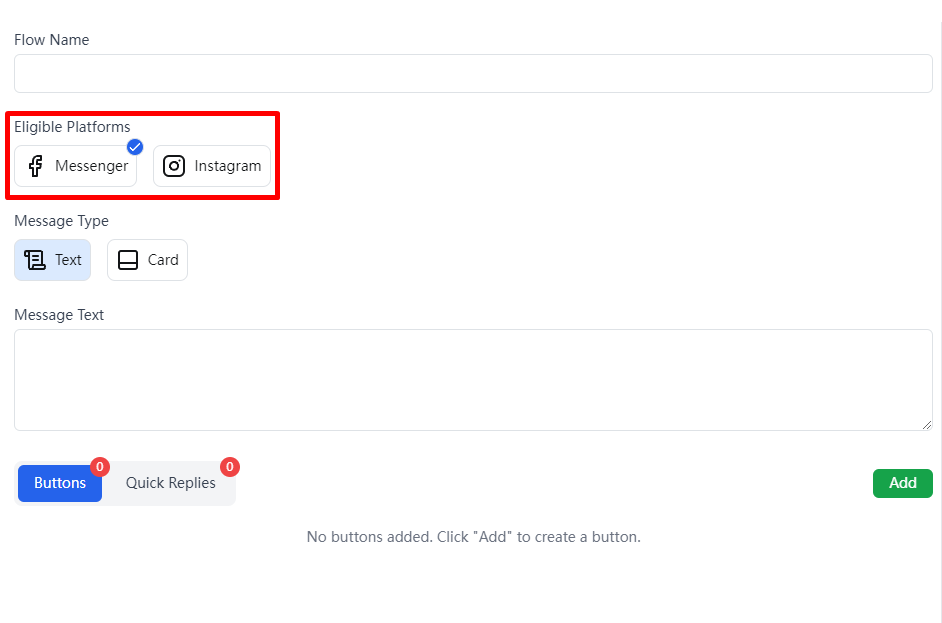
After adding a button, you can choose between two modes: Postback or Web URL.
- If you choose Postback, you will need to select the corresponding Postback ID. If none is available, you can click “Add New Flow” to create a new Postback.
- If you choose Web URL, you will need to provide your website URL.
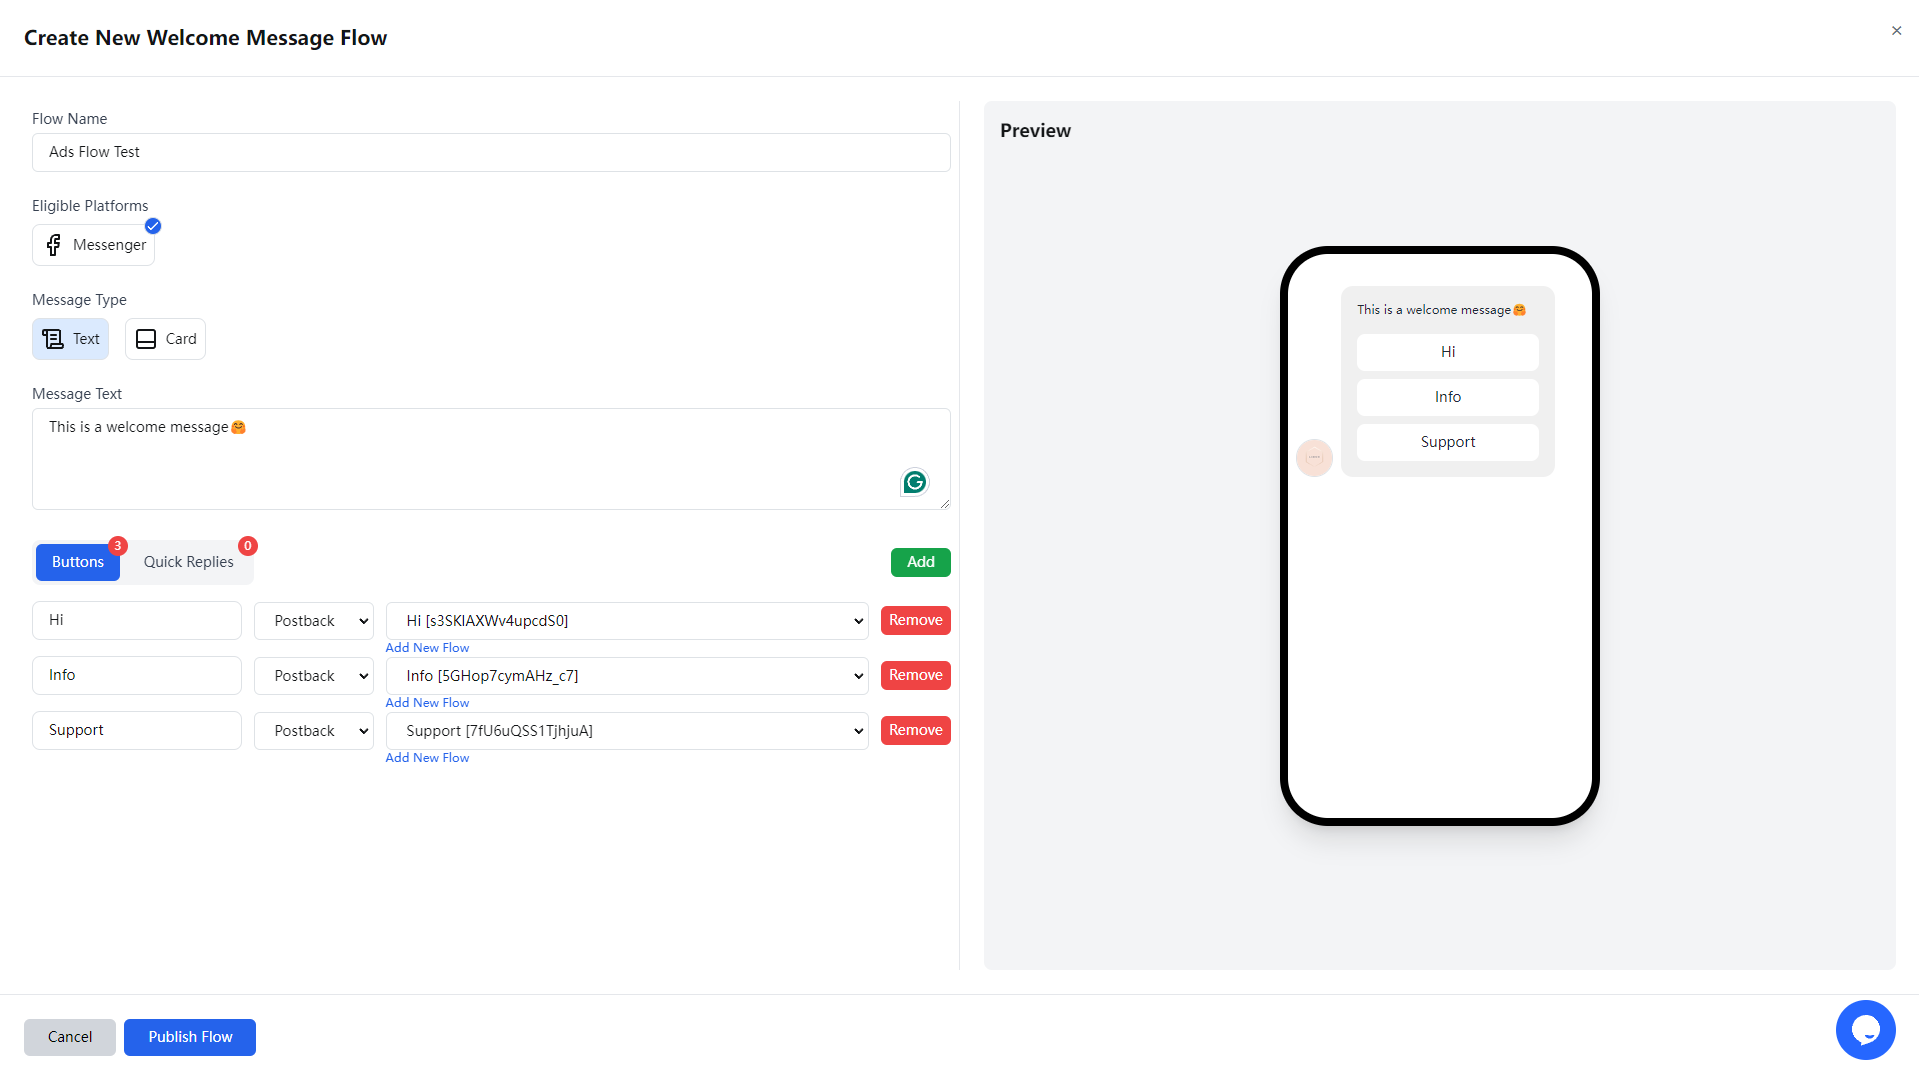
When you select Card under Messenger Type, you can upload an image or directly provide an image link.
You need to fill in the Card Title and Card Subtitle.
If necessary, you can also add Buttons or Quick Replies.
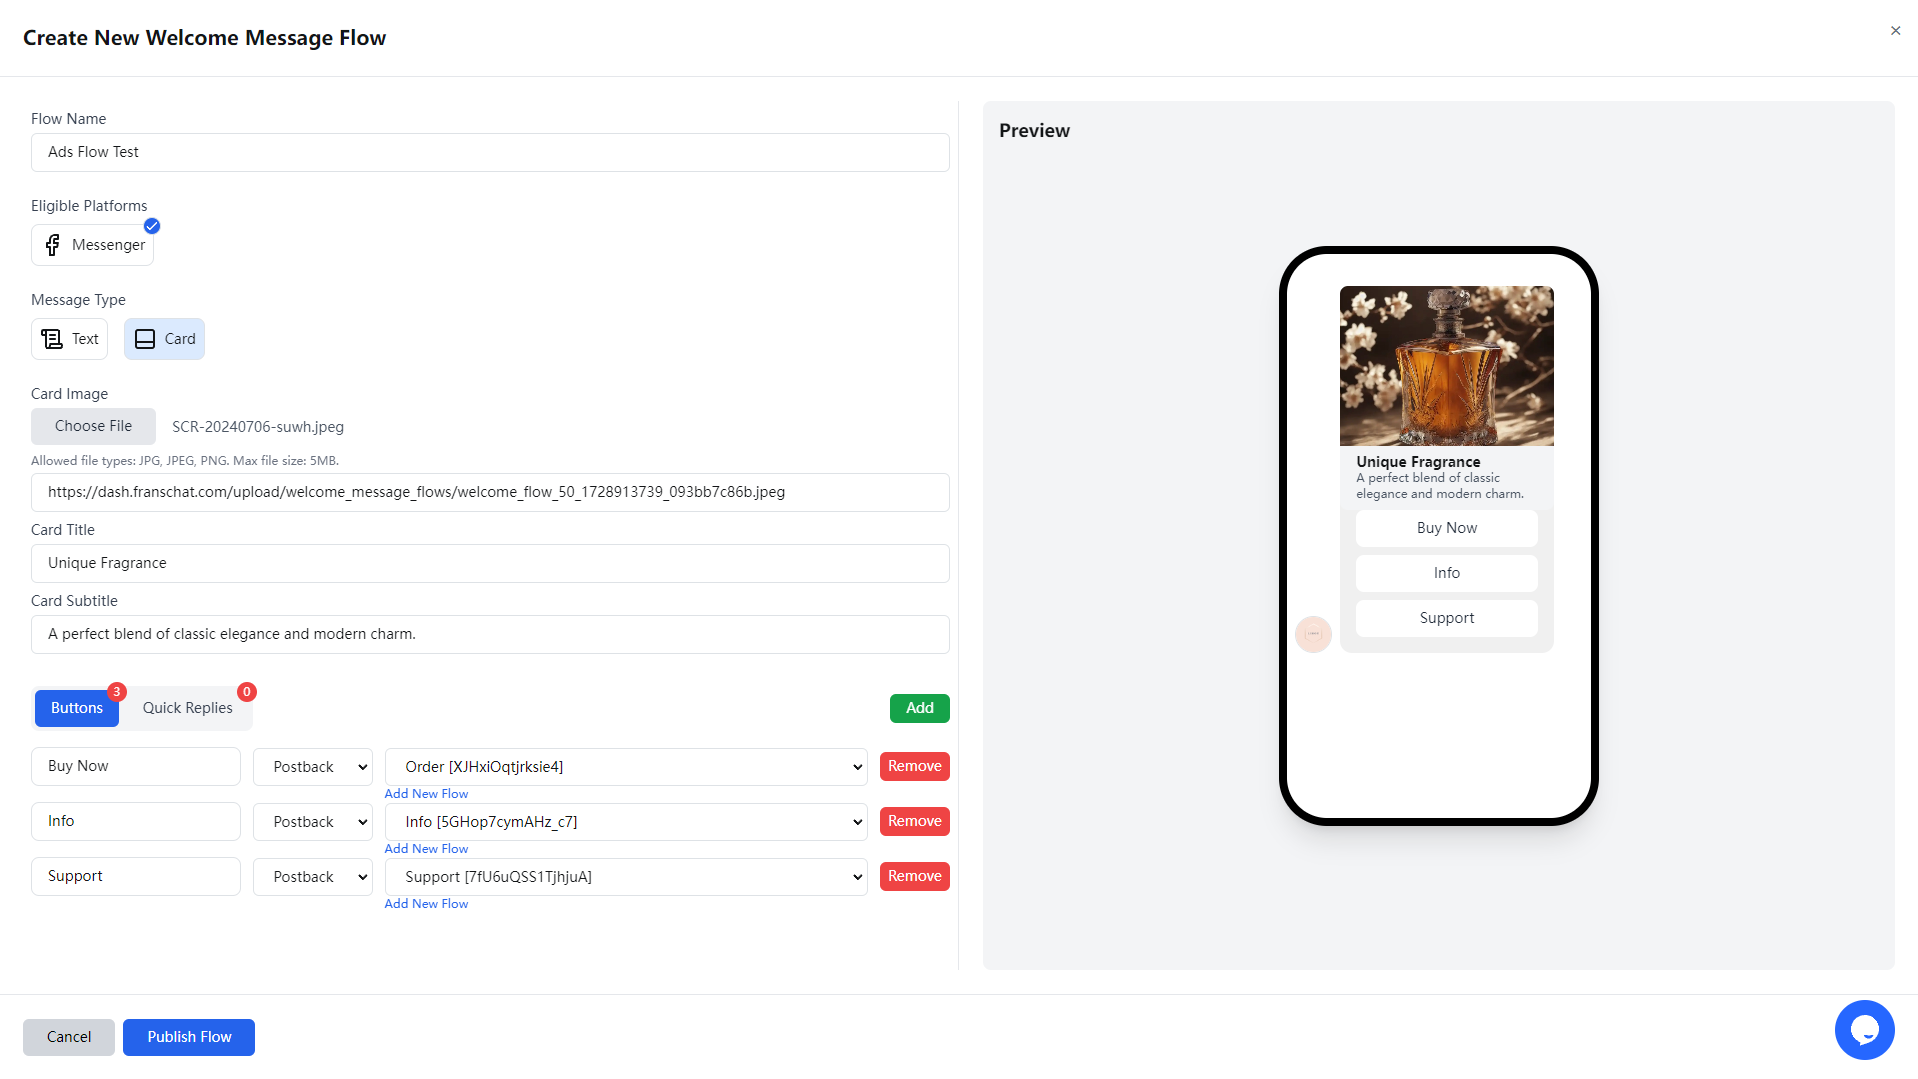
Once you have filled in all the information, click Publish Flow and wait for the upload to complete.

After completion, you can find the recently created flow in the Ads Welcome Message list, where you can edit or delete it.
In the Used in Ad column, you can see whether the flow is currently being used in any ads.
Please note that you cannot update flows that are currently connected to ads.
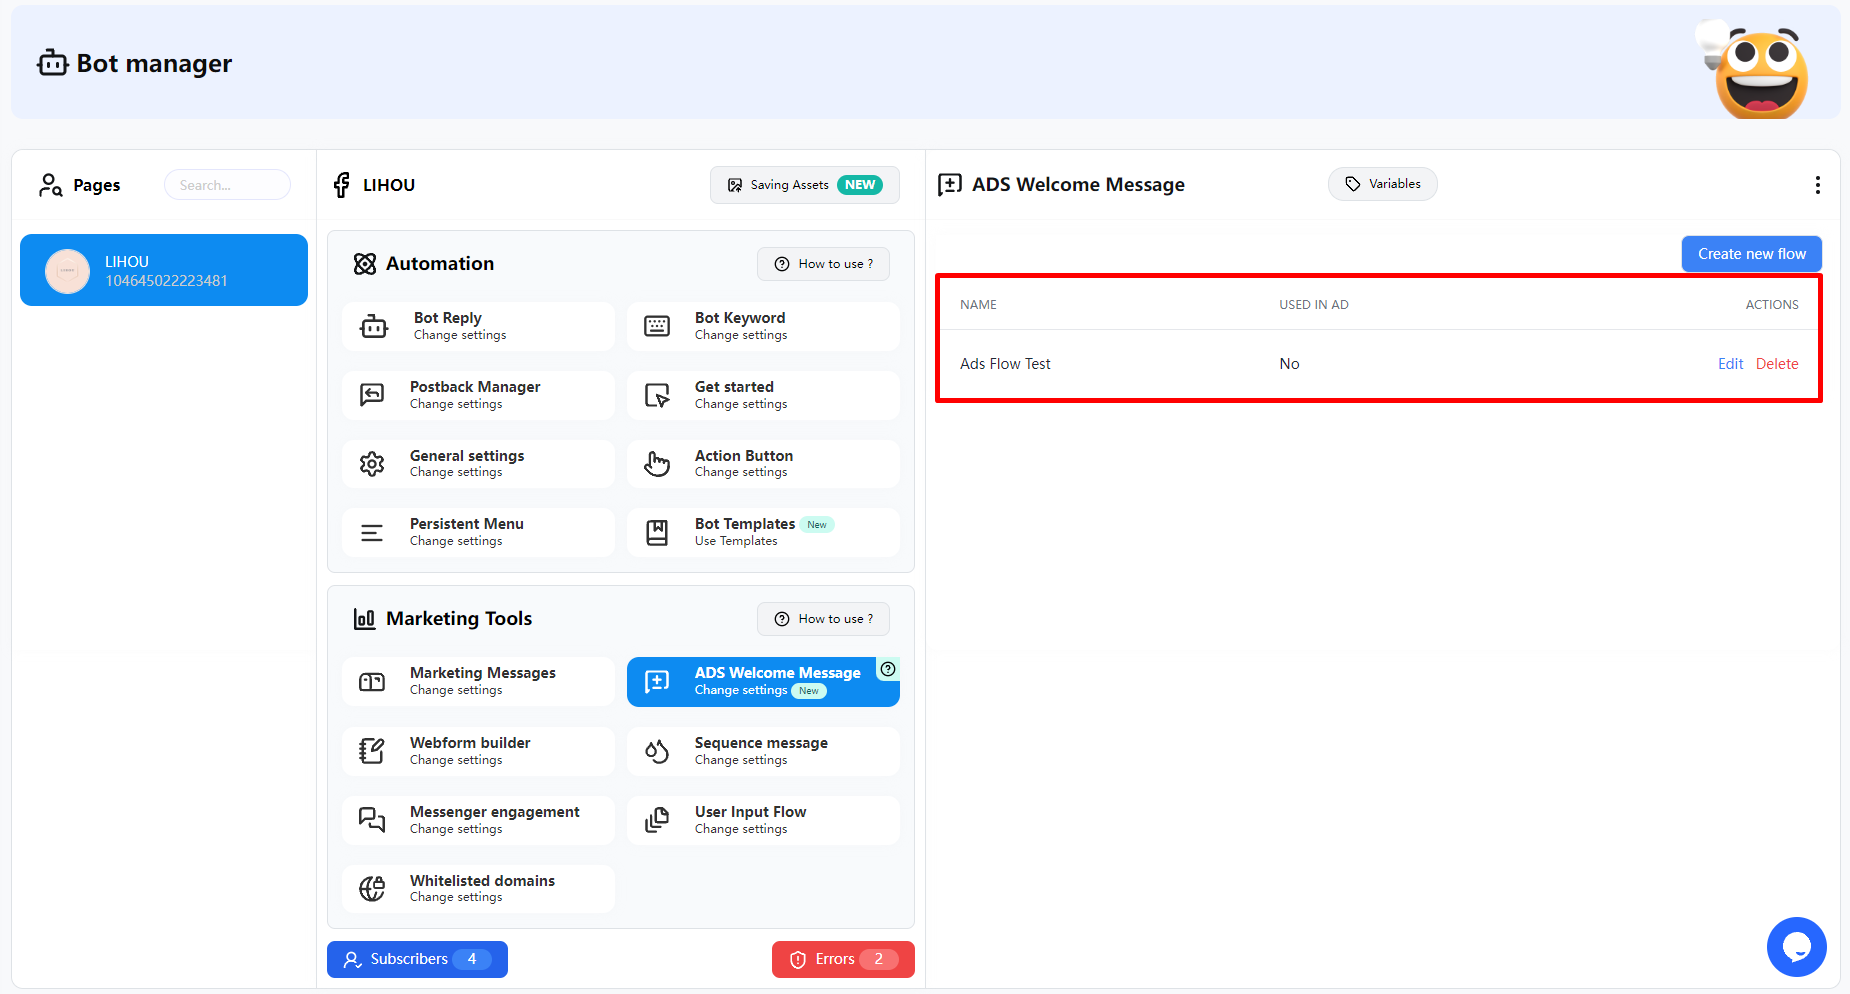
Next, we can select Partner App in Facebook Ads.
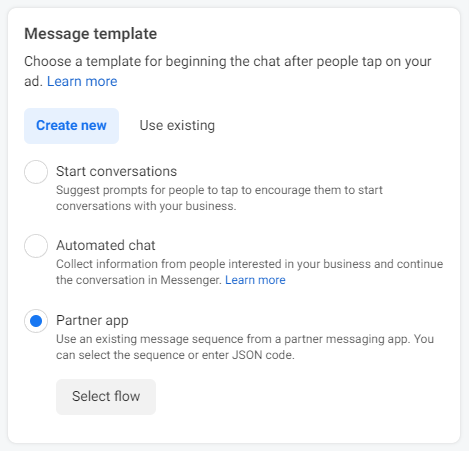
Then, select the FransChat platform in the Partner App.
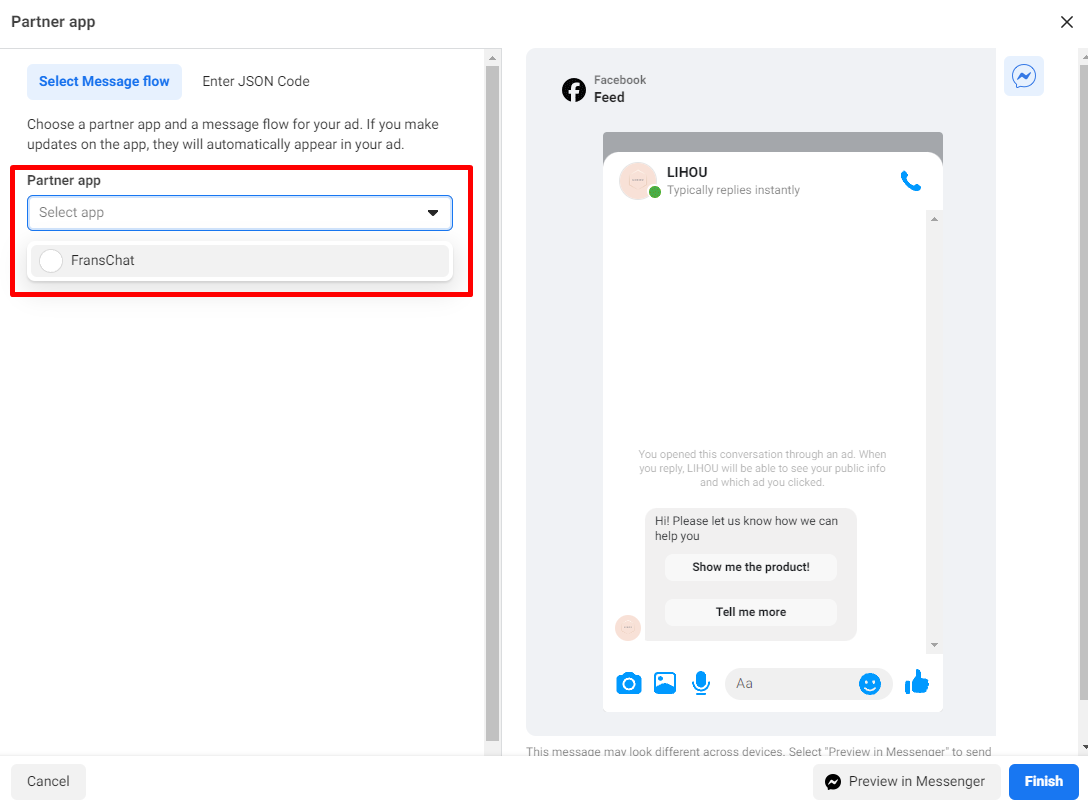
In the Message Flow, you can see the ads welcome message flows that you just created in FransChat.
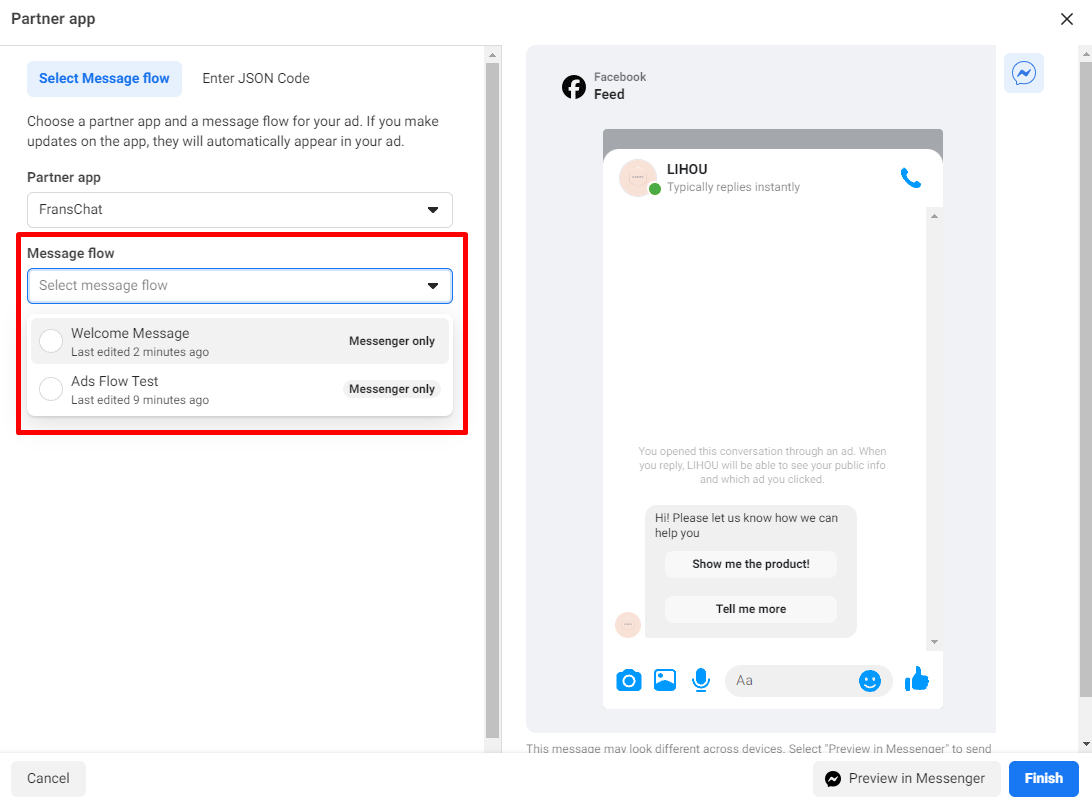
After selecting Message Flow, you can view the actual message template in the right-hand pane.
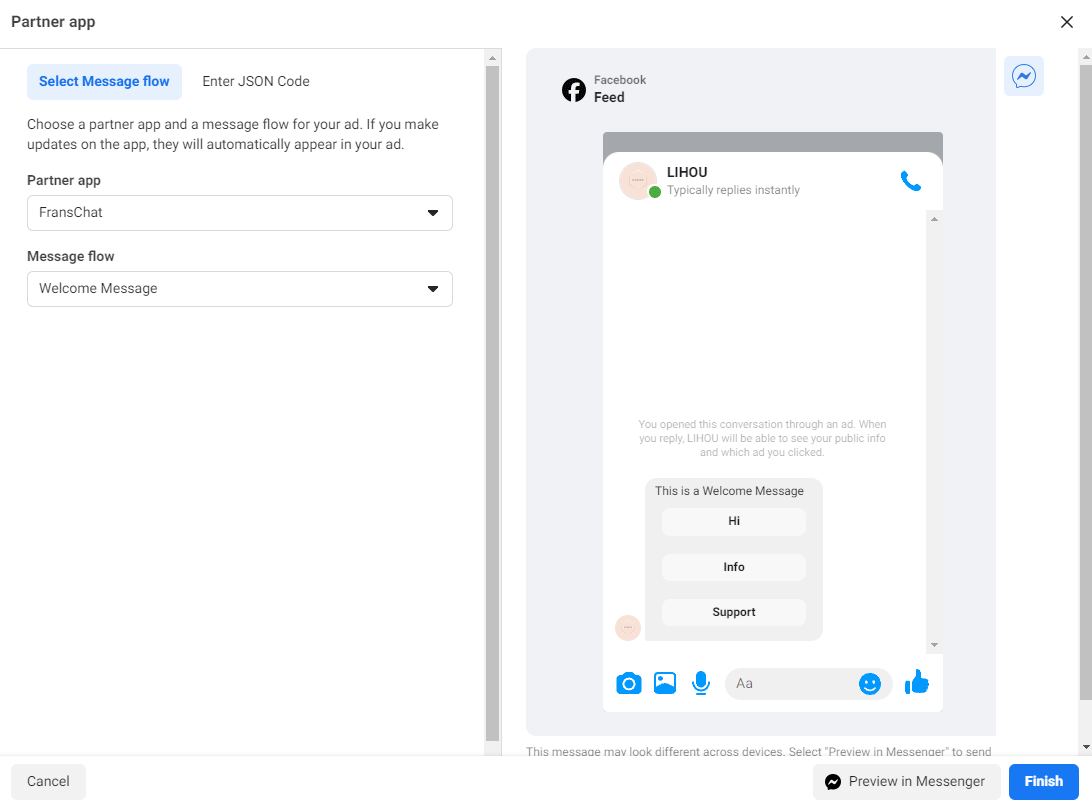
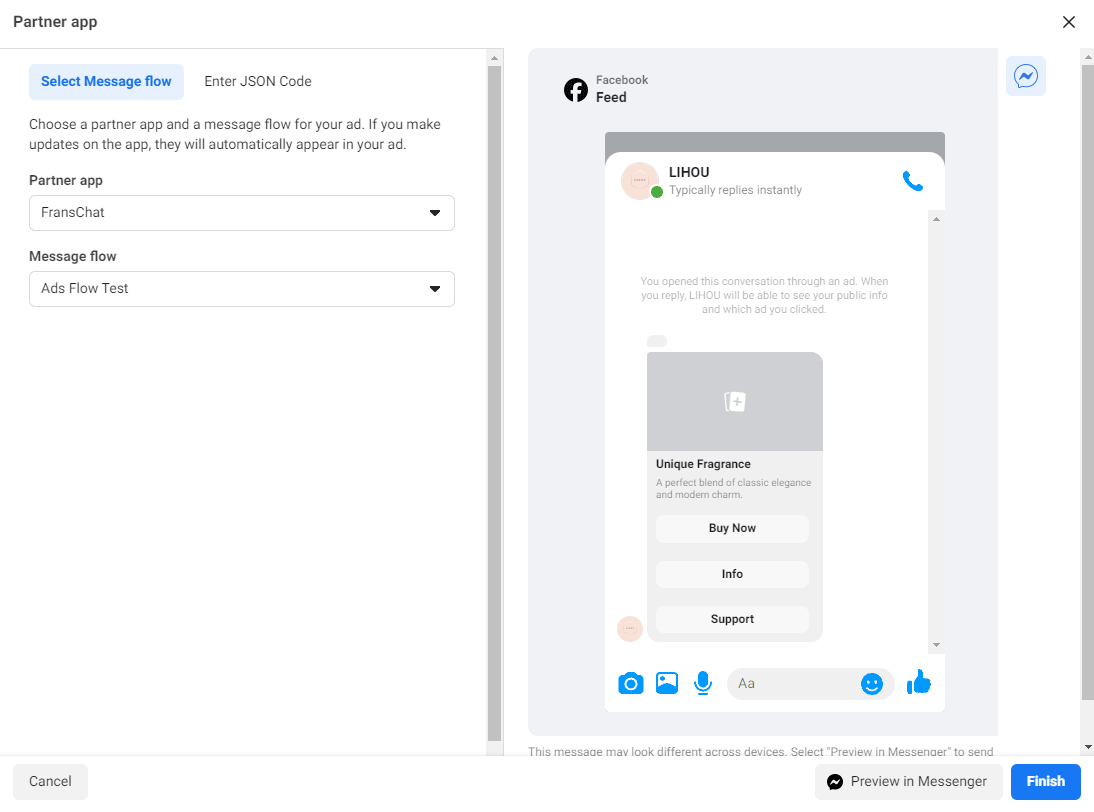
If you have created Quick Replies, you can also see the message templates with Quick Replies in Facebook Ads.
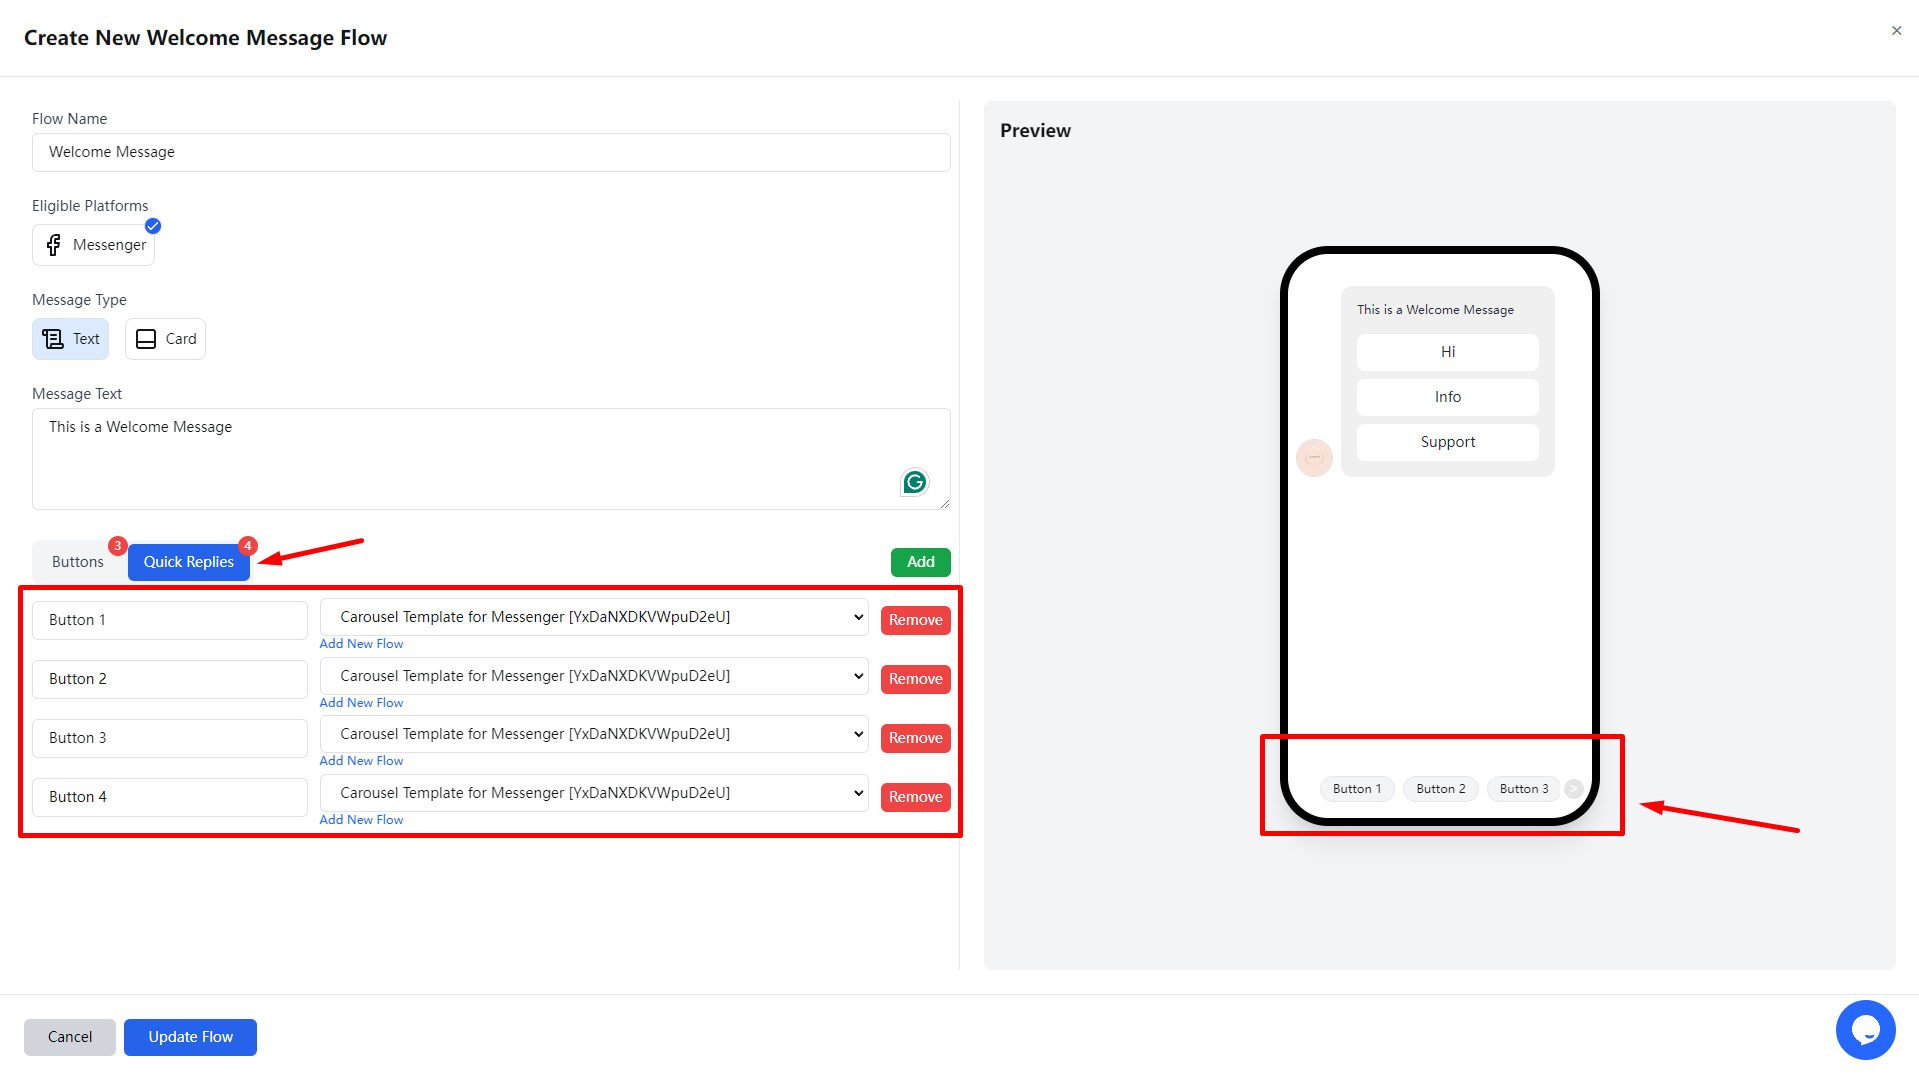
Finally, if you need to test this flow, you can click Preview in Messenger. You will then see the message template in your Messenger.
Once you confirm that there are no issues, click Finish to complete the setup.
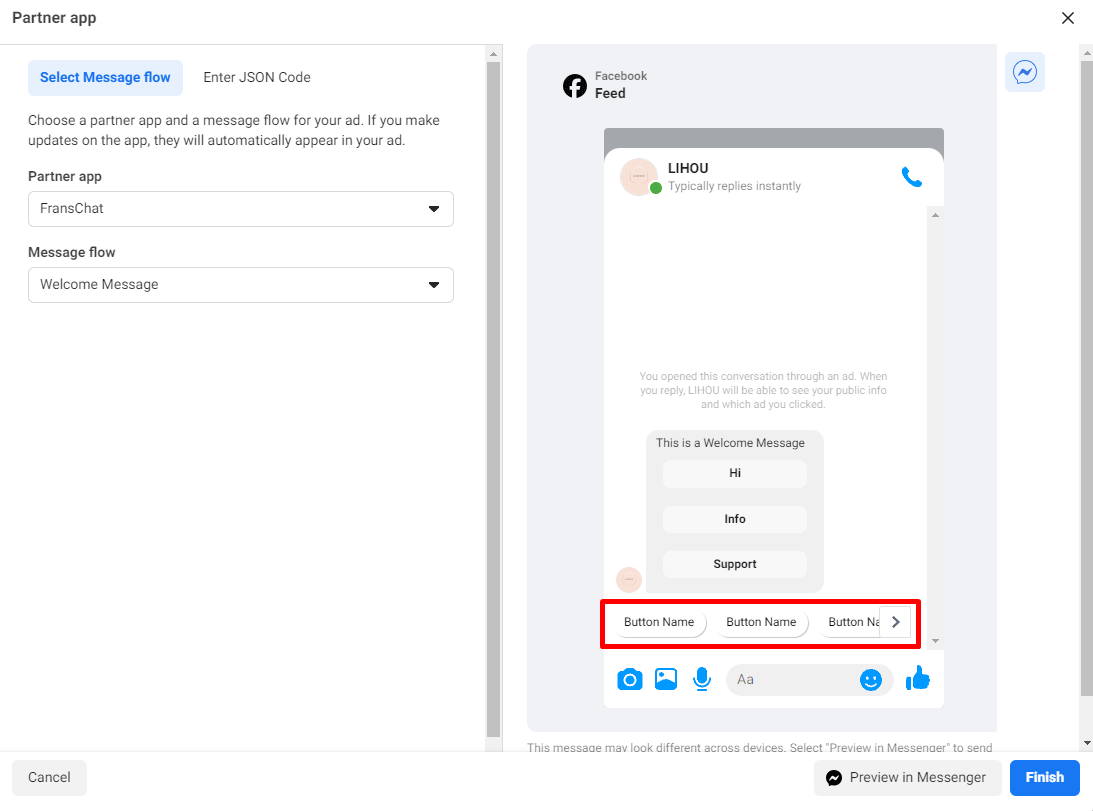
Webform builder
How it works
The Messenger Platform allows you to open a standard webview, where you can load webpages inside Messenger. This lets you offer experiences and features that might be difficult to offer with message bubbles, such as picking products to buy, seats to book, or dates to reserve.
Webform builder
Go to Messenger Bot Webform builder and you will see all your existing webview form you built so far.
- icon refers webview preview to know how it will look like and to copy webview url
- icon refers webview report to view form details and submitted form data
- Export Form Data
- icon refers webview edit
- icon refers webview delete
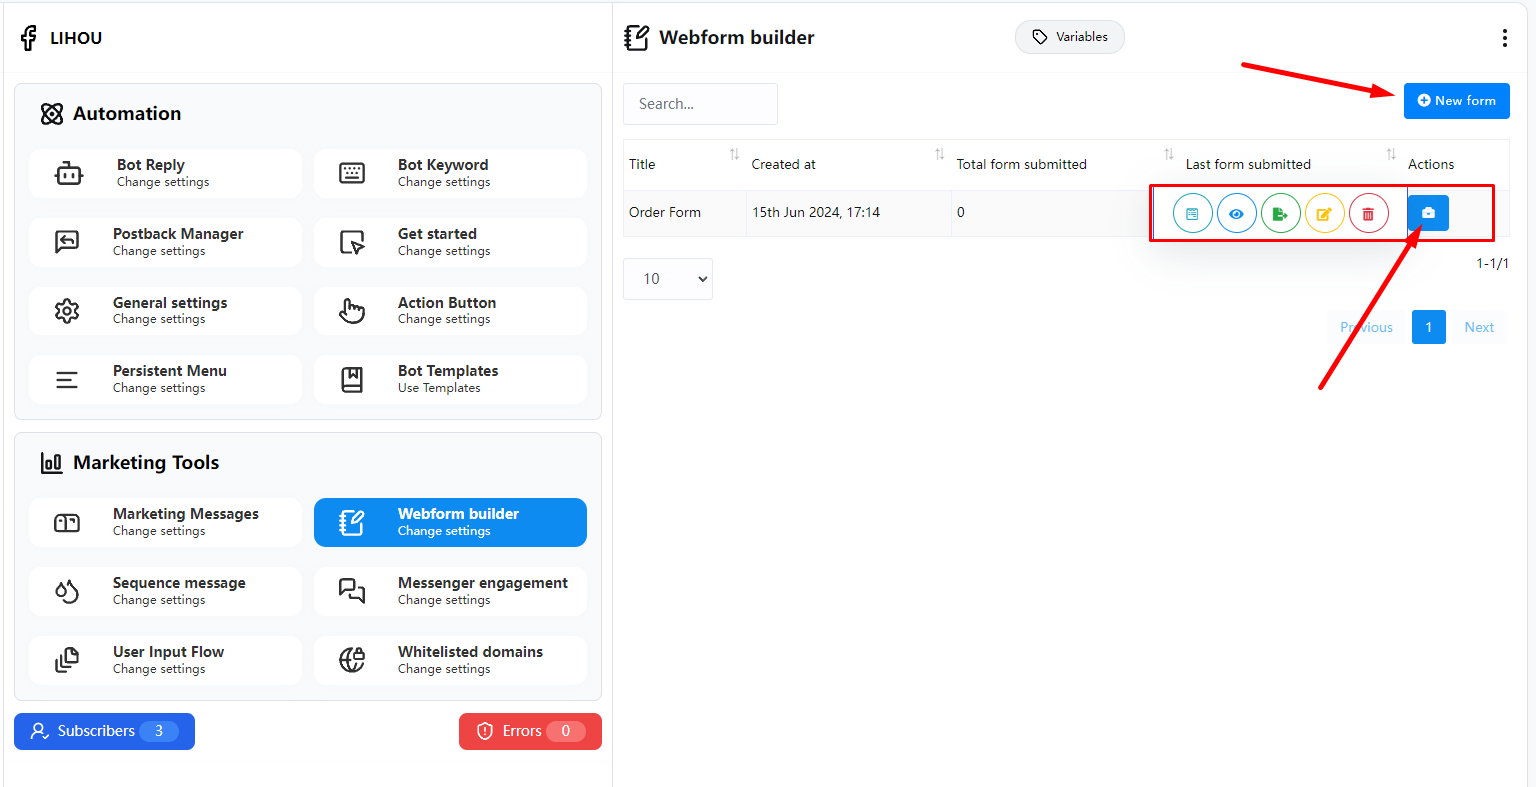
Create New Webform
To create a new webview form simply click “New form” button. This is a drag and drop form builder. Choose form name, title, page. You choose optional label and reply template. When people will submit the form they will be assigned to the selected labels and also they will receive the inbox reply.
Design your form easily by dragging the elements you want from right sidebar. Your form must have a submit button.
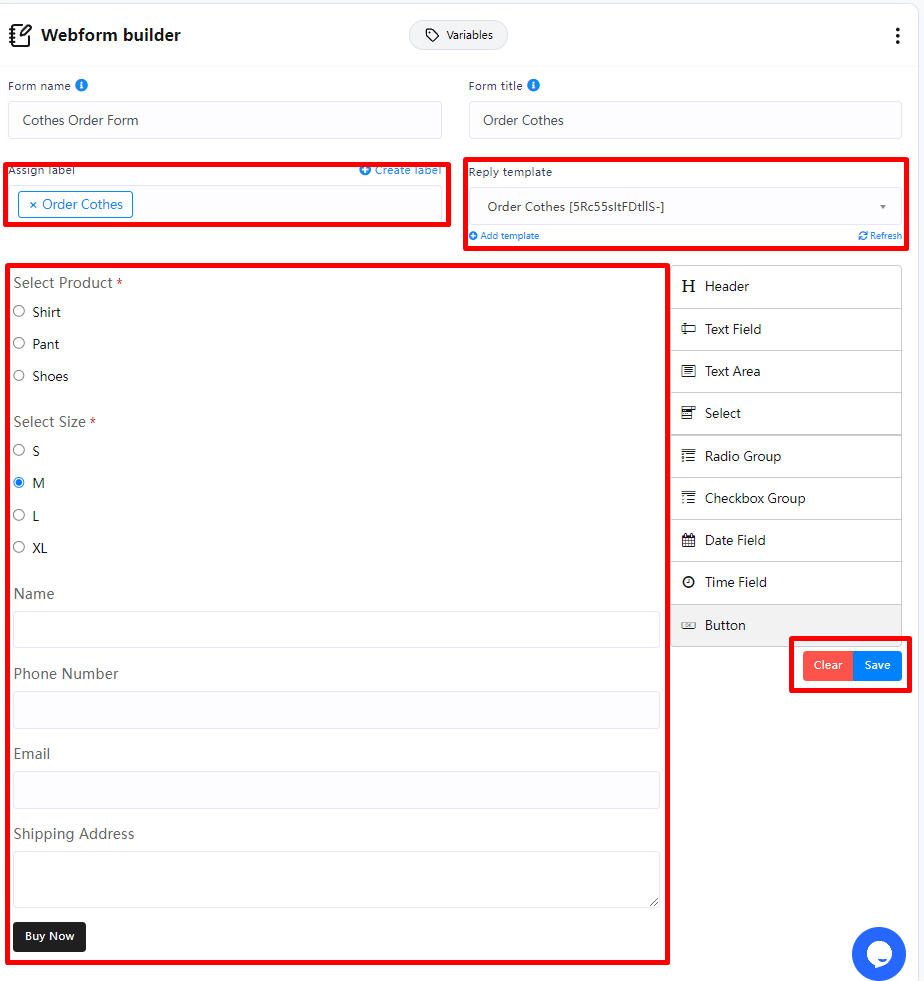
For each form field, you can edit it by clicking the pencil icon
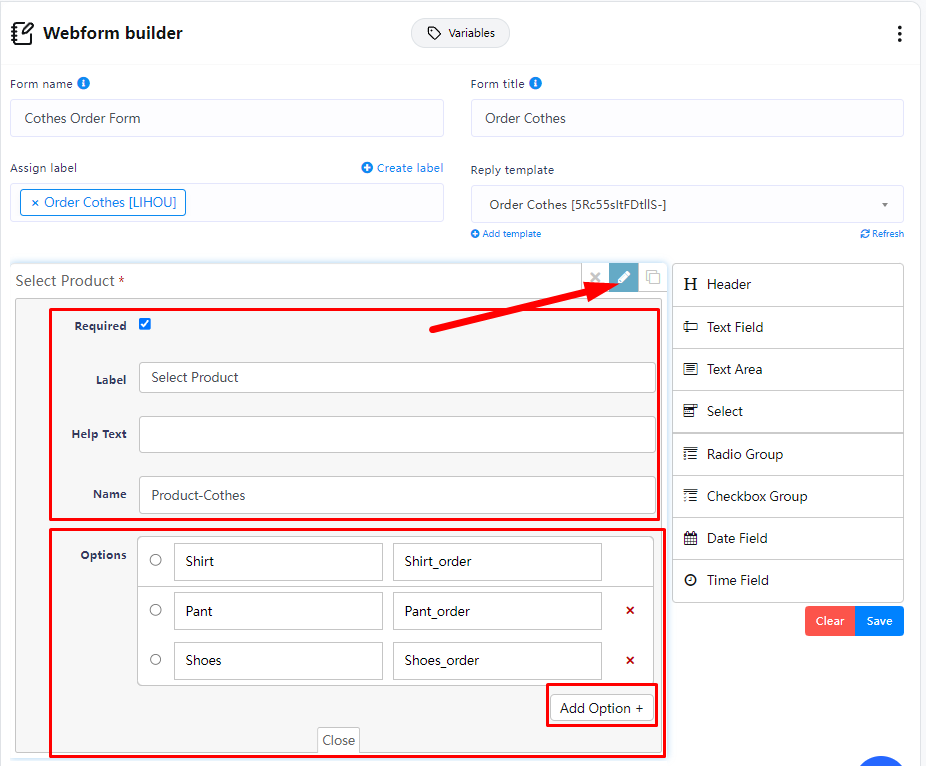
If it is a special field, such as email or mobile number, you can select the corresponding field in Type.
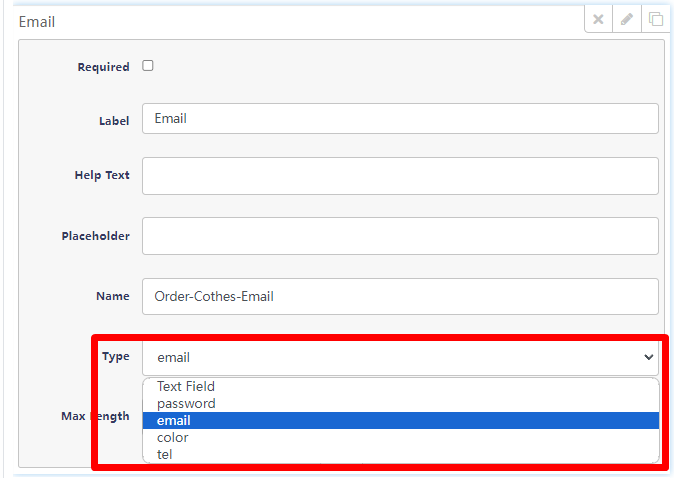
Finally, each form needs to have a button, click “Save” when you are done
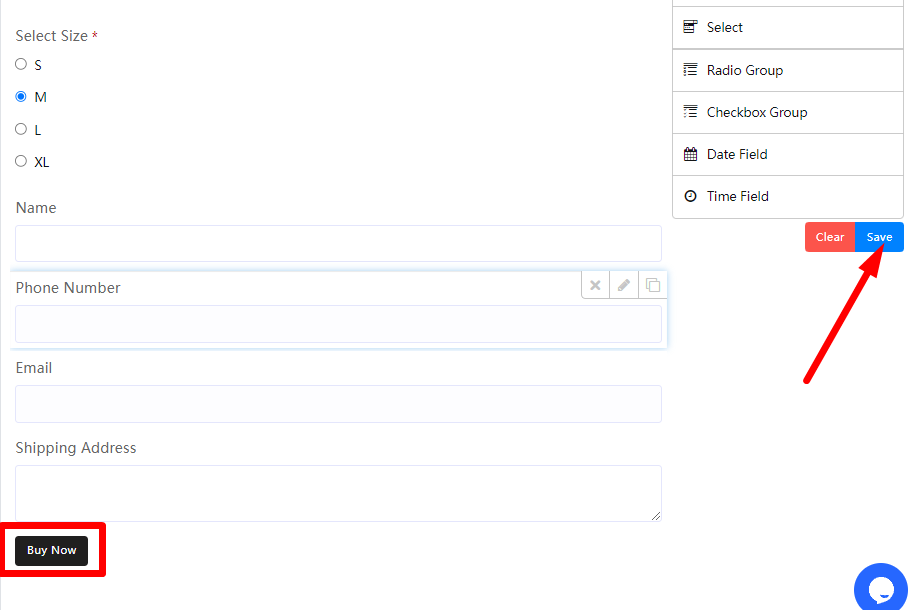
How To Use The Webform
Click icon and you can see your Webform preview, copy the browser URL, this is the Webform URL.
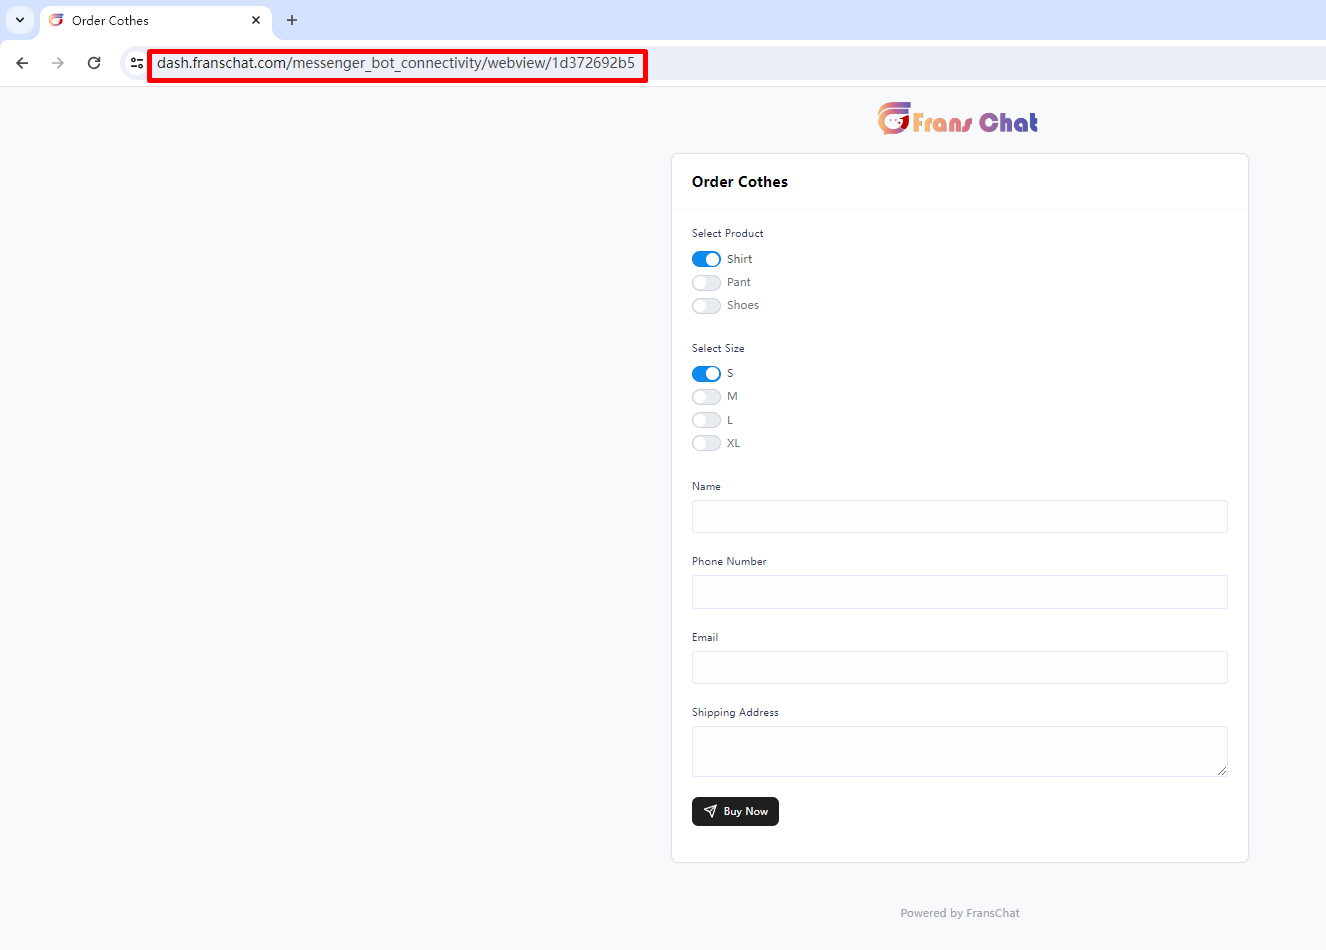
Now it’s time to use this Webform in bot settings. Go to Bot Manager Bot Reply , create a new flow or edit an existing bot settings. Webform works with text with buttons, generic template, carousel & media. Choose button type and choose Webform and put the copied URL.
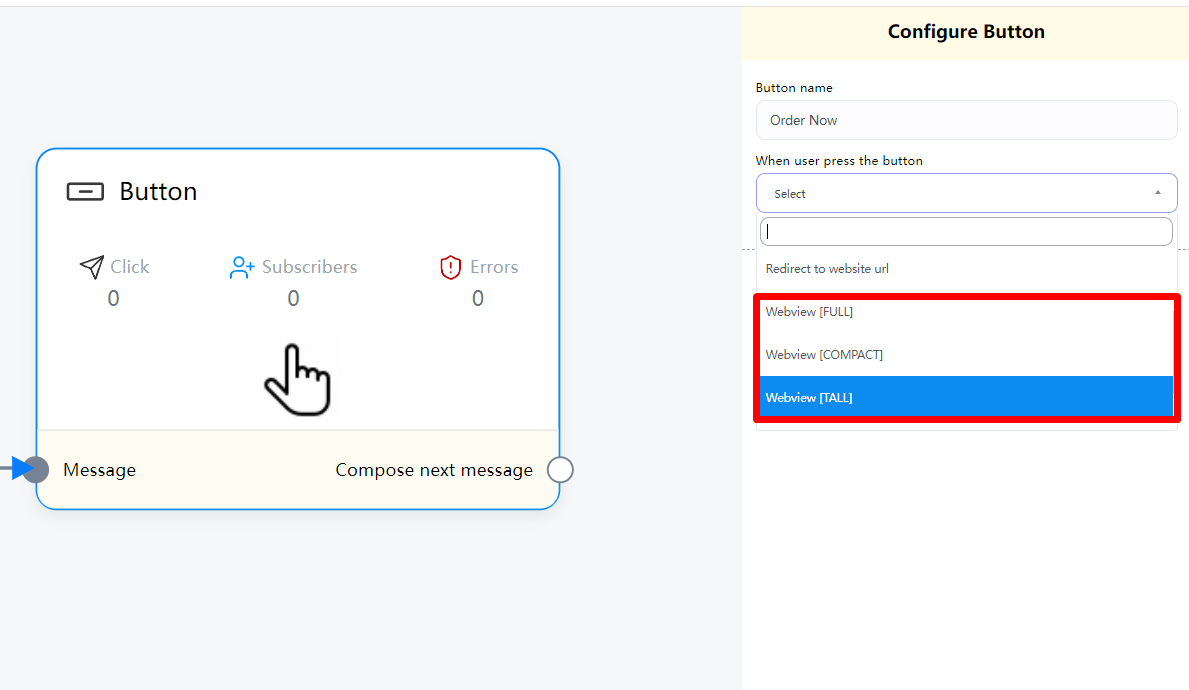
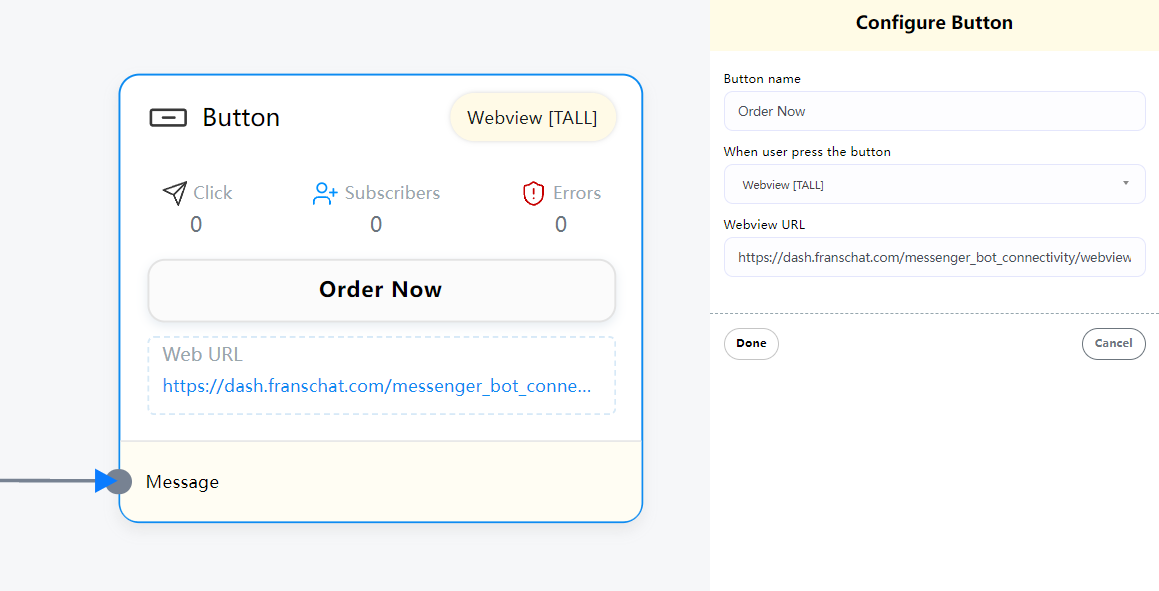
This will how this will look like in bot live action :
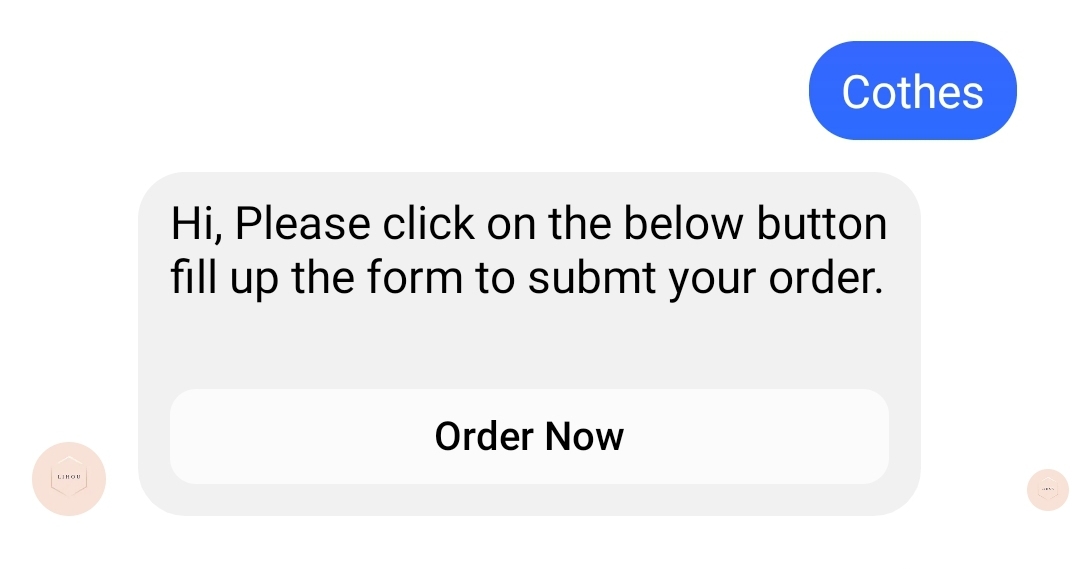
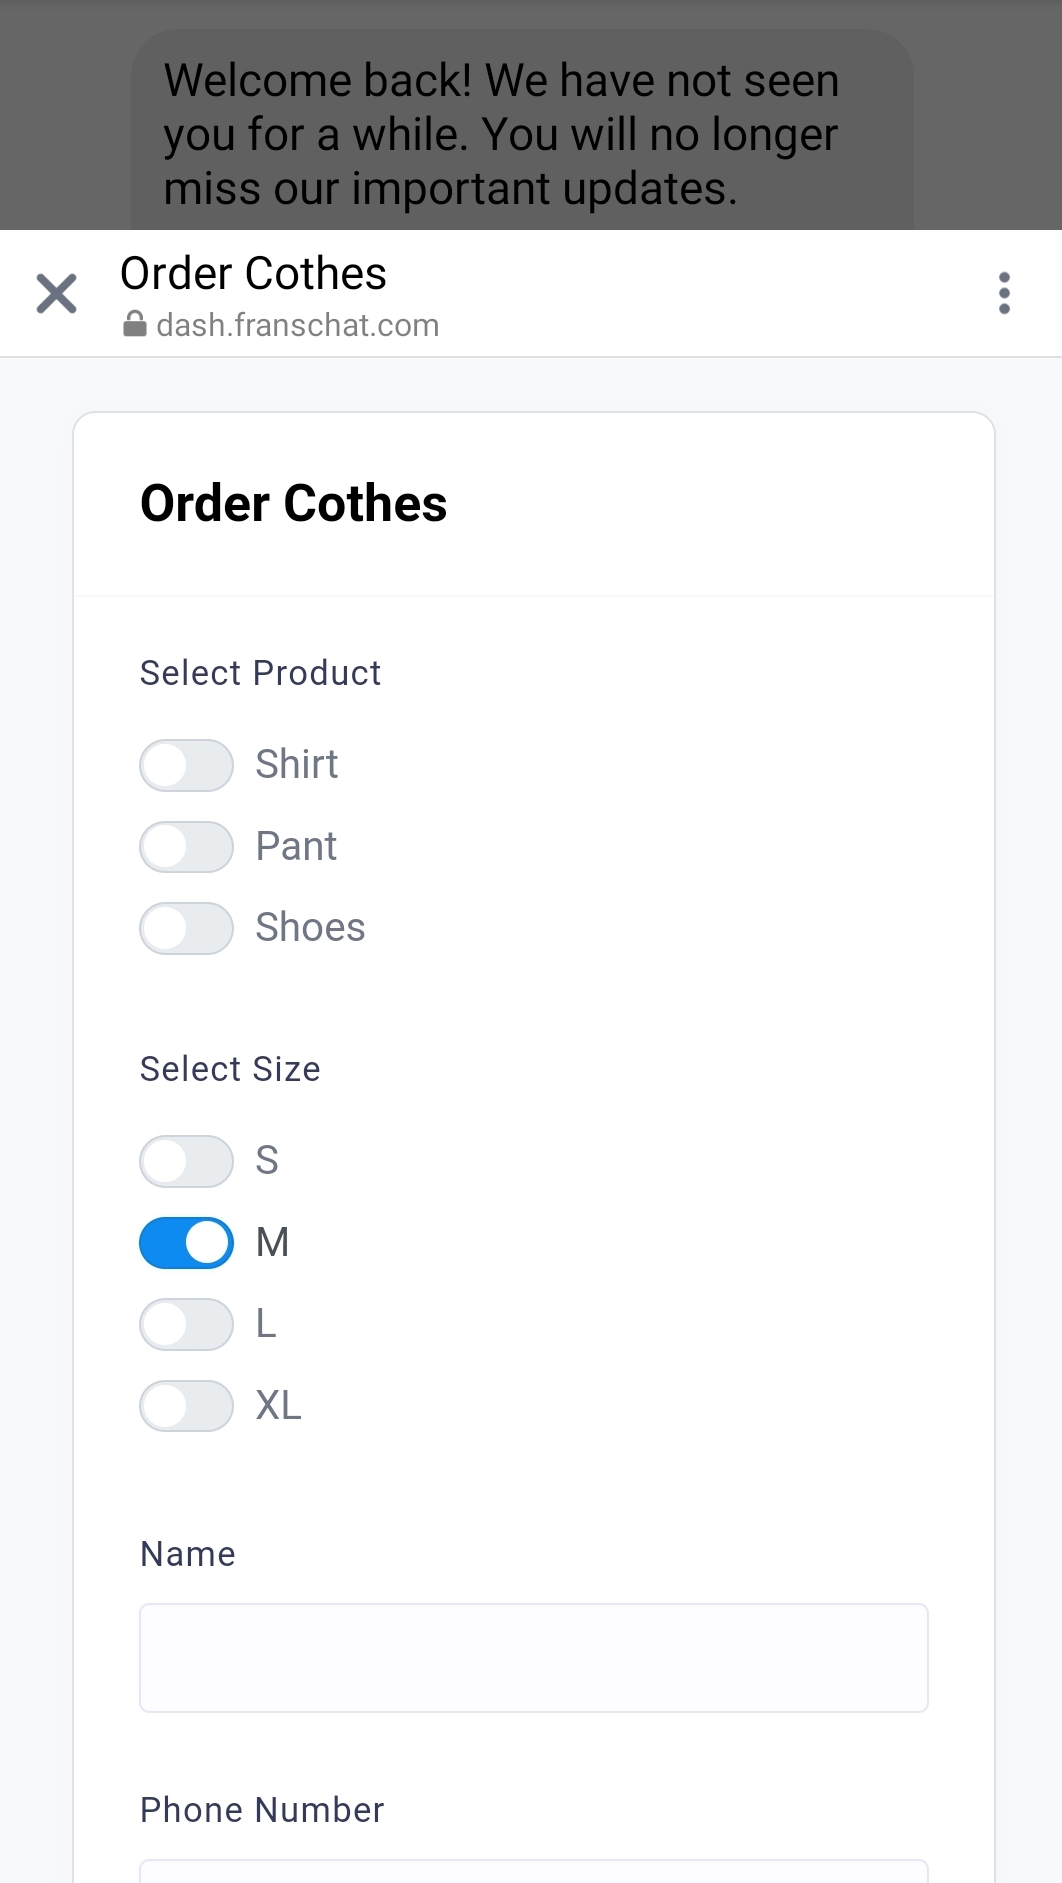
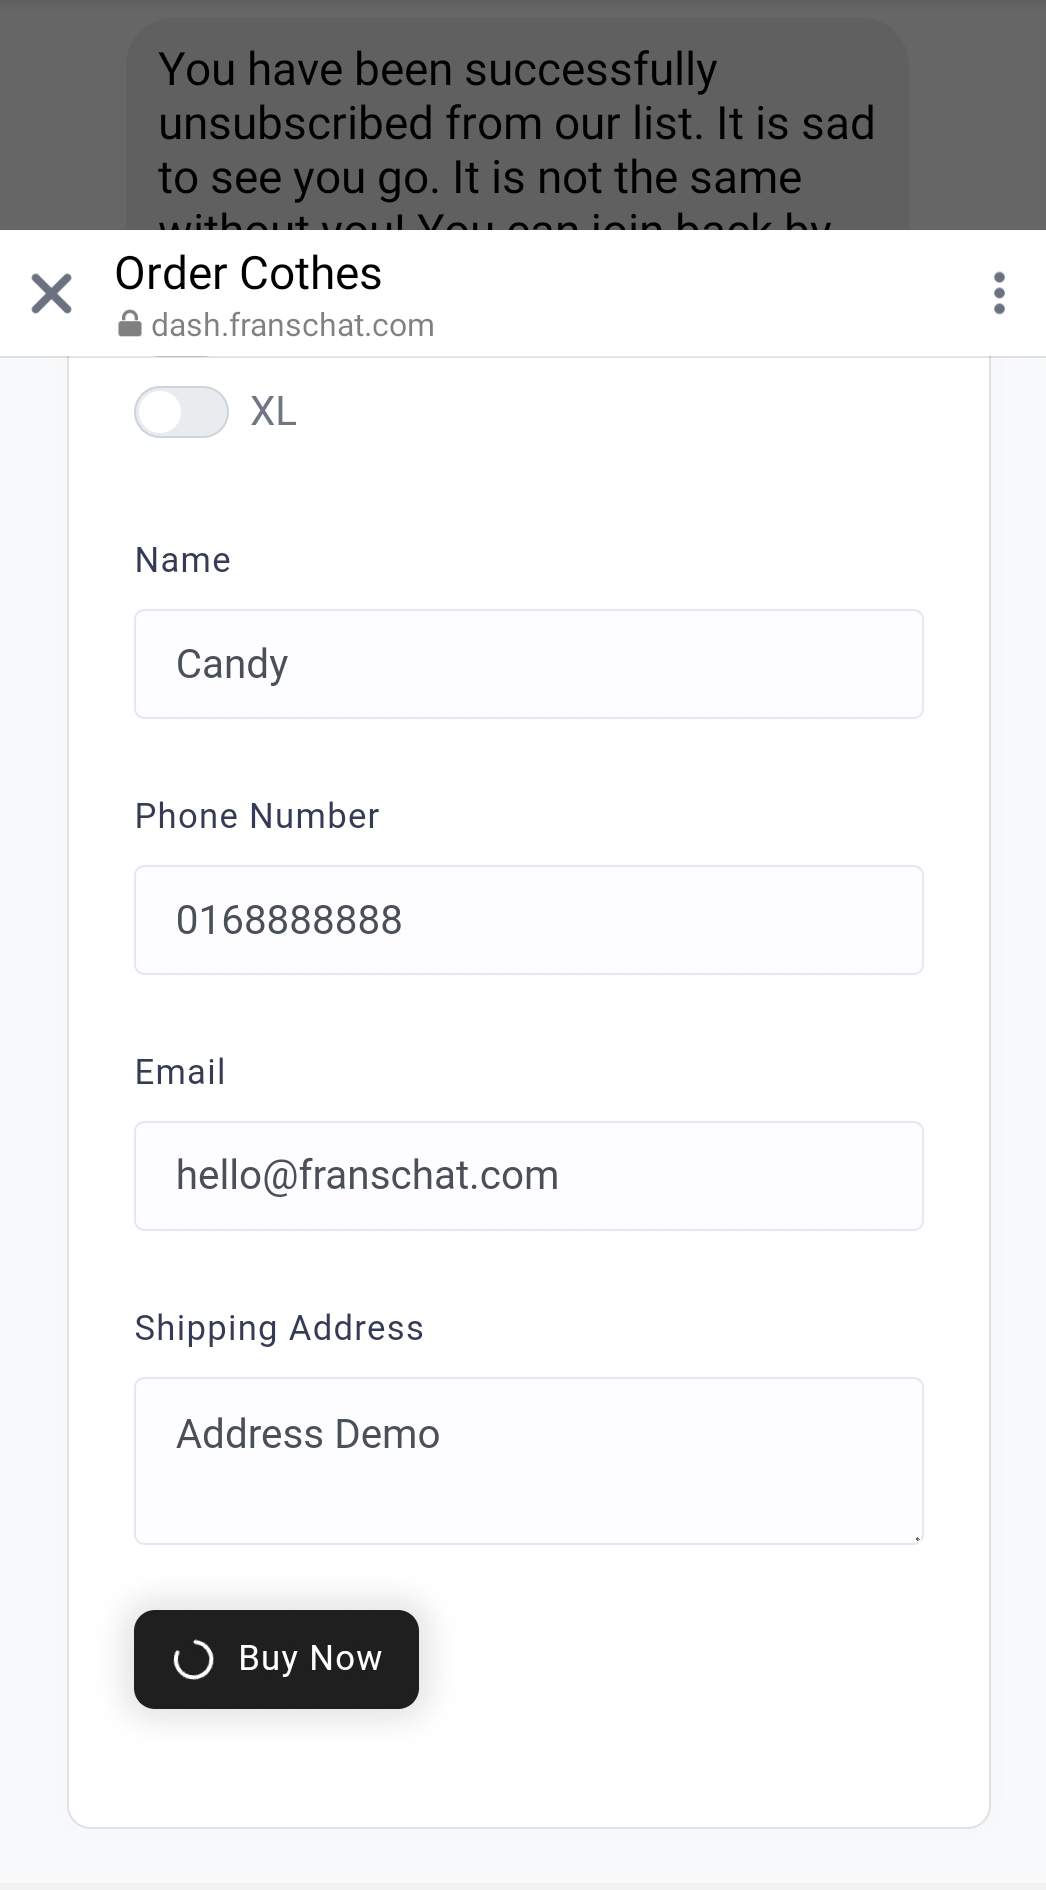
After submitting the form, the window will automatically close after Success! is displayed.
Then you will receive a response after submitting the form
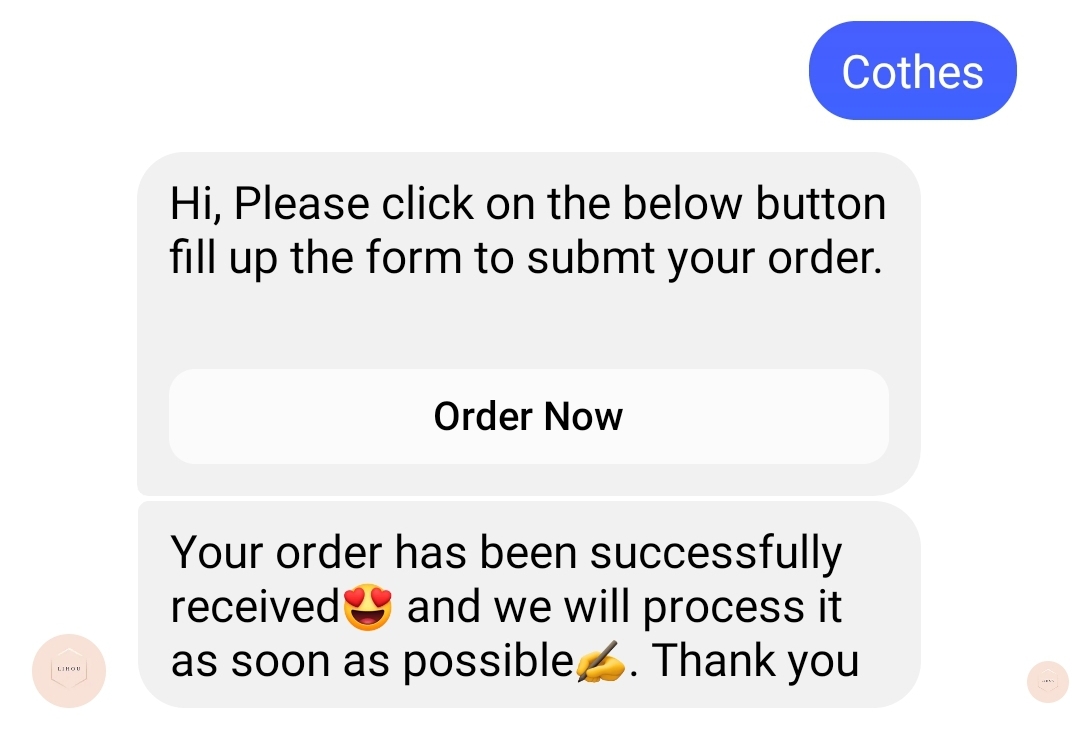
Report
Click icon in webview manager and you can see your webview report grouped by subscriber and clicking the eye icon inside here will pop up the submitted form data in details.
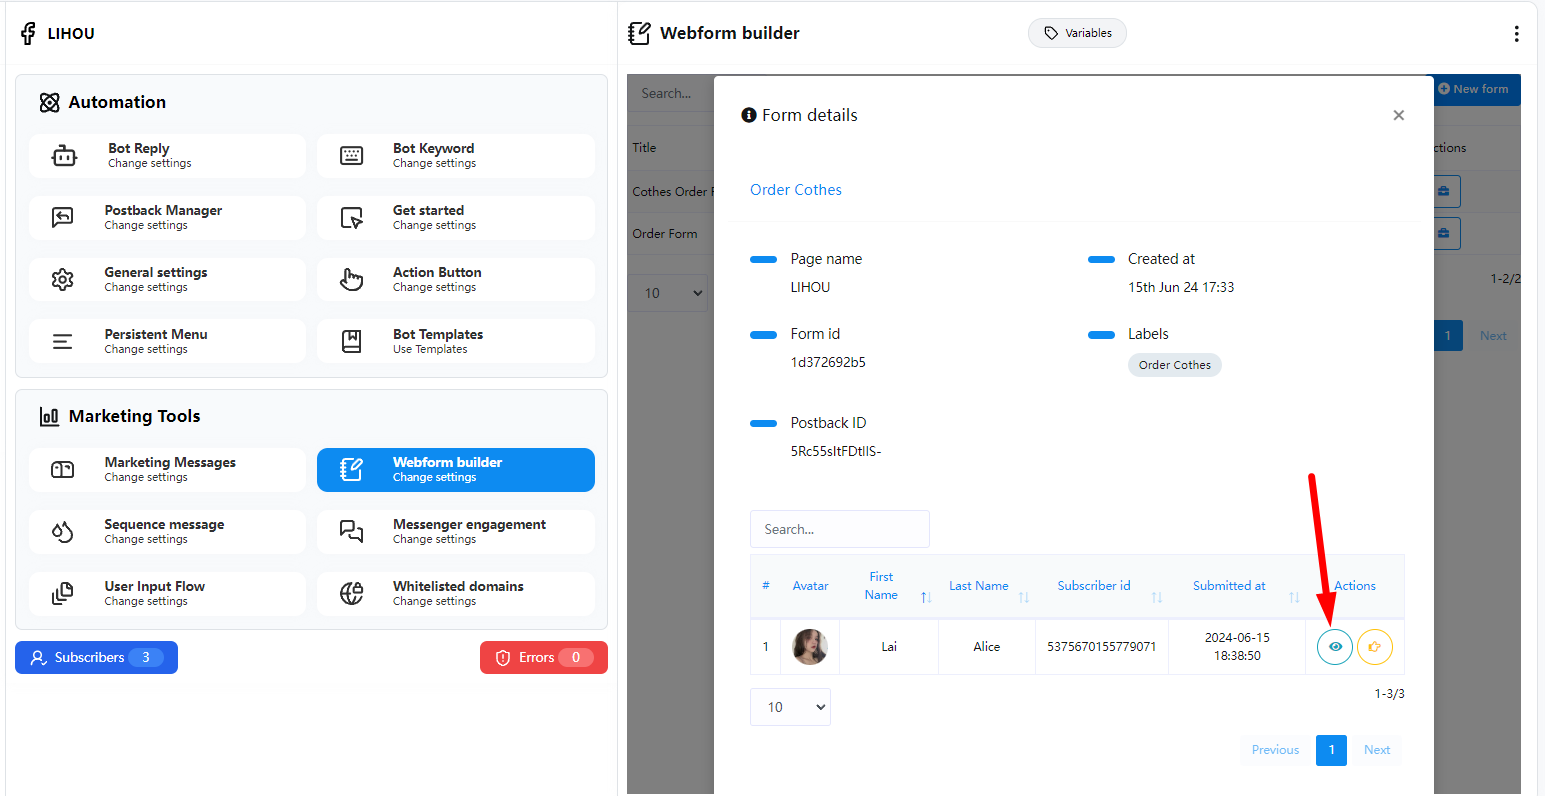
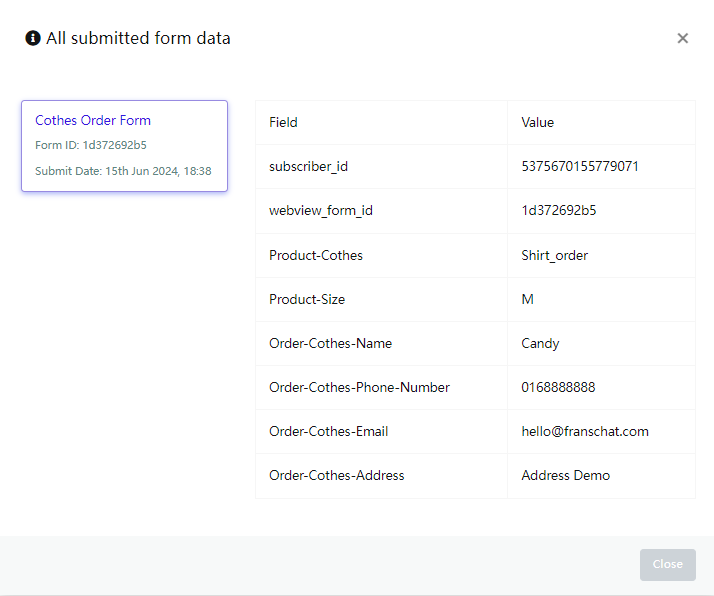
Example Use Cases
- A ticket-search bot can display an interactive stadium seat map for choosing a seat.
- A travel bot can provide travel preferences—aisle vs. window, inn vs. hotel, dietary needs—accessible from the persistent menu.
- A dental-appointment bot can display an interactive calendar for choosing an appointment slot.
- A news bot can provide a multi-select list of topics to subscribe to.
- A commerce or brand bot can offer personal preferences to customize offers and free gifts.
If you are a developer, you can set a webhook URL after the user submits the form. The system will send the content in the form to the webhhok URL after the user submits the form.
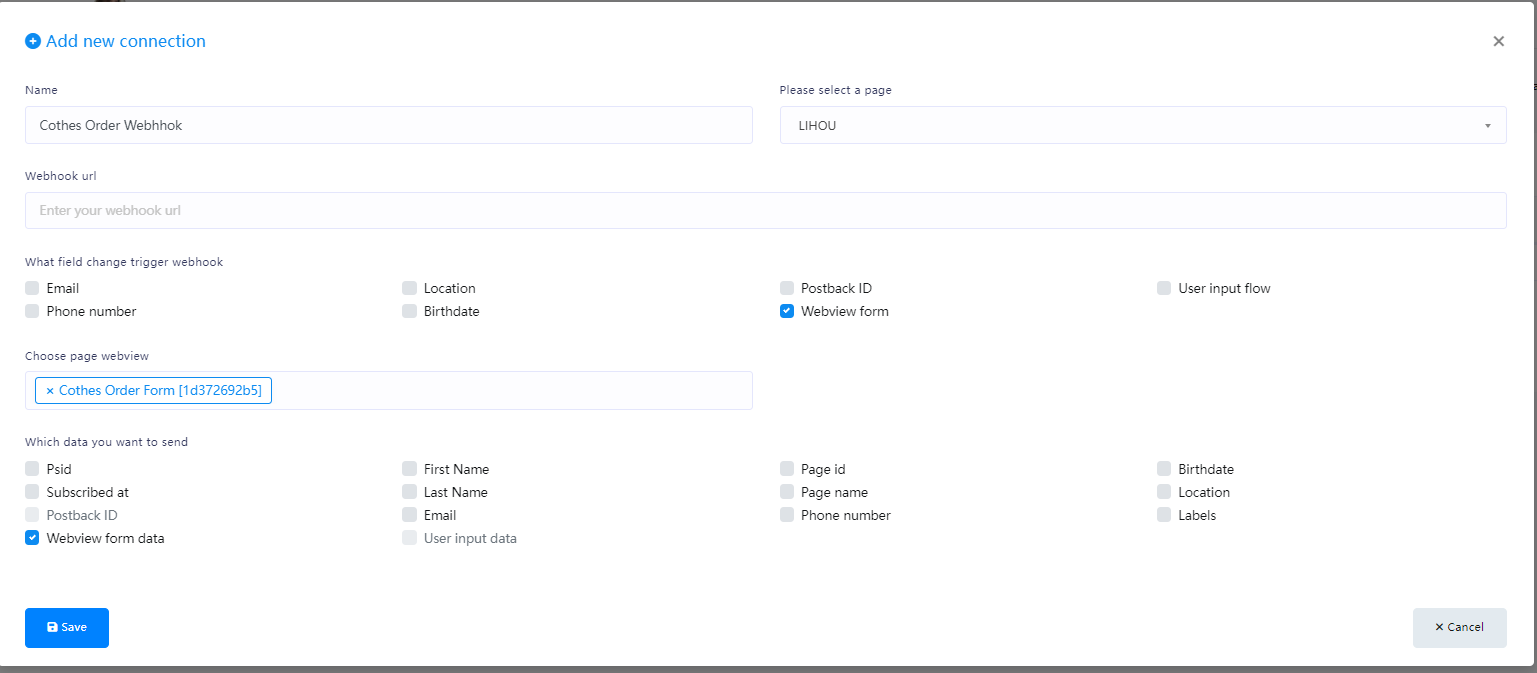
For details on how to set the webhook url, please refer to JSON API Connector
Sequence Message
Sequence messaging is a marketing strategy that sends, or “drips,” a pre-written set of messages to messenger bot subscribers over time. This feature can send 24H promo and non-promotional with tag message sequence to messenger bot subscriber. It uses BOT API for sending message. The subscribers will be assigned under your sequence campaign automatically based on their entry point (engagement plugins) or post-back click. However, you can also assign manually or change the campaign.
Create New Sequence
How to create Sequence Messaging can be viewed here
Sequence Lists
To view all the sequences that have been created, you can go to Bot manager Marketing Tools Sequence message and click Lists
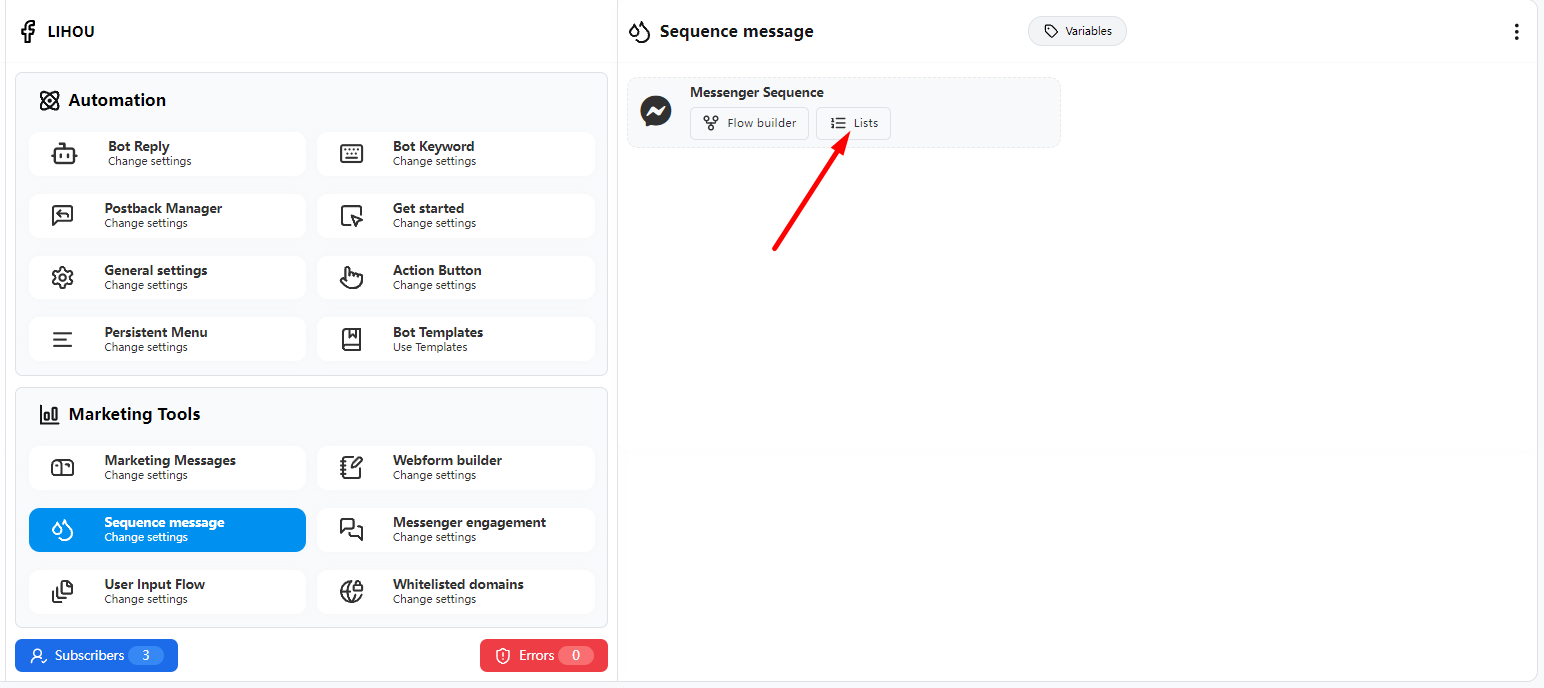
Here you can see all the sequences that have been created. In Actions, you can click Report to view some basic data reports of the current sequence.
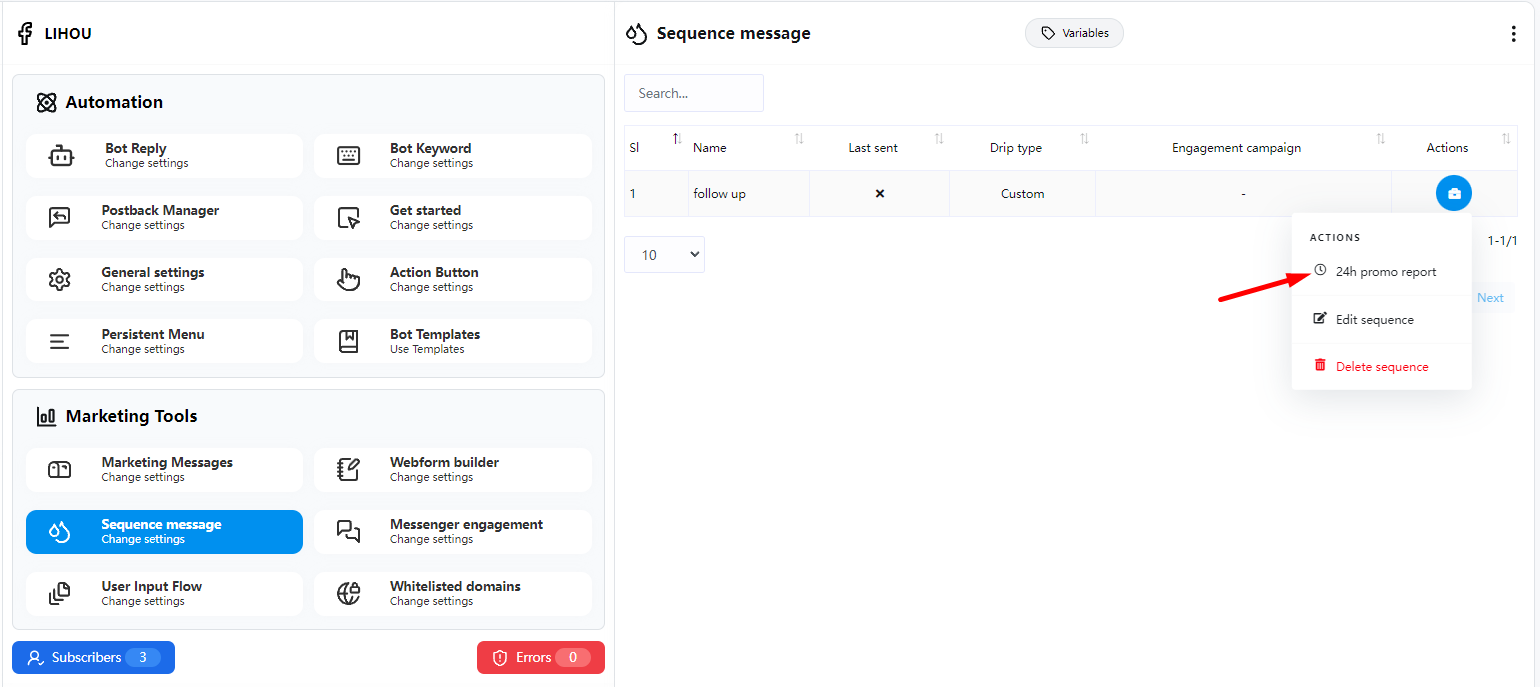
Messenger Engagement
Messenger Engagement Plugin
This guide lists different ways that you can use the Messenger Platform from Meta to drive business discovery and engagement.
Send to messenger plugin
The send to Messenger plugin renders a button on your website that allows a person to opt-in to receive messages from you on Messenger. This is useful for providing follow-up at a later time, such as confirmations and updates. This plugin only works in HTTPS websites.
To create a new plugin click Flow builder button.
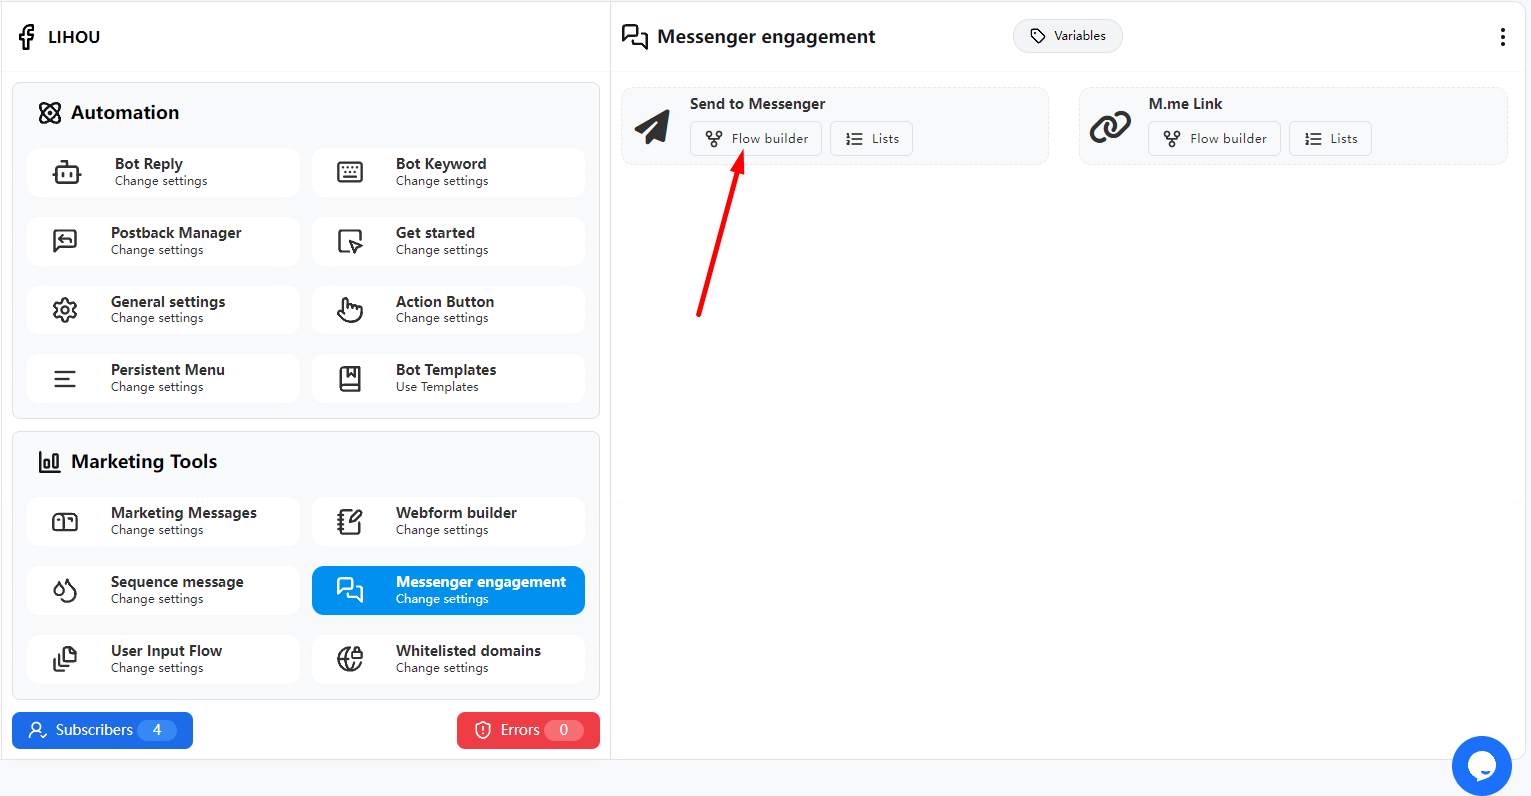
Create a new plugin
After clicking the Flow builder button, we will enter the following page. In the menu on the right, the corresponding plugin will be automatically selected for Action Button and Messenger engagement plugin. No settings are required.
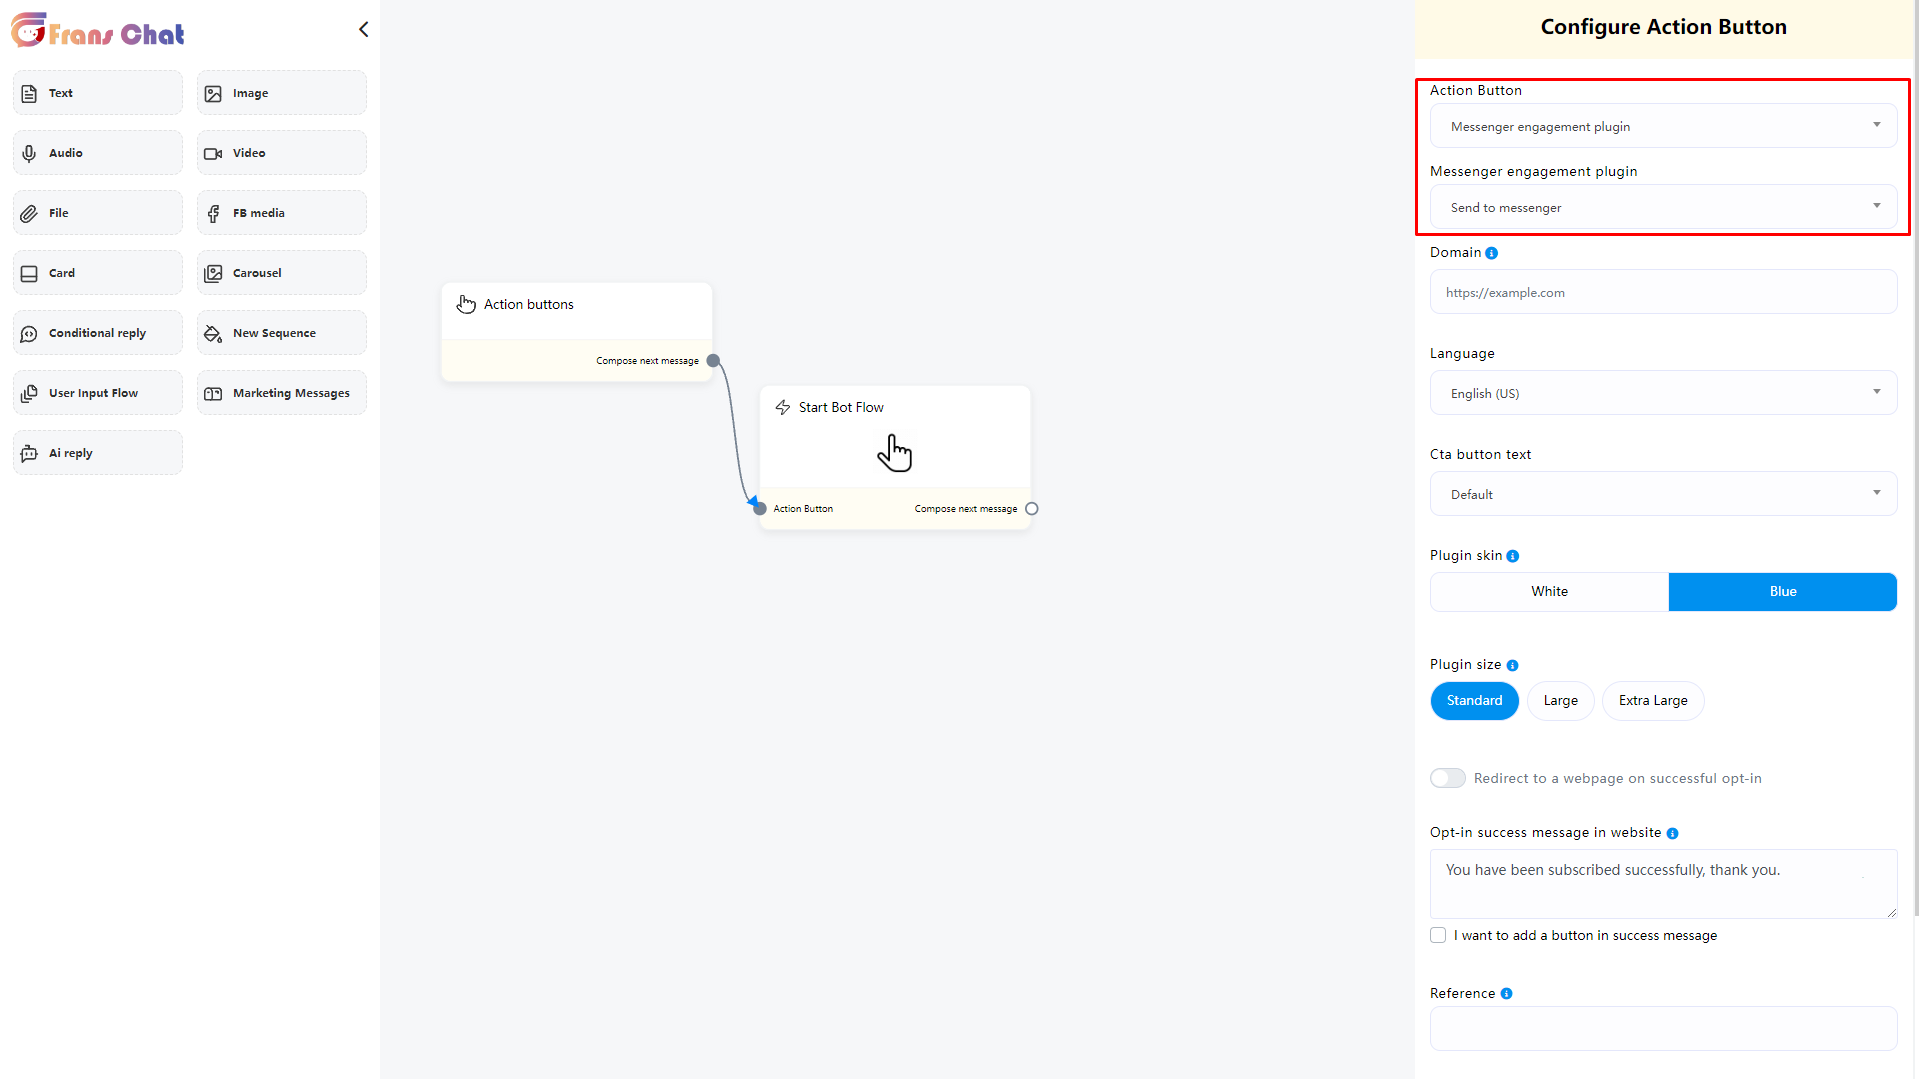
Now we need the parts in the picture
1. Domain = (Enter the website domain where you are about to insert the Send to messenger plugin)
2. Language = (Select the language of your plugin)
3. Cta button text = (Select the click button text of the Send to messenger plugin, you can set it according to the situation)
4.Plugin skin = (Set the appearance color of the Send to messenger plugin)
5. Plugin size = (Set the size of the Send to messenger plugin)
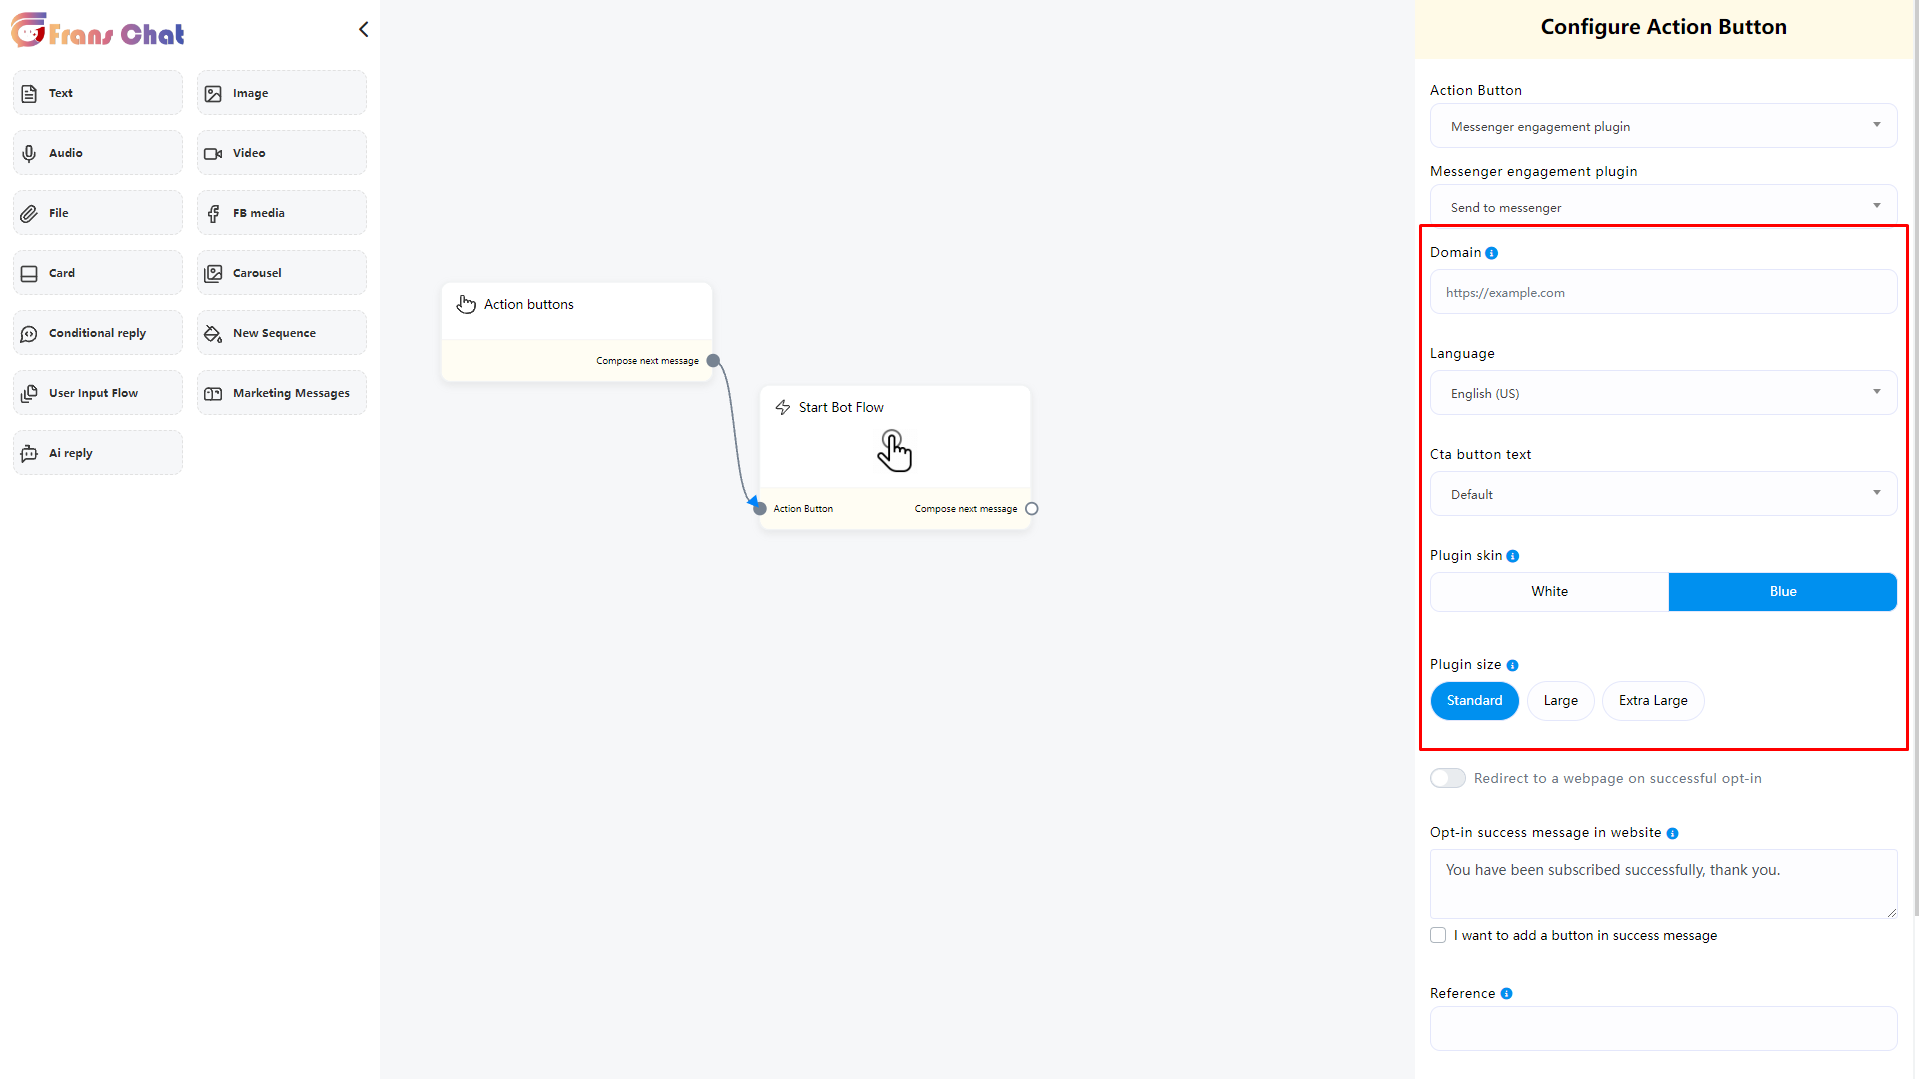
Next, continue to set up the completed content that will be displayed after the user clicks the plugin and logs in to Facebook (Opt-in success message in website)
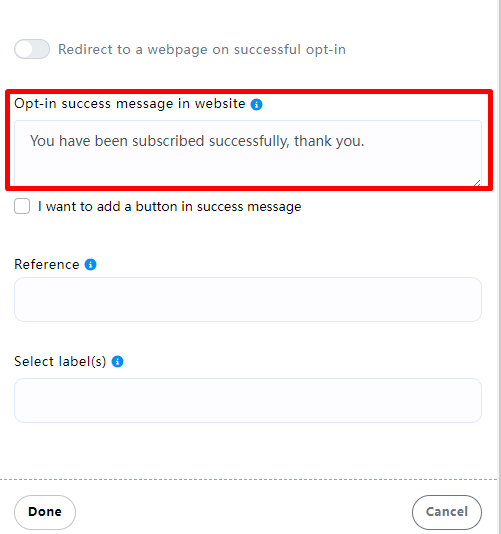
If enabled (I want to add a button in success message)
Then a button will be added after the success message is displayed after the user clicks the plugin
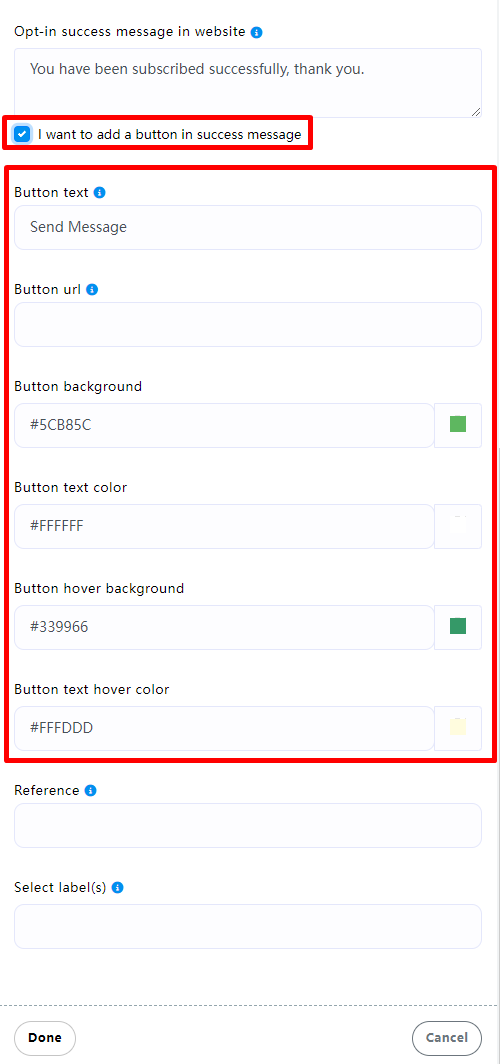
If enabled (Redirect to a webpage on successful opt-in)
Then the user will be redirected directly to the set link after clicking the plugin
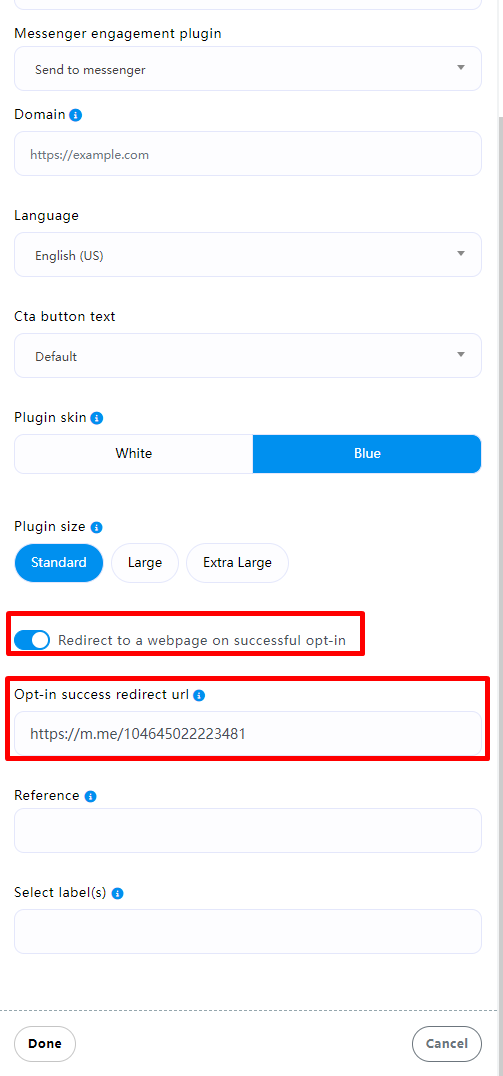
Finally, you must set (Reference)
You can set a name for the activity related to this plugin
Note: All References must be unique.
Select label(s) is to set a label, which will be automatically added to the user when the user clicks to join.
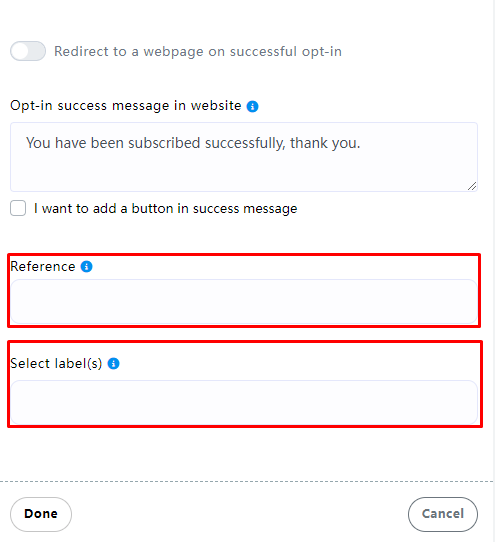
Finally click Done and you will see the plugin settings on the editor.
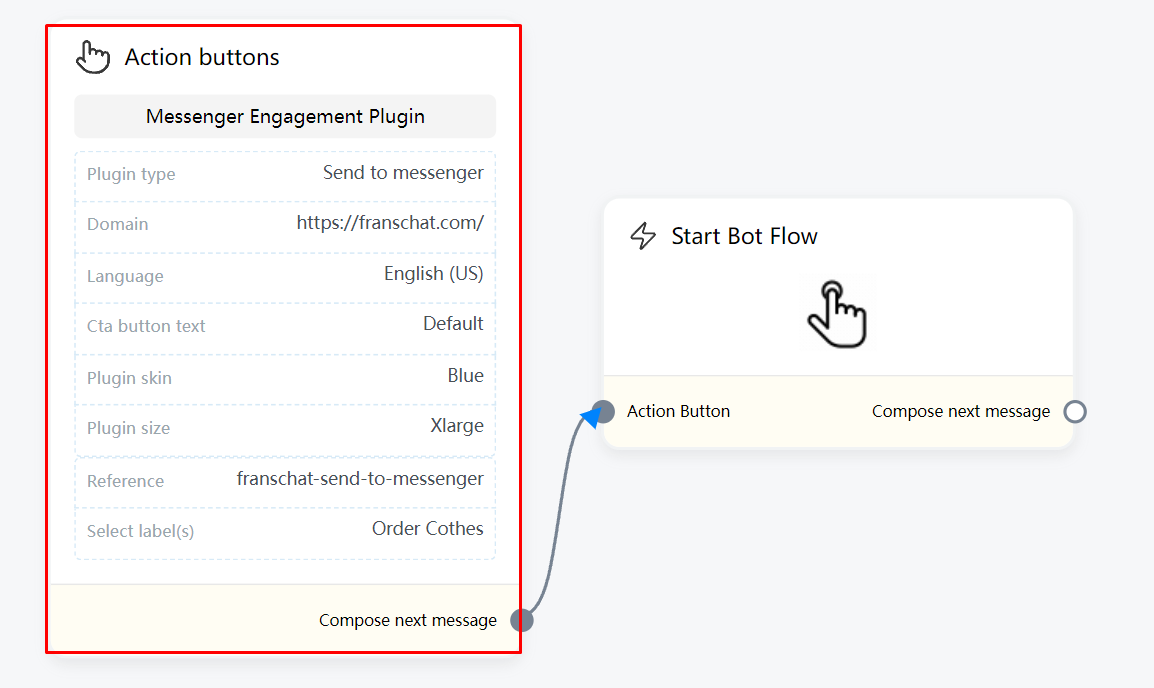
Finally, you can set up the next conversation in “Start Bot Flow”. For example, if we add a “Text” component in “Start Bot Flow”, when the user clicks on the plug-in to join successfully, it will automatically reply to the user’s information in the Text.
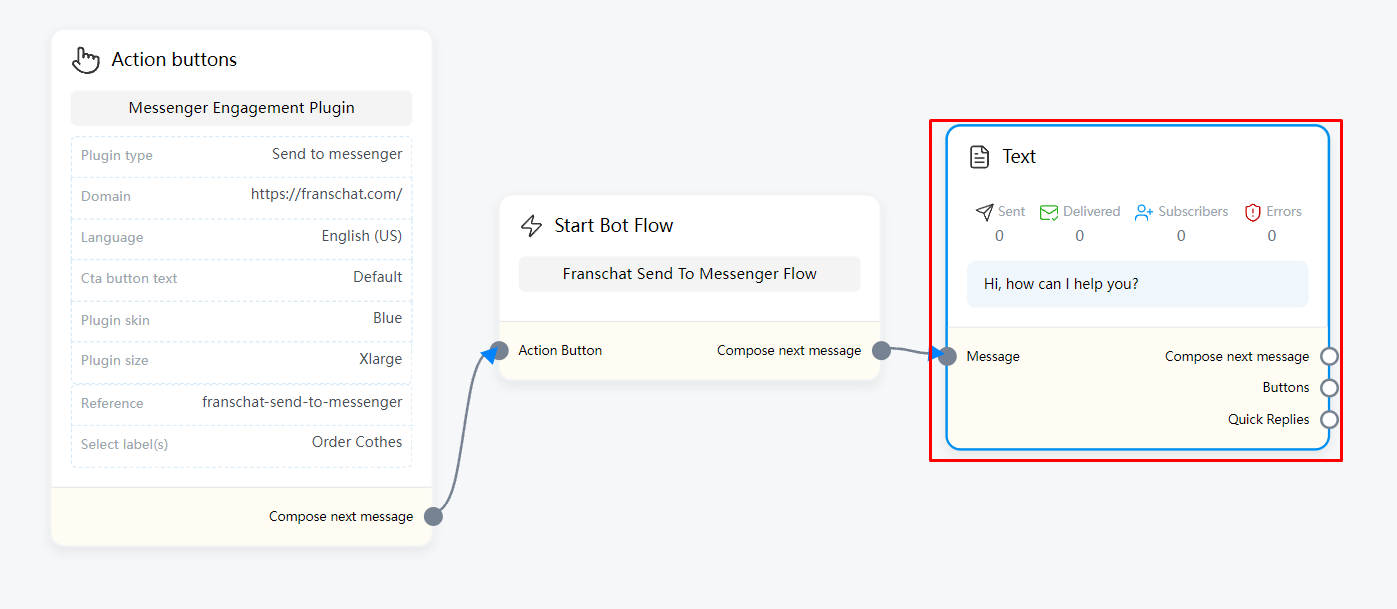
Plugin List
This list shows all the plugins you’ve created so far, and if you’ve lost that plugin, you can get the embed code for that plugin. This list shows all the plugins you’ve created so far, and if you’ve lost that plugin, you can get the embed code for that plugin.
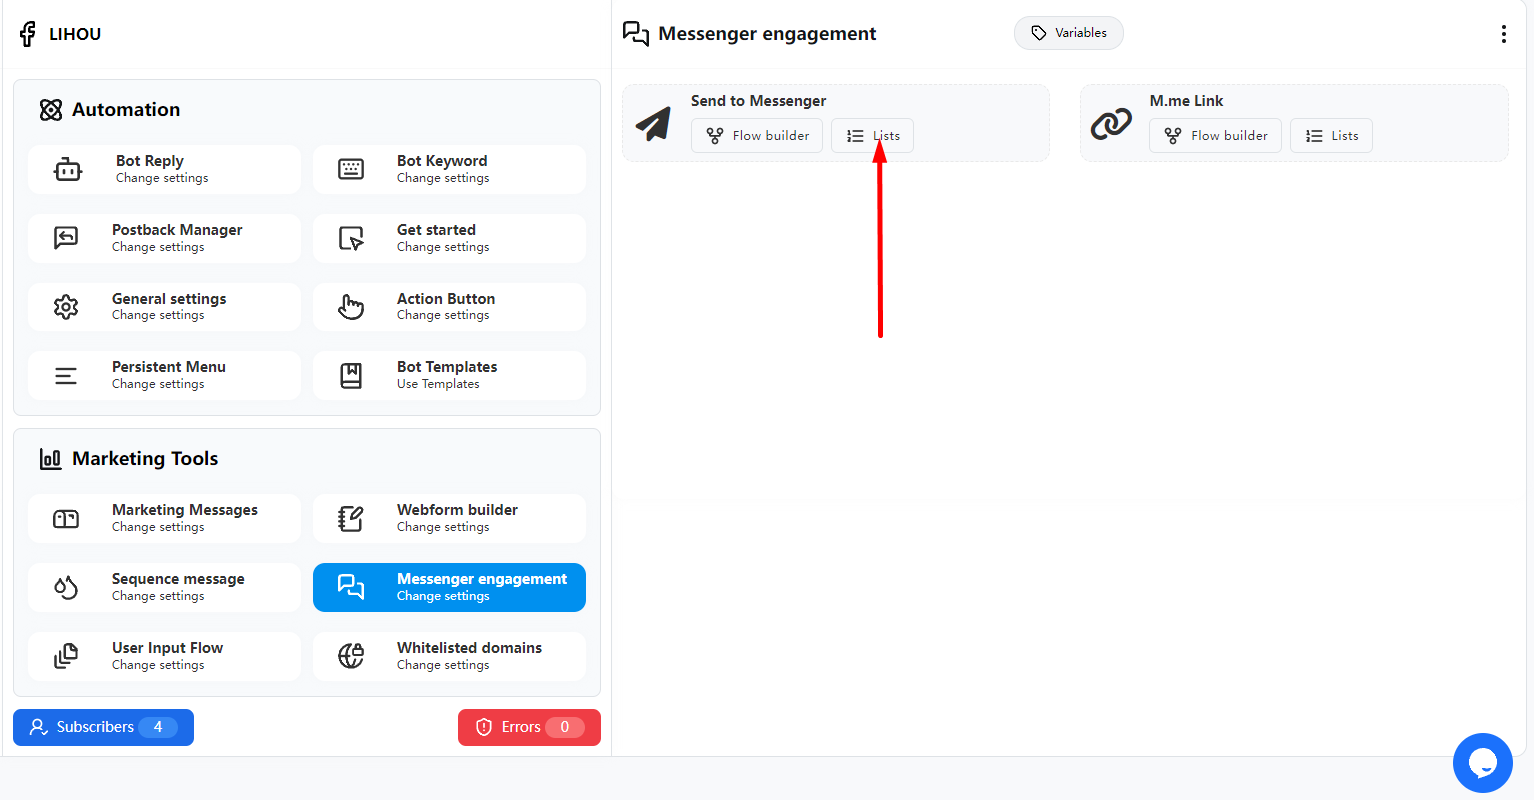
Click the edit icon in Actions to enter the edit page to modify the plugin
Click “js code” to get the plugin code and embed it in your website
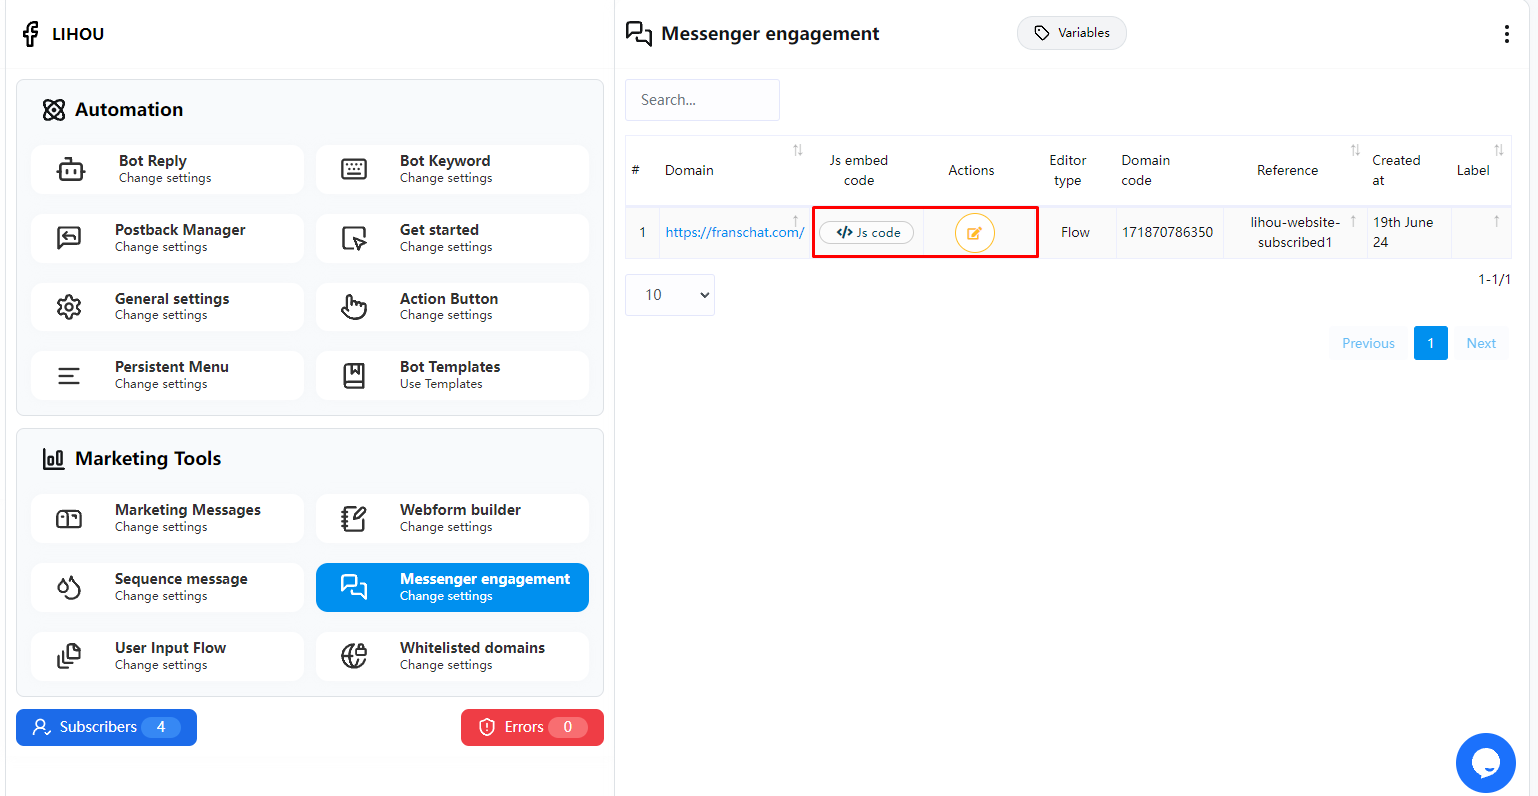
Copy the embed code and put it on your website
Put this code inside the html block of your website where you want to display this plugin.
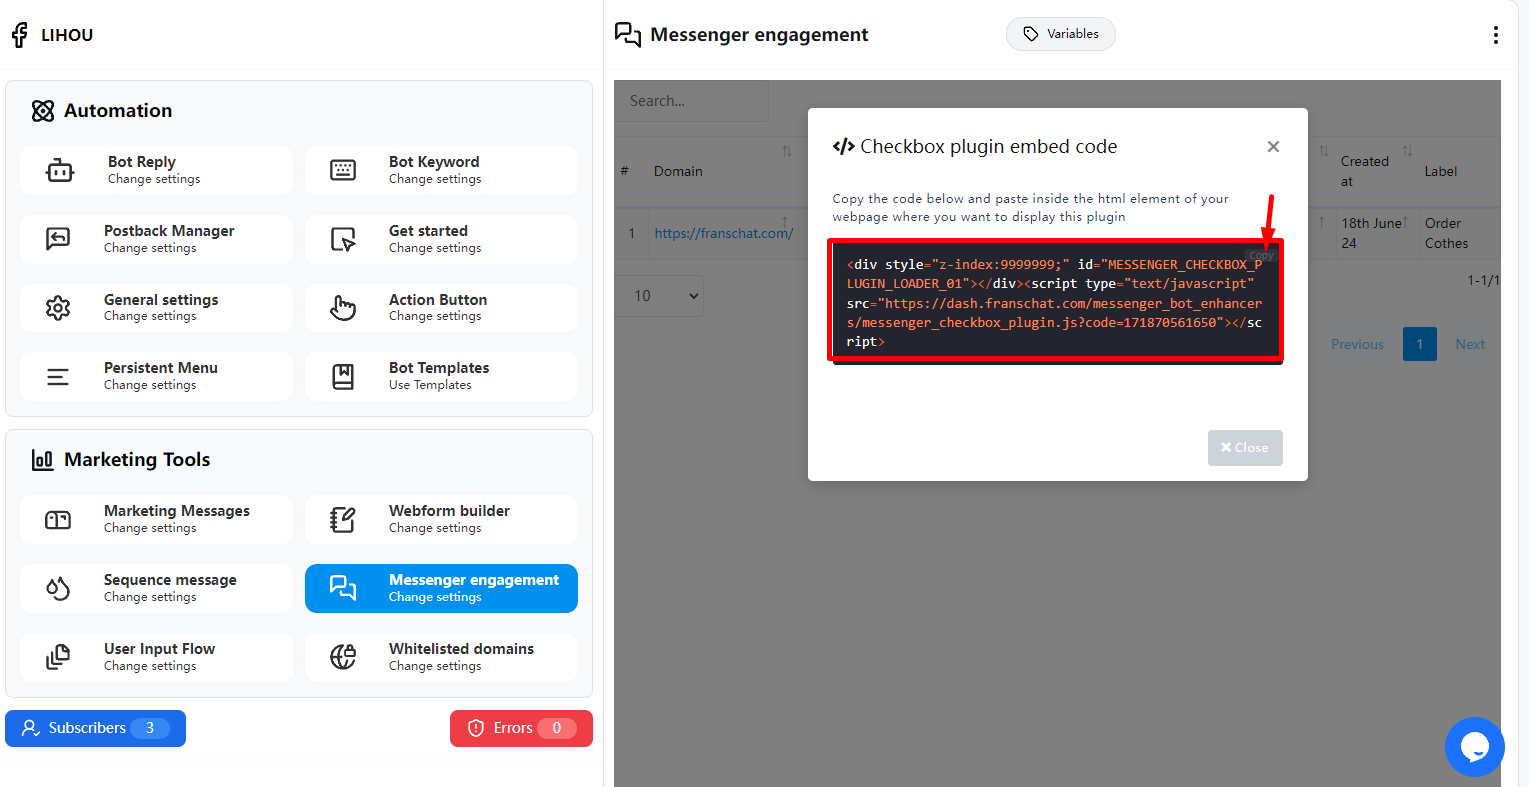
How it looks on your website
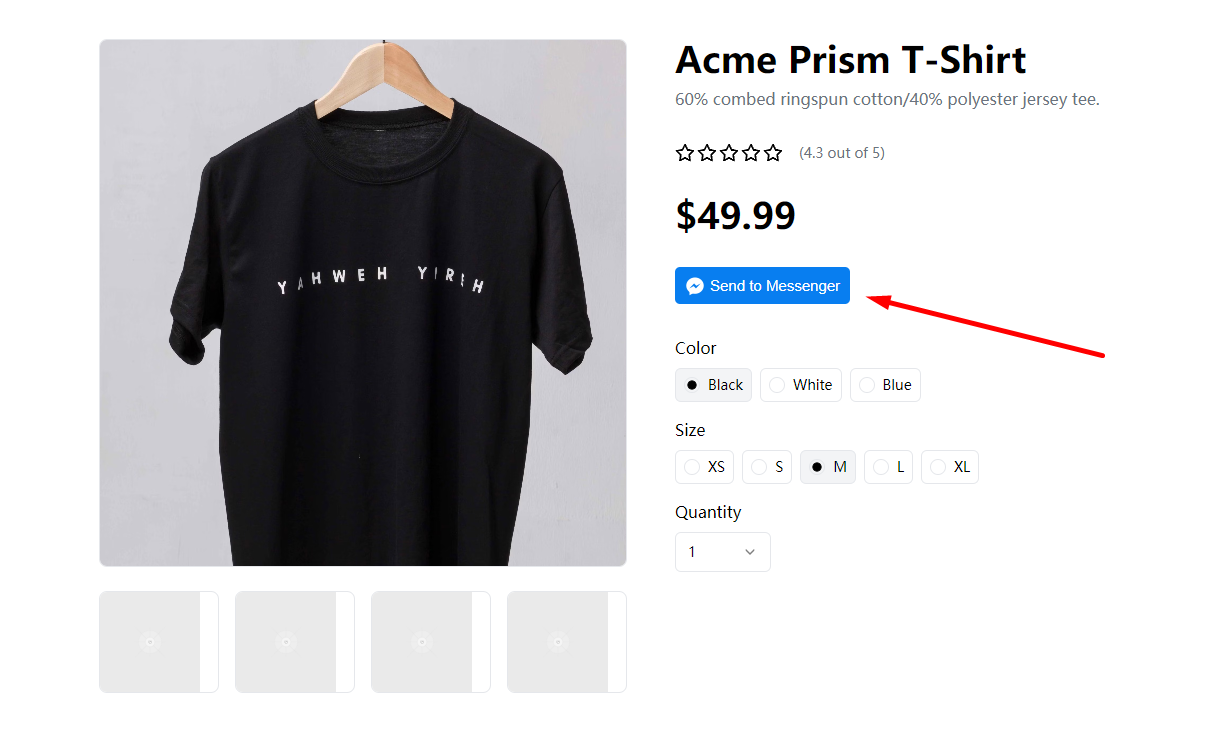
When the user clicks, a pop-up window will pop up to log in to the Facebook account. After the login is completed, a prompt will be displayed on the page, and the information in Flow will be sent to the logged-in user.
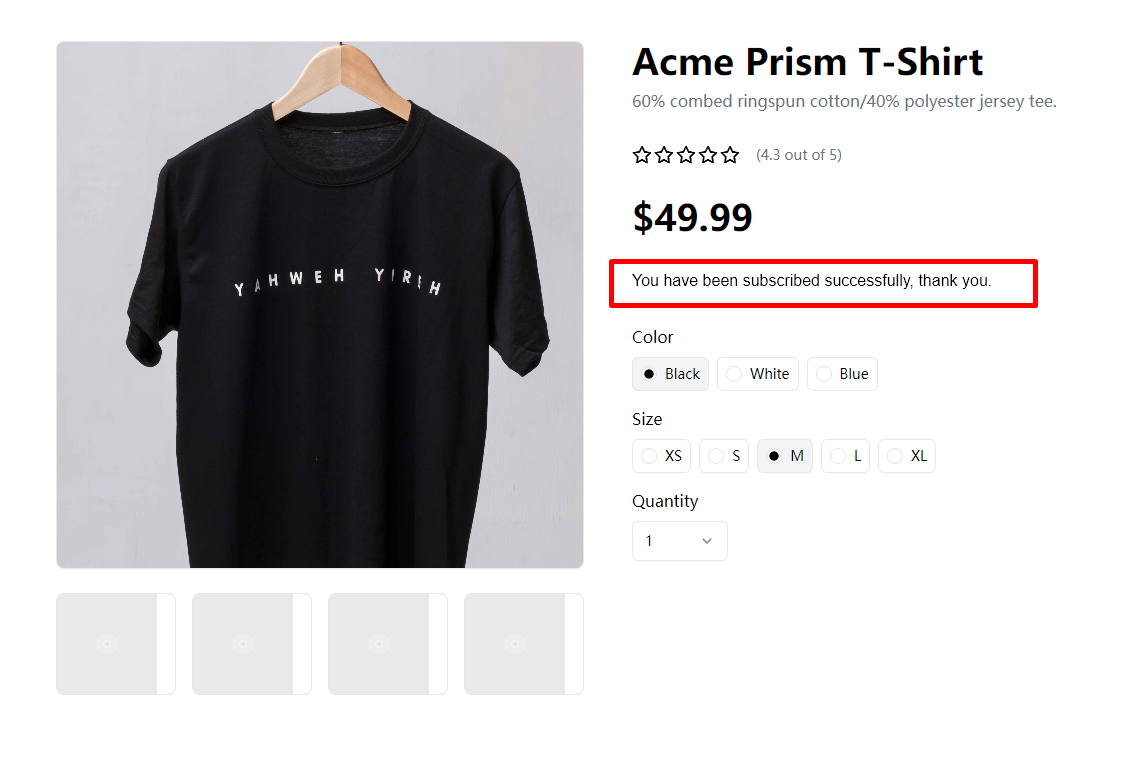
M.me link & QR code
m.me is a shortened URL service operated by Facebook that redirects users to a person, page, or bot in Messenger. You can use them on your website, email newsletters, and more. The m.me link for your bot allows you to link people directly to your Messenger bot. When the link is clicked, a conversation is automatically opened on messenger.com or in the Messenger mobile app. You will also get QR code image of your m.me link from this list below.
To create a new plugin click Flow builder button.
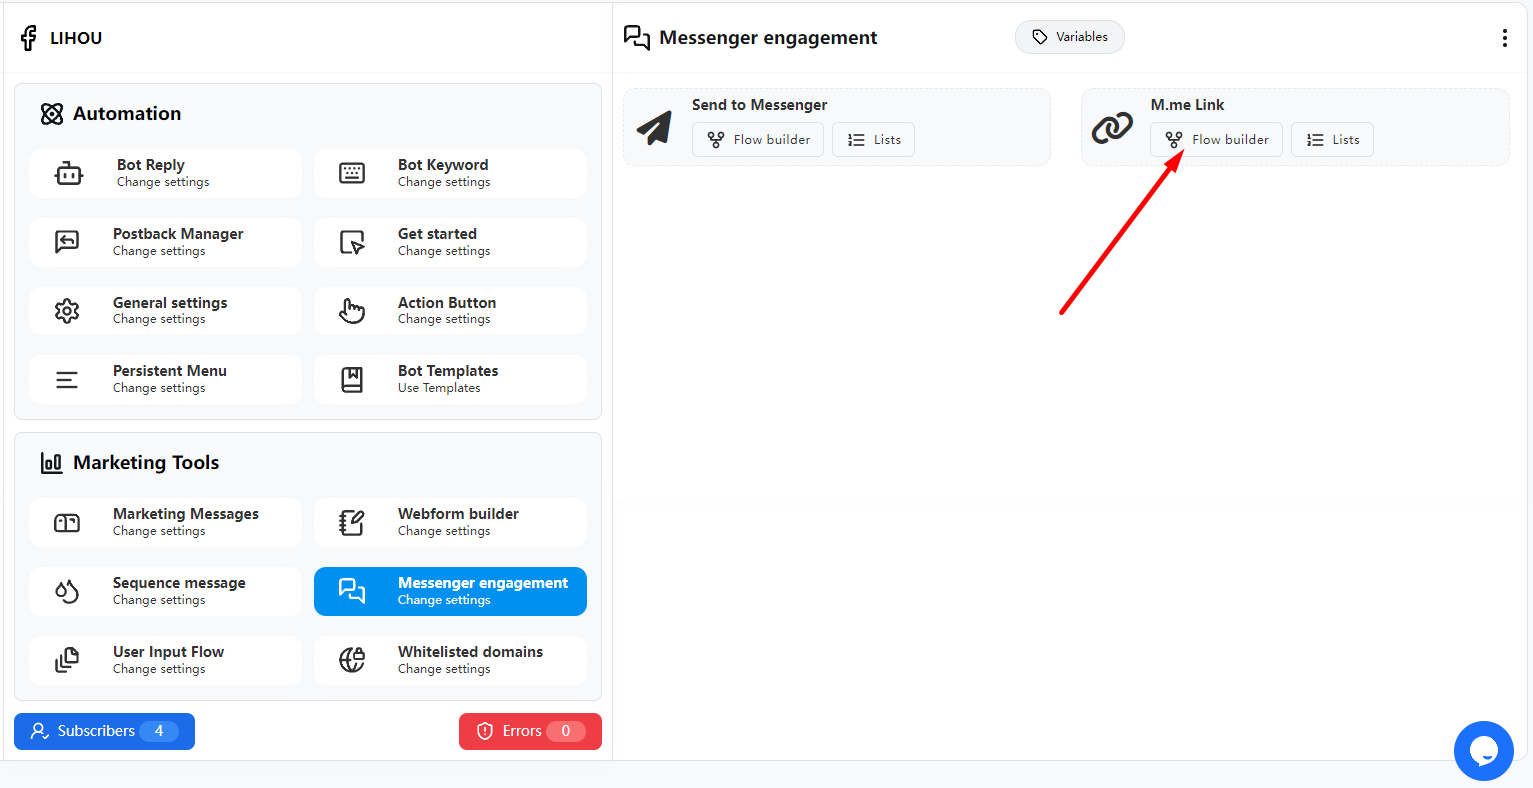
Create a new plugin
After clicking the Flow builder button, we will enter the following page. In the menu on the right, the corresponding plugin will be automatically selected for Action Button and Messenger engagement plugin. No settings are required.
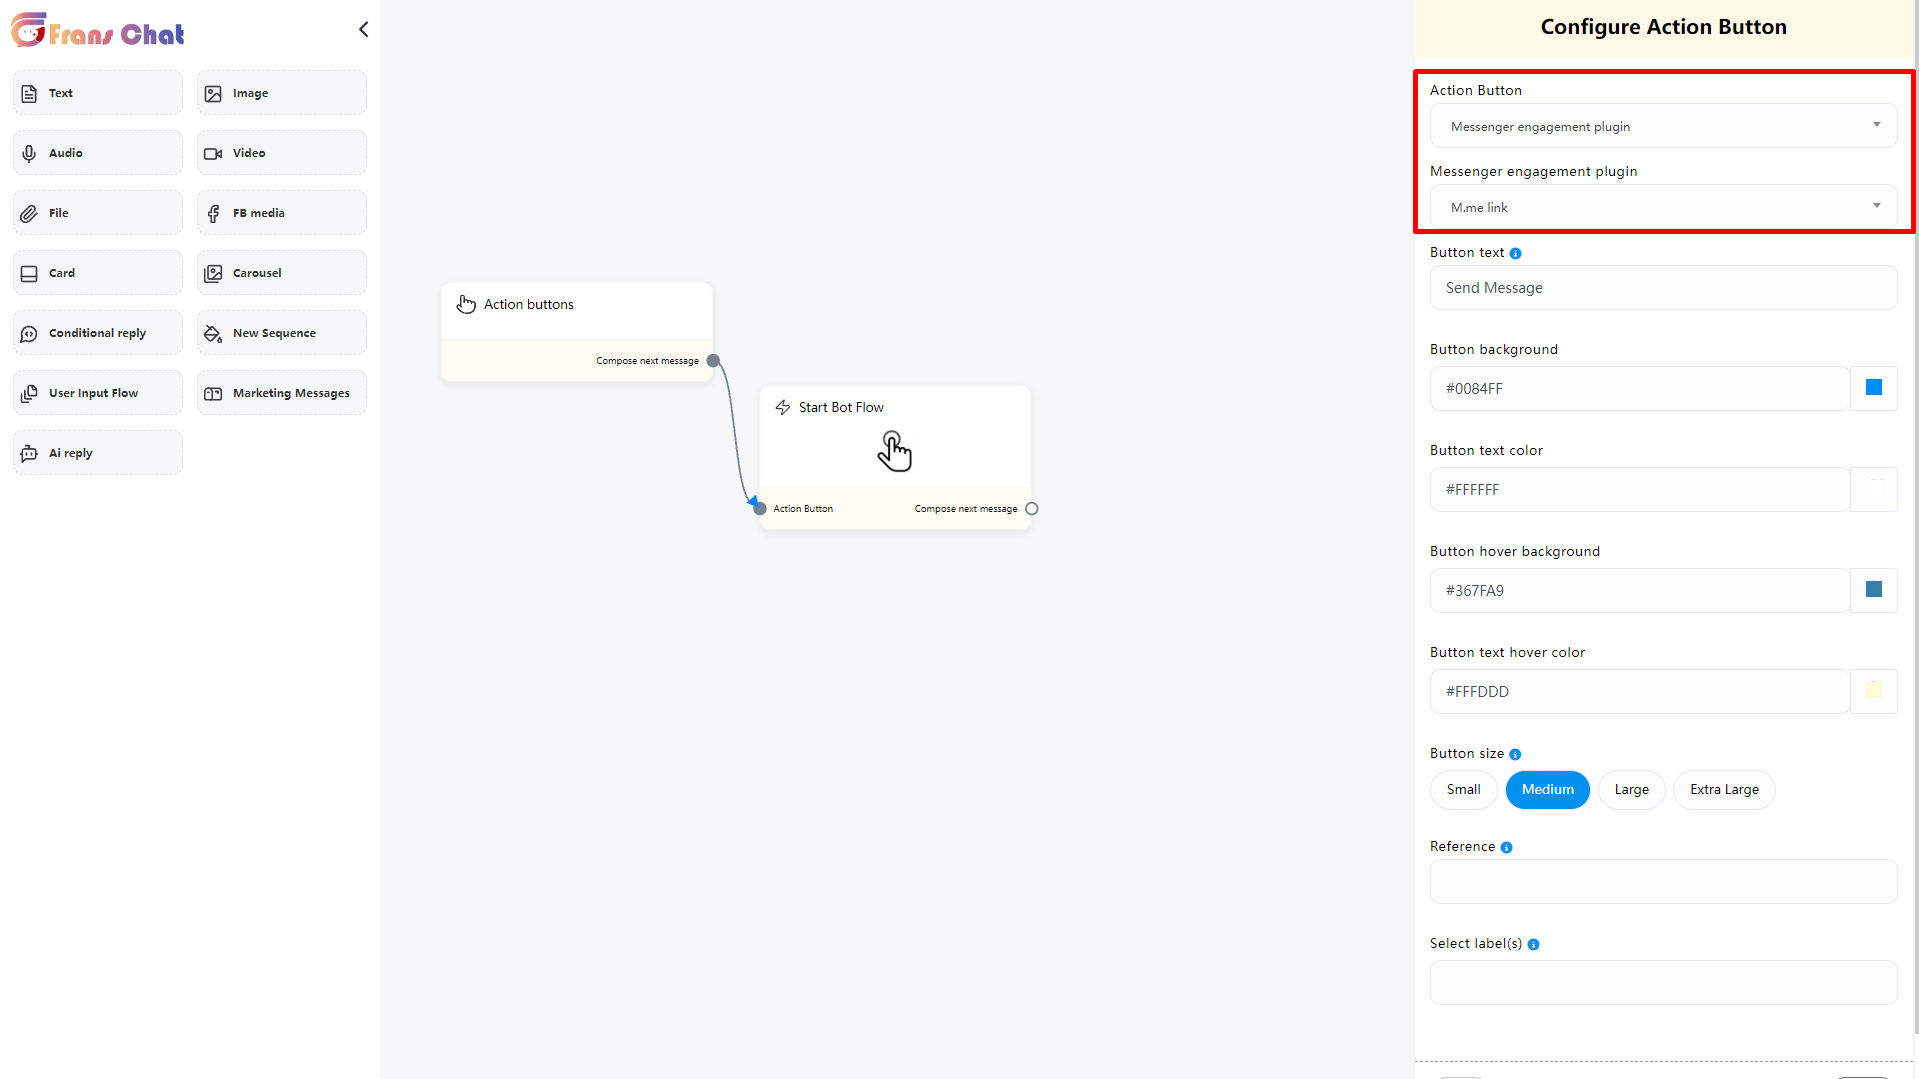
If you need to use embed code to display this button, you can set the “Button” part
In the “Reference” part, you must set a parameter. The “Reference” value of each plugin is unique and is used for system identification.
In the Select label part, you can set a label if necessary. When the user enters Messenger through me.link, this label will be automatically added to the user
Click Done when completed
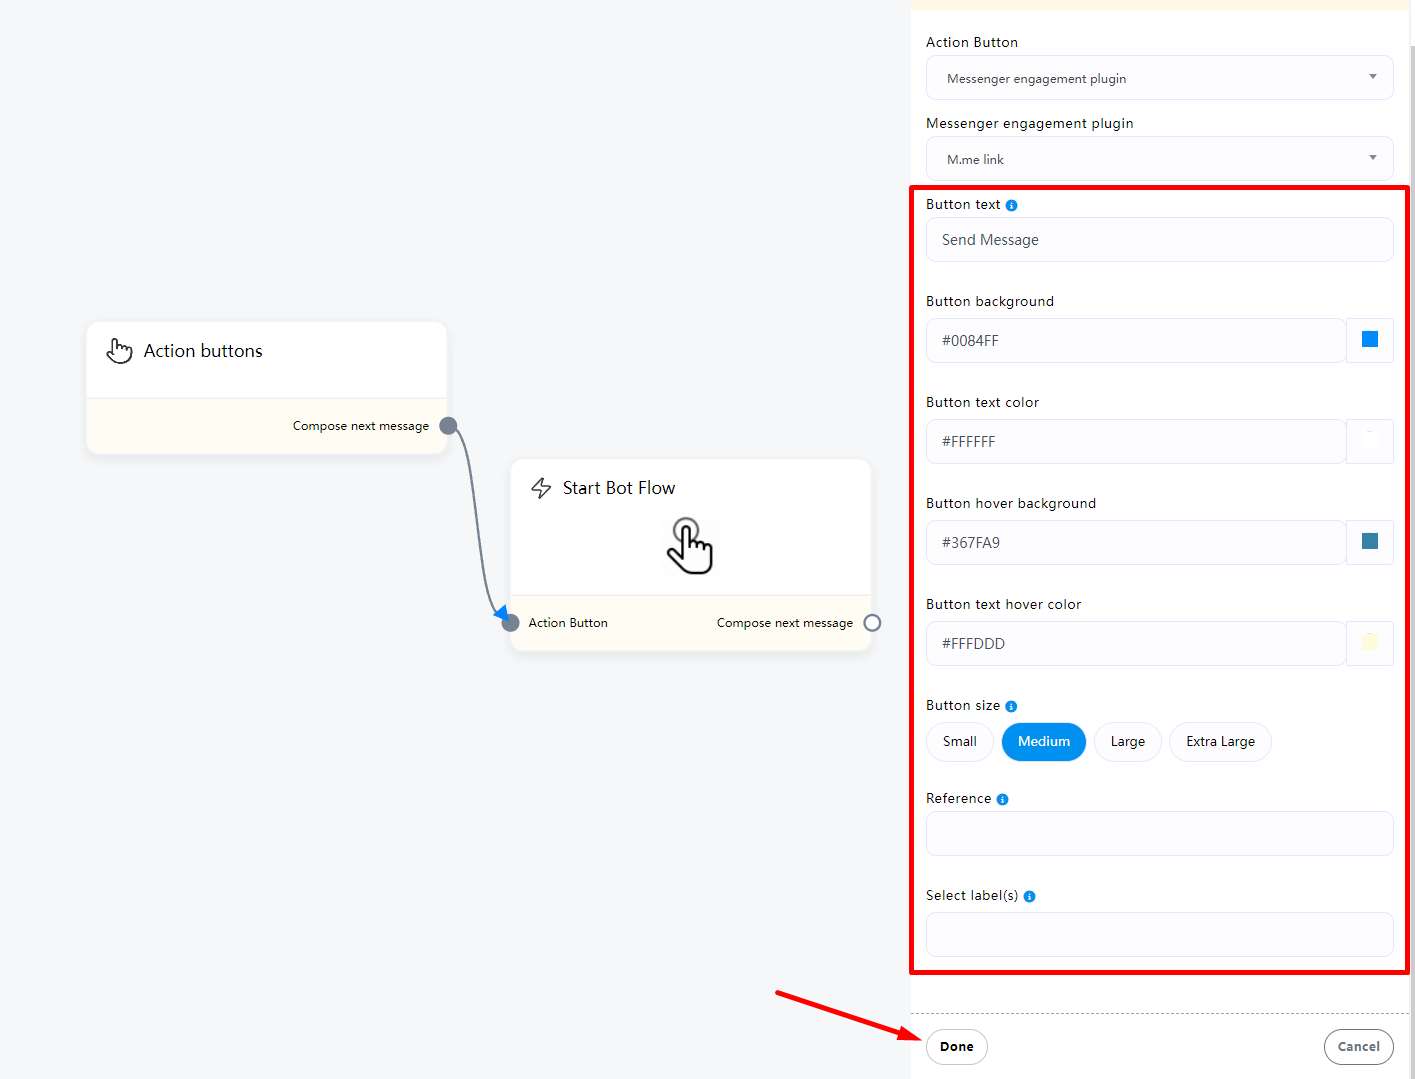
Next you will see the details of the settings in the “Action Buttons” component. Now you can continue to set the information content after the “Start Bot Flow” component
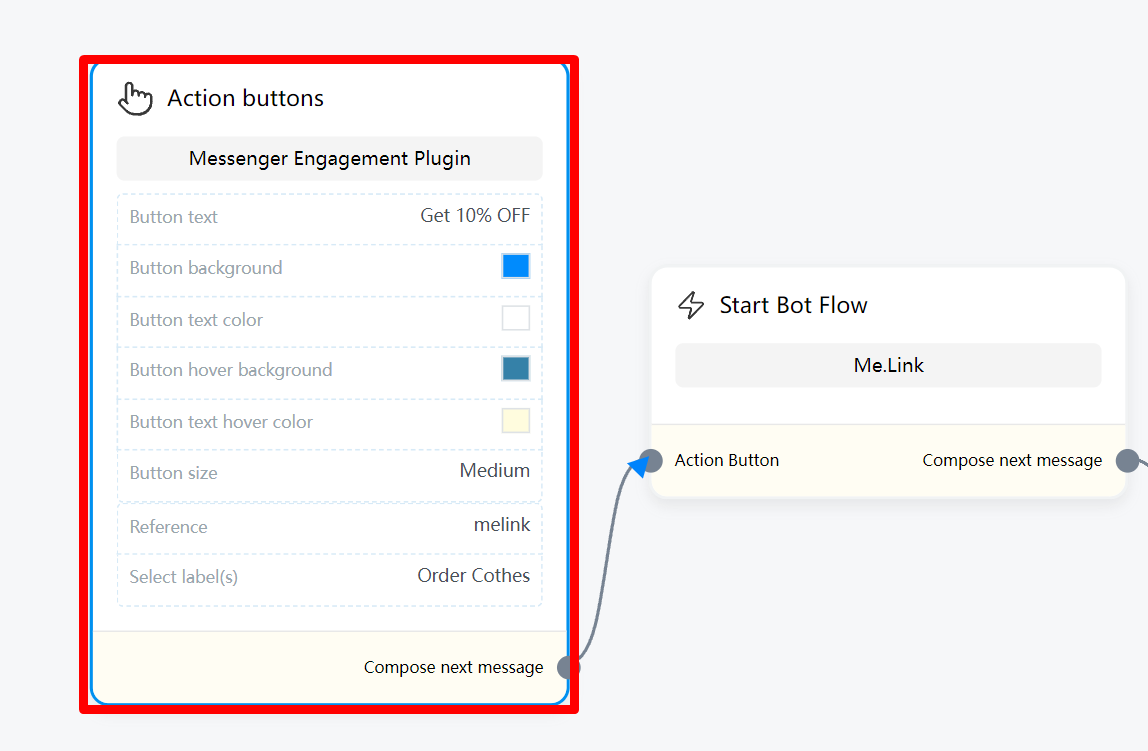
For example, in the demo, the purpose of Me.link is to give users the function of obtaining coupons, and I can edit it like this.
Now when the user enters Messenger through Me.link, the following information will be automatically sent to the user
After editing, click Save.
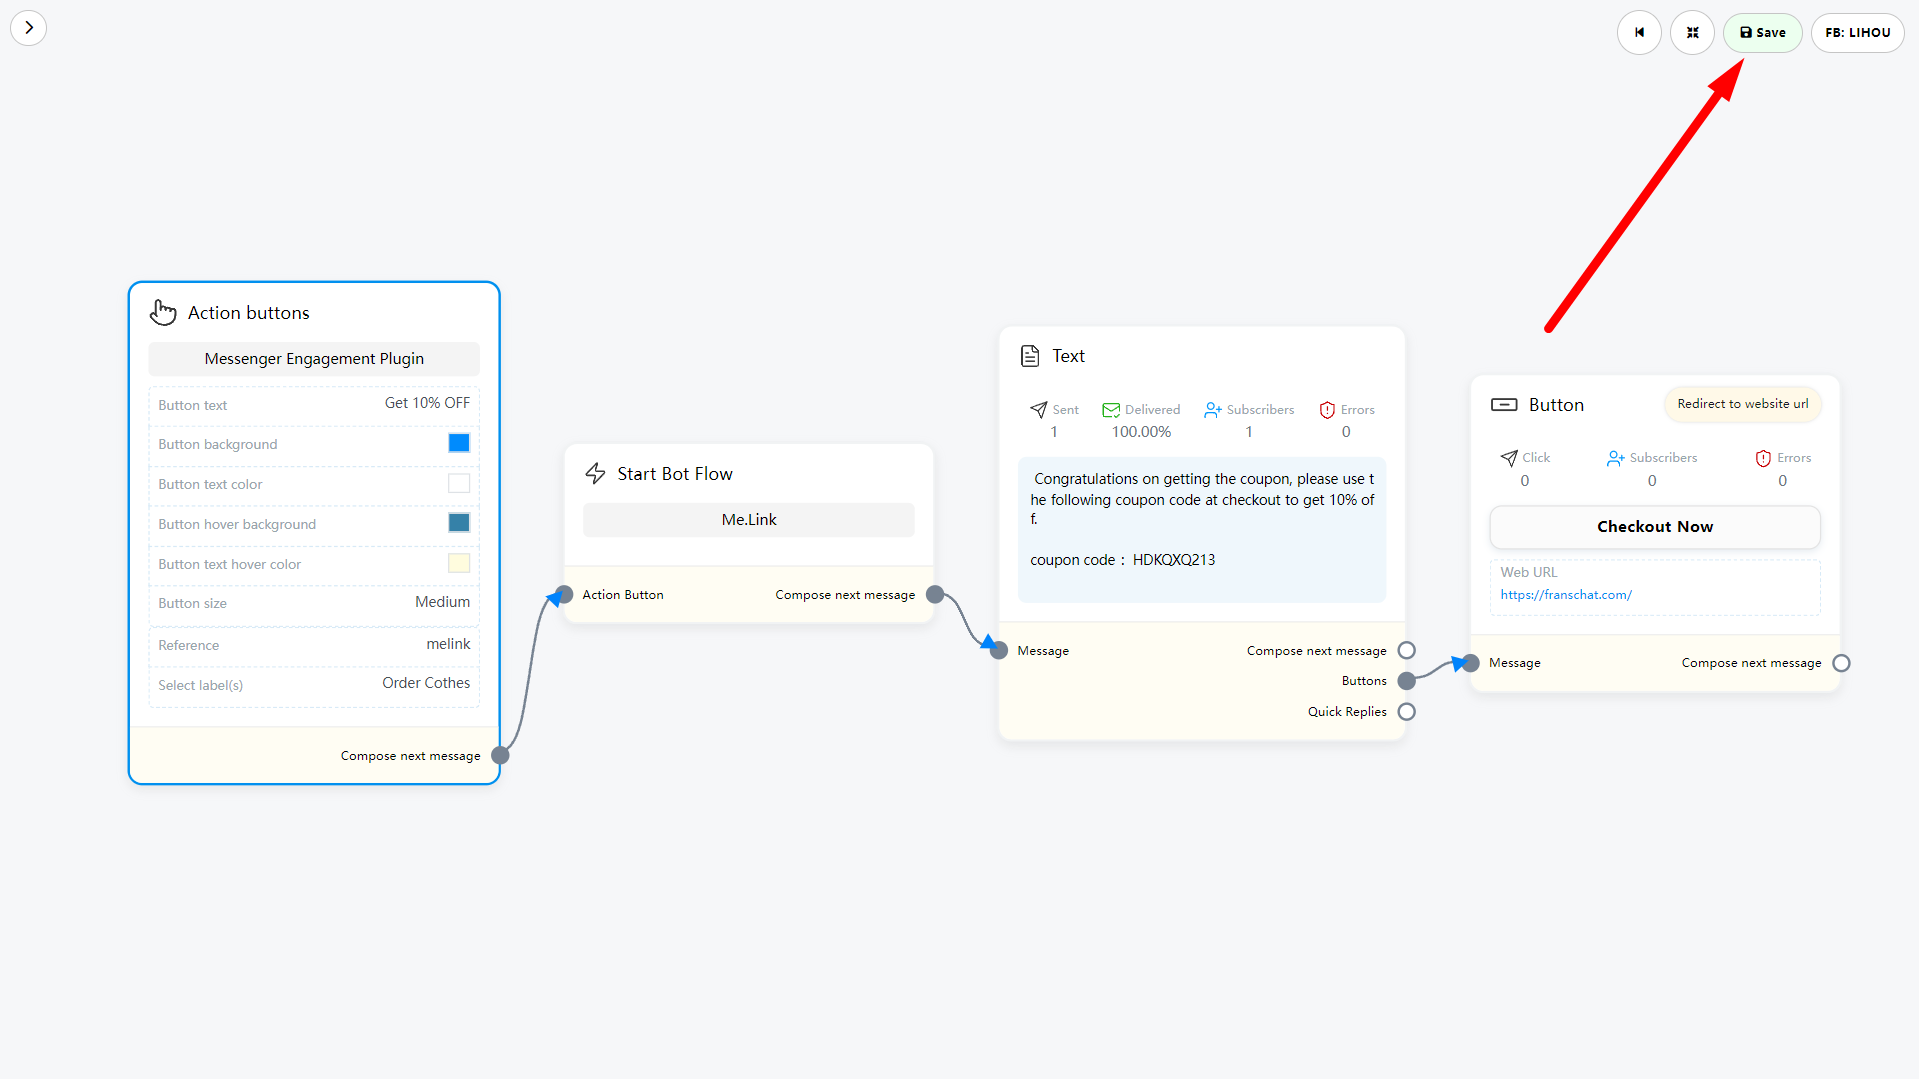
Plugin List
This list shows all the plugins you’ve created so far, and if you’ve lost that plugin, you can get the embed code for that plugin. This list shows all the plugins you’ve created so far, and if you’ve lost that plugin, you can get the embed code for that plugin.
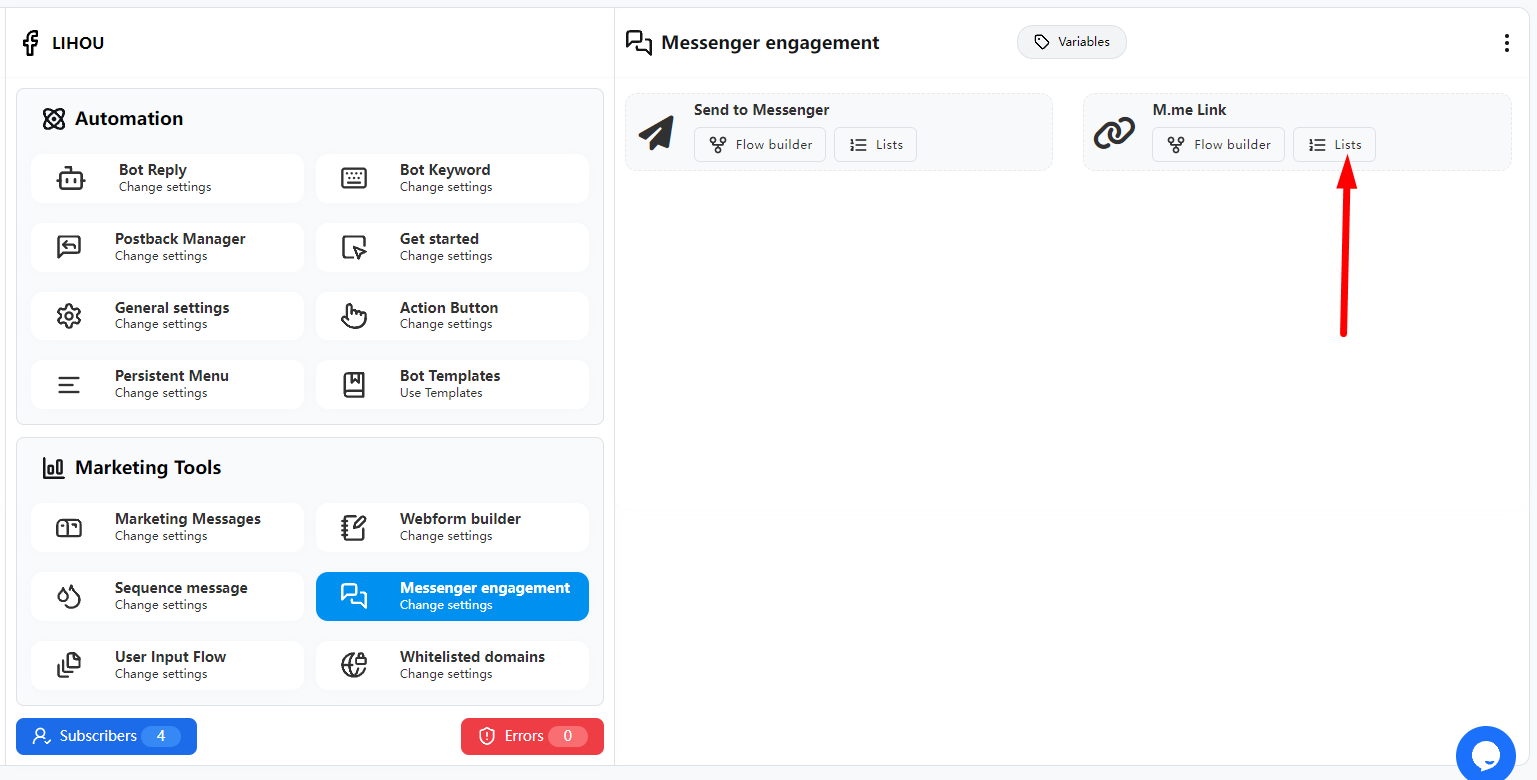
Click the edit icon in Actions to enter the edit page to modify the plugin
Click “js code” to get the plugin code and embed the button into your website
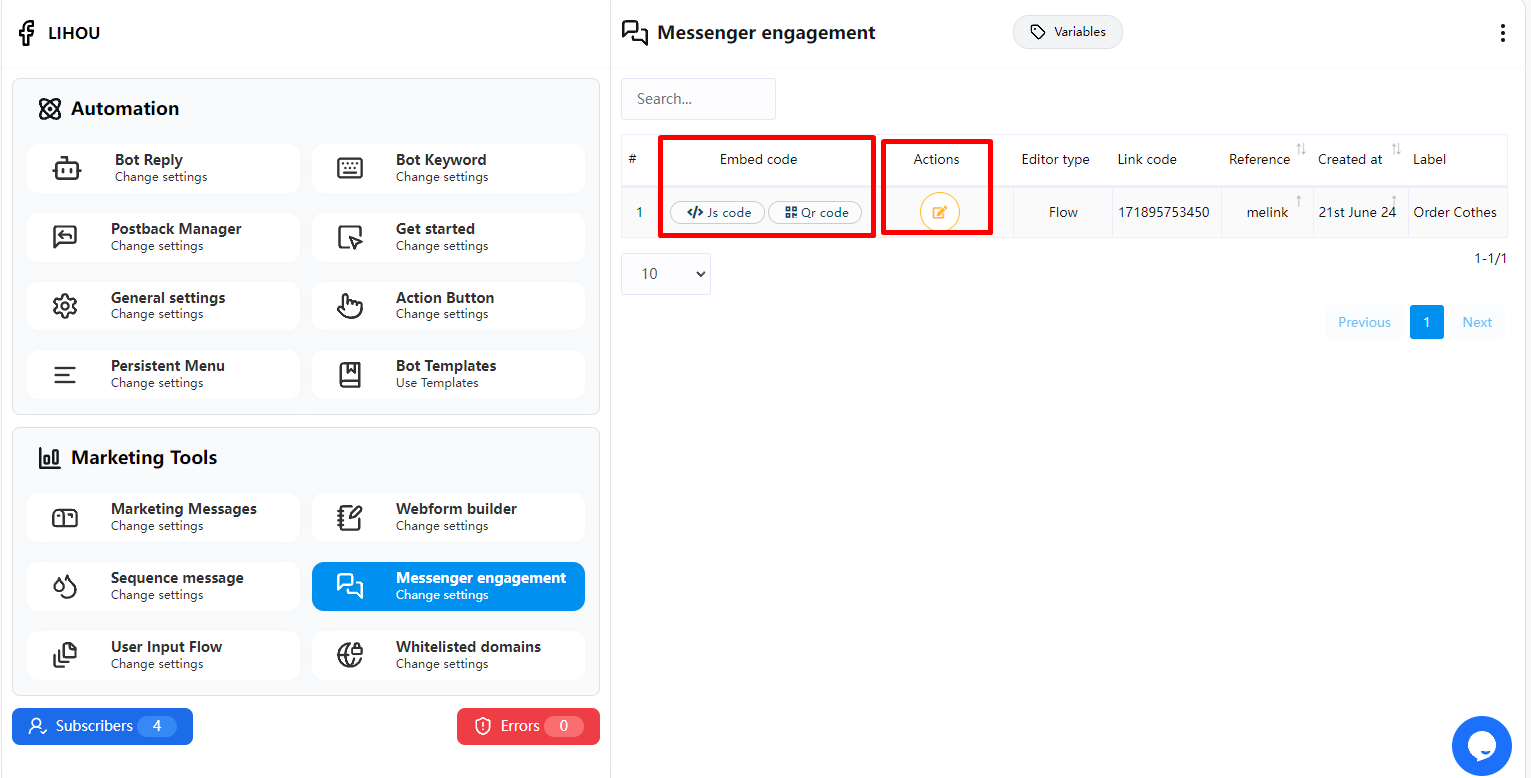
You can copy the plugin code and embed the button on your website, or you can use “M.me Link” and when users visit this URL they will be redirected to Messenger. You can also embed this link into your website button.
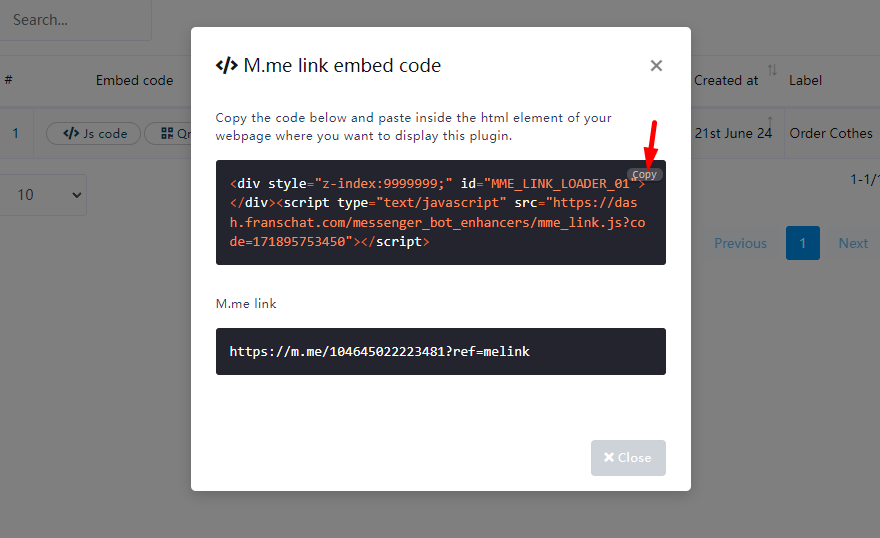
You can use QR Code, and when users scan this QR code, they will be redirected to Messenger.
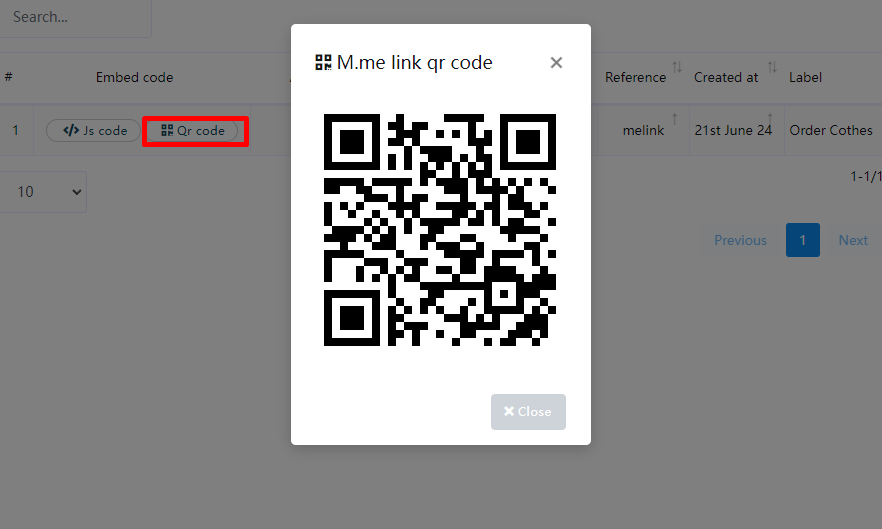
How does the workflow on your website work via buttons or URLs?
You can embed the button into your website through js code, or customize a button and jump to the URL of M.me Link
When the user clicks the button, he will be redirected to the user’s Messenger and receive the following message.
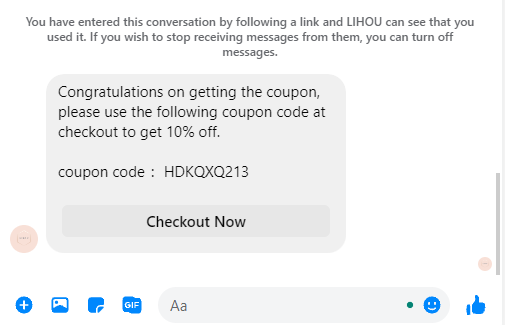
User Input Flow
You can check here how to create User Input Flow
In Bot manager Marketing Tools User Input Flow you can view the list of currently created User Input Flows and create new Custom Fields
User Input Flow List
Click the Lists button in the User Input Flow
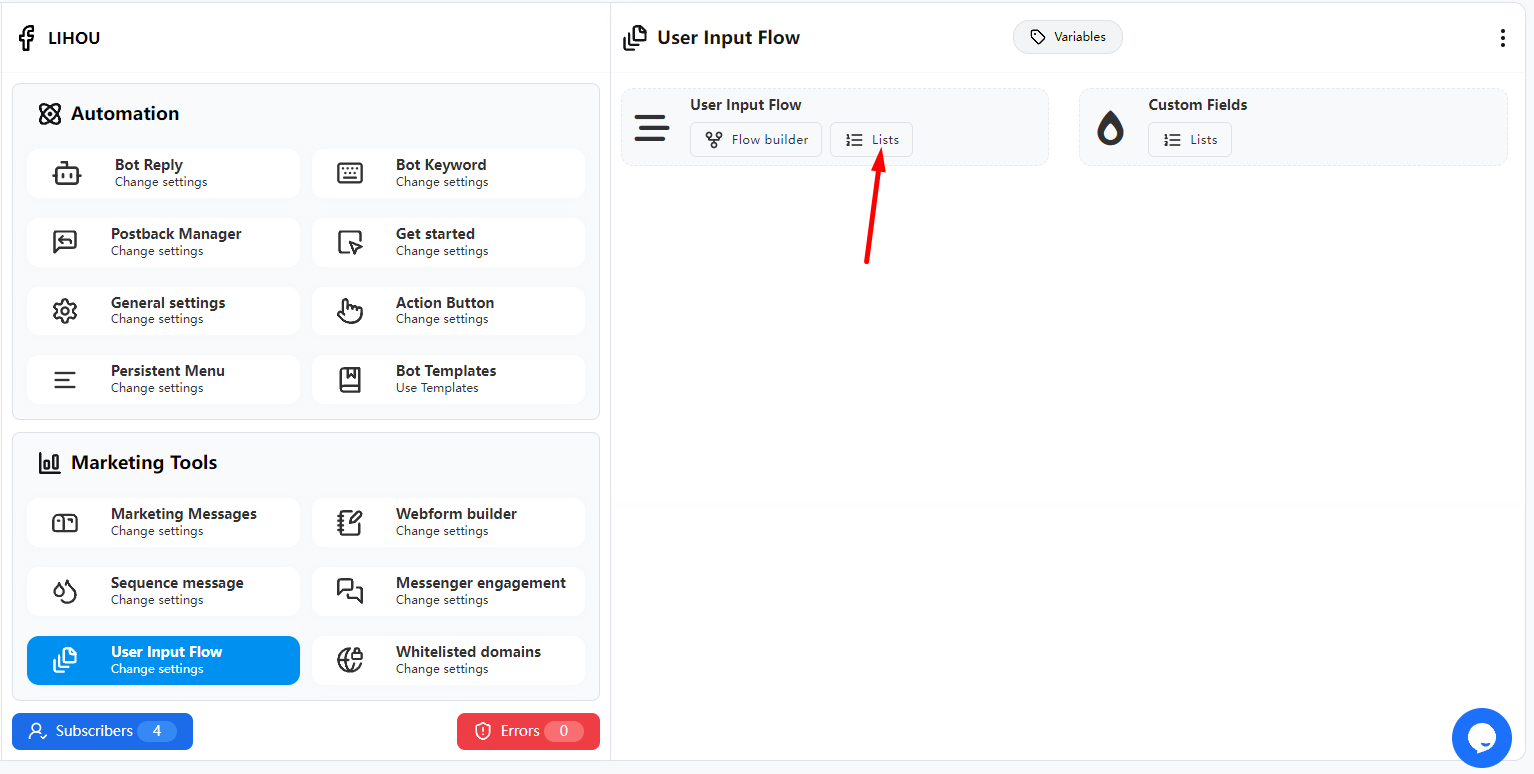
In “Action”, you can click the eye icon to view the users who have completed the User Input Flow and the information they have submitted.
You can also export this information or edit it.
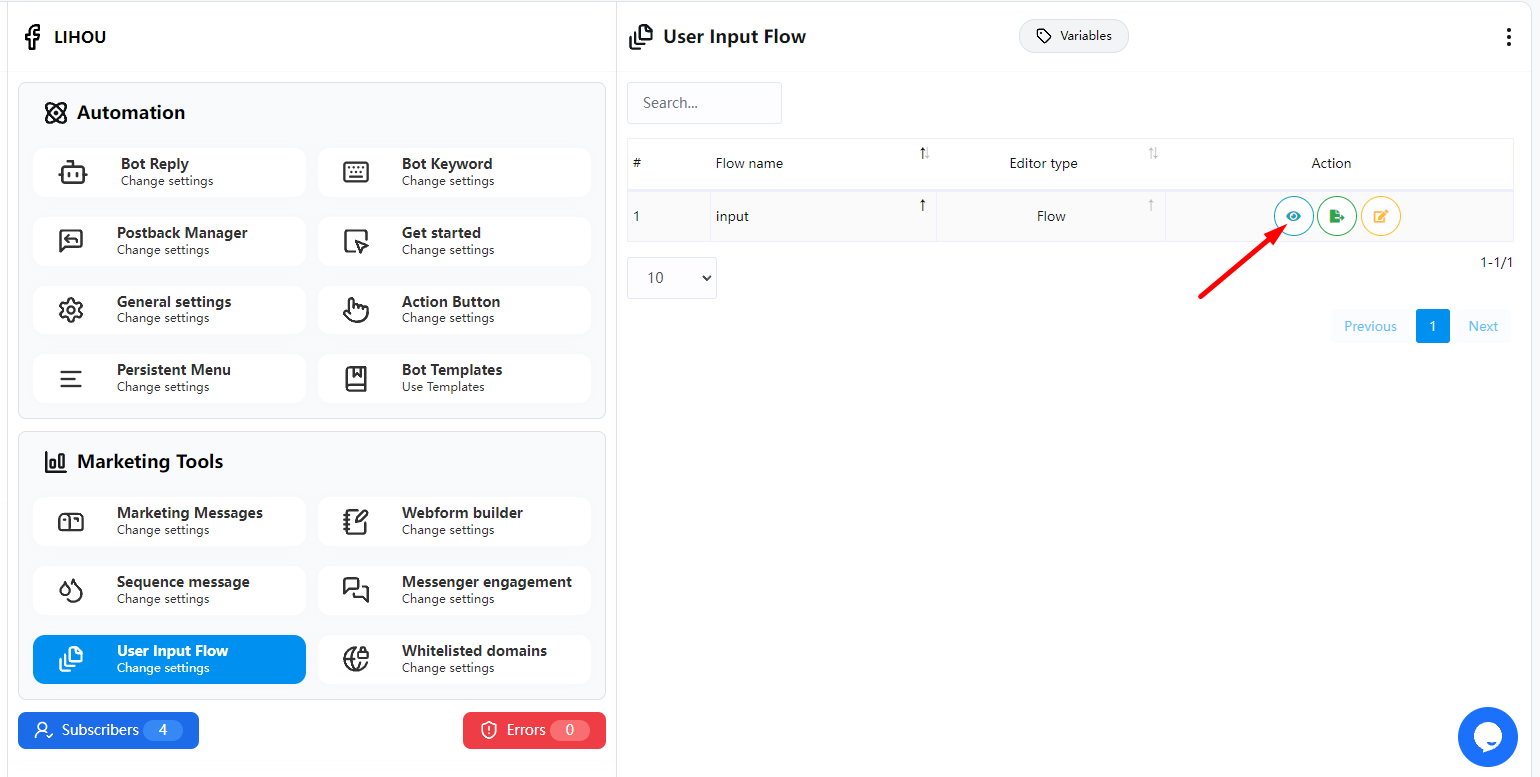
Custom Fields
In the “Custom Fields” section, click the Lists button
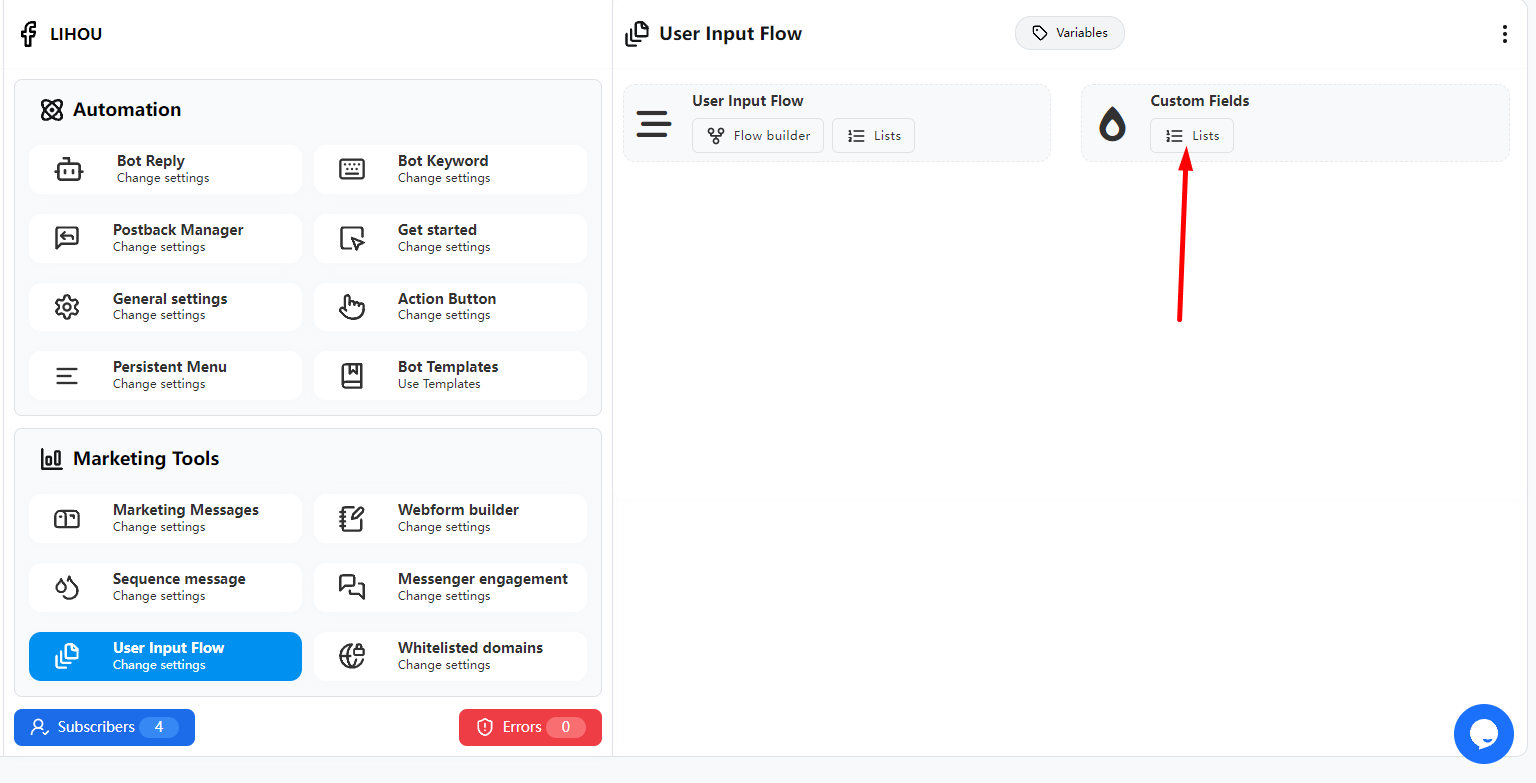
You can see all the Custom Fields that have been created so far. If you want to create a new Custom Field, you can click the “New Custom Field” button above.
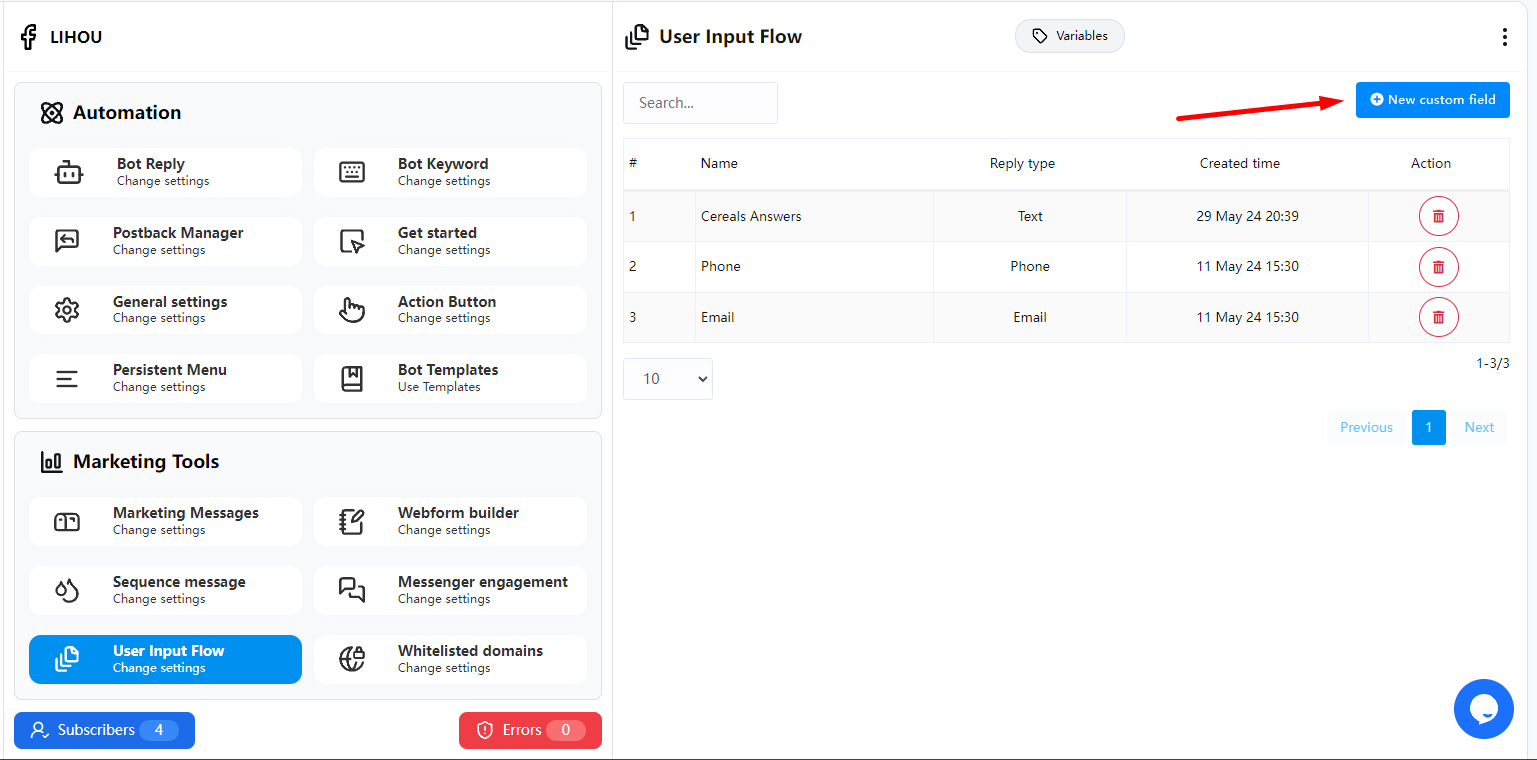
Enter the name of the Custom Fields and the corresponding Type in the pop-up window, and click Save when you are finished.
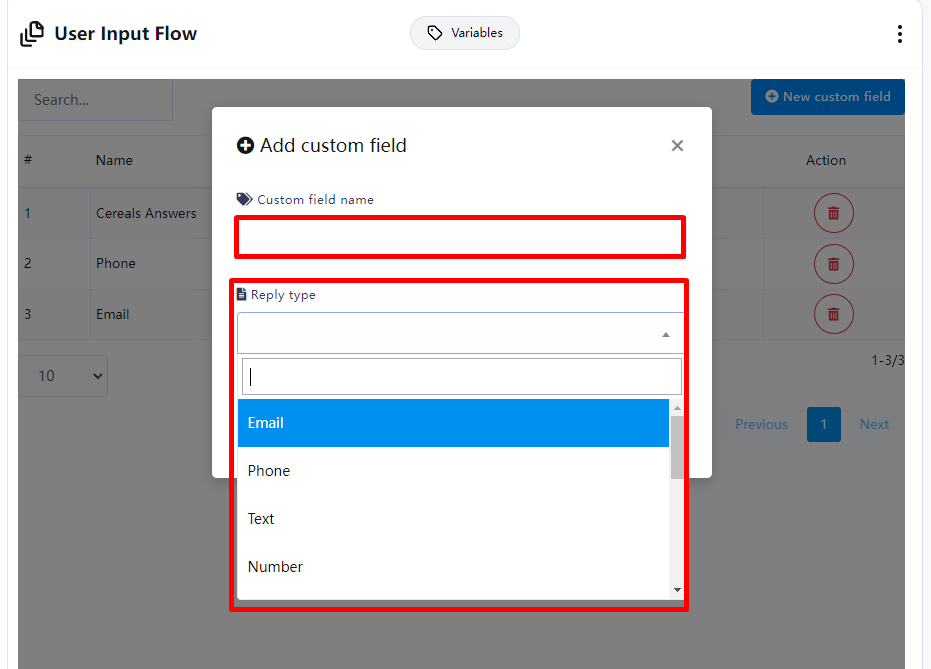
Whitelisted domains
Generally speaking, any URL sent by Facebook needs to be set as Whitelisted domains before Facebook allows this URL to be sent.
In FransChat, if a third-party URL is entered in the button, FransChat will automatically set this URL to Whitelisted domains, so generally there is no need to set it up. FransChat will automatically complete it.
You can view the currently added URLs in Bot manager Marketing Tools Whitelisted domains Action
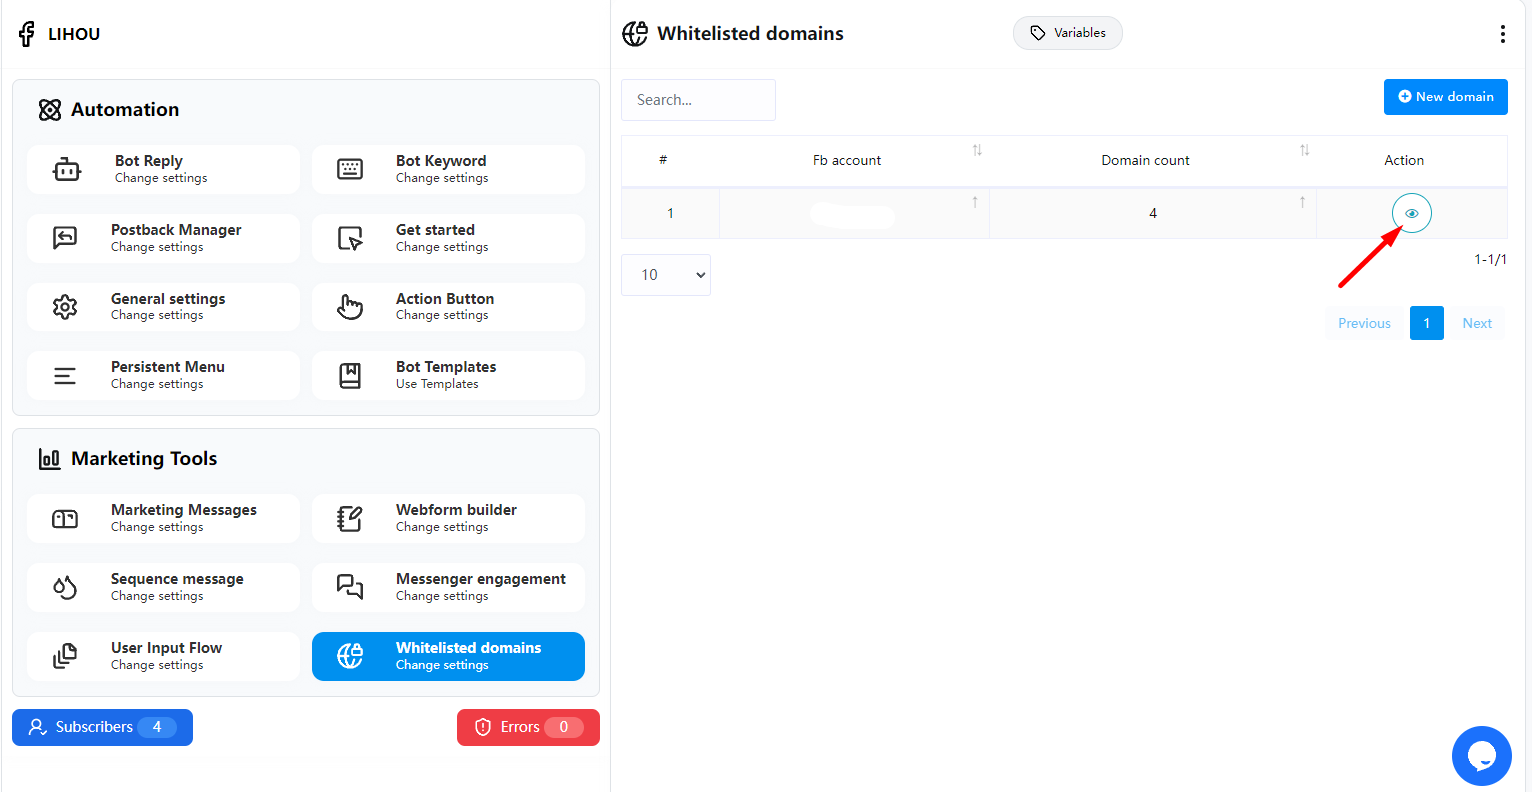
The URLs that have been added so far will be displayed here
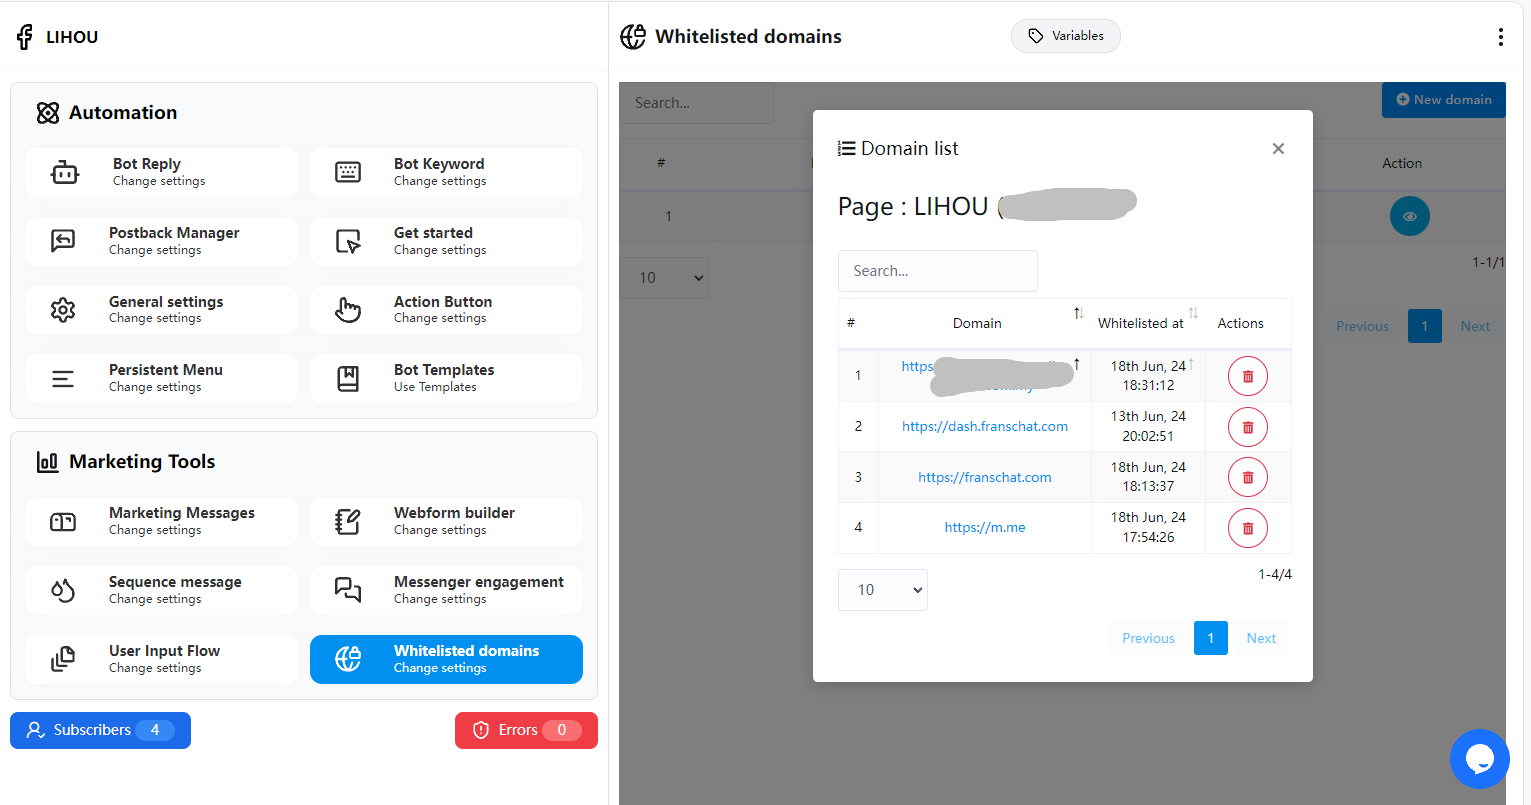
If you encounter a situation where you cannot send a message or receive an error message when sending a message, and the message contains a third-party URL, you can check whether this URL has been added to the Whitelisted domains. If not, you can manually add it again by clicking “New Domain” and entering your URL in the pop-up window, then save it.
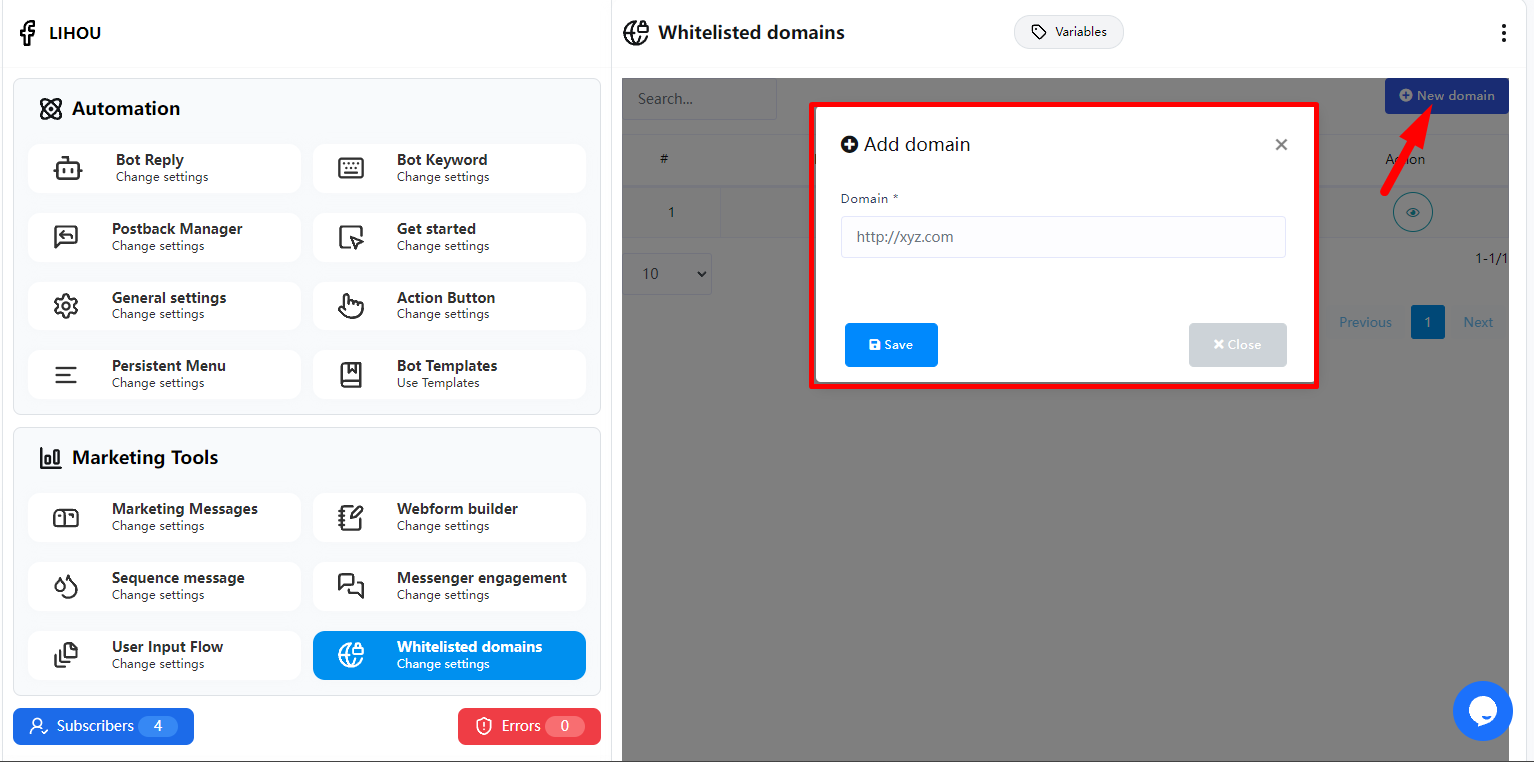
Comment Manager
All Post List
Create campaigns
To create campaigns, click on the Campaigns option on the All Post List page.
Instantly, a Facebook comment automation campaign page will appear.
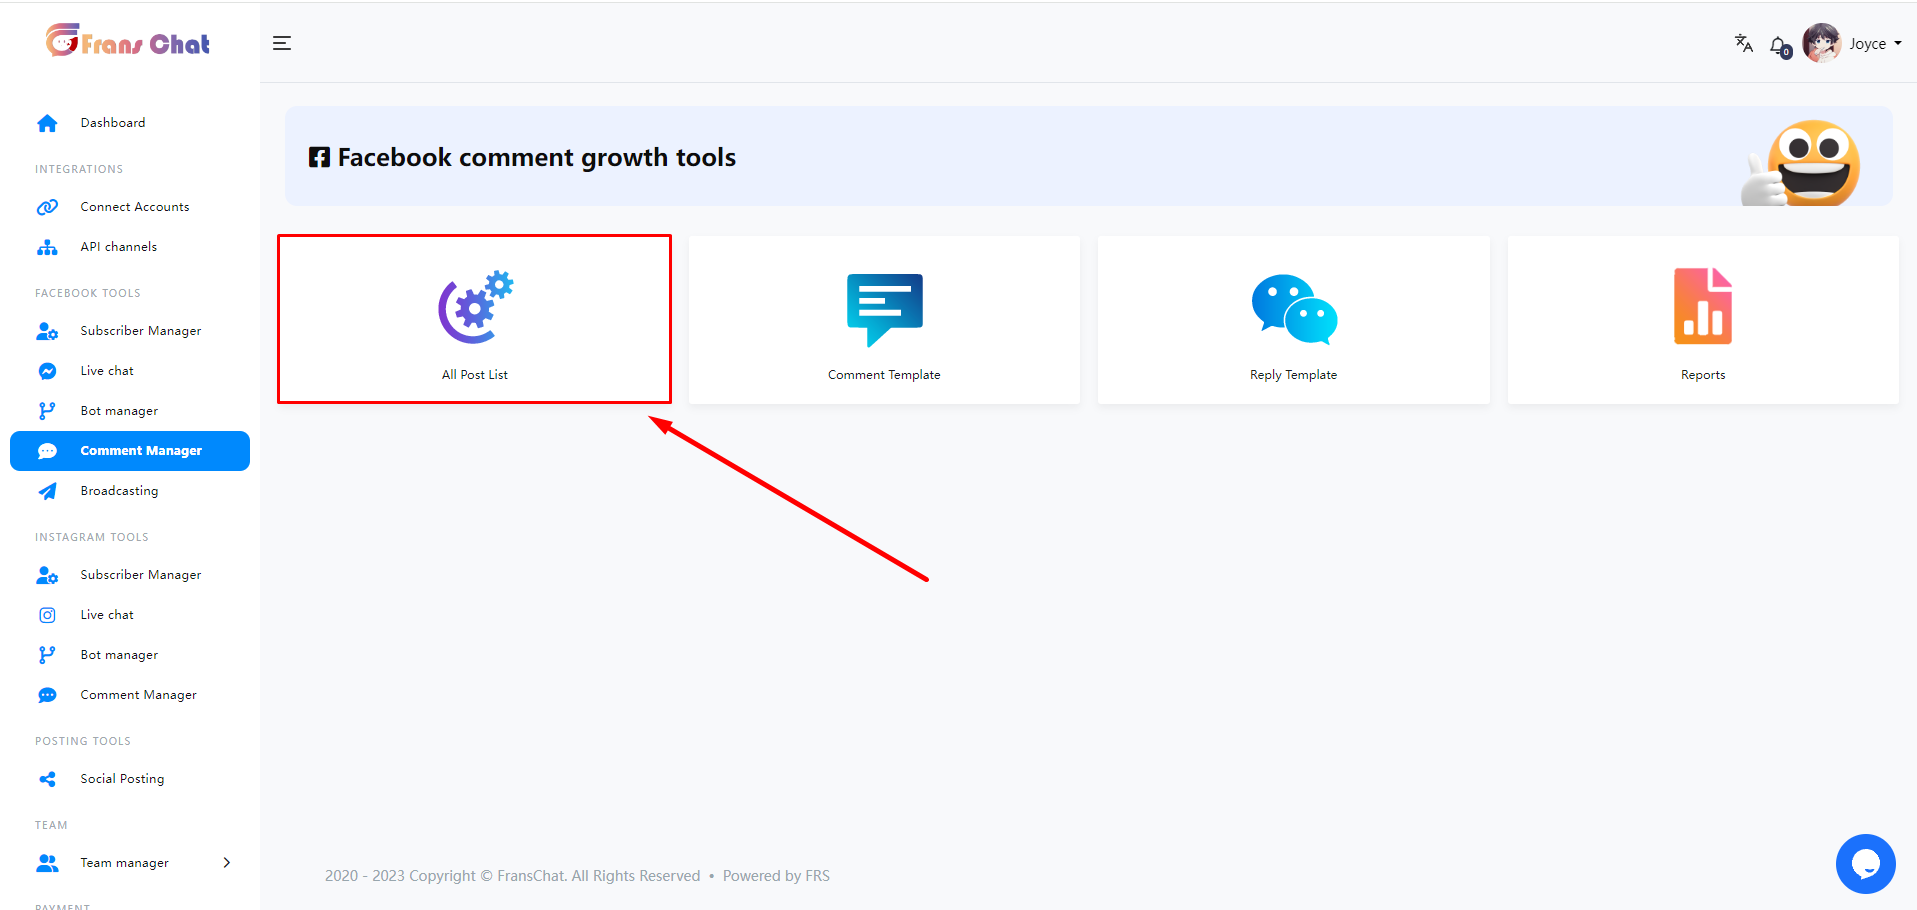
The page is divided into three sections.
On the Pages section, you have to select a Facebook page.
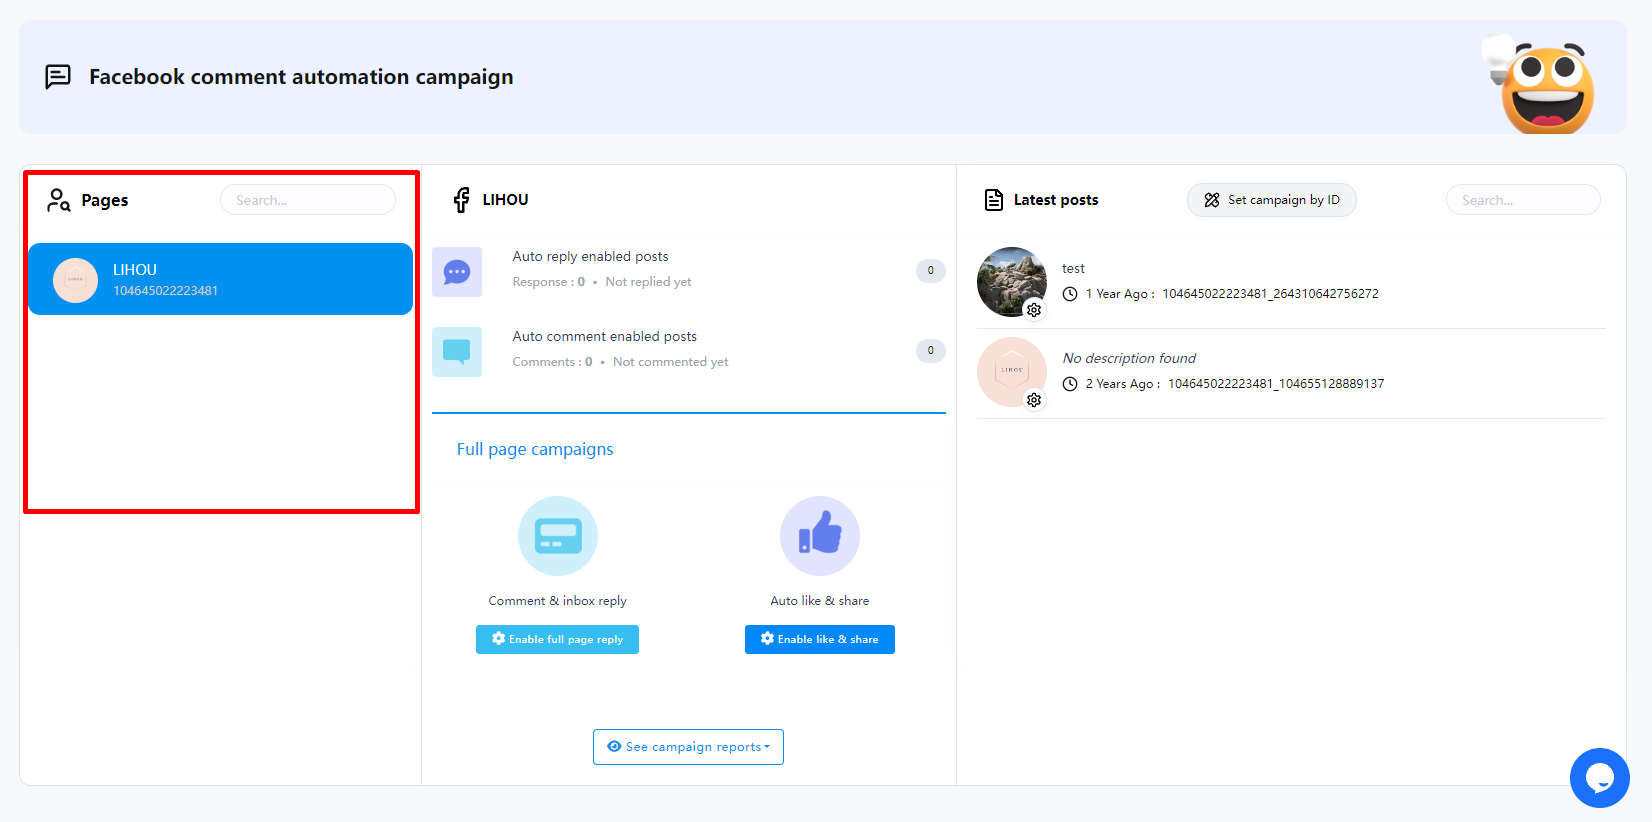
In the middle section, you can see reports.
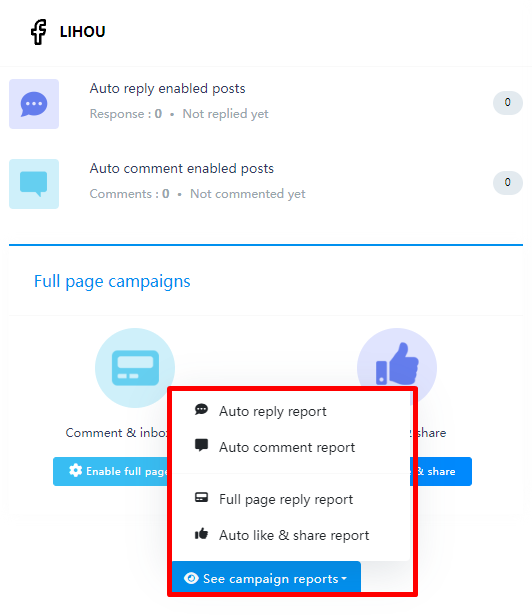
Full page campaigns
The Full page campaigns section requires upgrading to the PRO plan to use it
This feature can automate all posts on the current Facebook Page.
In the free plan, if you need to automatically reply to comments in each post, you must enable automation settings for each post separately.
The Full page campaigns feature will enable automation for all posts, including posts from ads. If you need to enable automated comment replies in ad posts published through Facebook ADS, you must use the “Comment & inbox reply” feature in “Full page campaigns”
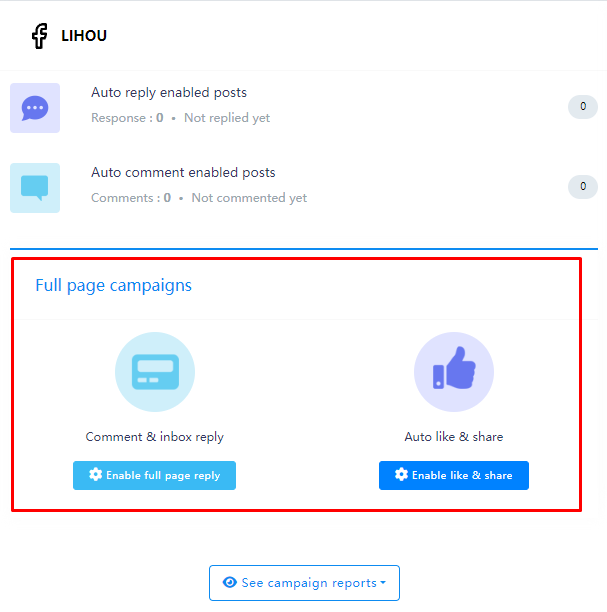
Comment & inbox reply
After clicking Enable full page reply, a pop-up window will open, where you need to set up automated comment replies and private replies for all pages.
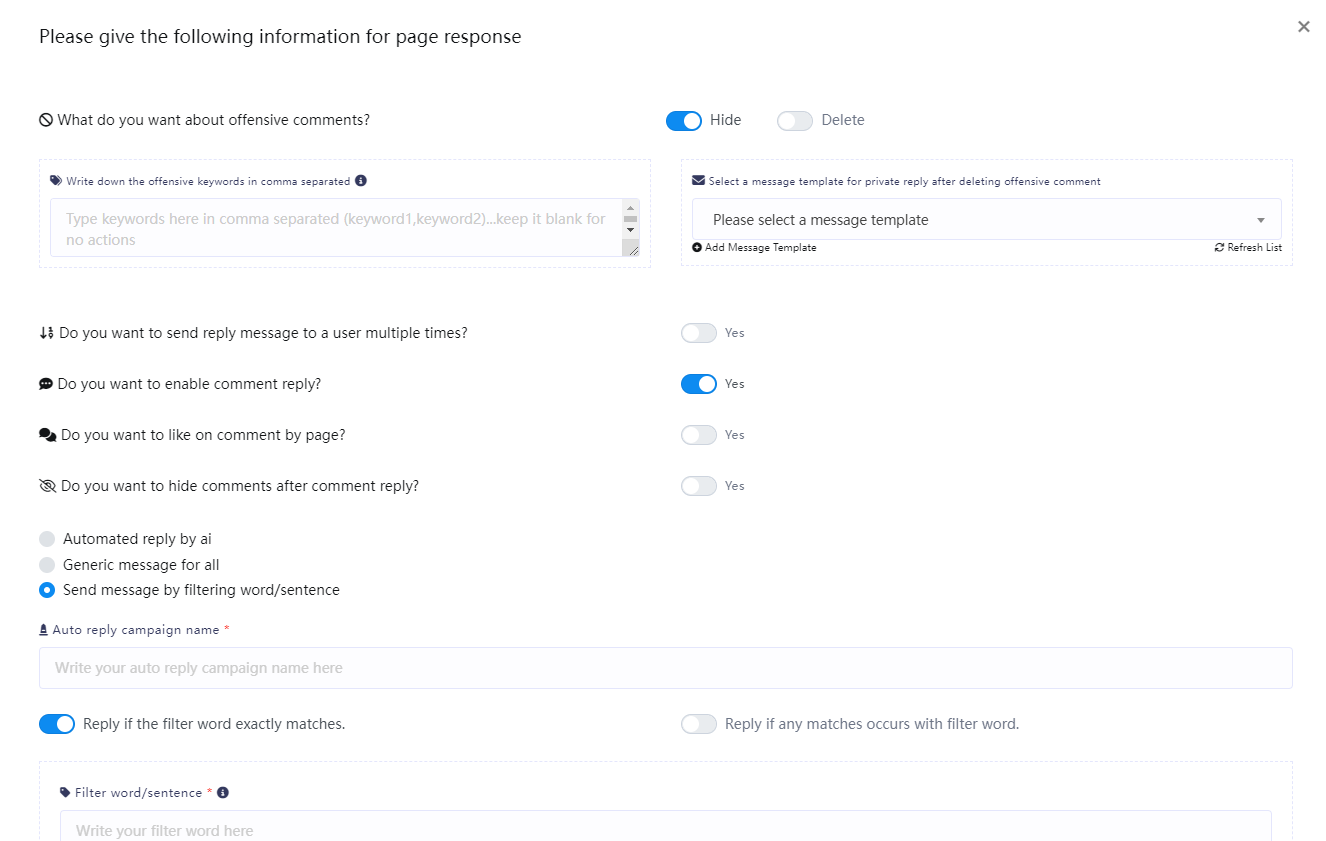
What do you want about offensive comments?
In the following settings, you can filter offensive comments in the comments. You can choose whether you want to hide or delete offensive comments when they appear.
Write down the offensive keywords in comma separated
Enter the keywords related to offensive comments here. If there are many keywords, you can use commas to separate them.
Select a message template for private reply after deleting offensive comment
If you need to send a private message to a user who has made an offensive comment, you can set it up as follows. In the drop-down list, select the message template you want to send. If there is no message template, click “Add Message Template” and the Visual Flow Builder Editor will open, where you can create one. If you do not need to send a private message to a user, you do not need to set a reply template.

If enabled, you will be replied to when the same user comments multiple times. If disabled, you will only be replied to when the same user comments for the first time. You will not be replied to when the same user comments again.
The system will reply to comments only after it is enabled, and it generally needs to be enabled.
After enabling, when a user comments, your Facebook Page will automatically like the user's comment
After enabling, when a user makes a comment, the system will automatically reply to the user's comment and hide the comment
- This feature helps you hide potential customers from your peers and business competitors.

Automated reply by ai
If you use Ai Reply, you must configure the Openai API before it can work properly.
First we need to set a name for this campaign.
Then in the Ai training data section you need to provide the AI with a prompt for how to reply to comments.
Note: When using Automated reply by ai, all comments posted by users will be automatically replied.
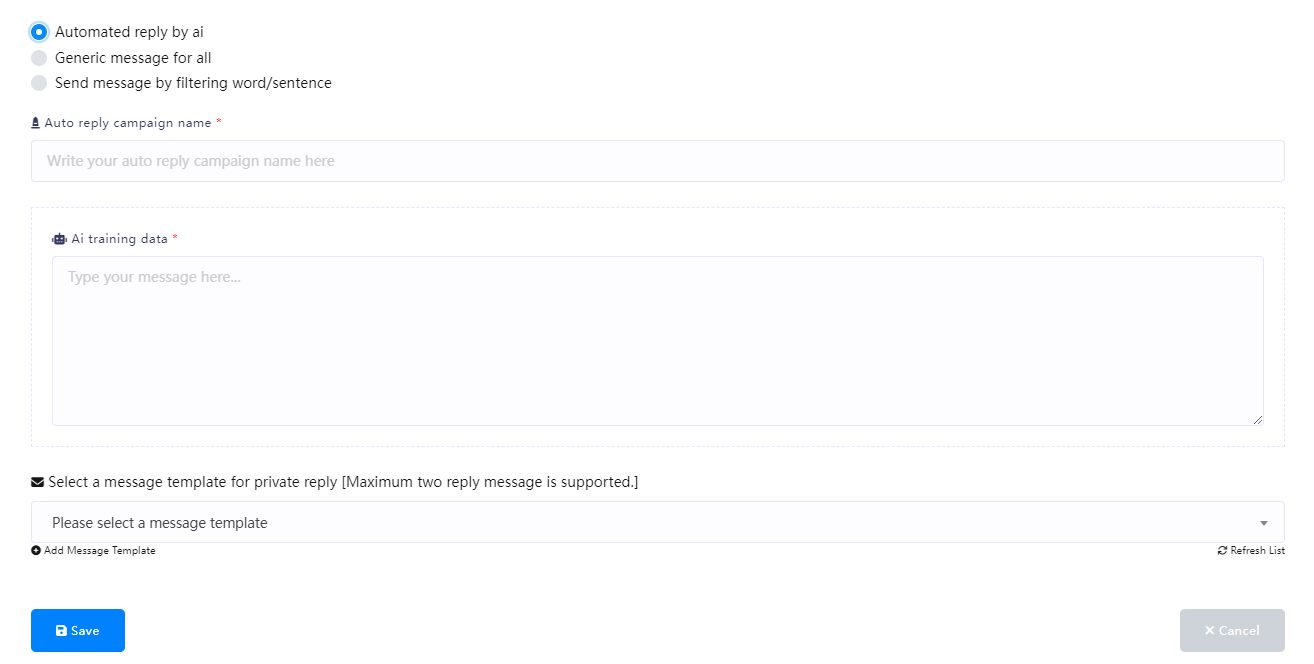
Generic message for all
Generic reply means same reply for everyone, no comment filtering applicable. It’s simple, just provide message for comment reply and inbox private reply. Everyone will get same reply no matter whatever they comment. The reply supports spintax and you can embed commenter name variable inside reply message. Tagging user is also possible for comment reply only, not for inbox private reply.
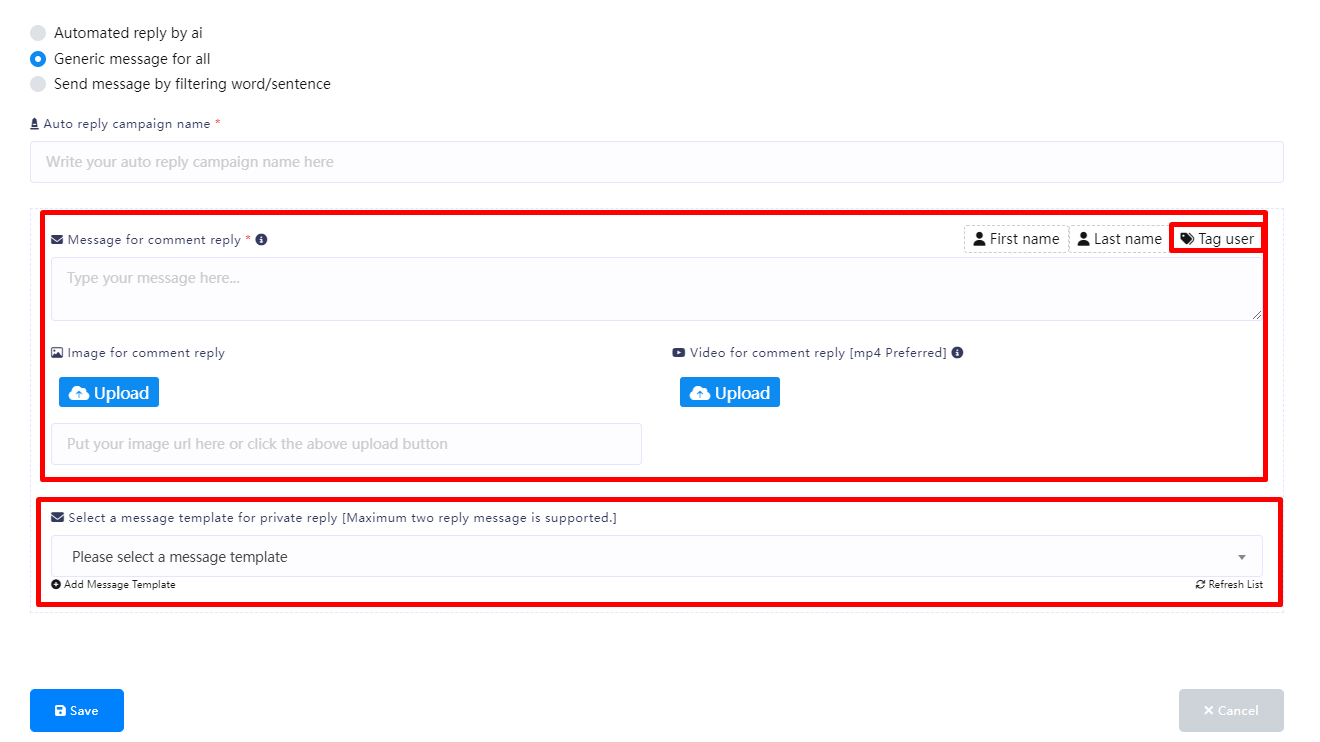
Send message by filtering word/sentence
On the other hand, if you choose to send a message by filtering words/sentences, more fields will appear.
First, write the campaign name in the Autoresponder Campaign Name field.
Then you have to enable one of the two options – Reply if the filter word matches exactly and Reply if any of the filter words match.
Then, you have to write the filter word or sentence in the appropriate field (separate with commas if there are multiple filter words).
After that, write a message for the comment reply, you can also upload a picture or video to reply to the comment (if you want a private reply, you don’t need to set this).
Then select a message template for the private reply (if you want a comment, you don’t need to set this).
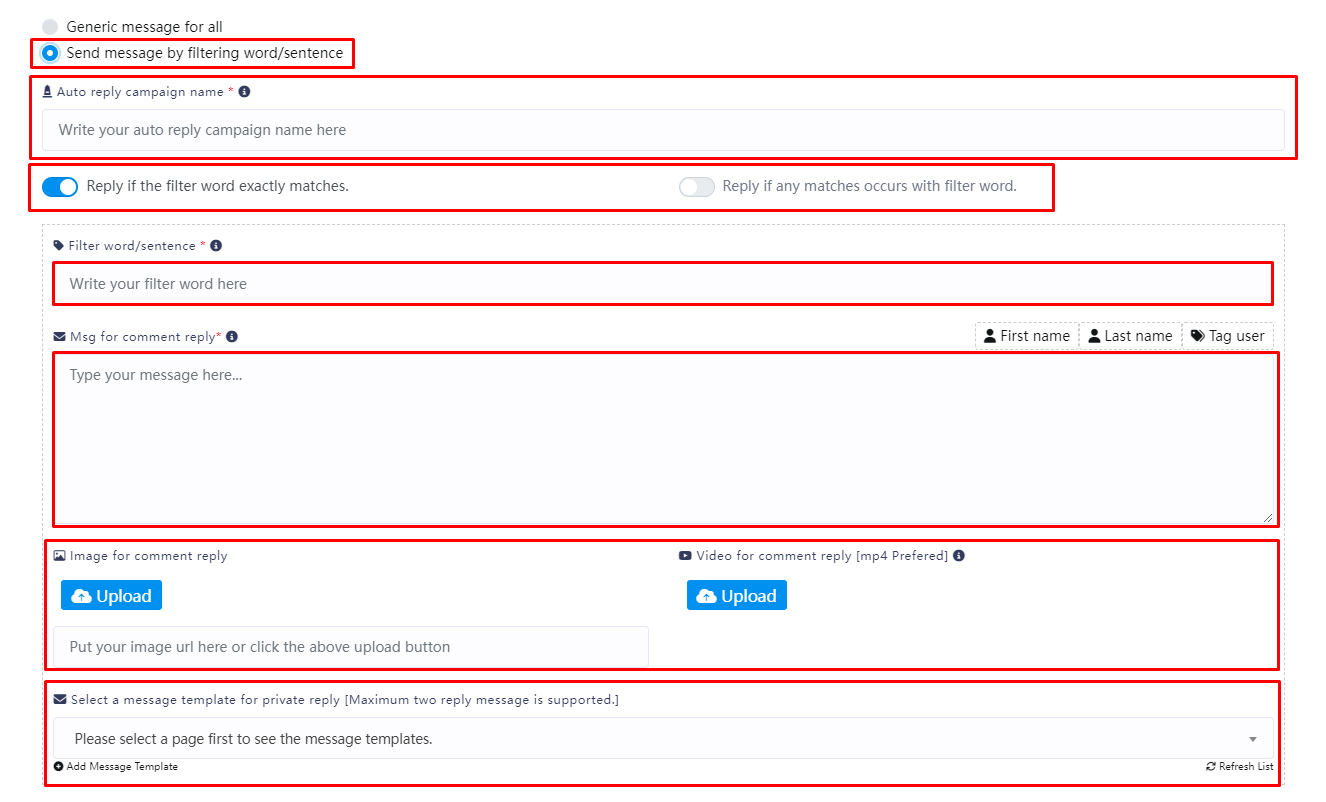
If you have different filter terms that require different responses, you can click the “Add more filtering” button below
Then you will see the same filter terms field settings displayed
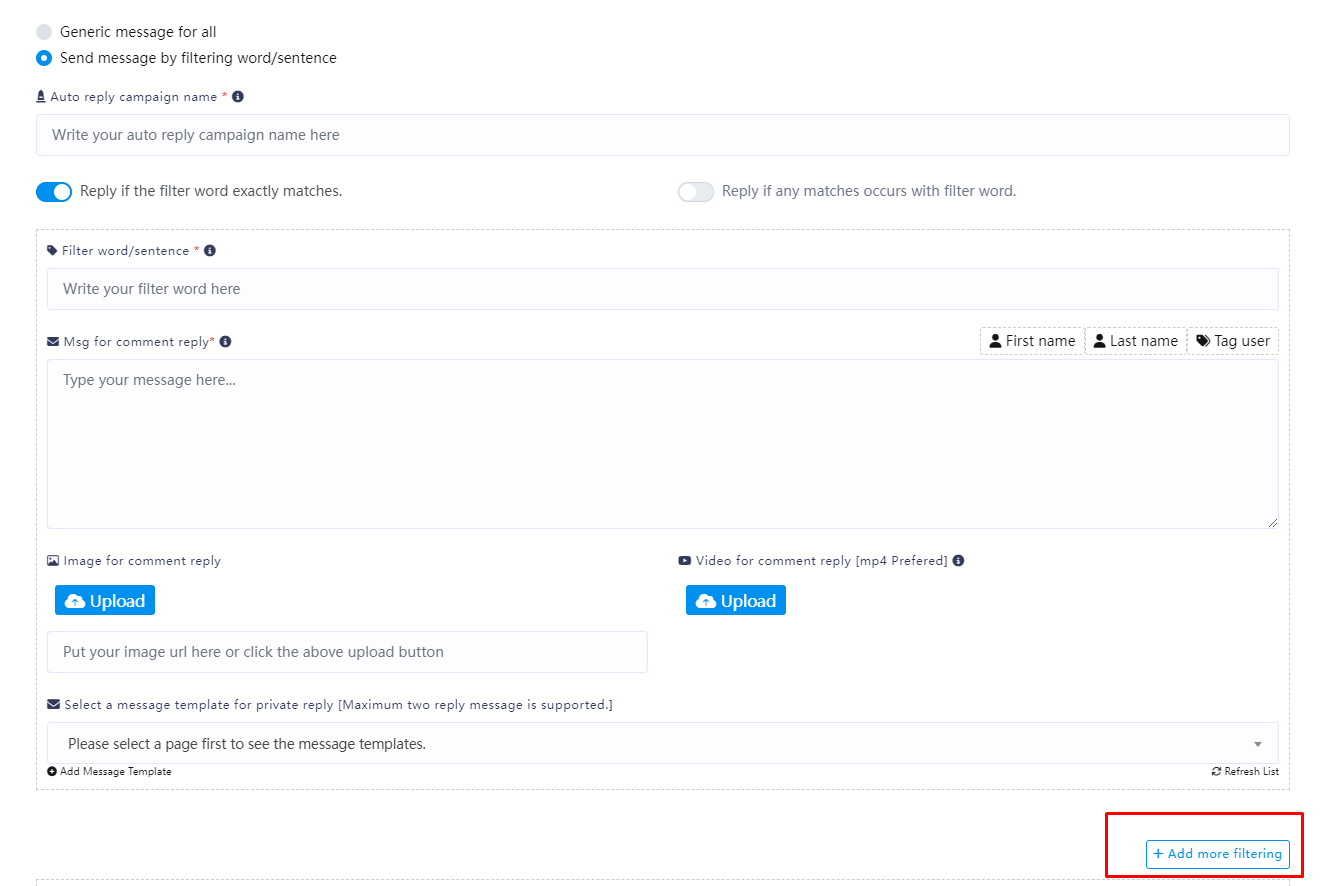
Finally, in the “Comment reply if no matching found” section, if you need to make an additional reply when a user’s comment does not contain the filter words, you can set it here (if you only need to reply to comments containing the filter words, then you don’t need to set it here)
Then click the “Save” button.
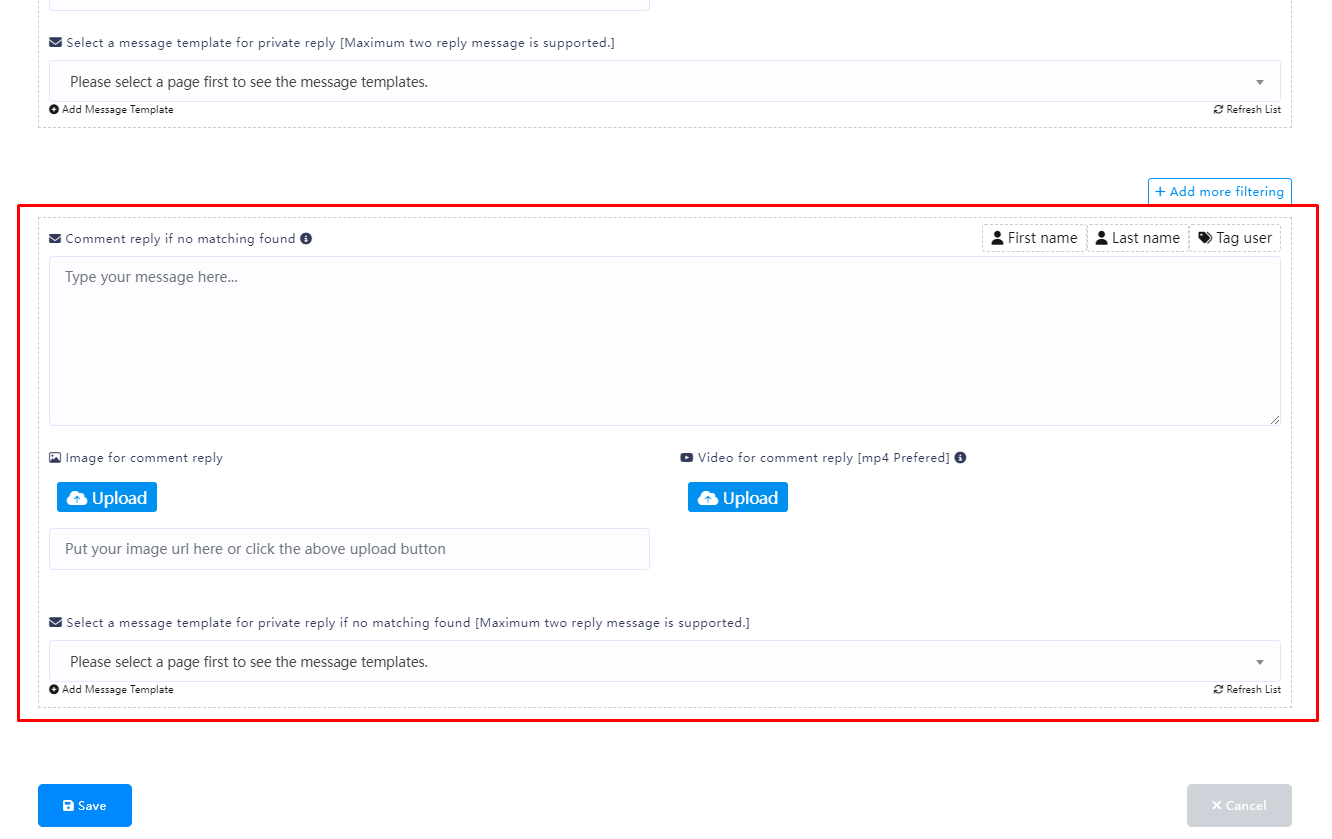
Auto like & share
This feature can auto like any new post of your page as your other pages and also can auto share any new post of your page as your other pages. It’s very simple, just select pages you want to hit like with and pages you want to share the new posts. Using enough share delay can be very useful for large number of share & avoid spamming.
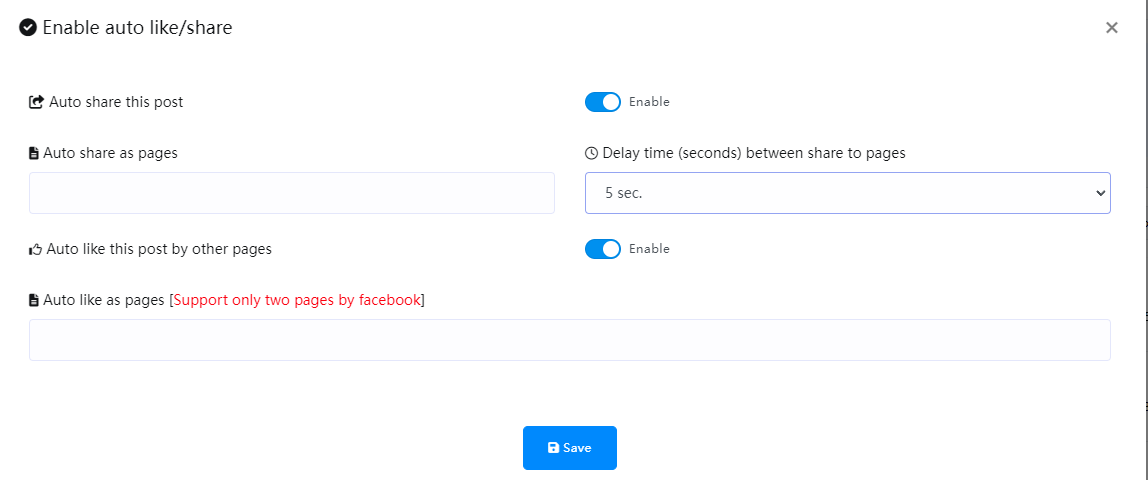
Latest Posts
Now come to the latest post sections. In the section, you can see the list of latest posts.
Now click on the gear icon of any post and a drop-down menu of different options — Enable auto reply, Enable auto comment, Check latest comments, Leave a comment now.
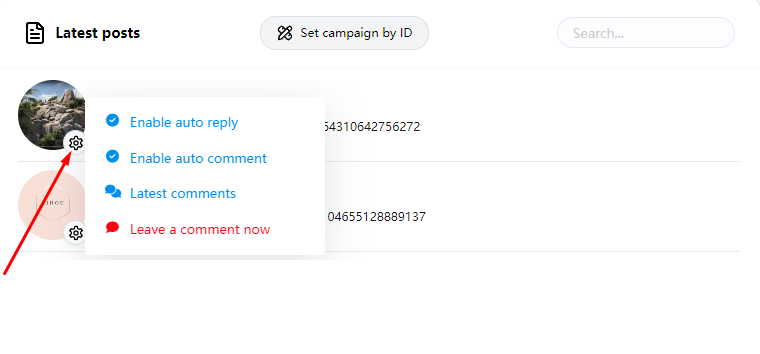
Enable auto reply
To enable auto reply for the post, click on the Enable auto reply option.
Instantly a modal form will appear. Now you have to fill out the modal form.
If you want to use a saved template, keep the radio button turned on.
Now select labels from the choose labels fields. Of course, you can select multiple labels.
Then you have to select an auto reply template.
Now click on the submit button.

Or you can cancel the template and create a new reply template
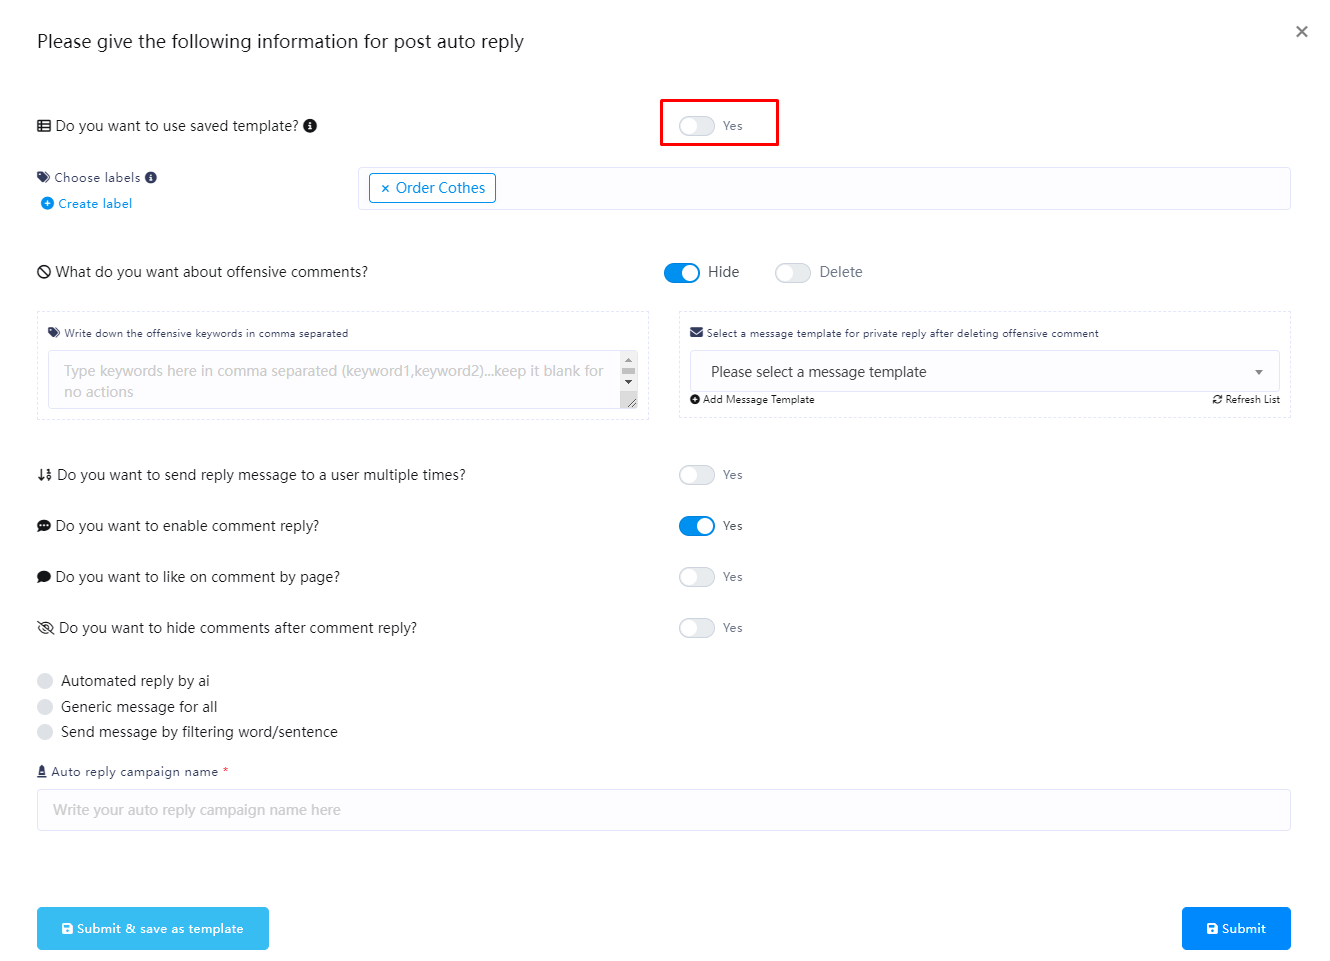
Enable auto comment
To enable auto comment, click on the Enable auto comment option.
Instantly, a modal form will appear. Now you have to fill out the form.
There are two modes for automatic comments: One time and Periodic
One time
In One time mode, comments will only be automatically made once within a specified time.
You need to fill in the campaign name and set the Auto comment template. You can see how to create an Auto comment template here.
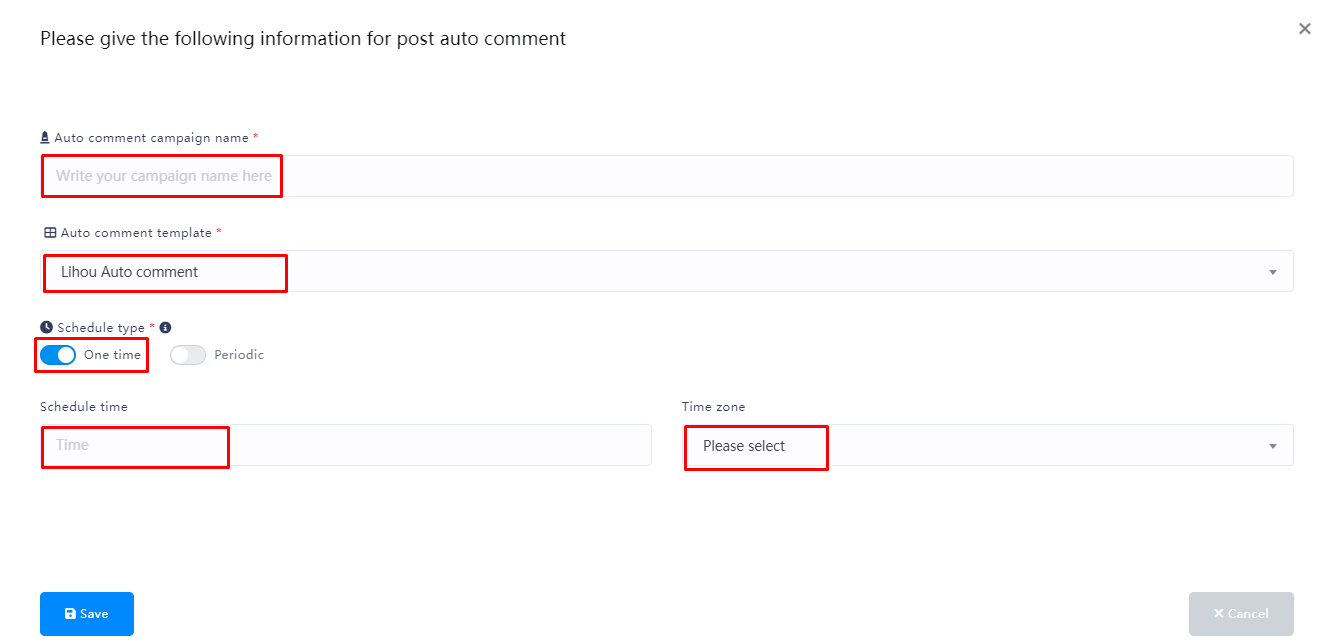
Periodic
In Periodic mode, you can repeat comments within a set time.
You can set the time for repeated comments, your time zone, and the start and end time of the activity in “Periodic schedule time”
In “Auto comment type”, if your Auto comment template has multiple comments set, then if you select “Random”, a comment in a template will be randomly selected for each repeated comment to be published, otherwise if you select “Serially”, it will be published in the order in the comment template
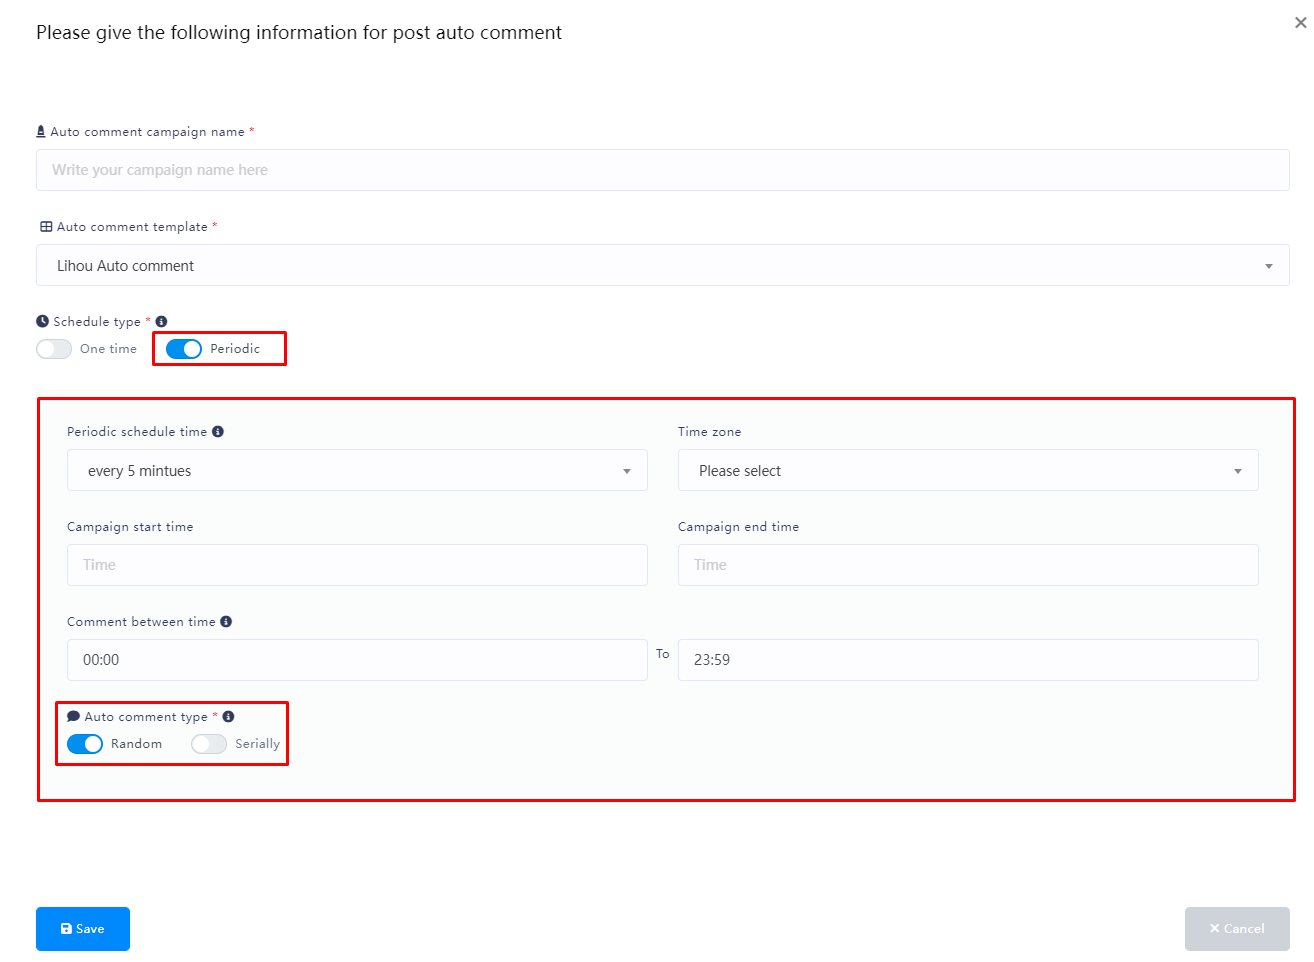
Check latest comments
To check latest comments, click on the Check latest comments opinion. And instantly, all the latest comments will appear on a modal form.
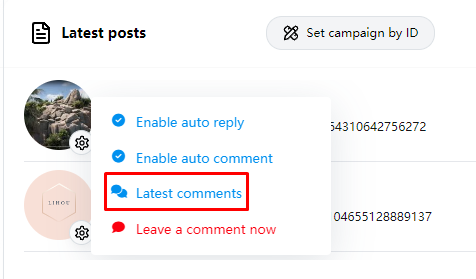
Leave a comment
To leave a comment under a post now, click on the Leave a comment option.
Instantly, a modal form will appear. Write a comment in the field and click Create comment button.
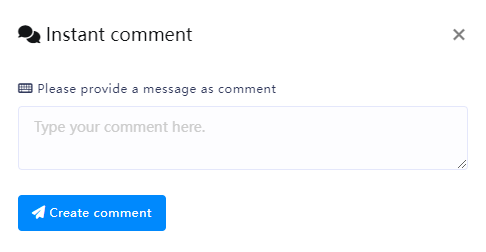
Comment Template
Creating auto comment template
To create a comment template, click on the comment template option.
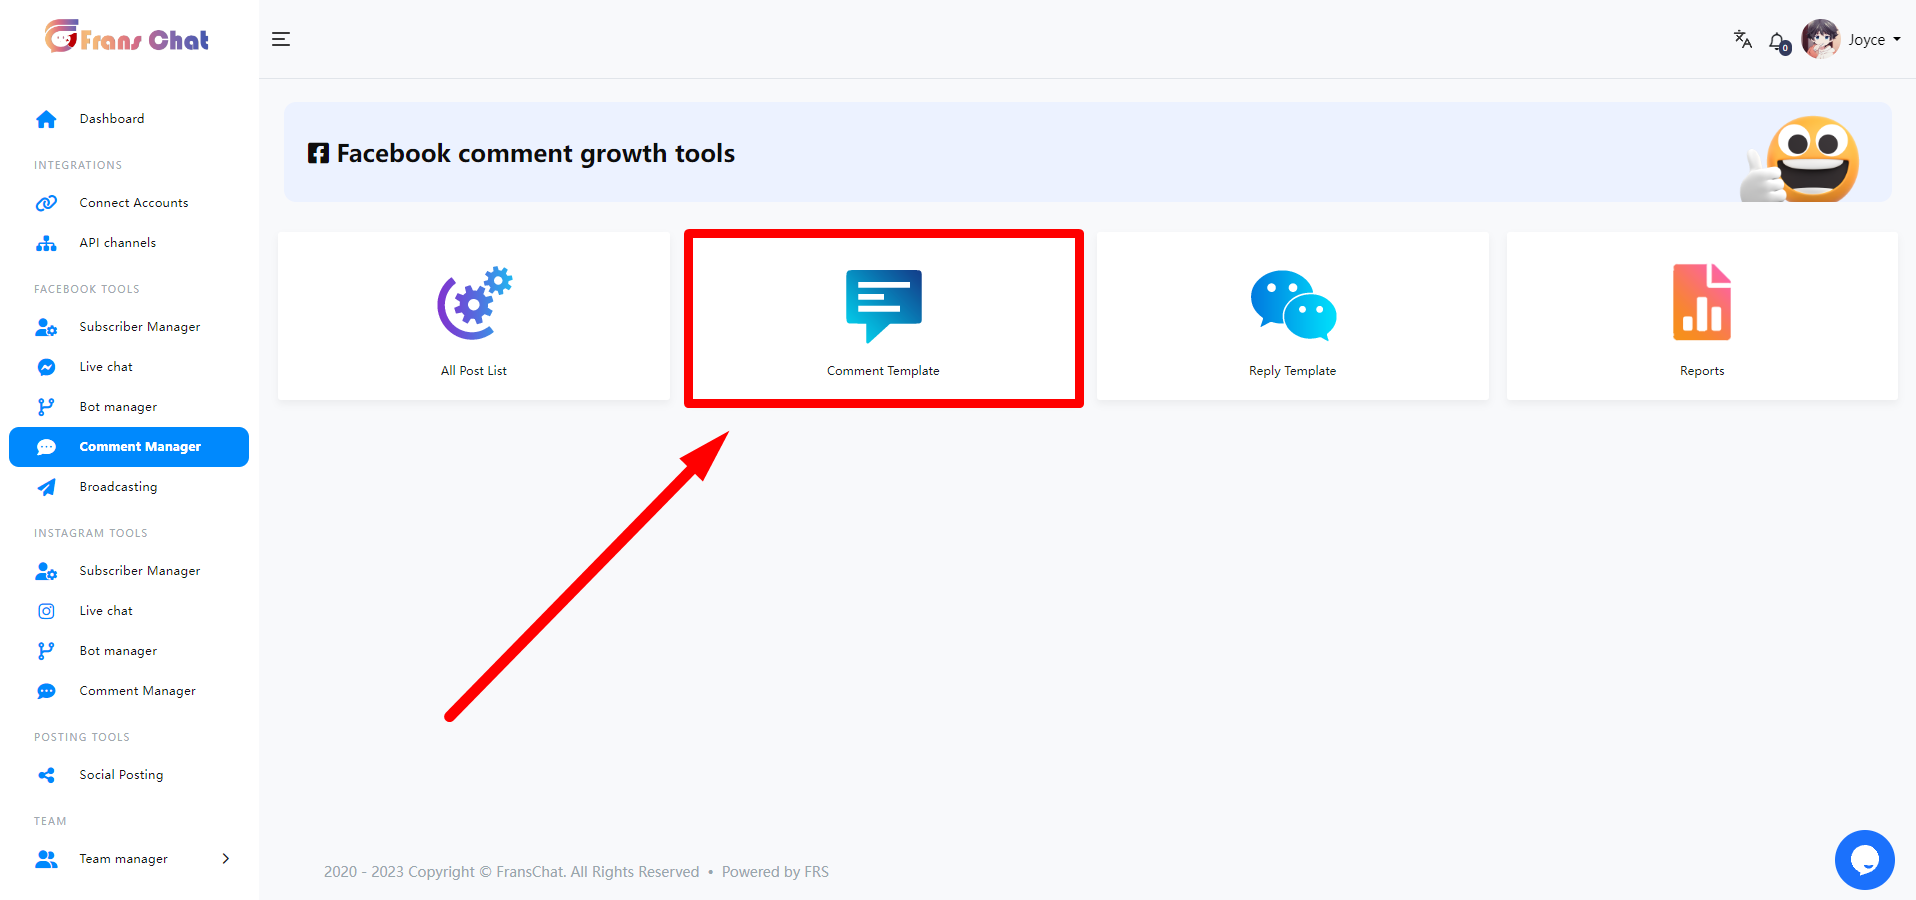
Instantly, the Auto comment template manager page will appear with a button called Create new template. Now click on the Create new template button.
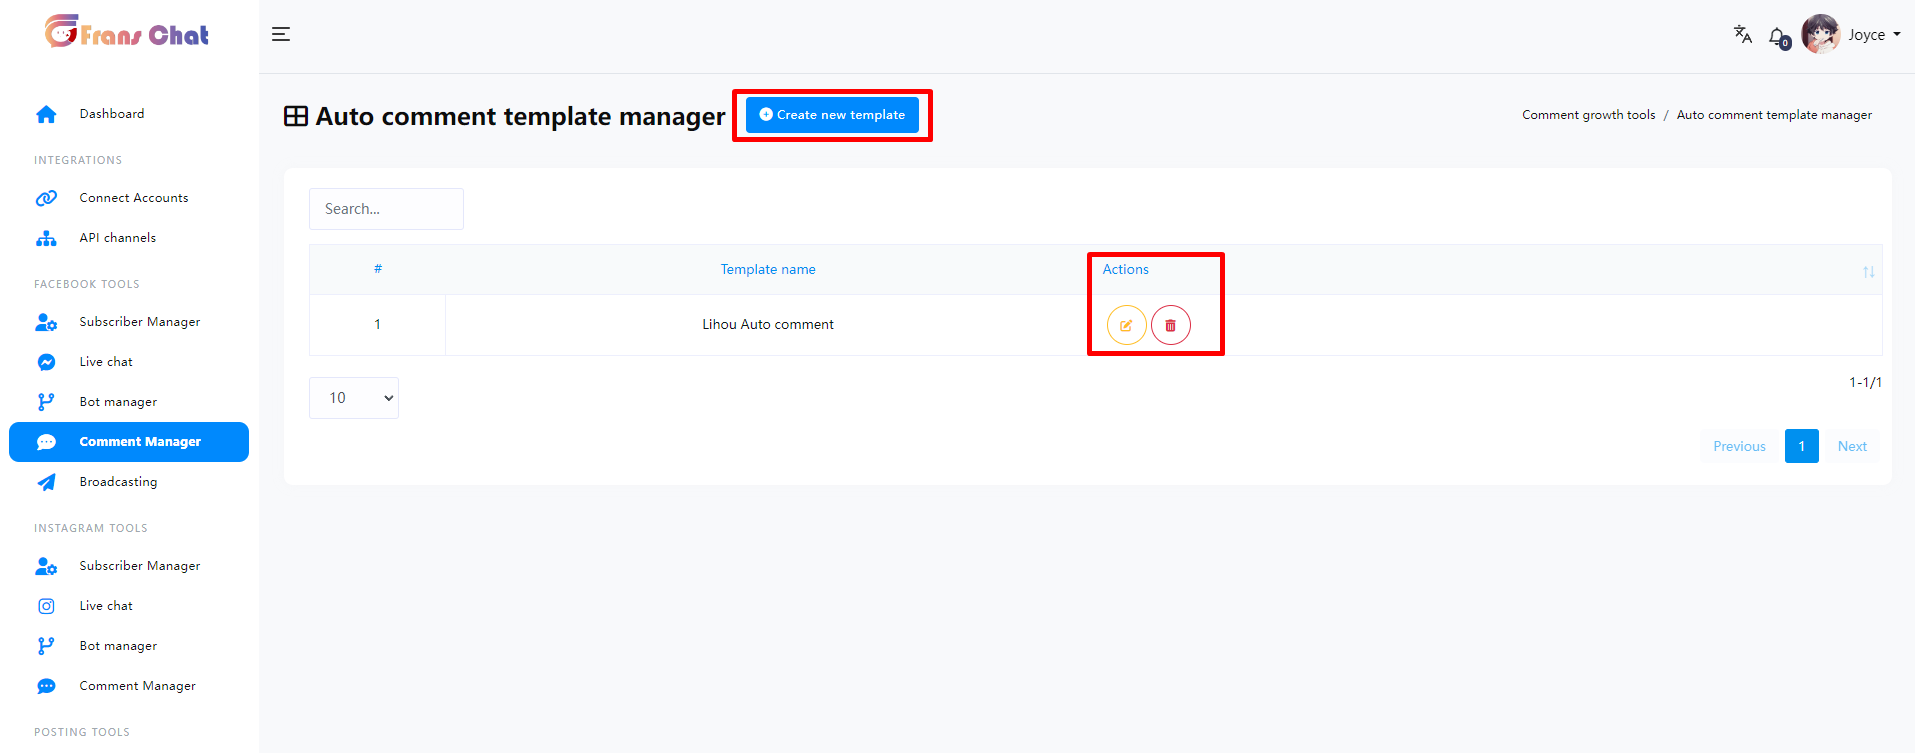
Instantly, a modal form will appear— you have to fill out the form to create an auto comment template.
Write a ‘Template name’ in the ‘Template name’ box. Then write a comment in the ‘Auto comment’ box, the comment that will be made automatically under your Facebook pages’ posts. You can add as many comments as you want by clicking on the ‘Add more’ button. Then click on the ‘Save’ button.
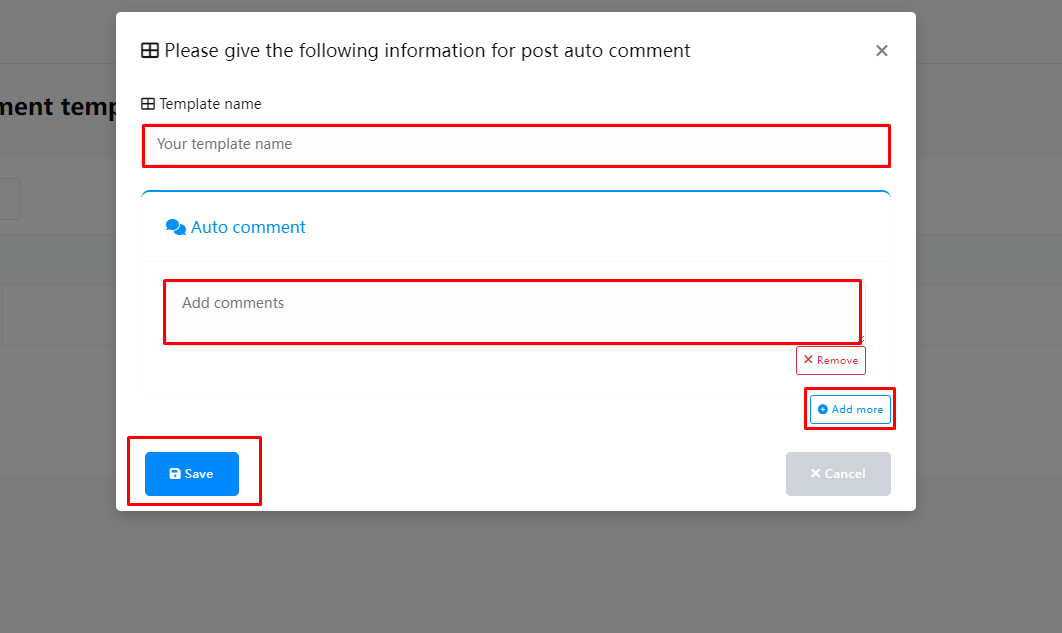
Instantly, a successful message will appear.
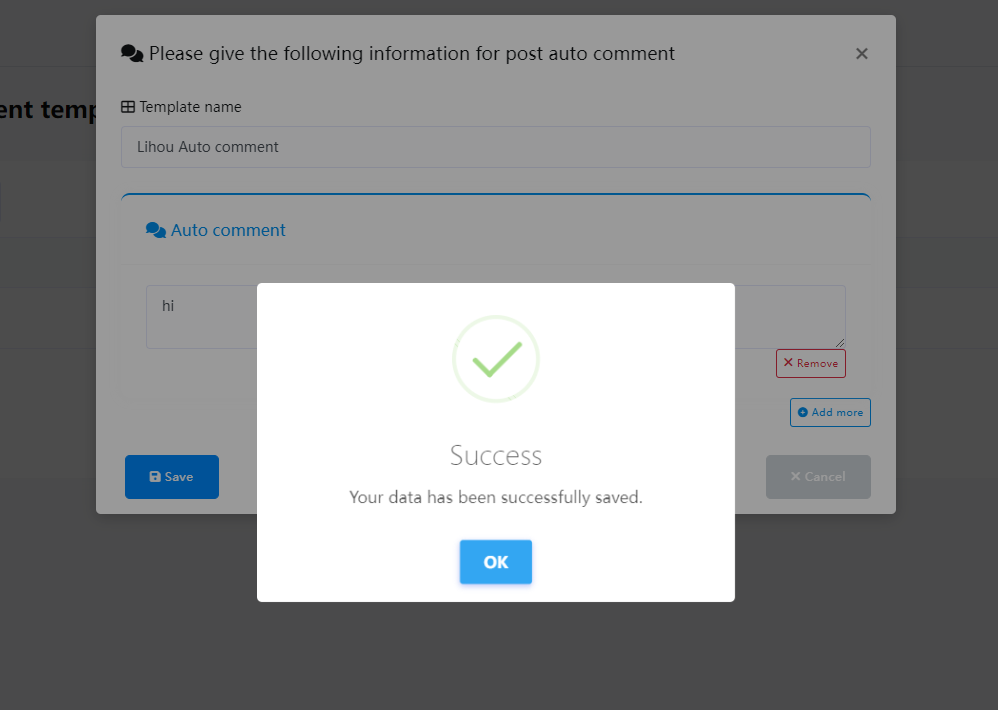
Now the template is created, and you can see the template name on the page called ‘Auto comment template manager’. Next to the template name, you will see the ‘edit’ and ‘delete’ icons. By clicking on the ‘Edit’ icon, you can edit the campaign. And by clicking on the ‘Delete’ icon, you can delete the template. Of course, you can create another template by clicking on the ‘Create new template’ button— you can create as many templates as you want.
Reply Template
Creating auto reply template
To create auto reply template, click on the Reply template option on the Comment Manager page.
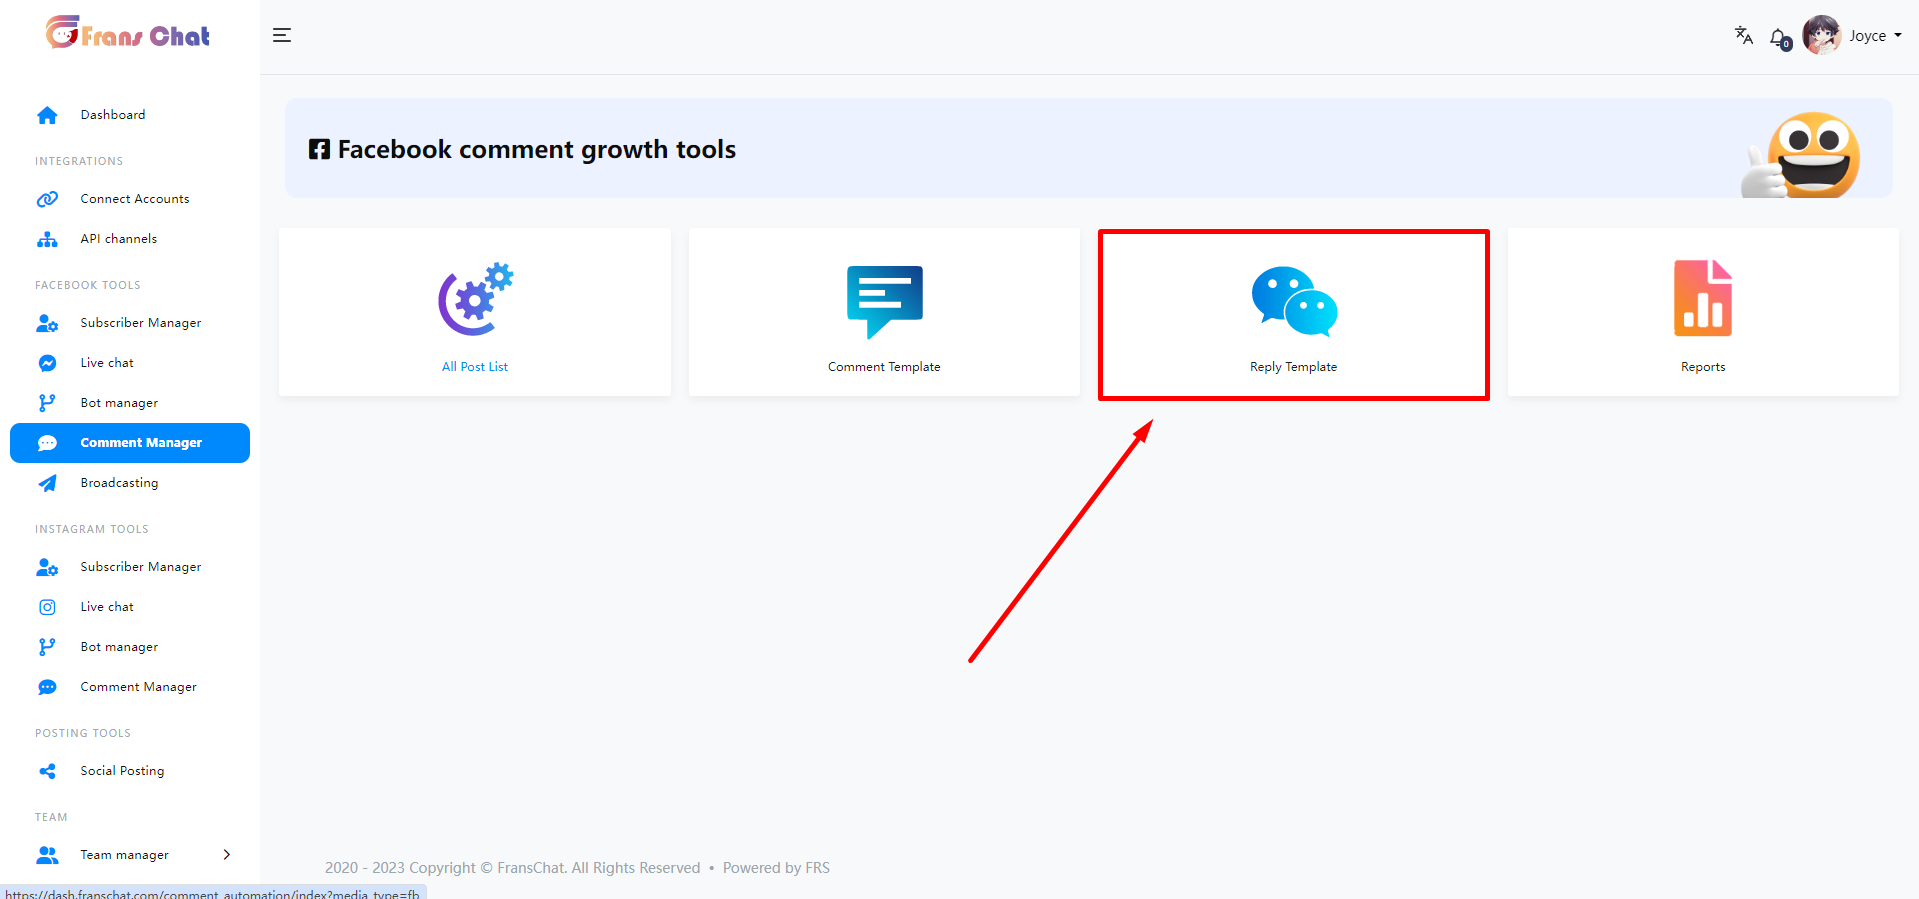
Instantly, Auto reply template manager page will appear with a button called Create new template.
Now click on the Create new template button.
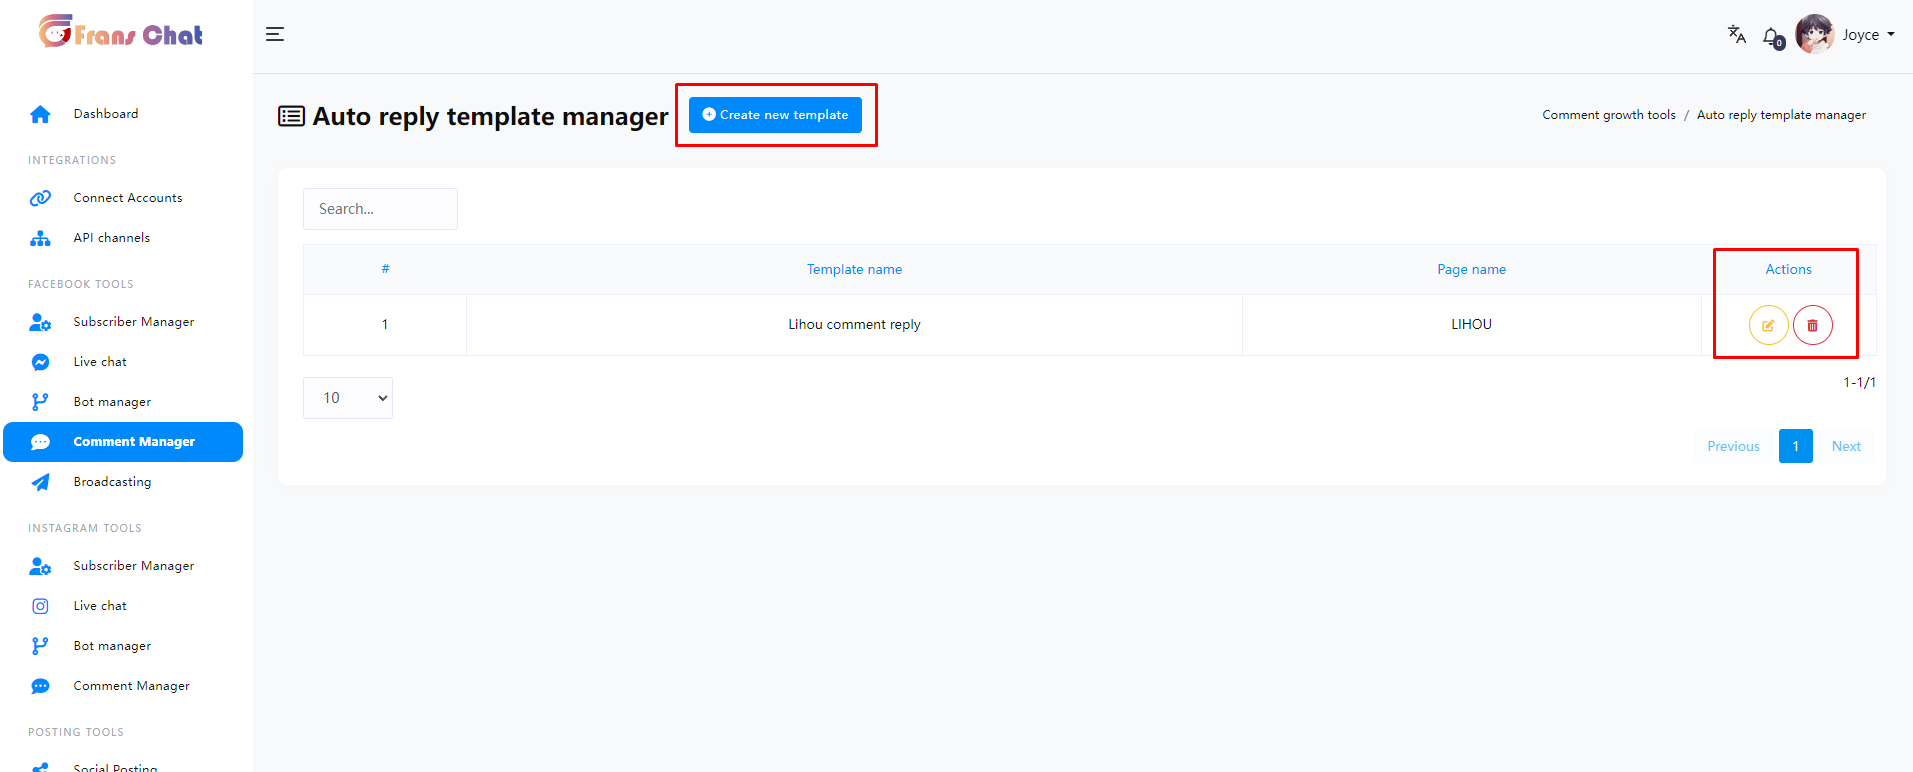
Instantly, a modal form will appear — you have to fill out the form.
Please select a page for auto-reply
First, you have to select a Facebook page from the drop-down menu.
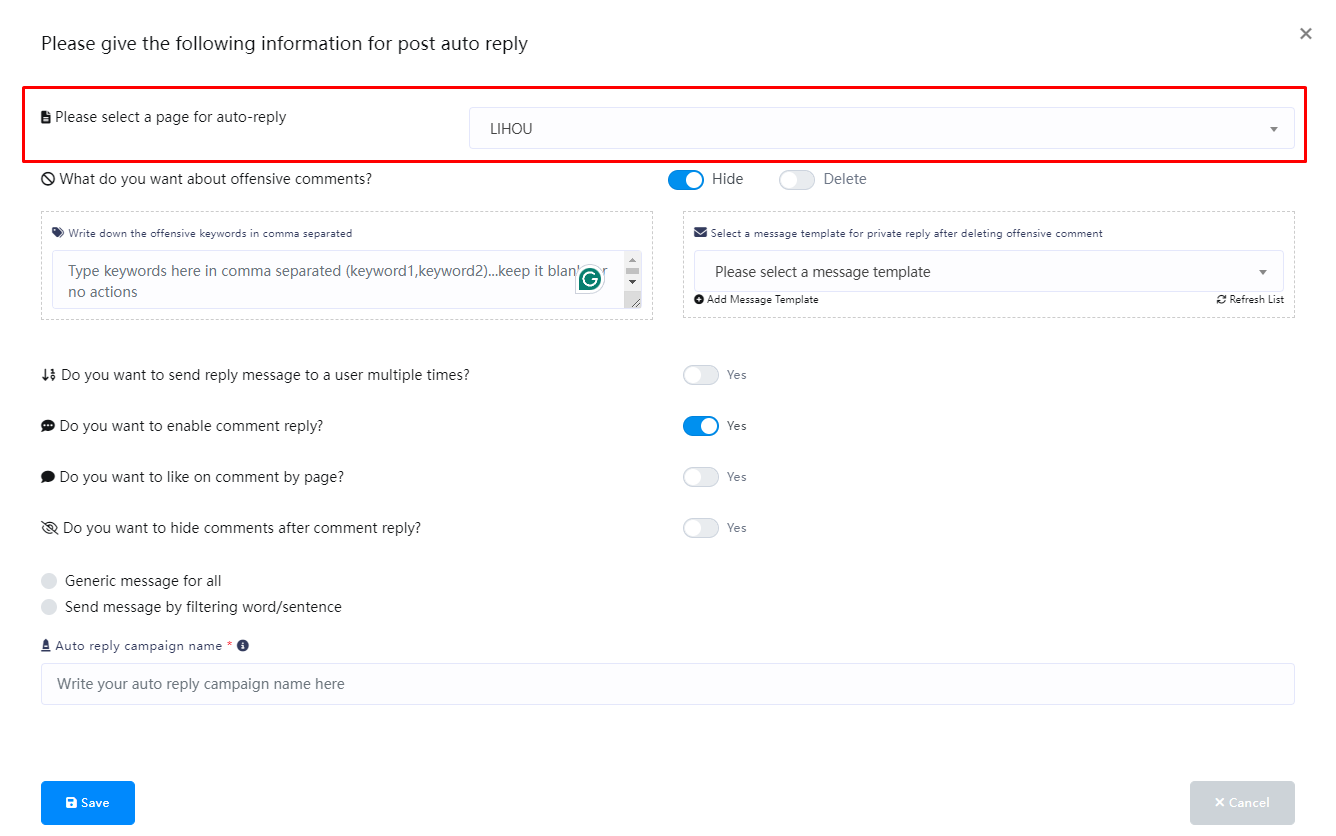
What do you want about offensive comments?
In the following settings, you can filter offensive comments in the comments. You can choose whether you want to hide or delete offensive comments when they appear.-
Write down the offensive keywords in comma separated
-
Select a message template for private reply after deleting offensive comment
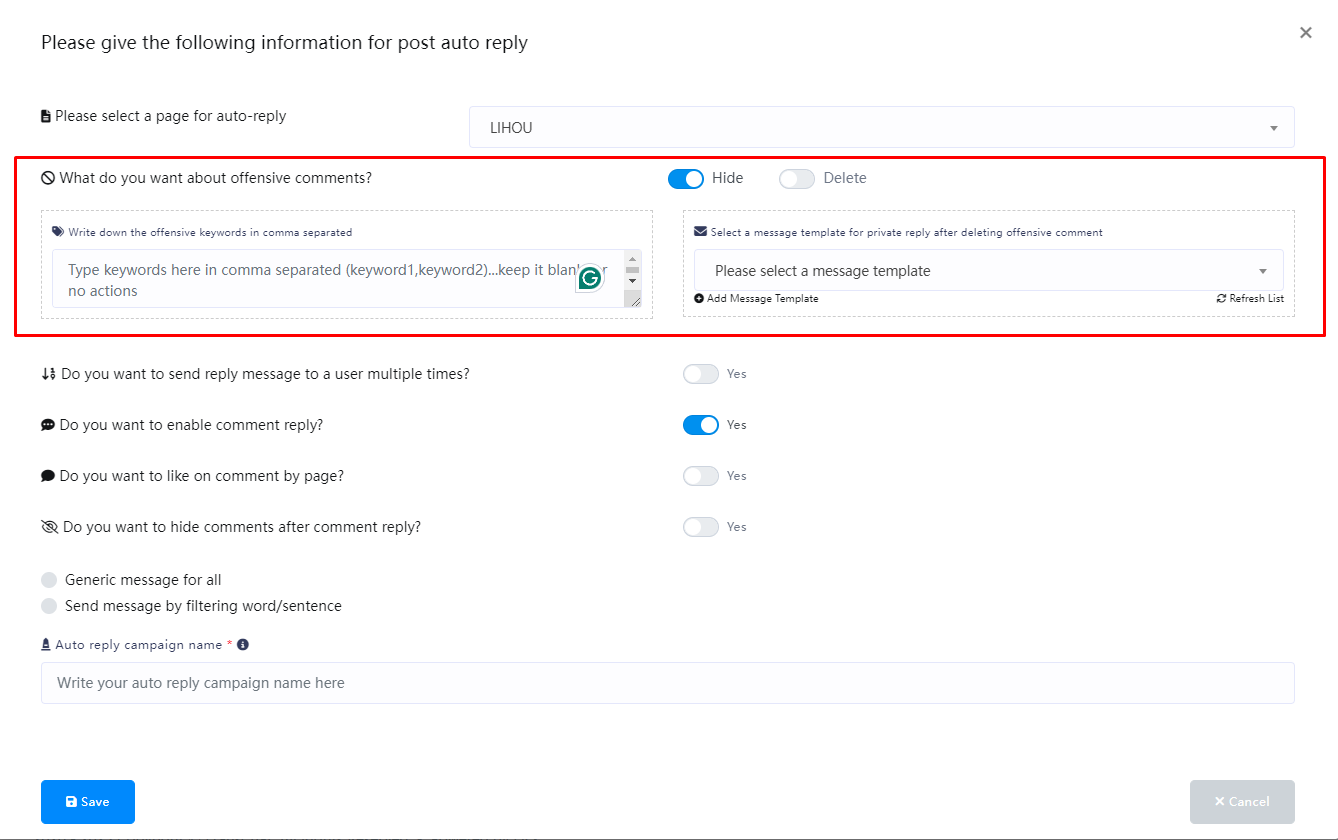
If enabled, you will be replied to when the same user comments multiple times. If disabled, you will only be replied to when the same user comments for the first time. You will not be replied to when the same user comments again.
The system will reply to comments only after it is enabled, and it generally needs to be enabled.
After enabling, when a user comments, your Facebook Page will automatically like the user's comment
After enabling, when a user makes a comment, the system will automatically reply to the user's comment and hide the comment
- This feature helps you hide potential customers from your peers and business competitors.
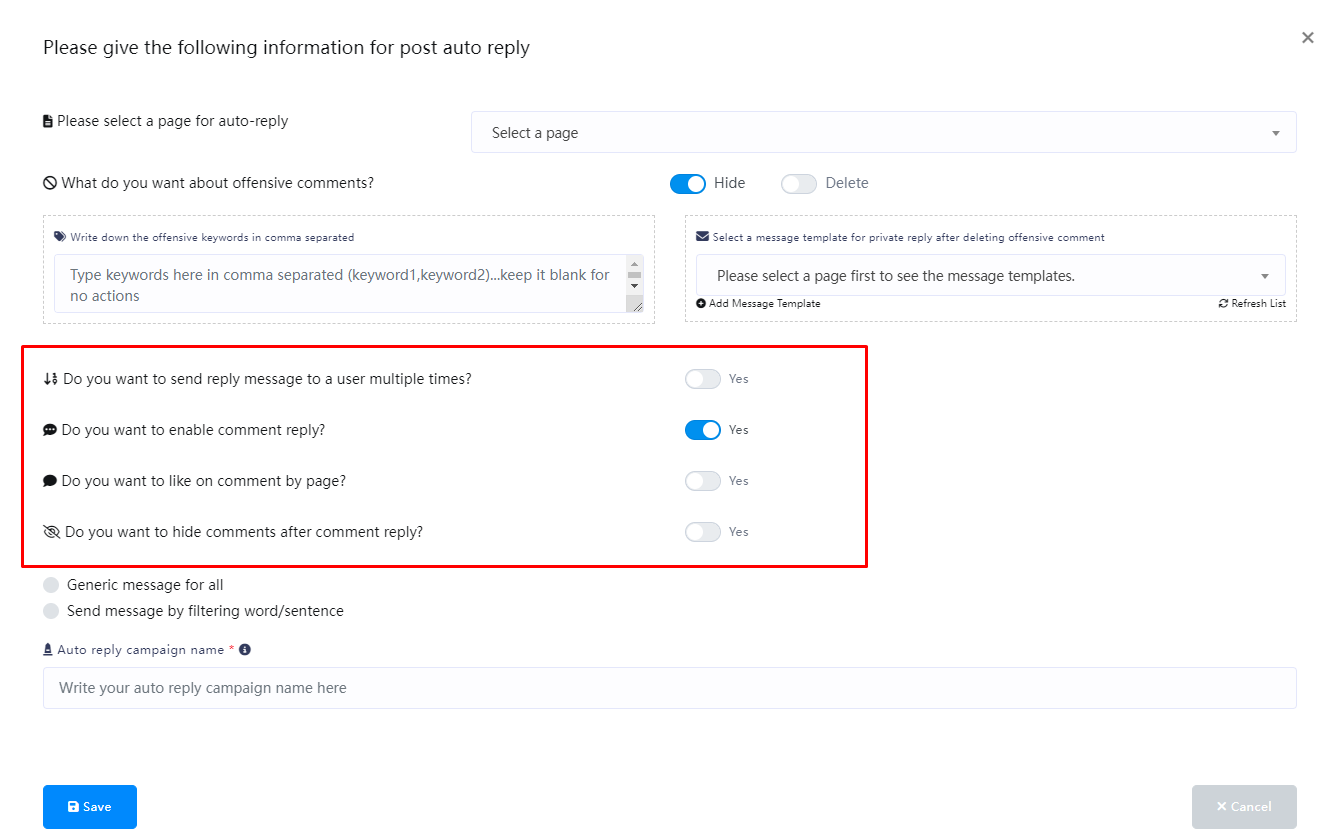
Generic message for all
After that, select Generic message for all option. And instantly, three fields will appear.
Write a template name in the Auto reply campaign name field.
Then write a message for Message for comment reply field.
After that, you have to select a message template for private reply.
Then click on the Save button.
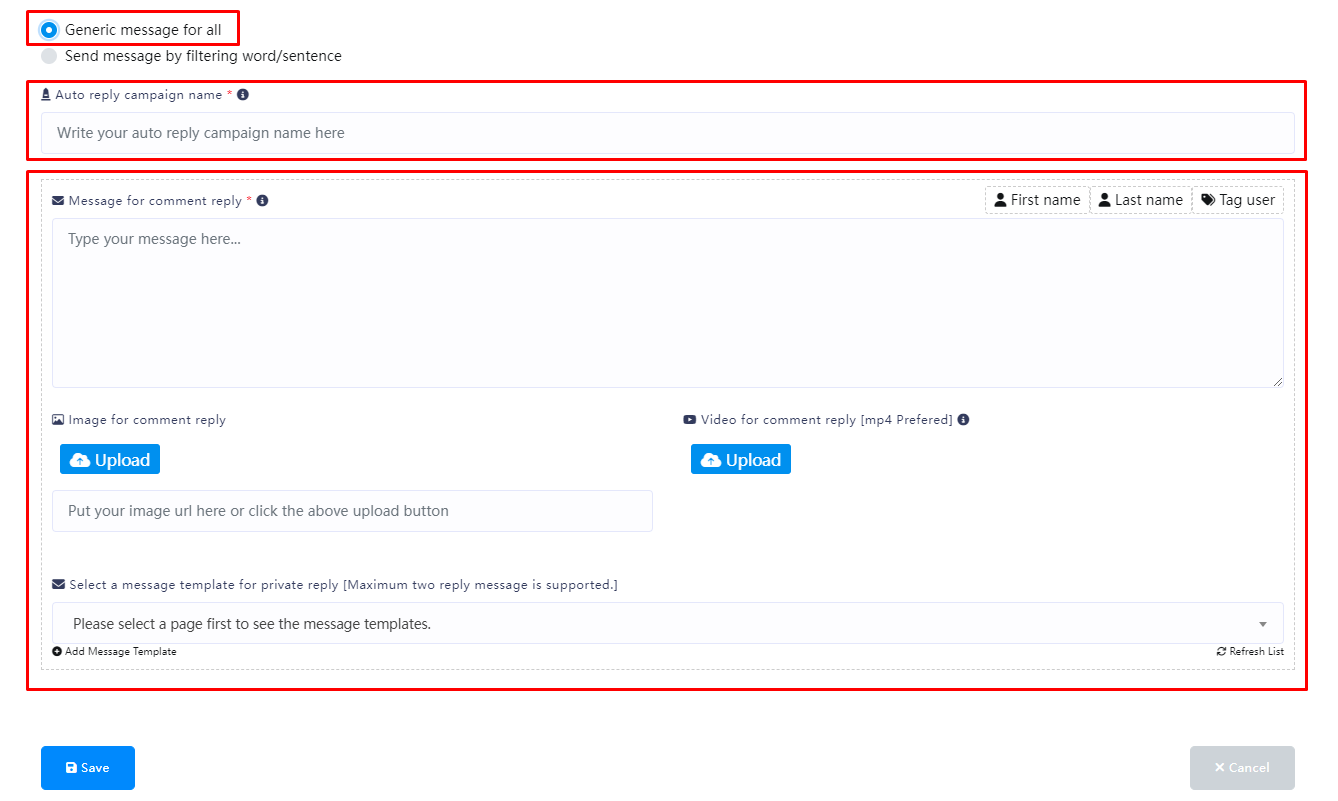
Send message by filtering word/sentence
On the other hand, if you choose to send a message by filtering words/sentences, more fields will appear.
First, write the campaign name in the Autoresponder Campaign Name field.
Then you have to enable one of the two options – Reply if the filter word matches exactly and Reply if any of the filter words match.
Then, you have to write the filter word or sentence in the appropriate field (separate with commas if there are multiple filter words).
After that, write a message for the comment reply, you can also upload a picture or video to reply to the comment (if you want a private reply, you don’t need to set this).
Then select a message template for the private reply (if you want a comment, you don’t need to set this).

If you have different filter terms that require different responses, you can click the “Add more filtering” button below
Then you will see the same filter terms field settings displayed

Finally, in the “Comment reply if no matching found” section, if you need to make an additional reply when a user’s comment does not contain the filter words, you can set it here (if you only need to reply to comments containing the filter words, then you don’t need to set it here)
Then click the “Save” button.

Reports
you can see all the reports by clicking on the Reports option.
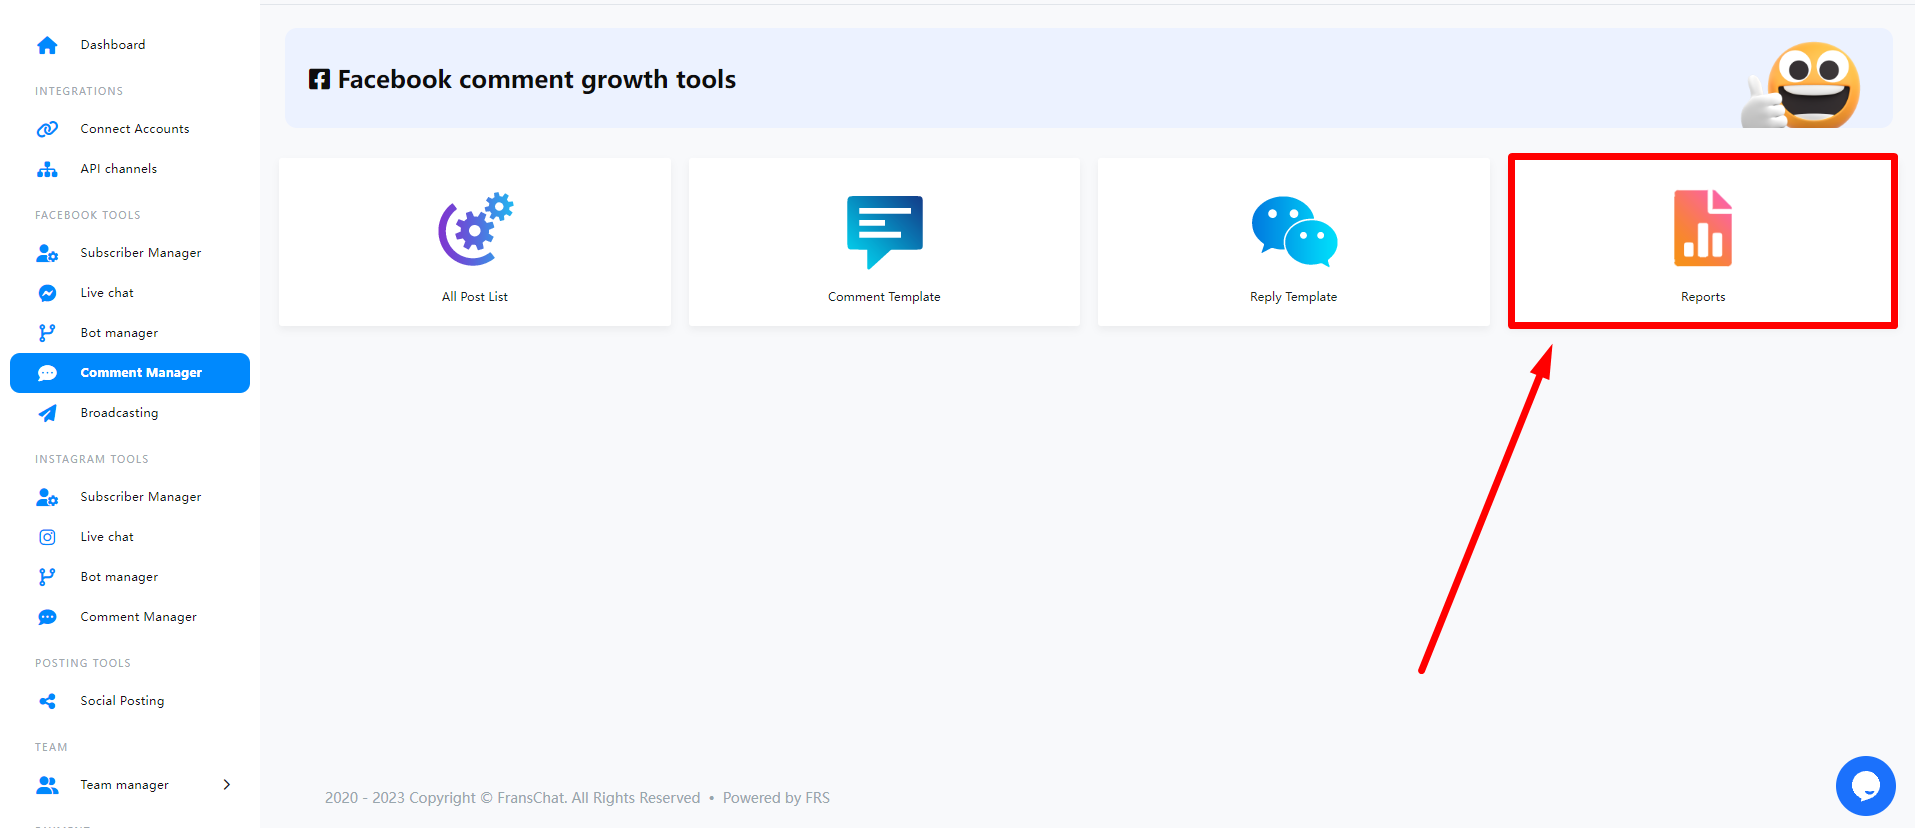
Team Manager
In FransChat you can create team member accounts to manage automated reply processes.

Articles
Team members
Before creating Team Members, you must first create Team Roles. You can view how to create Team Roles here.
In Team members, you can manage currently created members, modify member information, change passwords, delete members, etc.
To create a new Team member, you can click the NewTeam Member button

Note that you will need to fill in the member’s name, email, and password to create a member account.
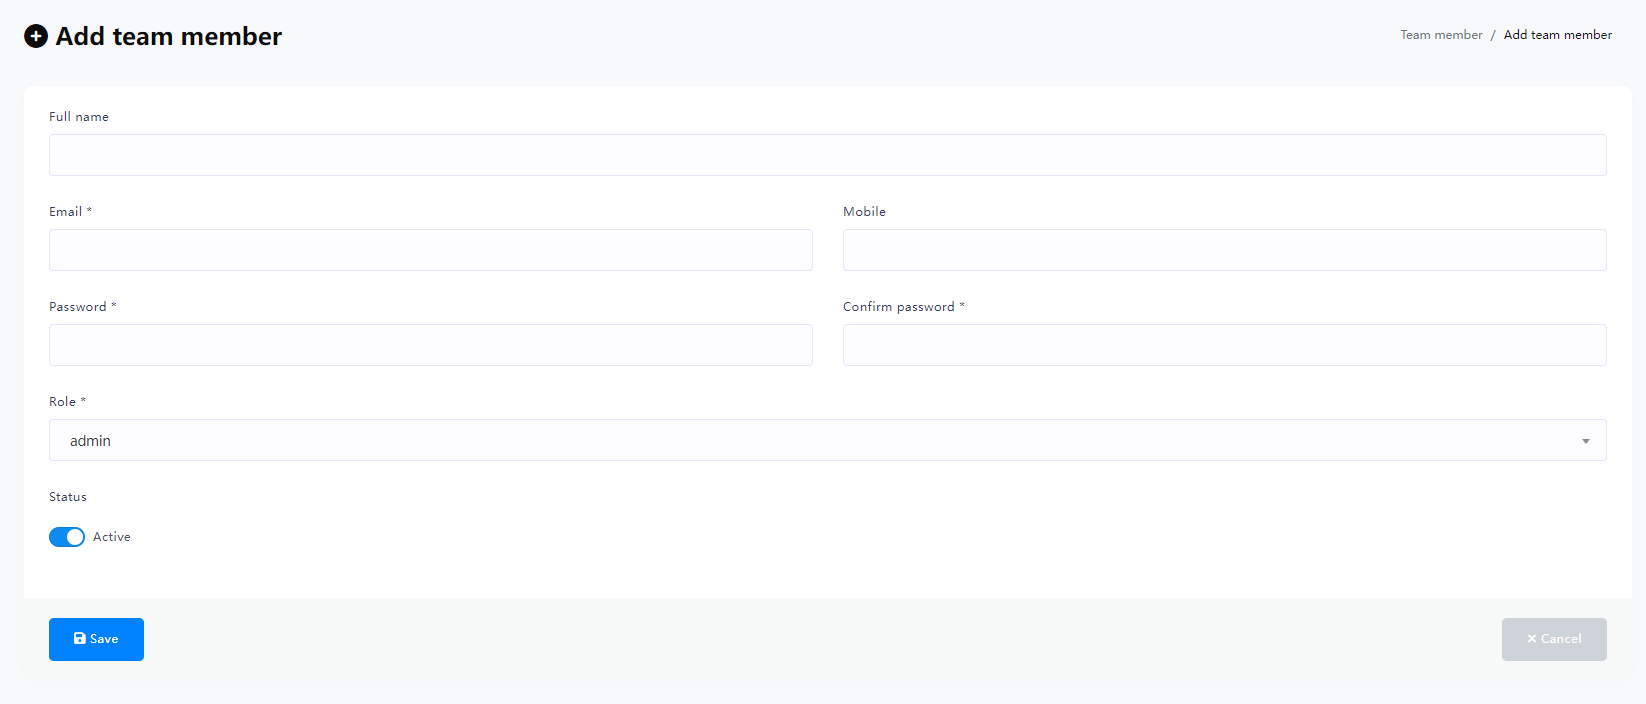
When logging in with a Team member account, you need to select Login as Team member on the FransChat login page.
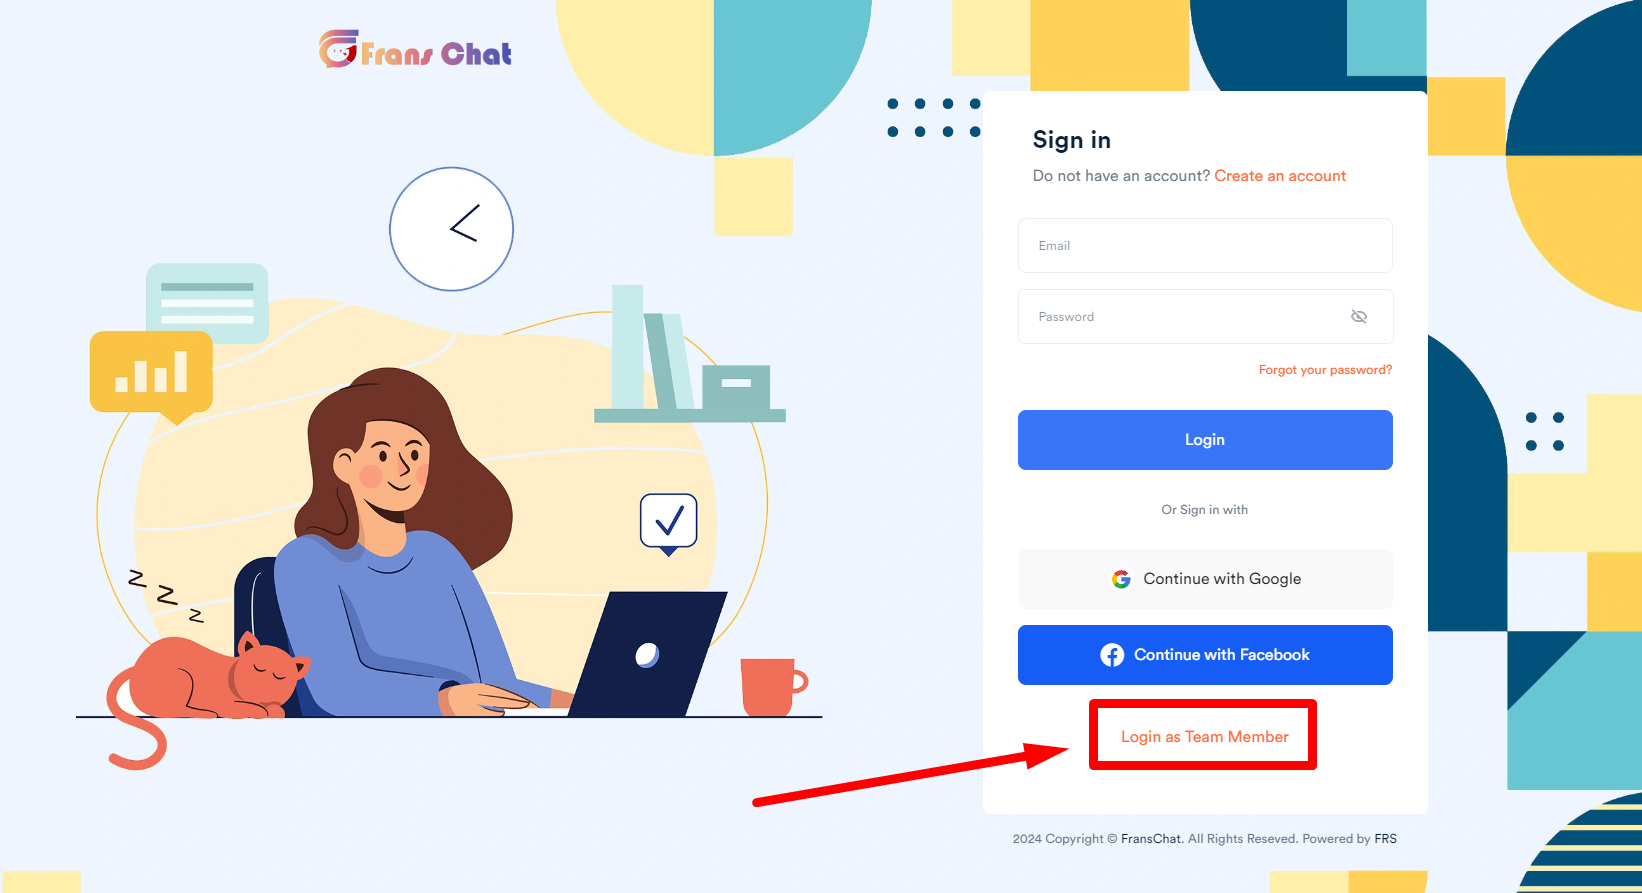
Then log in using the Team member account in this login form.
Team members accounts cannot access some sensitive information, such as API channels and payment pages
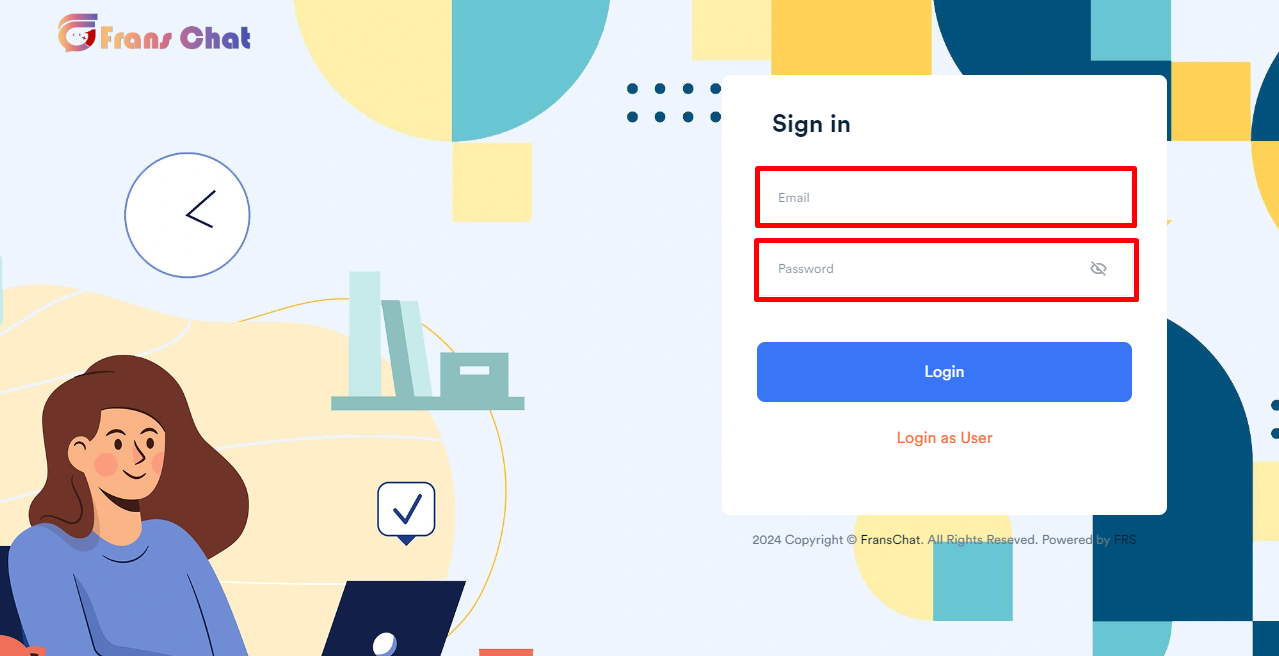
Team Roles
In Team Roles you can create new Team Roles or edit and delete them
Now let’s click the New Role button to create a new Team Role

In the Modules section, select the modules that the current role is allowed to manage.
In the Allowed privileges section, you can see the permissions that the role is allowed to manage the current module. If you do not select the default, all permissions will be selected.
Finally, click “SAVE”
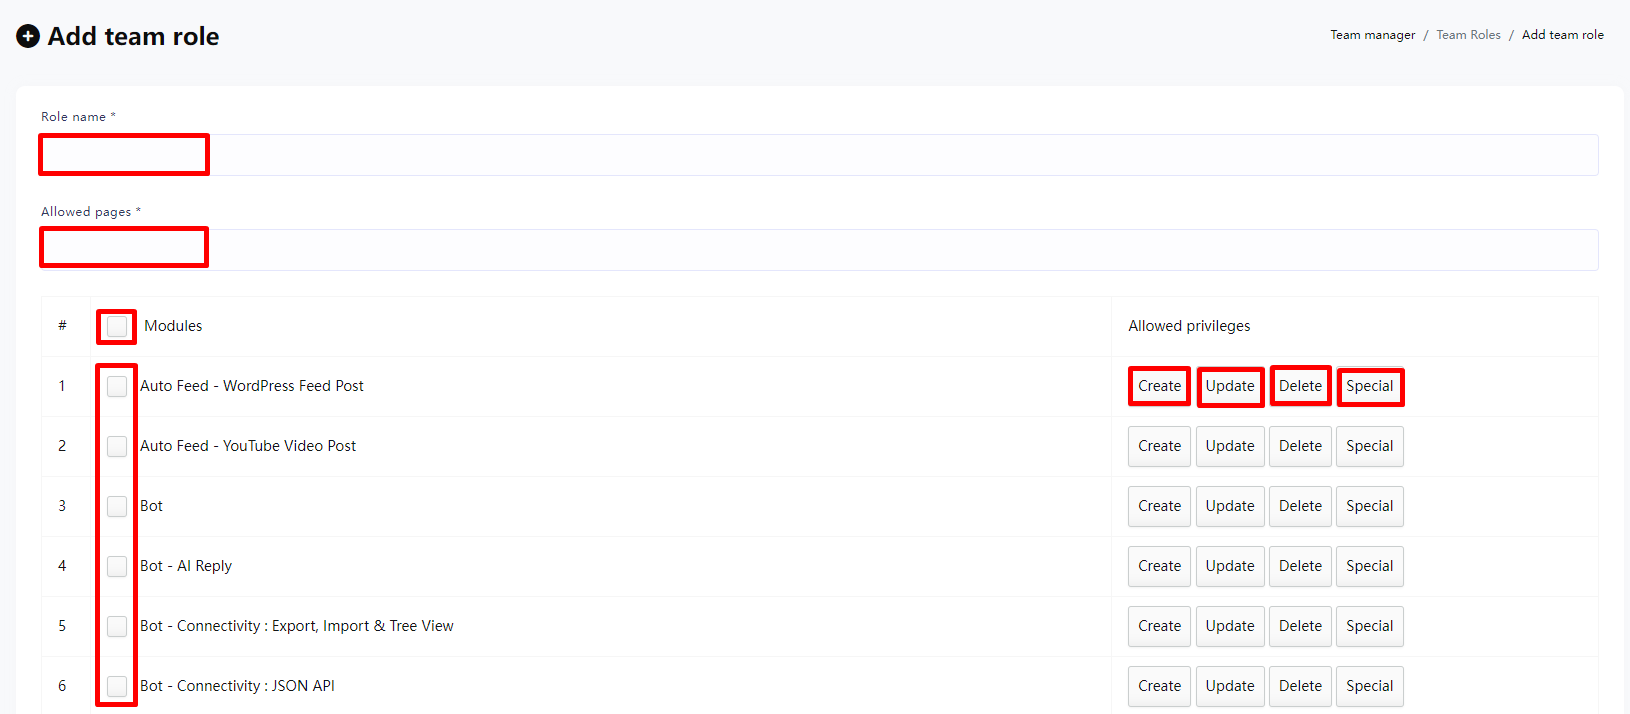
Live chat
On the live chat interface, you can view recent conversations between users and your Facebook Page or Instagram account. Of course, in live chat you can talk directly to users through their Facebook page or Instagram account. In a nutshell, you can do everything you can do on Facebook or Instagram Messenger. Additionally, you can complete other tasks such as creating labels, assigning labels to users, and setting up sequence messages.
Additionally, you can subscribe and unsubscribe users at any time. Likewise, you can pause and resume bot replies for specific users.
In this article, I will discuss how to use the live chat feature perfectly.
Using live chat is as easy as using Facebook and Instagram Messenger. That said, using live chat is very simple and straightforward.
Let’s see how to use Live Chat
First, go to the dashboard of FransChat. You will see the live chat menu at the left sidebar of the dashboard. Just click on the Live Chat option.

Instantly, the interface of the live chat will appear.
Live Chat interface is divided into three sections– subscribers list, messaging window, and actions.
Subscribers' list
In the Subscriber List section, you can see a list of subscribers who have recently chatted with you. Additionally, you can search for subscribers on the search bar. (Note that currently when searching for subscribers, the subscriber must be loaded into the subscriber list before the target subscriber can be successfully searched)

Messaging window
The messaging window is for directly chatting with users.
In the message tag field, you have to select a message tag. Click on the message tag field and instantly will appear a drop-down menu of different message tags such as Human agent, Account update, Confirmed Event, Post purchase Update, Non-promotional(NP registered only). If you select the human agent message tag, you have to reply to the message from users within 24 hours, otherwise, you will get an error. In this case, you have to use other message tags. If you want to know the usage of message tags, read the article by Facebook for developers.

Voice Messages
After clicking the microphone button, you can send the language. After clicking the microphone button, the icon will change to a wave, which means recording is in progress. Click it again to stop recording and send directly.

Bot Flow Messages
You can click the robot icon and a pop-up window will open. In the pop-up window, select the Bot Flow that has been created and send it to the user.

After selecting one of the flows, the robot icon will change to the loading state, and a pop-up notification will be displayed when all flwos have been sent.

Canned Response
To use the canned reply function, you can click the notebook icon and create a new canned reply in the pop-up window, or select an already created canned reply and click (Use). The pop-up window will then close and the canned message will be automatically Fill in the message input box

Send Attachment
To send a file or picture, you can click on the paperclip icon and then upload your picture in the pop-up window. (Note: Files will be sent as soon as upload is complete)

Search Information
Moreover, you can also search messages on the search bar in the messaging window.

Actions
In the action sections, you can accomplish some tasks. Moreover, you can see the primary data of users.
Assigned agent
You can assign the message to an agent for reply by selecting designated agent in the search box. (Note: You need to create a team role and team user before you can proceed with this step. Then you can view this article to create a team)

Select Labels
First, you will see a form called a label. From the label field, you can assign a label to a specific user. Click on the label form and instantly appear a drop-down menu of different labels you have created before. Then you have to select a label to assign the label to a subscriber list. The selected labels will appear on the label form. Well, you can select as many labels as you want for a specific user. True, you can remove labels one after another by clicking on the cross icon next to the label name. Of course, you can remove all the labels by clicking on the cross icon in the field.

Create Labels
Moreover, you can create a new label from here. Click on the create label button and a modal form with one field will appear. Write the name of the new label in the field and click on the new label button, and the label will be created and selected in the field automatically.

After you have selected labels in the Labels field, click on the save changes button to save the changes.

Message Sequence
Here you can custom assign Message sequences to specified subscribers, or cancel or delete their current Message sequences.

Select Message sequence and click Save

Opt-in through
Well, in the opt-in through option, you can see whether the subscriber has come directly through the Facebook page or the source is ADS. If you see the word Direct beside the opt-in through, you know that the user has come through the Facebook page or the Instagram account directly

Status
By clicking on the status button, you can unsubscribe and resubscribe a user. And by clicking on the bot status button, you can pause and resume the bot reply.

Primary Information
You can see the primary information of the subscribers– subscriber ID, gender, language, time, and date.

Get started

Get started & welcome message
The greeting text on the welcome screen is your first opportunity to tell a person why they should start a conversation with your messenger bot.
Some things you might include in your greeting text might include a brief description of what your bot does, such as key features,or a tagline.This is also a great place to start establishing the style and tone of your bot.Greetings have a 160 character maximum,so keep it concise.

We can click “Edit get started reply” to edit the reply content when the user clicks the “Get started” button.

After entering the edit page, we only need to modify the content in the “Text” component. You can also add buttons, etc.


Ice breakers
In Ice breakers, you can set up some frequently asked questions about your business or products.
Page profile priority
Some of the profile elements like ice breakers and get started button are incompatible with each other. So when both are set one will take precedence over the other. Here is the priority from highest to lowest:
- Api ice breakers
- Get started button
- Custom questions set via the page inbox ui
NB: Editing custom questions from the page inbox ui is disabled when ice breakers are set via api. This is to prevent breaking the experience set by the installed app.

If you need to use Ice breaker, you can enable Ice breaker, then enter some common questions in the questions below, and the corresponding response flow (you need to create a response flow for the questions first)
If you need to create multiple questions, you can click the “Add more question” button below to add more common questions.
Finally, click Save

Now when new users click on your Facebook page message, the “Get started” button will not be displayed but will be replaced by the FAQ.
Changelogs
January 14, 2025
Updates
Updates Optimize automatic reply speed
Updates Live Chat - Comment Private Reply Label
We have implemented performance optimizations and introduced new features to enhance user experience and operational efficiency.
Updates:
- System Performance Optimization:
- Improved message processing efficiency to reduce response time significantly.
- Enhanced concurrent handling capabilities to ensure multiple messages are processed simultaneously and effectively.
- Feature Improvement - Comment Private Reply Label:
- When a private reply is triggered from a comment, the corresponding automated reply will now display a "From Comment Private Reply" label in the Live Chat.
- This feature helps you easily distinguish the source of replies, allowing for more efficient conversation management and follow-ups.
- User Experience Enhancements:
- Overall response speed for automated replies has been noticeably improved, delivering a smoother interaction experience.
- The system supports a larger volume of requests while maintaining stability under high load conditions.
Thank you for your continued support. We are committed to providing you with more efficient and stable services. If you have any questions, feel free to reach out to us anytime!
November 15, 2024
Updates
NEW Enhanced Livechat Experience
NEW User and Page Avatars in Chat Bubbles
FIXED Notification Click Issue
TWEAKED Image Preview in Chatroom
TWEAKED Message Display Optimization
NEW:
- Enhanced Livechat Experience:
Improved the overall Livechat user experience for smoother interactions. - User and Page Avatars in Chat Bubbles:
Added user and page avatars to chat bubbles, making conversations more visually intuitive.
FIXED:
- Notification Click Issue:
Fixed an issue where clicking on Livechat notifications did not open the corresponding user’s chat window.
TWEAKED:
- Image Preview in Chatroom:
Images in the chatroom now open in a pop-up window for a larger preview instead of opening in a new tab. - Message Display Optimization:
Optimized the display of certain messages to enhance readability and user experience.
Overview of Updates:
This version primarily enhances the Livechat experience, resolves key user-reported issues, and further improves message display for a more user-friendly interface and interaction.
November 10, 2024
Updates
Updates Ads Welcome Message Support postback on both platforms
Improved Ads Welcome Message Flows
Ads Welcome Message now supports setting postback buttons for both Messenger and Instagram. You can set Messenger Postback for Messenger and Instagram Postback for Instagram separately.
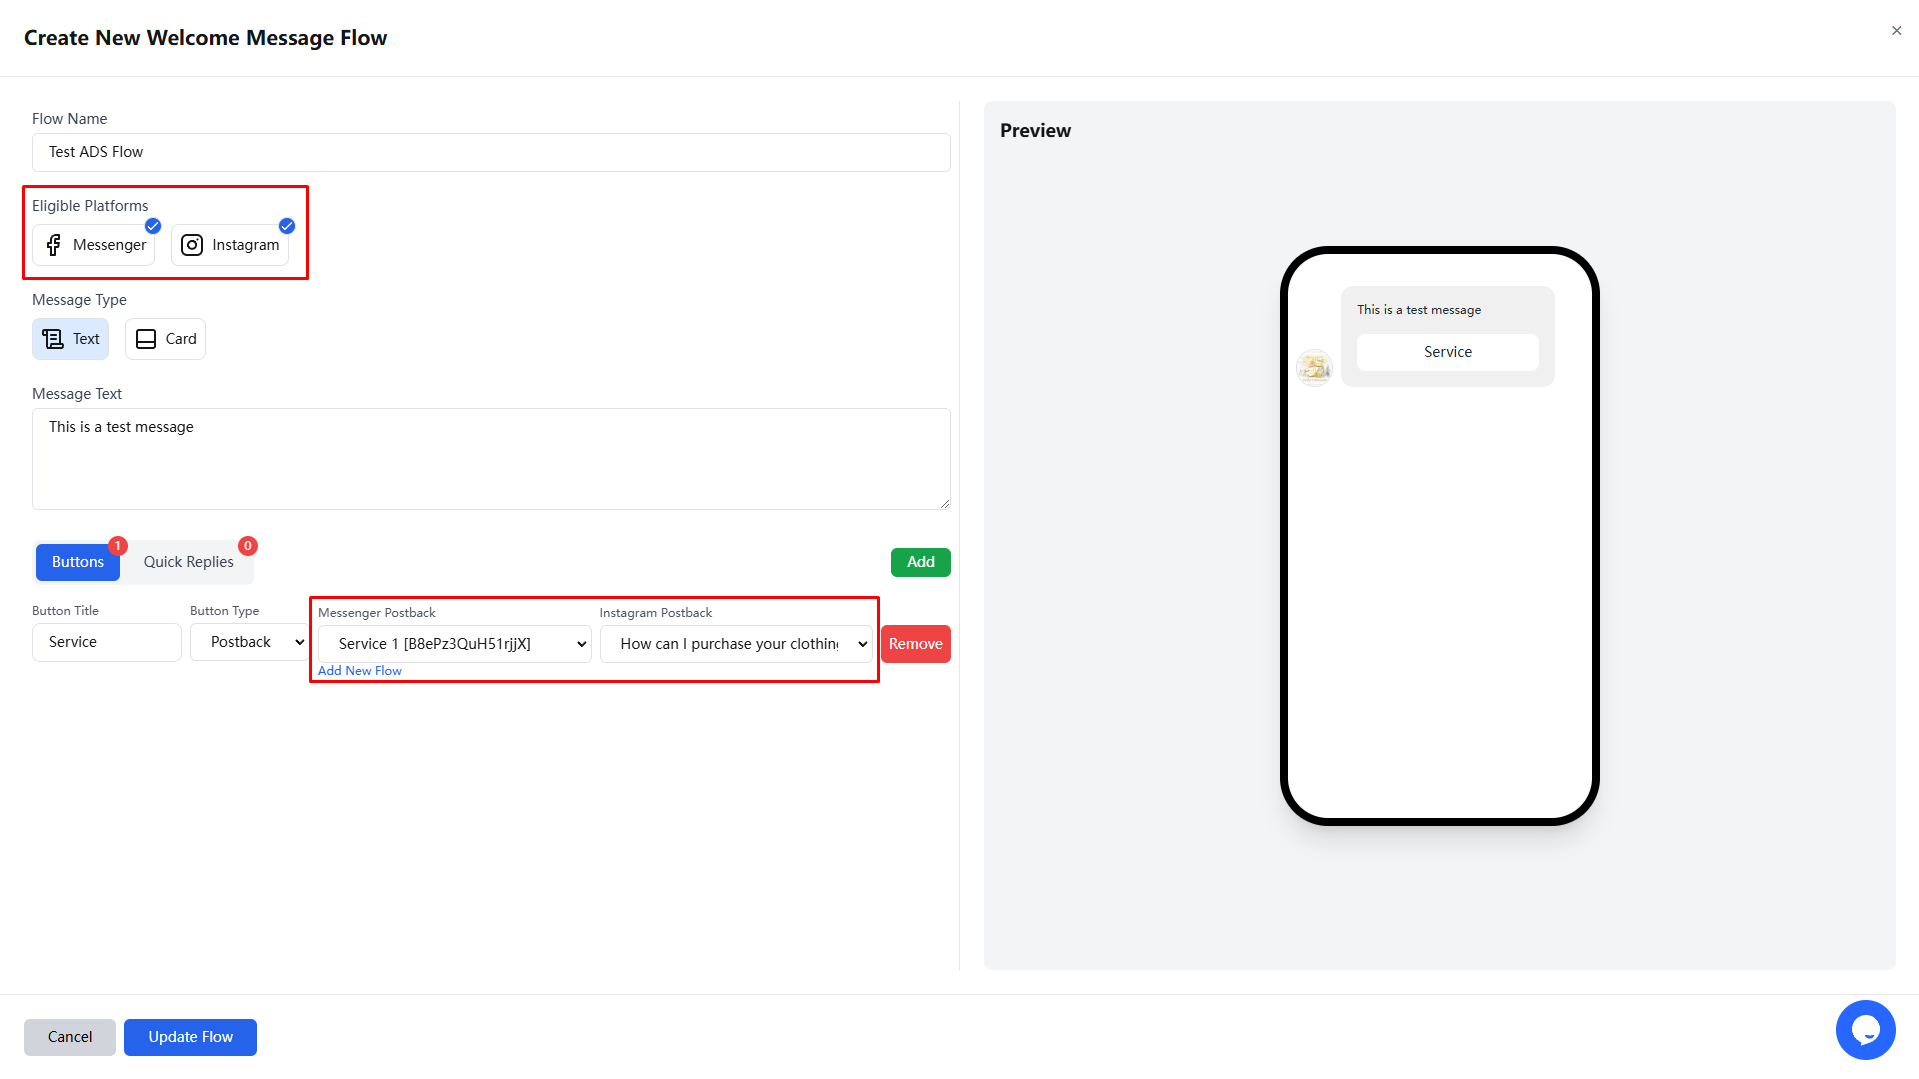
October 15, 2024
Updates
NEW Add Flow Templates
NEW Invoice Access After Subscription Plan
NEW Add Ads Welcome Message Flows
New Features and Improvements
We are excited to announce several important updates that will further enhance the user experience and functionality on our platform. Here are the details of this update:
1. Updated Flow Templates
We have updated the flow templates, allowing all new users to quickly create their first flow and understand how it works using these templates. This will enable new users to get started faster and reduce the learning curve. By selecting ready-made templates, users can immediately experience how to build and optimize flows for more effective customer engagement.
2. Invoice Access After Subscription Plan
After selecting a subscription plan, users can now easily obtain invoices in the transaction log. This new feature aims to simplify financial management processes, allowing users to conveniently view and download invoices.
3. Updated Ads Welcome Message Flows
We have made significant updates to the Ads Welcome Message feature. Now, PRO plan users no longer need to use JSON code to create flows for ads that click to Messenger or Instagram Direct. You can directly create welcome message flows in [direction] Bot Manager > Marketing Tools > ADS Welcome Message [/direction]. When creating ads that click to Messenger or Instagram Direct, you can easily connect to message flows from messaging partner apps. For detailed instructions on how to use this feature, please refer to the usage guide. This improvement will significantly streamline the process, making ad creation more intuitive and efficient.
These updates will help users make better use of our platform and enhance their operational efficiency. We look forward to you experiencing these new features and welcome your feedback!
August 8, 2024
Update
New Optimizing Asset Sending through the Messenger Platform
Benefits of Using Facebook Messenger's Attachment Upload API to Optimize Asset Sending
In modern digital communication, the speed and efficiency of information transfer are crucial. For businesses aiming to enhance customer interaction quality, ensuring the timeliness and accuracy of message content poses a significant challenge. To address this challenge, we have introduced a brand-new feature in the FransChat system: a unified approach to upload and send assets (such as images and videos) via the Facebook Messenger platform's Attachment Upload API. This approach not only improves operational efficiency but also significantly enhances user experience.
1. Increased Upload and Sending Efficiency
Using Facebook's Attachment Upload API allows users to directly upload images and videos in the Visual Flow Builder editor and save them to the Messenger platform. Traditionally, assets had to be sent from FransChat to Messenger, a process that was both time-consuming and complex. Now, all assets can be directly uploaded to Messenger, greatly simplifying this process. This optimization not only reduces data transfer time but also minimizes potential delays, ensuring that information reaches customers quickly.
2. Reduced Response Time
As business volume increases, the need to decrease response time becomes increasingly important. By directly utilizing the asset storage feature on the Messenger platform, we can achieve faster message delivery. Previously, sending assets could lead to delays, especially during peak periods. Now, all assets that need to be sent will be prioritized through the Messenger platform, ensuring that customers receive timely information. This quick response capability is undoubtedly a significant advantage in a competitive market.
3. Enhanced User Experience
Users have growing expectations and needs when interacting with brands. Using the Messenger Attachment Upload API not only speeds up asset sending but also ensures asset quality. Whether it’s high-definition images or smooth videos, users will receive a better visual experience in the messages they get. This high-quality interaction will greatly enhance customer satisfaction, increase user engagement, and ultimately promote long-term business growth.
4. Simplified Operation Process
Users who have previously uploaded any media will not need to make any modifications. Whenever there is media to be sent in your flow, if that media has not been uploaded to the Attachment Upload API, it will be automatically uploaded without any action required. This seamless automation allows users to manage media content more easily, ensuring timely information delivery to customers.
Conclusion
Overall, the strategy of using Facebook Messenger's Attachment Upload API to optimize asset sending provides significant advantages for businesses. By improving upload efficiency, reducing response time, enhancing user experience, and simplifying operation processes, this new feature will empower our clients to better interact with their users. As we continue to advance this strategy, we look forward to seeing the positive outcomes it brings, helping businesses maintain their competitive edge in the market.
July 1, 2024
Official Version
We are Excited to Announce the Official Launch of FransChat
An Automated Chatbot Platform
Dear Users,
We are thrilled to announce that FransChat is now live! FransChat is an all-in-one automation platform designed to enhance business interactions on social media. Integrating automated chatbot functionalities for Facebook Messenger and Instagram, FransChat aims to streamline communication processes, reduce manual workload, and boost efficiency.
Main Features and Benefits:
1. Automated Reply Process:
- Smart Conversations: FransChat can automatically respond to common customer queries and provide personalized interaction through customized conversation flows.
- Reduce Manual Workload: By automating replies, the platform significantly reduces the workload of human customer service representatives, allowing them to focus on more complex tasks.
- Increase Response Speed: Available 24/7, FransChat provides instant support to ensure customer issues are resolved quickly, enhancing customer satisfaction.
2. Multi-Channel Management:
- Centralized Management: Manage multiple Facebook Messenger and Instagram accounts from a single platform, simplifying operations and improving management efficiency.
- Seamless Integration: Supports integration with various third-party applications, extending platform functionality and enhancing flexibility.
3. Integrated AI ChatGPT:
- Intelligent Conversations: Leveraging the latest AI technology, FransChat offers more natural and intelligent conversation experiences, further improving customer interaction.
4. Form Collection of User Information:
- Streamlined Data Collection: Automatically collect user information such as email, phone number, and address through chatbots, simplifying the data collection process and improving accuracy.
5. Email and SMS Marketing:
- Targeted Marketing: Use collected user information to conduct targeted email and SMS marketing, enhancing marketing effectiveness.
- Automated Marketing Workflows: Set up automated rules for efficient email and SMS delivery, improving operational efficiency.
The launch of FransChat will help businesses achieve more efficient customer service management, enhance brand influence, and deliver an exceptional customer service experience through intelligent automation features. Our team will continue to optimize platform features to ensure you stay at the forefront of the market.
Thank you for your attention and support for FransChat!
For more information, please visit our official website or contact our customer support team.
Best regards,
The FransChat Team
Bot manager
How to build bot with flow builder
In this article, you will be shown how to create a Facebook Messenger bot using FransChat Flow Builder. Follow the article’s step-by-step instructions to create an interactive Facebook Messenger bot.
To build the bot, first, go to FransChat dashboard. Now in the Facebook Tools menu, click on the Bot Manager option in the left sidebar of the dashboard.

After entering the Bot Manager, you can see an interface like this, which is divided into three sections.
- The area on the left is your currently enabled Facebook Page. Select which Page to edit.
- The middle area is the menu options. When any menu item is selected, the screen will be displayed in the right area.
- The area on the right is the creation and list section, where you can create and view the currently created Flow

Now let’s follow the steps to continue to understand the function of each menu
Articles
- <i data-lucide="bot"></i>Bot Reply
- <i data-lucide="keyboard"></i>Bot Keyword
- <i data-lucide="message-square-reply"></i>Postback Manager
- <i data-lucide="square-mouse-pointer"></i>Get started
- <i data-lucide="settings"></i>General settings
- <i data-lucide="pointer"></i>Action Button
- <i data-lucide="menu"></i>Persistent Menu
- <i data-lucide="mailbox"></i> Marketing Messages
- <i data-lucide="message-square-diff"></i> ADS Welcome Message Flow
- <i data-lucide="notebook-pen"></i>Webform builder
- <i data-lucide="droplets"></i>Sequence Message
- <i data-lucide="messages-square"></i>Messenger Engagement
- <i data-lucide="file-stack"></i>User Input Flow
- <i data-lucide="globe-lock"></i>Whitelisted domains
Bot Reply
Visual Flow Builder Editor
Well, to build a bot, click on the “Create New Flow” button.

And instantly, the editor of the Flow Builder will appear. The editor is divided into two parts – Doc-menu and editor. On the Doc-menu, all the components are gathered together.

To build a bot, you have to drag components from the Doc-menu and drop them on the editor. Then you have to configure the components and connect them to each other. On the Doc-menu, there are 13 components.

Add components without dragging from Doc-menu.
You can also add components without dragging the component from the Doc-menu and dropping it on the editor. From the next output of any component, drag the cursor and drop. And instantly a menu of the different components will appear. And from the menu, select a component and the component will appear on the editor connected with the mother component.

When all components are connected, click the save button on the upper right to run.

Next, we will explain to you the use of each component in detail.
Start bot flow
On the Editor, you will see an element called start bot flow. This component is essential to building the bot. Double-click on the Start bot Flow element and the Right Sidebar called Configure Reference will appear.

The instructions in the Configure Reference of “Start bot flow” can be divided into two parts.

The first is the upper part, where you set the trigger keyword for the entire Bot Flow reply.
For example: We enter “Hi” in the input box. You can also set multiple similar keyword combinations, but you must provide keywords separated by commas, such as “Hello, Hi, Start”. When a user sends a private message to your Page Then enter the keyword “Hi” or “Hello, Hi, Start” to trigger an automatic reply behind the Start bot flow component.
You can also choose the match type – exact keyword match and string match.
- Exact keyword match – this will only be triggered when the user must enter a complete match of the keyword
- String match – triggered if the field entered by the user contains keywords

Next, the second part of the “Start bot flow” configuration is explained.
- Title – Give the “Start bot flow” a name
- Add label(s) – Add a label (when the user triggers this Start bot flow, a label will be automatically added to the user to facilitate subsequent classification of different user groups)
- Remove label(s) – Remove labels (when the user triggers this Start bot flow, a specific label currently owned by the user will be automatically removed)
- Subscribe to sequence – When the user triggers this Start bot flow, the user will automatically subscribe to the sequence (mainly used for Follow Up)
- Unsubscribe from sequence – When the user triggers this Start bot flow, the user’s current subscription sequence will be removed (when the user has subscribed to the same sequence once and completed the automatic message push, the system will not re-subscribe the user to the same sequence again. , even if the user triggers the Start bot flow again, it will not resubscribe. At this time, you can use the “Unsubscribe from sequence” method to remove the user’s sequence at a certain stage)
- Assign conversation to a group – Assign the current conversation that triggered this flow to a specific team role.
- Assign conversation to a user – Assign the current conversation that triggered this flow to a specific team user.
- Send data to webhook url – This function will be integrated with third-party applications. When the user triggers this Flow, a webhook notification will be sent to the URL address filled in. You can go here to view the currently created webhook notification.

After the settings are completed, click Done. Now you can see that the “Start bot flow” component has displayed the Title name you set, as well as tag information such as keywords.

Compose next massage – This connection point represents the next response content after triggering this component.

Text
If you want to build a bot with a text element, drag the Text Component and drop it on the editor. Now double-click on the component and a sidebar called Configure Text Message will appear with a text field. In the text field, you have to provide your reply message. You can include the first name or the last name of the user in the reply message.
You can also enable typing on display by turning on the radio button. Then you can select the delay time in reply in seconds.
Now click on the Done button and the information will appear on the component. Then connect the text component with the Start bot flow component.

Include Custom variables in the reply message
Besides, you can include custom variables in the reply message. Click on the button called custom and a drop-down menu of different variables will appear. And from the drop-down menu, select a variable. The custom variable will be replaced by the actual value before sending it.
NOTE: To learn how to create custom variables, click here

Image, Audio, Video, and File component
Likewise, you can add Image, Audio, Video, and File components. For these components, you have to upload an image, audio, video, and file respectively. Then you have to connect the components with other components.

Upload an image
After the upload is completed, click Done to see the uploaded file in the component. In addition, you can also directly enter the file address URL in the input box without uploading.

FB Media
To add FB Media component, drag the FB Media component from the Doc-menu and drop it on the editor. Now double-click on the FB Media component and the right sidebar called Facebook Media URL will appear. In the Facebook Media URL field, put your Facebook Page media URL.
You can enable typing on display and select time in seconds for the delay in reply. Now click on the done button and the Facebook page media URL will appear on the component.

Card
To add Card Component, drag the Card Component from the Doc-menu and place it on the editor. The Card component will appear with a button component. Well, now double-click on the Card component and a right sidebar called Configure Generic Template will appear. Now upload an image. After uploading an image, paste a link in the image click destination link field. When a user clicks on the image, the user will be redirected to the URL. Now write a title in the Title field and a subtitle in the Subtitle field.

Then you have to configure the Button Component
Read the following section to know how to add and configure the Button Component.
Button
To add Button component, drag your cursor from the button output of a component like the Text or Card component and drop. Instantly, the Button component will appear connected with the mother component.
And sometimes the button component automatically appear connected with other component, such as Card and Carousel component.
Now double-click on the button component and a right sidebar called configure button will appear. Now write a text in the button text field – the text will appear on the button.
Then you have to select the button type from the “When user press the button” field. Clicking on the “When user press the button” field will display a drop-down menu – Send Message, Start a flow, Redirect to website url, Webview [full], Webview[compact], Webview[tall], Call us, Sysyem default action button

When user press the button - Button types
We’ll explain how to use each option one by one

Send message
Select “Send message” on the button type and click on the done button.
You can see that when “Send message” is selected, the configuration button is similar to “Start bot flow”. “Send message” in each button is equivalent to a new “Start bot flow”. Now we can configure the user click in the button What will be triggered after this button. For example, we can set add tags, remove tags or Subscribe to sequence. For specific settings, see the “Start bot flow” section.

Now you can continue to connect to the next conversation after “Send message” type.

Start a flow
If you select “Start a flow” as the button type, a “Flow name” field will appear. You must select a Flow from the “Flow name” field. Click on the “Flow name” field and a drop-down menu of different flows will appear. Then select a Flow from the drop-down menu. Then click the “Done” button. The Flow name will appear in the Action type on the button component.

Redirect to website url
If you selectRedirect to website url, Webview [FULL], Webview [TALL], Webview [COMPACT], another field will appear. And in the field, you have to paste an URL. Now paste a URL and click on the done button. After that, the URL will appear on the Button component.
For the Webview type, your experience will appear as a layer overlaid on top of the conversation, displaying at full screen, 75% height, or 50% height, depending on your content and use case


Call us
Select Call us button from the drop-down menu of different button types and instantly, another field called Mobile/Phone number will appear. Now you have to provide your phone number in the field. Then click on the done button.

System default action button
Form the “System default action button” type field, you can select User email, User birthday, User phone or User location, Unsubscribe button, Resubscribe button, Chat with human, Chat with robot. After selecting any from the button type, click on the done button. Instantly the button type will appear on the button.
For specific settings, please refer to the “Action Button” article, click here

Quick Reply
To add a quick reply component, drag and drop your cursor from the quick reply output of a component such as a text or card component. Immediately, the quick reply component will appear connected to the parent component.
Now double-click on the “Quick Reply” component and a right sidebar named “Configure Quick Reply” will appear. Now, in the Quick Reply Type field, you have to select the Quick Reply Type. Click on the Quick Reply Type field and a drop-down menu of different types of quick replies will appear – Send message, Start bot flow, Phone, and Email.
(Note: More than 3 quick reply components can exist at the same time under the same component.)

Send message as quick reply type
Select send message as the quick reply type, and instantly a field called button text will appear. Now you have to provide a text for the button in the button text field.
For labels, sequence, assignment, and webhook are basically the same as buttons.

After setting the quick reply button text, we can connect a new component, such as text, below the quick reply component.

Start a flow as quick reply type
If you select Start a flow as the quick reply type, two fields – button text and postback id will appear. In the button text field, you have to write a text for the button. And from the flow id field, you have to select a flow. Click on the flow id field and a drop-down menu of different flow id will appear. And from the drop-down menu, select a flow id. And click on the Done button. And the flow id will appear on the Quick reply component

Phone as quick reply
Just select phone as the quick reply type in the quick reply type field and click on the done button. In this case, the quick reply will collect your phone number from your Facebook Profile and show in the messenger. When a user clicks on the phone number, the system will receive the phone number. And the user will get a message that the system have received your phone number.

Email as quick reply
Just select Email as the quick reply type in the quick reply type field and click on the done button. In this case, the quick reply will collect your Email address from your Facebook Profile and show in the messenger. When a user click on the phone number, the system will receive the email address. And the user will get a message that the system have received your Email address.

Carousel
To add a Carousel component, drag the Carousel component from the Doc-menu and drop it on the editor. Instantly, the Carousel component will appear with three carousel items connected with the Carousel component and three button components connected with the three carousel components.
Now double-click on the Carousel component and the right sidebar called configure Carousel will appear. In the sidebar, you can enable typing on display and select delay in reply time in seconds. Now click on the Done button.

Carousel Item
Now come to the carousel Item component. Double-click on the carousel Item button and the right sidebar called Configure Carousel Item will appear with some fields.
Now upload an image. After uploading an image, paste a link in the image click destination link field. When a user clicks on the image, the user will be redirected to the URL. Now write a title in the title field and a subtitle in the subtitle field. Enable the typing on display and select delay time in seconds.
Likewise, you have to configure the other two carousel items.
Now you have to configure buttons. You already know how to configure buttons.
You can add other components with the button components if you want.
Now click on the save button or press ctrl + S and your bot will be saved.

Conditional Reply
With the condition add-on, you can build a condition and rules-based messenger bot that can talk to people intelligently. For example, if the user is male, the bot will call him Mr. On the other hand, if the user is Female, the bot will call her Miss/Mrs. And if the system already has the email number of a specific user, the bot will inform the user that the system already has the email number. Contrarily, if the system doesn’t have the email number of a specific user, the bot will ask for the email number from the user.
In this article, I will show you how to build a condition and rules-based messenger bot on the Flow Builder.
To build a condition and rules based messenger bot, you have to use an element called condition that will work as the entry point of the conditional conversation.
Let’s see how to build condition and rules-based messenger bot.

Add conditional elements via drag and drop and connect them with Start Bot Flow. Now double click on the conditional element. A form field will immediately appear on the right side of the editor. At the top of the form field, you’ll see two radio buttons – Match All and Match Any. You must select Match All or Match Any.
Please note:
1. If Match All is selected, all conditions must be true for the expression to be evaluated.
2. If you select Any Match, at least one condition must be true for the expression to be evaluated.
Since we only configure one condition, you can choose any of them.

Then you will see the system field and the custom field. Both the system field and the custom field contain initial fields to configure conditions. Of course, by clicking on the plus sign next to the system field and custom field, you can add more fields to configure conditions on them. Of course, you can remove extra condition by clicking remove button.

Let’s set a condition to check if the user is male or female and send messages accordingly:
Click on the Variable field and a drop-down menu of the different variables will appear. Now you have to select a variable. Likewise, you have to select an operator from the operator field and a value from the value field.
I select Gender as the variable, and Equal(=) as the operator, and Male as the value. Now I click on the ok button to insert data to the condition element.
In addition to this, you can also use Label and other conditions

On the condition element, you will see two sockets – True and False. If the condition evaluates to true, the message connecting to the True socket will be sent. Contrary, if the condition evaluates to false, the message connecting to the False socket will be sent.
Well, now add a text element and connect it to the socket called True. Then write a message addressing the user as Mr. the message that will be sent to the male users.
Likewise, add another text element and connect it to the False socket and write a message, addressing the user as Miss/Mrs, the message that will be sent to the female users.

Now add a button element and connect it to both text elements. Well, write a button text and select send message as the button type and click the ok button. Instantly, a send message element connected to the button element will appear. Now give a title for the Send message.
Now I will set another condition to see whether the system has the email address of the user or not. If the system has the email address of a user, the bot will inform the user that the updated information will be sent to the email address. On the other hand, if the system doesn’t have the email address of a specific user, the bot will ask for the email address from the user.
Let’s set a condition to check if the system has the email address of a specific user or not and send messages accordingly:
Add condition element and connect it to the send message element. After that, click on the condition element to configure a condition. If you configure one condition, it doesn’t matter whether you select All Match or Any Match.
Like before, select Email as the variable and Has Value as the operator. And click on the ok button. That’s all. The condition is set.

Now add two text element and connect them to the true and false sockets of the condition element. Now click on the text element connecting to the true element and write a text message to inform the user that the updated information will be emailed to the user.
Then click on the other text element connecting to the false socket and write a message to inform the user that the system doesn’t have the email address and tell the user to click on a quick reply button to send the email address.
If the condition becomes true, the text message connecting to the True socket will be sent. On the other hand, if the condition becomes false, the text message connecting to the False socket will be sent. That is if the system has the email address of a specific user, the bot will inform the user that the updated information will be sent. And if the system doesn’t have the email address of a user, the bot will ask for the email user.
Now add a quick reply button and connect it to the text element connecting to the false socket. Double-click on the quick reply element, select email as the Quick Reply type and click on the ok button. With the reply button, the bot will collect the email address from the user.
Now click on the save button or press Ctrl + s on the keyboard to save your bot.
If everything is ok, the bot will work accordingly. That is, if the user is male, the bot will address him as Mr and if the user is female, the bot will address her as Mrs/Miss. Moreover, if the system has the email address of a user, the bot will inform the user that updated information will be emailed to the user and if the system doesn’t have the email address of a specific user, the bot will ask for the email address of the user.
If you need to customize the next reply content when the user enters an email, you can use the (user input flow) element. Here I will make a simple demonstration. For the specific use of the (user input flow) element, you can view (user input flow) explanation.

New Sequence
Sequence, this function is mainly used to send multiple messages at different time periods.
For example: after a user registers for certain activities, segmented reminders are sent to the user after a fixed time, or it is used for product promotion and follow-up with customers.
Next, let’s take a look at how to set up Sequence

First, we need to find the Subscribe to sequence option in the Start Bot Flow element or in each button.
If you have already created a sequence, it will be displayed in the drop-down list. If you don’t have one or want to create a new one, select (New sequence). You will then see the Start Bot Flow or button automatically display an additional connection block for the sequence.

Next, we need to set it in the New sequence element. First, we double-click the New sequence element. In the menu on the right, we need to set (Sequence Name). The name is used to facilitate our understanding of the purpose of this sequence later.
Next, the following settings need to be set according to the situation.
1. First, if your sequence is about promotional information and the time to send the message is within 24 hours, then we can directly proceed to the next section (Send message after) to set the time to send the message without setting it.
2. If the message you send is more than 1 day later, then we need to set the following parts.
Starting Time and Closing Time – This time setting is about the time range when sending the Sequence message. Generally, if there is no time range required to send, select 00:00.
Time Zone – Select the time zone for sending the message according to your needs
Message Tag – Select the correct Message Tag according to the content of the message you send. For details, please refer to the following
| Message Tag | DESCRIPTION | ALLOWED | DISALLOWED (NON-EXHAUSTIVE) |
|---|---|---|---|
| Send the user reminders or updates for an event they have registered for (e.g., RSVP’ed, purchased tickets). This tag may be used for upcoming events and events in progress. |
|
|
| Notify the user of an update on a recent purchase. |
|
|
| Notify the user of a non-recurring change to their application or account. |
|
|
| Allows human agents to respond to user inquiries. Messages can be sent within 7 days after a user message. |
|
|
| News messages allow news publishers to send regular news updates to their subscribers in Messenger. This feature is only available for registered news Pages under the | Registered news Pages under the Facebook News Page Index (NPI) | Read Policy Details here |
Send message after
Two time periods can be set here
1. Promotional – limited to sending within 24 hours
2. Non-promotional – limited to sending after 1 day, and can be sent within 30 days at most


When setting the Send message after element, 3 blocks will be added by default. You can delete or add Send message after according to your needs.
After setting the completion time, we can connect the content to be sent in (Compose & schedule message) below the Send message after element

Now we can select the content to be sent. If you plan to send the same content every time period, you can connect them all in one element.

If the content sent in each period is different, you can also connect new message elements separately
Now we have completed the settings for Sequence. Now, whenever a user triggers (Start Bot Flow) or (Button), if a Sequence is set, the user who triggered these elements will be automatically subscribed to the Sequence and the sending time will start.
In addition, every time a user completes the subscription to the Sequence, the next time the user triggers (Start Bot Flow) or (Button) again, the user will not subscribe to the same Sequence again.
If you need the user to re-subscribe to the Sequence every time the (Start Bot Flow) is re-triggered, I suggest that you can set the Sequence in the button part after (Start Bot Flow), and set (Unsubscribe from sequence) in (Start Bot Flow) and select the Sequence that has been set afterwards.
In this way, every time a user triggers (Start Bot Flow), the Sequence will be unsubscribed first, and then re-subscribed in the subsequent button part.
User Input Flow
User Input Flow is a form that collects user information. I will explain the specific settings in detail below.
First, we need to add the User Input Flow element to the flow. You can choose to connect the User Input Flow after the Start Bot Flow, or connect it to any other element in the flow that can connect to the next piece of information.

Now double-click the User Input Flow element. In the drop-down menu on the right, if you have created a User Input Flow template before, it will be displayed.

You can directly select the Campaign template you created before to use

If you need to create a new one, you can select (Add new input flow).
Next, you need to set a name for this User Input Flow activity. After completion, click Done and you will see a new (New Question) element automatically added.
New Qusetion
Now we double-click the New Qusetion element to set the form questions.

Now we can see that there are two question types in the menu on the right
1. Free Keyboard input (anything the user enters will be considered as an answer)
2. Multiple Choice (several options are set by default, and the user can only choose from the options and it will be considered as an answer)


You need to choose which question type to use based on your current question. Next, we need to enter your question in Question. If you choose (Multiple Choice), you will also see two option boxes below (Option 1, Option 2). If you have more answers, you can continue to add them.


Free Keyboard input is suitable for asking users information, such as name, email, phone number, address, etc. Users can enter the answer at will.
Multiple Choice is suitable for giving an option, and users can choose one of your options as the answer.

Next, let’s continue to understand the settings in the second half. The settings here are
1. Reply type
2. Save to custom field
3. Save to system field
4. Assign to labels
5. Assign to a messenger sequence
6. Assign to an email/phone sequence
7. Skip button text
Let’s explain them one by one. First,
1.Reply type
Determine the type of the user’s answer based on your question. For example, when your question is (Your Name?) This question belongs to a text reply (general answer), then we need to use Text in the reply type.
If your question is (Your Email?) At this time, the user’s reply is ([email protected]) This type, we need to set type to (Email)
Even if the user inputs the email included in a piece of information, the system will extract the correct email separately. For example, if the user’s reply is: (My email: [email protected]), the system will filter (My email:) and extract the correct ([email protected]) and save it to the system.
Currently, the reply types are as follows
Text, Email, Phone, Number, URL, File, Image, Video, Date, Time, Datetime

In addition, when you select Email, Phone, an additional option will be displayed
- Attach email quick-reply
- Attach phone quick-reply


When selected, when the user answers this question, Facebook will automatically obtain the user’s email and phone number as a quick-reply and automatically display it in the user interface, allowing the user to select without inputting.
Conclusion: According to your question, select the corresponding reply type according to the type of the user’s reply. Then the system will judge whether the user’s reply is correct. If it is not correct, it will send an error message to prompt the user that the current reply information format is incorrect and ask the user to answer again.
2.Save to custom field
A custom field stores the user’s answer in the corresponding field, for example: field name = User Name
We ask the user’s name, and when the user replies, we save the answer under User Name. Later, when we view the user’s answer, we can see the corresponding table
User Name | Michael Johnson

To create a custom field, click Add New, and an input box and a drop-down list will appear.

Now we need to enter a name in (Custom field name), and then select the type corresponding to this name in (Reply type). Click Save when you are done.


Next, we can see the custom field we just created in the selection box.
3.Save to system field
system field, this is the system default field. Currently, there are only 4 options: Email, Phone, Birthday, and Location. When these answers are obtained, they will be saved in the user’s system field. You can directly see the user’s detailed information in the subscriber details.

4.Assign to labels
When the user completes the question, you can add a label to the user

5.Assign to a messenger sequence
When the user completes this question, the user can be assigned a subscription sequence
6.Assign to a email/phone sequence
When the user completes this question, the user can be assigned to subscribe to the email/phone sequence
For more information about email/phone sequence, you can visit this article

7.Skip button text
If this question allows users to skip, you can set this button and enter the name of the skip button in the input box.
If it is not set, it means that this question cannot be skipped. If the user’s answer does not match the reply type, it will continue to ask until the correct reply type is obtained.

Next, let’s continue with the setup

When we select Multiple Choice, after completing the settings, we can see the multiple choice questions under the question in the (New Qusetion) element, as well as other settings.


Now we use Free Keyboard input to do a complete tutorial

Next, you can see two options in the connection below the (New Question) element
1. Compose next message (If you have another question, you can connect this option to continue asking the next question)

2. Final reply (If your question ends here, then connect this option to end this User Input Flow and connect to other reply elements)

In the above demonstration, we asked two questions
- Your Email
- Your Phone
After the end, I connected the Text element to reply, and these questions were saved to the corresponding system field
We can use system variables directly in Text, and when actually replying to the user, the system variables will be converted into the user’s answer.

If you have a lot of questions and you are worried that the user may choose the wrong answer during the input process, you can add a button at the end and reconnect the (User Input Flow) element and select the campaign you just created.
If the user needs to re-answer the question, they can click the button and re-answer with a new answer.
Marketing Messages
Marketing messages allow a Facebook Page or Instagram professional account to send messages to a user after the standard message time frame, with the user’s permission. You can use marketing messages to build relationships with users who are interested in you or your business.
Next we will explain how to use the marketing message feature

First, drag and drop the “Marketing messages” component from the menu onto the editor.
Then double-click the “Marketing messages” component. In the pop-up menu on the right, we need to make some settings.
First, “Title”, this name will be displayed in the Title of the subscription message.
Next is “Marketing messages postback ID”. If you have created Marketing messages before, it will be displayed here. If not, you can select “New Marketing messages” to create a new Marketing message.
Next, we need to select an image. You can use the image related to your Marketing messages as the cover.
After completion, we can click “Done”, and then you can see that the Marketing messages component has updated the message just set on the editor, and then a new component “New Marketing messages” will be automatically connected.

Now double-click the “New Marketing messages” component. We need to set the template name of this Marketing message in the pop-up menu on the right, so that we can know the purpose of this Marketing message later.

Now that we have completed this, we can connect the next reply in the next message. In the demo, when a user receives a subscription request from this Marketing messages, when the user clicks the subscribe button, we will reply to the user “Thank you for your subscription😍”
If you need to Create a campaign on Marketing Messages Broadcast, you can check out this article for details. Click here
Ai Reply
Ai Reply component is a component that can automatically reply to users using AI model. To use Ai Reply, you must first set up OpenAI API. You can check this article for more information. Click here
If you only need to use AI in a specific process, you can set it in the usual Visual Flow Builder Editor, but there are limited ways to invoke AI. You can set keywords. For example, we set a keyword “ai” in “Start Bot Flow”. When the user enters a question, append “ai” to let AI reply, for example:
1. Hello, can I learn about your product? ai
2. @ai, Hello, can I learn about your product?
This approach has certain limitations. Users must enter prompt words to wake up. In addition, if you need to use AI to reply completely, you can enable the connection of Ai Reply component when there is no matching reply. In this way, when the user inputs content that does not exist in all the keyword flows you currently set, AI reply will be enabled. You can check this article for more specific settings. Click here

Ai Reply component, drag the Ai Reply component from the component menu to the editor, double-click the Ai Reply component, and in the text input box on the right menu, you need to enter the AI prompt word.
Generally, the prompt word entered in the Ai Reply component is how you want the AI to reply, such as what tone to use, or what content cannot be replied. When the AI receives a message other than the prompt word, how should it reply to ensure that the AI does not reply to things other than your business.
Bot Keyword
Keywords play a very important role in automated replies. When you create a Flow, you can enable a keyword for this Flow to trigger it. For example, we set one or more keywords “hi, pm, dm” in this Flow. Now when the user enters the corresponding “keyword” in the messenger, this Flow will be triggered.

In the menu Bot manager Automation Bot Keyword , all the keywords currently created in the Flow will be displayed. You can also click the “Set Keyword” button here

In the Visual Flow Builder Editor, you can set keywords in Start bot Flow to start this Flow.

After saving the Flow, you can see the currently created “keyword” in the Bot manager Automation Bot Keyword page. In addition, the status “Live” is displayed, which means that this keyword is currently enabled.

If you need to disable a keyword, you can set the keyword to “Stop” in Actions.

At this time, “Paused” will be displayed in the keyword status, and the keyword will not be triggered.
Postback Manager
In the menu Bot manager Automation Postback Manager , this generally displays the postbacks in all current Flows. Normally, we will not use this, but if you need to use it for Facebook click to messenger ads, then we need to get the Json Code here.

First we must create a new Flow for ADS, but make sure you have created the main Flow, which will be used for subsequent button postbacks.
In the Visual Flow Builder Editor, if you want to create a Facebook ads flow, there are some limitations
1. Only one message is allowed (can be paired with a button or quick reply)
2. For ads avoid putting first name, last name, direct link of webivew form, direct link of ecommerce store. These will not work.

To start the entire Flow when setting up the button you can use “Start a flow” and select the button of the previously created Flow as the postback.

After creating the ADS Flow, you can return to Bot manager Automation Postback Manager to see the name of the Flow you just created. You can click the icon in the figure to get the Json code

You can copy the json code and go to Facebook Ads Manager to set it up.

In Facebook Ads Manager, select “Partner app” in “Message template” and click Select flow

Next we click “Enter JSON Code”

We need to delete the default Json Code

Next we need to paste the JSON Code we just copied into it

If everything goes well, you will be able to see the ads flow you just created.

Next, click “Save” and you’re done. You can also click “Preview in Messenger” to test it.

You will then receive a test message from your Page in your Facebook account.
Get started

Get started & welcome message
The greeting text on the welcome screen is your first opportunity to tell a person why they should start a conversation with your messenger bot.
Some things you might include in your greeting text might include a brief description of what your bot does, such as key features,or a tagline.This is also a great place to start establishing the style and tone of your bot.Greetings have a 160 character maximum,so keep it concise.

We can click “Edit get started reply” to edit the reply content when the user clicks the “Get started” button.

After entering the edit page, we only need to modify the content in the “Text” component. You can also add buttons, etc.


Ice breakers
In Ice breakers, you can set up some frequently asked questions about your business or products.
Page profile priority
Some of the profile elements like ice breakers and get started button are incompatible with each other. So when both are set one will take precedence over the other. Here is the priority from highest to lowest:
- Api ice breakers
- Get started button
- Custom questions set via the page inbox ui
NB: Editing custom questions from the page inbox ui is disabled when ice breakers are set via api. This is to prevent breaking the experience set by the installed app.

If you need to use Ice breaker, you can enable Ice breaker, then enter some common questions in the questions below, and the corresponding response flow (you need to create a response flow for the questions first)
If you need to create multiple questions, you can click the “Add more question” button below to add more common questions.
Finally, click Save

Now when new users click on your Facebook page message, the “Get started” button will not be displayed but will be replaced by the FAQ.
General settings
In General settings, we can enable some fixed settings for Facebook Page Bot.
Mark as seen status
After enabling Mark as seen status, every time a user sends a message to your Facebook Page messenger, the Bot will automatically mark the message as read.

Chat with human email
When you use the “System default action button” in the button and click “Chat with human”, FransChat will send an email to the email saved in the General settings Chat with human email to remind the user that a conversation with a human customer service is needed.
For instructions on how to use the Chat with human email button, please click here

Reply if no match found
When unmatched replies are enabled, every time a user sends a message to messenger and the message does not correspond to any keywords or automated replies, a fixed unmatched reply template will be enabled.
If you want to fully use AI to respond to all user inquiries, enabling mismatch responses can be very useful.
You can click here to set the unmatched template message.

Prevent Button Spam
This feature is to prevent users from continuously clicking the button multiple times in a short period, causing the bot to repeatedly respond with the same message.
If enabled, you can set a time interval (default is 5 seconds). If the user clicks the same button more than once within this time frame, the system will not respond to the user. The system will only respond to the same button’s message once within the set time interval.

Integrate Email APIs
If you use email marketing, you can integrate the platform you are using.
Whenever you collect a user’s email through quick replies, buttons, or during the User Input Flow (emails must be stored in the system), FransChat will save the user’s email and name to the email marketing platform you have set up with Integrate email APIs.
You can integrate email api here

SMS integration & Email integration
Whenever you collect a user’s phone number or email through quick replies, buttons, or during the User Input Flow (phone number and email must be stored in the system), if you have set up SMS integration & Email integration, FransChat will automatically send a message to the obtained phone number or email.
You can set up SMS and email integration here

Action Button
In the Action Button settings, we can set some system-fixed trigger reply content
For example:
Get started & welcome message section, when a new user enters the message through Get started, we can set the “Get-started Template” in the Action Button to set the automatic reply content
Get-started Template
Need to trigger Get-started Template reply You must enable “Get started & welcome message“

Now we click on “Get-started Template” and you will be taken to the edit page. Here we only need to edit the text part. You can modify the content in the original text component and add buttons to set the flow of the next reply.

No Match Template
To use the No Match Template, you must enable the “Reply if no match found” feature in the “General settings“
Note: After enabling the “Reply if no match found” feature, all subsequent messages will use this template to reply unless the keyword triggers the automatic reply flow.
If “Reply if no match found” is not enabled, users will not be replied to topics other than keywords.

Now we click “No Match Template” to edit it. By default, you can modify the content in the default Text component and add more information or buttons.

If you want to fully automate the conversation with the user, you can use the AI component
Note: You only need to use one AI component. You must configure the ChatGPT API first. For details, please refer to here
Now you just need to enter some keywords in the Ai reply component to tell the AI how to reply to the user, what to answer, etc.

Button Reply Template
The following 8 template types all belong to the template content of the next reply after the user completes the button click or completes the operation using the “System default action button” in the “Button component”


Four of the templates are for obtaining user information, such as Birthday, Email, Phone, Location
When obtaining user information, the system will save the user information in the user configuration.


When you use “System default action button” and now Email via a button, the specific process is as follows:
First, we set the corresponding template message in the “Action Button”
In the reply content, we use the variable #system_email#, which will attach the email provided by the user in the next reply when the user provides an email

Next, we need to use the button in any get user flow and select “System default action button” , “user email”

Now when this flow is triggered, a button to get email will be displayed. When the user clicks it, a half-window web page will be opened to enter the user’s email


When the user submits the completed email, the window will automatically close after the message “Success!” is displayed.
And reply to the message of the corresponding template in “Action Button”
And we can see here that the variable #system_email# in the original message is successfully replaced with the Email entered by the user

Subscribe Template
For “Un-subscribe Template” and “Re-subscribe Template”
After the user clicks the button, the system will cancel the user’s subscription status or re-subscribe. This will be used when sending Broadcasting to the user. If you can click to unsubscribe, you will not be able to send Broadcast to the user again.

Chat with Human & Robot
When “System default action button” is selected in the button and “chat with human” is used, this will pause the automatic reply for that user, and the user will not be able to reply even if he enters keywords.
The user can restore the automatic reply by clicking the “Chat with robot” button again.

If you need to be notified after a user clicks “Chat with Human”, you can set a notification email address in General settings Chat with human email . Every time a user clicks “Chat with Human”, the system will send a notification email with the user’s name and basic information to the email address, informing you that a user needs a human reply.

Persistent Menu
How it works
With a persistent menu, you can create and send a menu of key business features (like hours, store locations, and products) that always appears in people’s Messenger conversations with your business.

Create Persistent Menu
After entering the Persistent Menu, click the “Create persistent menu” button in the list.

Now you will enter the edit page of Create persistent menu, where there are several options
1. Locale (This is the language used for selecting persistent menu, usually the default is OK)
2. Composer input disabled? (If enabled, users will not be able to enter any text in messenger, which is usually used in fully automated and unmanned situations)

Menu
This section is for creating menus
1. Menu Title (menu name)
2. Web URL / Postback (action after clicking the menu)
3. Set the action target after clicking the menu. If you choose Web URL, enter your URL link

When you select Postback, the third option will show all your current flows. You can choose which flow will be triggered when clicking this menu. You can also click Add to create a new one.
If you need to create more menus, you can click the “Add” button below to create more menus.

After finishing, click Submit. After saving, you will see the currently created persistent menu in the list.
It may take some time for the persistent menu to update in Messenger. If you don’t see it update, you can try deleting your current Facebook account and the current Page Messenger conversation history and resending a new message to see if the persistent menu is displayed.

Marketing Messages
If you have created Marketing Messages in any Flow, they will be displayed in the list. You can refer to here for how to create Marketing Messages.
In the list, you can clearly see how many subscribers each Marketing Message currently has. If you need to view detailed subscriber details, you can click the user icon button in “Actions” and you will see who the current subscribers are in the pop-up window.

ADS Welcome Message Flow
When creating Click-to-Messenger or Click-to-Instagram Direct ads, you can enhance user engagement by connecting message flows from messaging partner applications. These message flows can include text, images, emojis, and button message types.
This guide explains how to manage welcome message flows using FransChat.
Navigate to Bot Manager Marketing Tools ADS Welcome Message , and select “Create New Flow.”

Next, you will see a pop-up window. Here, you must enter the Flow Name and select Eligible Platforms. If your page is linked to Instagram, you will see both Messenger and Instagram as options. You need to choose which platform this ads welcome message flow will be used for.
Note:
- If you select the Instagram platform and choose Text under Messenger Type, you can only select either Buttons or Quick Replies, not both.
- If it’s for the Messenger platform, you can choose both Buttons and Quick Replies.
- If Messenger Type is set to Card and you’re using the Instagram platform, you won’t be able to select Quick Replies.

After adding a button, you can choose between two modes: Postback or Web URL.
- If you choose Postback, you will need to select the corresponding Postback ID. If none is available, you can click “Add New Flow” to create a new Postback.
- If you choose Web URL, you will need to provide your website URL.

When you select Card under Messenger Type, you can upload an image or directly provide an image link.
You need to fill in the Card Title and Card Subtitle.
If necessary, you can also add Buttons or Quick Replies.

Once you have filled in all the information, click Publish Flow and wait for the upload to complete.

After completion, you can find the recently created flow in the Ads Welcome Message list, where you can edit or delete it.
In the Used in Ad column, you can see whether the flow is currently being used in any ads.
Please note that you cannot update flows that are currently connected to ads.

Next, we can select Partner App in Facebook Ads.

Then, select the FransChat platform in the Partner App.

In the Message Flow, you can see the ads welcome message flows that you just created in FransChat.

After selecting Message Flow, you can view the actual message template in the right-hand pane.


If you have created Quick Replies, you can also see the message templates with Quick Replies in Facebook Ads.

Finally, if you need to test this flow, you can click Preview in Messenger. You will then see the message template in your Messenger.
Once you confirm that there are no issues, click Finish to complete the setup.

Webform builder
How it works
The Messenger Platform allows you to open a standard webview, where you can load webpages inside Messenger. This lets you offer experiences and features that might be difficult to offer with message bubbles, such as picking products to buy, seats to book, or dates to reserve.
Webform builder
Go to Messenger Bot Webform builder and you will see all your existing webview form you built so far.
- icon refers webview preview to know how it will look like and to copy webview url
- icon refers webview report to view form details and submitted form data
- Export Form Data
- icon refers webview edit
- icon refers webview delete

Create New Webform
To create a new webview form simply click “New form” button. This is a drag and drop form builder. Choose form name, title, page. You choose optional label and reply template. When people will submit the form they will be assigned to the selected labels and also they will receive the inbox reply.
Design your form easily by dragging the elements you want from right sidebar. Your form must have a submit button.

For each form field, you can edit it by clicking the pencil icon

If it is a special field, such as email or mobile number, you can select the corresponding field in Type.

Finally, each form needs to have a button, click “Save” when you are done

How To Use The Webform
Click icon and you can see your Webform preview, copy the browser URL, this is the Webform URL.

Now it’s time to use this Webform in bot settings. Go to Bot Manager Bot Reply , create a new flow or edit an existing bot settings. Webform works with text with buttons, generic template, carousel & media. Choose button type and choose Webform and put the copied URL.


This will how this will look like in bot live action :


After submitting the form, the window will automatically close after Success! is displayed.

Then you will receive a response after submitting the form

Report
Click icon in webview manager and you can see your webview report grouped by subscriber and clicking the eye icon inside here will pop up the submitted form data in details.


Example Use Cases
- A ticket-search bot can display an interactive stadium seat map for choosing a seat.
- A travel bot can provide travel preferences—aisle vs. window, inn vs. hotel, dietary needs—accessible from the persistent menu.
- A dental-appointment bot can display an interactive calendar for choosing an appointment slot.
- A news bot can provide a multi-select list of topics to subscribe to.
- A commerce or brand bot can offer personal preferences to customize offers and free gifts.
If you are a developer, you can set a webhook URL after the user submits the form. The system will send the content in the form to the webhhok URL after the user submits the form.

For details on how to set the webhook url, please refer to JSON API Connector
Sequence Message
Sequence messaging is a marketing strategy that sends, or “drips,” a pre-written set of messages to messenger bot subscribers over time. This feature can send 24H promo and non-promotional with tag message sequence to messenger bot subscriber. It uses BOT API for sending message. The subscribers will be assigned under your sequence campaign automatically based on their entry point (engagement plugins) or post-back click. However, you can also assign manually or change the campaign.
Create New Sequence
How to create Sequence Messaging can be viewed here
Sequence Lists
To view all the sequences that have been created, you can go to Bot manager Marketing Tools Sequence message and click Lists

Here you can see all the sequences that have been created. In Actions, you can click Report to view some basic data reports of the current sequence.


Messenger Engagement
Messenger Engagement Plugin
This guide lists different ways that you can use the Messenger Platform from Meta to drive business discovery and engagement.
Send to messenger plugin
The send to Messenger plugin renders a button on your website that allows a person to opt-in to receive messages from you on Messenger. This is useful for providing follow-up at a later time, such as confirmations and updates. This plugin only works in HTTPS websites.
To create a new plugin click Flow builder button.

Create a new plugin
After clicking the Flow builder button, we will enter the following page. In the menu on the right, the corresponding plugin will be automatically selected for Action Button and Messenger engagement plugin. No settings are required.

Now we need the parts in the picture
1. Domain = (Enter the website domain where you are about to insert the Send to messenger plugin)
2. Language = (Select the language of your plugin)
3. Cta button text = (Select the click button text of the Send to messenger plugin, you can set it according to the situation)
4.Plugin skin = (Set the appearance color of the Send to messenger plugin)
5. Plugin size = (Set the size of the Send to messenger plugin)

Next, continue to set up the completed content that will be displayed after the user clicks the plugin and logs in to Facebook (Opt-in success message in website)

If enabled (I want to add a button in success message)
Then a button will be added after the success message is displayed after the user clicks the plugin

If enabled (Redirect to a webpage on successful opt-in)
Then the user will be redirected directly to the set link after clicking the plugin

Finally, you must set (Reference)
You can set a name for the activity related to this plugin
Note: All References must be unique.
Select label(s) is to set a label, which will be automatically added to the user when the user clicks to join.

Finally click Done and you will see the plugin settings on the editor.

Finally, you can set up the next conversation in “Start Bot Flow”. For example, if we add a “Text” component in “Start Bot Flow”, when the user clicks on the plug-in to join successfully, it will automatically reply to the user’s information in the Text.

Plugin List
This list shows all the plugins you’ve created so far, and if you’ve lost that plugin, you can get the embed code for that plugin. This list shows all the plugins you’ve created so far, and if you’ve lost that plugin, you can get the embed code for that plugin.

Click the edit icon in Actions to enter the edit page to modify the plugin
Click “js code” to get the plugin code and embed it in your website

Copy the embed code and put it on your website
Put this code inside the html block of your website where you want to display this plugin.

How it looks on your website

When the user clicks, a pop-up window will pop up to log in to the Facebook account. After the login is completed, a prompt will be displayed on the page, and the information in Flow will be sent to the logged-in user.

M.me link & QR code
m.me is a shortened URL service operated by Facebook that redirects users to a person, page, or bot in Messenger. You can use them on your website, email newsletters, and more. The m.me link for your bot allows you to link people directly to your Messenger bot. When the link is clicked, a conversation is automatically opened on messenger.com or in the Messenger mobile app. You will also get QR code image of your m.me link from this list below.
To create a new plugin click Flow builder button.

Create a new plugin
After clicking the Flow builder button, we will enter the following page. In the menu on the right, the corresponding plugin will be automatically selected for Action Button and Messenger engagement plugin. No settings are required.

If you need to use embed code to display this button, you can set the “Button” part
In the “Reference” part, you must set a parameter. The “Reference” value of each plugin is unique and is used for system identification.
In the Select label part, you can set a label if necessary. When the user enters Messenger through me.link, this label will be automatically added to the user
Click Done when completed

Next you will see the details of the settings in the “Action Buttons” component. Now you can continue to set the information content after the “Start Bot Flow” component

For example, in the demo, the purpose of Me.link is to give users the function of obtaining coupons, and I can edit it like this.
Now when the user enters Messenger through Me.link, the following information will be automatically sent to the user
After editing, click Save.

Plugin List
This list shows all the plugins you’ve created so far, and if you’ve lost that plugin, you can get the embed code for that plugin. This list shows all the plugins you’ve created so far, and if you’ve lost that plugin, you can get the embed code for that plugin.

Click the edit icon in Actions to enter the edit page to modify the plugin
Click “js code” to get the plugin code and embed the button into your website

You can copy the plugin code and embed the button on your website, or you can use “M.me Link” and when users visit this URL they will be redirected to Messenger. You can also embed this link into your website button.

You can use QR Code, and when users scan this QR code, they will be redirected to Messenger.

How does the workflow on your website work via buttons or URLs?
You can embed the button into your website through js code, or customize a button and jump to the URL of M.me Link

When the user clicks the button, he will be redirected to the user’s Messenger and receive the following message.

User Input Flow
You can check here how to create User Input Flow
In Bot manager Marketing Tools User Input Flow you can view the list of currently created User Input Flows and create new Custom Fields
User Input Flow List
Click the Lists button in the User Input Flow

In “Action”, you can click the eye icon to view the users who have completed the User Input Flow and the information they have submitted.
You can also export this information or edit it.

Custom Fields
In the “Custom Fields” section, click the Lists button

You can see all the Custom Fields that have been created so far. If you want to create a new Custom Field, you can click the “New Custom Field” button above.

Enter the name of the Custom Fields and the corresponding Type in the pop-up window, and click Save when you are finished.

Whitelisted domains
Generally speaking, any URL sent by Facebook needs to be set as Whitelisted domains before Facebook allows this URL to be sent.
In FransChat, if a third-party URL is entered in the button, FransChat will automatically set this URL to Whitelisted domains, so generally there is no need to set it up. FransChat will automatically complete it.
You can view the currently added URLs in Bot manager Marketing Tools Whitelisted domains Action

The URLs that have been added so far will be displayed here

If you encounter a situation where you cannot send a message or receive an error message when sending a message, and the message contains a third-party URL, you can check whether this URL has been added to the Whitelisted domains. If not, you can manually add it again by clicking “New Domain” and entering your URL in the pop-up window, then save it.

General settings
In General settings, we can enable some fixed settings for Facebook Page Bot.
Mark as seen status
After enabling Mark as seen status, every time a user sends a message to your Facebook Page messenger, the Bot will automatically mark the message as read.

Chat with human email
When you use the “System default action button” in the button and click “Chat with human”, FransChat will send an email to the email saved in the General settings Chat with human email to remind the user that a conversation with a human customer service is needed.
For instructions on how to use the Chat with human email button, please click here

Reply if no match found
When unmatched replies are enabled, every time a user sends a message to messenger and the message does not correspond to any keywords or automated replies, a fixed unmatched reply template will be enabled.
If you want to fully use AI to respond to all user inquiries, enabling mismatch responses can be very useful.
You can click here to set the unmatched template message.

Prevent Button Spam
This feature is to prevent users from continuously clicking the button multiple times in a short period, causing the bot to repeatedly respond with the same message.
If enabled, you can set a time interval (default is 5 seconds). If the user clicks the same button more than once within this time frame, the system will not respond to the user. The system will only respond to the same button’s message once within the set time interval.

Integrate Email APIs
If you use email marketing, you can integrate the platform you are using.
Whenever you collect a user’s email through quick replies, buttons, or during the User Input Flow (emails must be stored in the system), FransChat will save the user’s email and name to the email marketing platform you have set up with Integrate email APIs.
You can integrate email api here

SMS integration & Email integration
Whenever you collect a user’s phone number or email through quick replies, buttons, or during the User Input Flow (phone number and email must be stored in the system), if you have set up SMS integration & Email integration, FransChat will automatically send a message to the obtained phone number or email.
You can set up SMS and email integration here

Comment Manager
Articles
All Post List
Create campaigns
To create campaigns, click on the Campaigns option on the All Post List page.
Instantly, a Facebook comment automation campaign page will appear.

The page is divided into three sections.
On the Pages section, you have to select a Facebook page.

In the middle section, you can see reports.

Full page campaigns
The Full page campaigns section requires upgrading to the PRO plan to use it
This feature can automate all posts on the current Facebook Page.
In the free plan, if you need to automatically reply to comments in each post, you must enable automation settings for each post separately.
The Full page campaigns feature will enable automation for all posts, including posts from ads. If you need to enable automated comment replies in ad posts published through Facebook ADS, you must use the “Comment & inbox reply” feature in “Full page campaigns”

Comment & inbox reply
After clicking Enable full page reply, a pop-up window will open, where you need to set up automated comment replies and private replies for all pages.


What do you want about offensive comments?
In the following settings, you can filter offensive comments in the comments. You can choose whether you want to hide or delete offensive comments when they appear.
Write down the offensive keywords in comma separated
Enter the keywords related to offensive comments here. If there are many keywords, you can use commas to separate them.
Select a message template for private reply after deleting offensive comment
If you need to send a private message to a user who has made an offensive comment, you can set it up as follows. In the drop-down list, select the message template you want to send. If there is no message template, click “Add Message Template” and the Visual Flow Builder Editor will open, where you can create one. If you do not need to send a private message to a user, you do not need to set a reply template.

If enabled, you will be replied to when the same user comments multiple times. If disabled, you will only be replied to when the same user comments for the first time. You will not be replied to when the same user comments again.
The system will reply to comments only after it is enabled, and it generally needs to be enabled.
After enabling, when a user comments, your Facebook Page will automatically like the user's comment
After enabling, when a user makes a comment, the system will automatically reply to the user's comment and hide the comment
- This feature helps you hide potential customers from your peers and business competitors.

Automated reply by ai
If you use Ai Reply, you must configure the Openai API before it can work properly.
First we need to set a name for this campaign.
Then in the Ai training data section you need to provide the AI with a prompt for how to reply to comments.
Note: When using Automated reply by ai, all comments posted by users will be automatically replied.

Generic message for all
Generic reply means same reply for everyone, no comment filtering applicable. It’s simple, just provide message for comment reply and inbox private reply. Everyone will get same reply no matter whatever they comment. The reply supports spintax and you can embed commenter name variable inside reply message. Tagging user is also possible for comment reply only, not for inbox private reply.

Send message by filtering word/sentence
On the other hand, if you choose to send a message by filtering words/sentences, more fields will appear.
First, write the campaign name in the Autoresponder Campaign Name field.
Then you have to enable one of the two options – Reply if the filter word matches exactly and Reply if any of the filter words match.
Then, you have to write the filter word or sentence in the appropriate field (separate with commas if there are multiple filter words).
After that, write a message for the comment reply, you can also upload a picture or video to reply to the comment (if you want a private reply, you don’t need to set this).
Then select a message template for the private reply (if you want a comment, you don’t need to set this).

If you have different filter terms that require different responses, you can click the “Add more filtering” button below
Then you will see the same filter terms field settings displayed

Finally, in the “Comment reply if no matching found” section, if you need to make an additional reply when a user’s comment does not contain the filter words, you can set it here (if you only need to reply to comments containing the filter words, then you don’t need to set it here)
Then click the “Save” button.

Auto like & share
This feature can auto like any new post of your page as your other pages and also can auto share any new post of your page as your other pages. It’s very simple, just select pages you want to hit like with and pages you want to share the new posts. Using enough share delay can be very useful for large number of share & avoid spamming.

Latest Posts
Now come to the latest post sections. In the section, you can see the list of latest posts.
Now click on the gear icon of any post and a drop-down menu of different options — Enable auto reply, Enable auto comment, Check latest comments, Leave a comment now.

Enable auto reply
To enable auto reply for the post, click on the Enable auto reply option.
Instantly a modal form will appear. Now you have to fill out the modal form.
If you want to use a saved template, keep the radio button turned on.
Now select labels from the choose labels fields. Of course, you can select multiple labels.
Then you have to select an auto reply template.
Now click on the submit button.

Or you can cancel the template and create a new reply template

Enable auto comment
To enable auto comment, click on the Enable auto comment option.
Instantly, a modal form will appear. Now you have to fill out the form.
There are two modes for automatic comments: One time and Periodic
One time
In One time mode, comments will only be automatically made once within a specified time.
You need to fill in the campaign name and set the Auto comment template. You can see how to create an Auto comment template here.

Periodic
In Periodic mode, you can repeat comments within a set time.
You can set the time for repeated comments, your time zone, and the start and end time of the activity in “Periodic schedule time”
In “Auto comment type”, if your Auto comment template has multiple comments set, then if you select “Random”, a comment in a template will be randomly selected for each repeated comment to be published, otherwise if you select “Serially”, it will be published in the order in the comment template

Check latest comments
To check latest comments, click on the Check latest comments opinion. And instantly, all the latest comments will appear on a modal form.

Leave a comment
To leave a comment under a post now, click on the Leave a comment option.
Instantly, a modal form will appear. Write a comment in the field and click Create comment button.

Comment Template
Creating auto comment template
To create a comment template, click on the comment template option.

Instantly, the Auto comment template manager page will appear with a button called Create new template. Now click on the Create new template button.

Instantly, a modal form will appear— you have to fill out the form to create an auto comment template.
Write a ‘Template name’ in the ‘Template name’ box. Then write a comment in the ‘Auto comment’ box, the comment that will be made automatically under your Facebook pages’ posts. You can add as many comments as you want by clicking on the ‘Add more’ button. Then click on the ‘Save’ button.

Instantly, a successful message will appear.

Now the template is created, and you can see the template name on the page called ‘Auto comment template manager’. Next to the template name, you will see the ‘edit’ and ‘delete’ icons. By clicking on the ‘Edit’ icon, you can edit the campaign. And by clicking on the ‘Delete’ icon, you can delete the template. Of course, you can create another template by clicking on the ‘Create new template’ button— you can create as many templates as you want.
Reply Template
Creating auto reply template
To create auto reply template, click on the Reply template option on the Comment Manager page.

Instantly, Auto reply template manager page will appear with a button called Create new template.
Now click on the Create new template button.

Instantly, a modal form will appear — you have to fill out the form.
Please select a page for auto-reply
First, you have to select a Facebook page from the drop-down menu.

What do you want about offensive comments?
In the following settings, you can filter offensive comments in the comments. You can choose whether you want to hide or delete offensive comments when they appear.-
Write down the offensive keywords in comma separated
-
Select a message template for private reply after deleting offensive comment

If enabled, you will be replied to when the same user comments multiple times. If disabled, you will only be replied to when the same user comments for the first time. You will not be replied to when the same user comments again.
The system will reply to comments only after it is enabled, and it generally needs to be enabled.
After enabling, when a user comments, your Facebook Page will automatically like the user's comment
After enabling, when a user makes a comment, the system will automatically reply to the user's comment and hide the comment
- This feature helps you hide potential customers from your peers and business competitors.

Generic message for all
After that, select Generic message for all option. And instantly, three fields will appear.
Write a template name in the Auto reply campaign name field.
Then write a message for Message for comment reply field.
After that, you have to select a message template for private reply.
Then click on the Save button.

Send message by filtering word/sentence
On the other hand, if you choose to send a message by filtering words/sentences, more fields will appear.
First, write the campaign name in the Autoresponder Campaign Name field.
Then you have to enable one of the two options – Reply if the filter word matches exactly and Reply if any of the filter words match.
Then, you have to write the filter word or sentence in the appropriate field (separate with commas if there are multiple filter words).
After that, write a message for the comment reply, you can also upload a picture or video to reply to the comment (if you want a private reply, you don’t need to set this).
Then select a message template for the private reply (if you want a comment, you don’t need to set this).

If you have different filter terms that require different responses, you can click the “Add more filtering” button below
Then you will see the same filter terms field settings displayed

Finally, in the “Comment reply if no matching found” section, if you need to make an additional reply when a user’s comment does not contain the filter words, you can set it here (if you only need to reply to comments containing the filter words, then you don’t need to set it here)
Then click the “Save” button.

Reports
you can see all the reports by clicking on the Reports option.

Knowledge Base
Dashboard
In the FransChat dashboard, you can visually view your current data analysis. For example, the number of new subscribers acquired during the month, the current number of messages sent, current subscriber usage, etc.
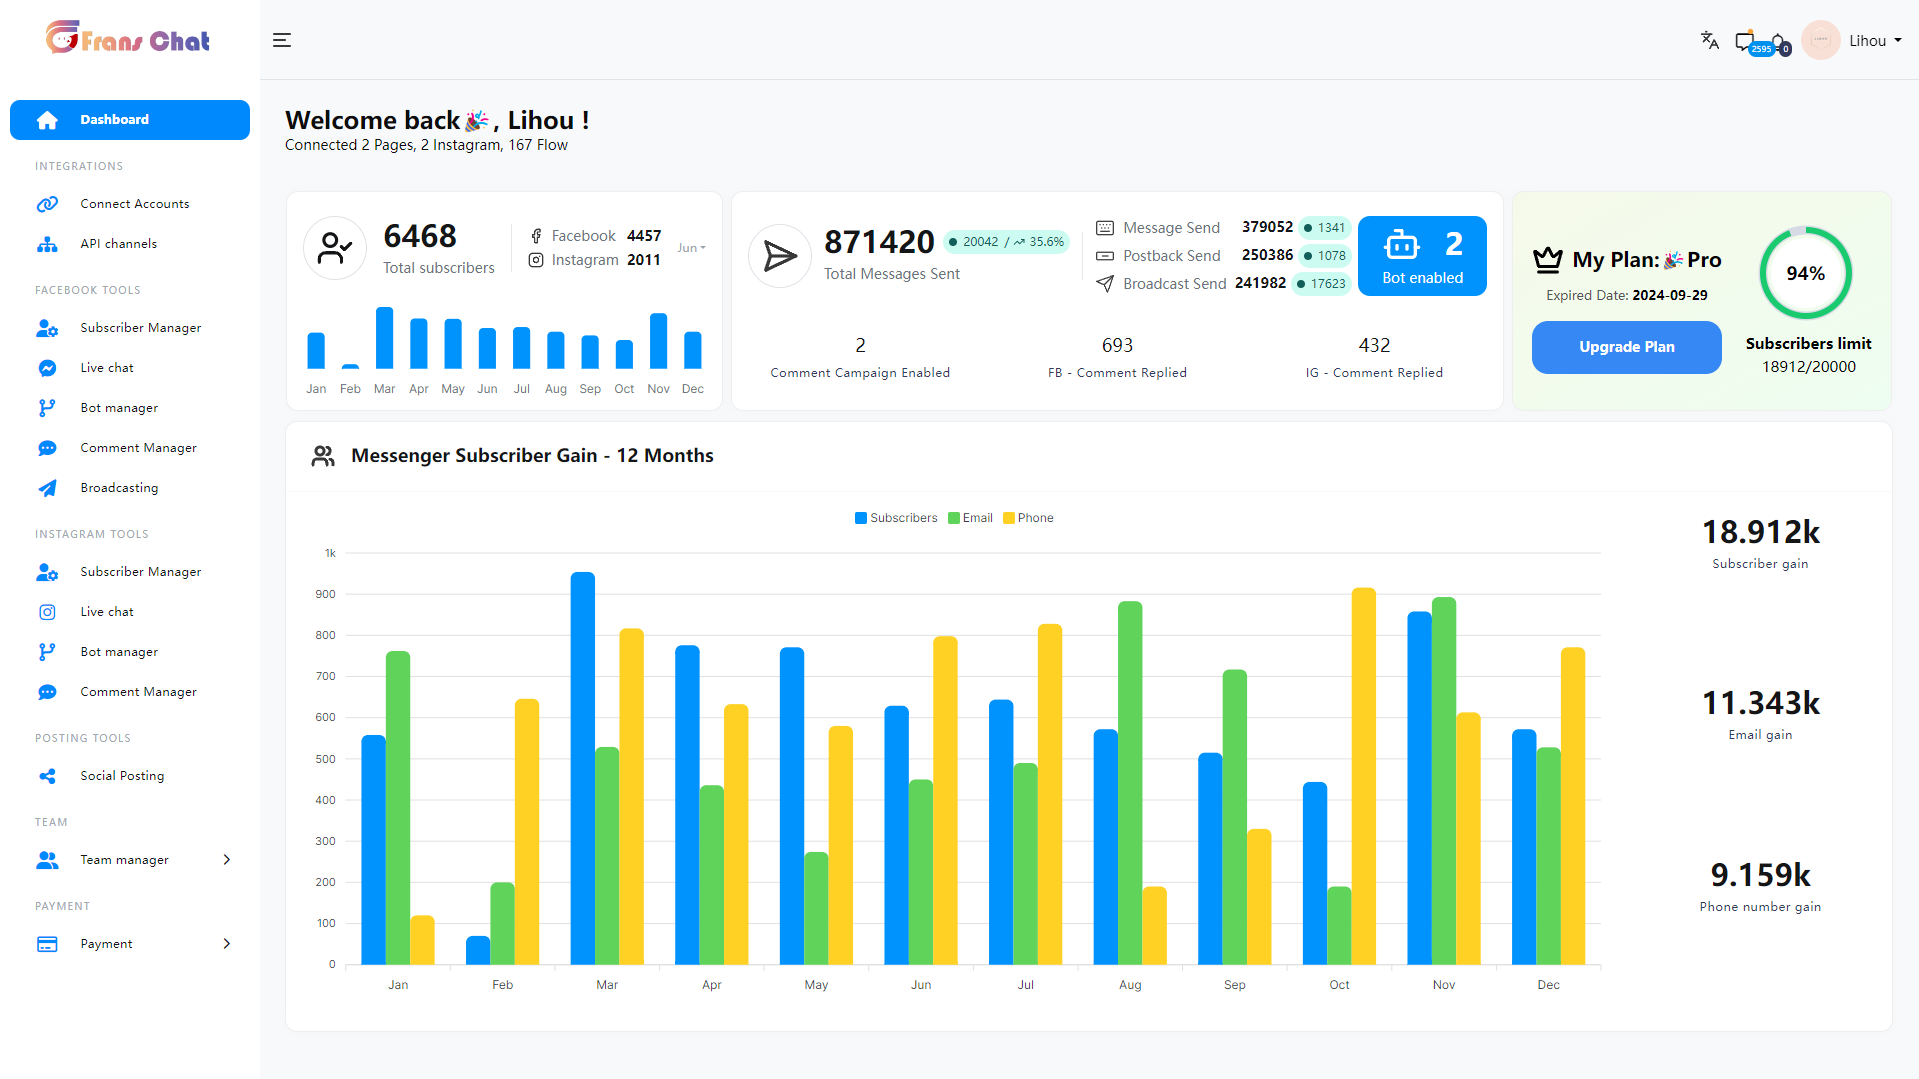
Integrations
In Integrations you can link your 3rd party accounts such as Social media, Email autoresponder APIs, SMS apis, Email APIs, WordPress, Woocommerce, OpenAI API
let’s start!
Connect Accounts
Facebook & Instagram Accounts
FransChat is primarily a marketing application based on Facebook and Instagram. So you have to import your Facebook and Instagram accounts into FransChat. Importing Facebook and Instagram accounts into FransChat is simple and straightforward. Just follow the instructions and you’ll be importing your Facebook and Instagram accounts in no time.
Import Facebook and Instagram Accounts
To import Facebook and Instagram accounts, first, go to the dashboard of FransChat. At the left sidebar of the dashboard, you will see a menu called Facebook and Instagram. Click on the menu.
Instantly, a page called connect Facebook and Instagram will appear with a button called Login with Facebook.
Not that, to import Facebook and Instagram accounts, Facebook(Logged In) has to be opened on another tab of the same browser.
Well, now click on the Login with Facebook button

Instantly, a modal form will appear on Facebook with three buttons edit settings, continue as your profile name and log into another account.
Click on the edit settings button if you want to edit the settings.

Just as you click on the edit settings button, a modal form will appear on the Facebook profile that is opened on another tab of the browser.
On the modal form, you have to select Instagram business accounts you want to use with FransChat. Of course, you can select multiple or all Instagram business accounts.
Then click on the Next button.

Instantly, another modal form will appear on the Facebook profile. On the modal form, you have to select the Facebook pages you want to use with FransChat. Of course, you can select multiple or all Facebook pages.
Then, click on the Next button.

Instantly, a modal form will appear. On the modal form, you have to select what FransChat is allowed to do. Keep every option turned on.
Then click on the Done button.

Instantly, another modal form will appear with a message that now you have linked FransChat to Facebook and the Ok button.
Now click on the OK button.

Import Account Directly
By clicking on the Continue as Profile name, you can import Facebook accounts directly.

Import Another Account
You can also import another account by clicking on the log-in into another account button.

Click on the Log in into another account button and the Facebook login page will appear.
Now Log in with the Facebook and the account will be imported into FransChat.

Successfully Imported Account
Instantly, the Connect Facebook and Instagram page will appear with a successful message and Facebook profile and Facebook page. Under the Facebook pages, you will see two buttons — the plug button and the delete button.

Enable Bot Connection
Now you have to enable bot connection for the pages. To enable bot connection for a page, click on the plug button under the page.

Instantly, a modal will appear with Cancel and OK button. Click on the OK button.

And a successful message — Bot connection has been enabled successfully — will appear.

Instead of the plug button, you will see two more buttons — the Eraser button and the Power button.

Disable Bot Connection
By clicking on the power button, you can disable the bot connection. Just as you click on the power button, a modal will appear with Cancel and OK buttons. Click on the OK button and the bot will be disabled.


And Instead of the power button, a radio button will appear.

Re-start Bot Connection
To re-start the bot connection, click on the radio button. Instantly, a modal will appear with Cancel and OK buttons. Click on the OK button and the bot will be restarted.


And instead of the radio button, the power button will appear.

Delete Bot Data
Click the eraser button on the left and immediately, a modal will appear with “Cancel” and “OK” buttons. Click the “OK” button and the robot will delete all data again.


Now the Bot will return to its initial state

Delete Page
You need to delete the Bot when it is not connected.


By clicking Delete, you will delete the connection between the page and FransChat. If you need to re-import this page, you will need to log back into your Facebook account import page
Delete Facebook Account
Deleting a Facebook account will delete all currently imported pages.
Immediately after clicking the Unlink button, a modal will appear with Cancel and OK buttons.
Click the OK button and a success message will appear. Facebook account will be deleted.

API channels
Facebook & Instagram Tools
This article will explain in detail how to create and work with automations
The setup is basically the same for both Messenger and Instagram channels.
Subscriber Manager
Subscriber Manager
With the subscriber manager feature of FransChat, you can see all of your subscribers. And you can scan subscriber lists and enable auto scan and search subscribers. Moreover, you can migrate page conversations as subscribers, download search results, assign labels to selected subscribers, and delete subscribers.Besides, you can create New labels on the page.
First, go to the dashboard of the FransChat. At the left sidebar of the dashboard, you will see a menu called subscriber manager. Click on the subscriber manager menu.

Live chat
On the live chat interface, you can view recent conversations between users and your Facebook Page or Instagram account. Of course, in live chat you can talk directly to users through their Facebook page or Instagram account. In a nutshell, you can do everything you can do on Facebook or Instagram Messenger. Additionally, you can complete other tasks such as creating labels, assigning labels to users, and setting up sequence messages.
Additionally, you can subscribe and unsubscribe users at any time. Likewise, you can pause and resume bot replies for specific users.
In this article, I will discuss how to use the live chat feature perfectly.
Using live chat is as easy as using Facebook and Instagram Messenger. That said, using live chat is very simple and straightforward.
Let’s see how to use Live Chat
First, go to the dashboard of FransChat. You will see the live chat menu at the left sidebar of the dashboard. Just click on the Live Chat option.

Instantly, the interface of the live chat will appear.
Live Chat interface is divided into three sections– subscribers list, messaging window, and actions.
Subscribers' list
In the Subscriber List section, you can see a list of subscribers who have recently chatted with you. Additionally, you can search for subscribers on the search bar. (Note that currently when searching for subscribers, the subscriber must be loaded into the subscriber list before the target subscriber can be successfully searched)

Messaging window
The messaging window is for directly chatting with users.
In the message tag field, you have to select a message tag. Click on the message tag field and instantly will appear a drop-down menu of different message tags such as Human agent, Account update, Confirmed Event, Post purchase Update, Non-promotional(NP registered only). If you select the human agent message tag, you have to reply to the message from users within 24 hours, otherwise, you will get an error. In this case, you have to use other message tags. If you want to know the usage of message tags, read the article by Facebook for developers.

Voice Messages
After clicking the microphone button, you can send the language. After clicking the microphone button, the icon will change to a wave, which means recording is in progress. Click it again to stop recording and send directly.

Bot Flow Messages
You can click the robot icon and a pop-up window will open. In the pop-up window, select the Bot Flow that has been created and send it to the user.

After selecting one of the flows, the robot icon will change to the loading state, and a pop-up notification will be displayed when all flwos have been sent.

Canned Response
To use the canned reply function, you can click the notebook icon and create a new canned reply in the pop-up window, or select an already created canned reply and click (Use). The pop-up window will then close and the canned message will be automatically Fill in the message input box

Send Attachment
To send a file or picture, you can click on the paperclip icon and then upload your picture in the pop-up window. (Note: Files will be sent as soon as upload is complete)

Search Information
Moreover, you can also search messages on the search bar in the messaging window.

Actions
In the action sections, you can accomplish some tasks. Moreover, you can see the primary data of users.
Assigned agent
You can assign the message to an agent for reply by selecting designated agent in the search box. (Note: You need to create a team role and team user before you can proceed with this step. Then you can view this article to create a team)

Select Labels
First, you will see a form called a label. From the label field, you can assign a label to a specific user. Click on the label form and instantly appear a drop-down menu of different labels you have created before. Then you have to select a label to assign the label to a subscriber list. The selected labels will appear on the label form. Well, you can select as many labels as you want for a specific user. True, you can remove labels one after another by clicking on the cross icon next to the label name. Of course, you can remove all the labels by clicking on the cross icon in the field.

Create Labels
Moreover, you can create a new label from here. Click on the create label button and a modal form with one field will appear. Write the name of the new label in the field and click on the new label button, and the label will be created and selected in the field automatically.

After you have selected labels in the Labels field, click on the save changes button to save the changes.

Message Sequence
Here you can custom assign Message sequences to specified subscribers, or cancel or delete their current Message sequences.

Select Message sequence and click Save

Opt-in through
Well, in the opt-in through option, you can see whether the subscriber has come directly through the Facebook page or the source is ADS. If you see the word Direct beside the opt-in through, you know that the user has come through the Facebook page or the Instagram account directly

Status
By clicking on the status button, you can unsubscribe and resubscribe a user. And by clicking on the bot status button, you can pause and resume the bot reply.

Primary Information
You can see the primary information of the subscribers– subscriber ID, gender, language, time, and date.

Bot manager
How to build bot with flow builder
In this article, you will be shown how to create a Facebook Messenger bot using FransChat Flow Builder. Follow the article’s step-by-step instructions to create an interactive Facebook Messenger bot.
To build the bot, first, go to FransChat dashboard. Now in the Facebook Tools menu, click on the Bot Manager option in the left sidebar of the dashboard.

After entering the Bot Manager, you can see an interface like this, which is divided into three sections.
- The area on the left is your currently enabled Facebook Page. Select which Page to edit.
- The middle area is the menu options. When any menu item is selected, the screen will be displayed in the right area.
- The area on the right is the creation and list section, where you can create and view the currently created Flow

Now let’s follow the steps to continue to understand the function of each menu
Comment Manager
Team Manager
In FransChat you can create team member accounts to manage automated reply processes.

Team members
Before creating Team Members, you must first create Team Roles. You can view how to create Team Roles here.
In Team members, you can manage currently created members, modify member information, change passwords, delete members, etc.
To create a new Team member, you can click the NewTeam Member button

Note that you will need to fill in the member’s name, email, and password to create a member account.

When logging in with a Team member account, you need to select Login as Team member on the FransChat login page.

Then log in using the Team member account in this login form.
Team members accounts cannot access some sensitive information, such as API channels and payment pages

Team Roles
In Team Roles you can create new Team Roles or edit and delete them
Now let’s click the New Role button to create a new Team Role

In the Modules section, select the modules that the current role is allowed to manage.
In the Allowed privileges section, you can see the permissions that the role is allowed to manage the current module. If you do not select the default, all permissions will be selected.
Finally, click “SAVE”

Changelogs
January 14, 2025
Updates
Updates Optimize automatic reply speed
Updates Live Chat - Comment Private Reply Label
We have implemented performance optimizations and introduced new features to enhance user experience and operational efficiency.
Updates:
- System Performance Optimization:
- Improved message processing efficiency to reduce response time significantly.
- Enhanced concurrent handling capabilities to ensure multiple messages are processed simultaneously and effectively.
- Feature Improvement - Comment Private Reply Label:
- When a private reply is triggered from a comment, the corresponding automated reply will now display a "From Comment Private Reply" label in the Live Chat.
- This feature helps you easily distinguish the source of replies, allowing for more efficient conversation management and follow-ups.
- User Experience Enhancements:
- Overall response speed for automated replies has been noticeably improved, delivering a smoother interaction experience.
- The system supports a larger volume of requests while maintaining stability under high load conditions.
Thank you for your continued support. We are committed to providing you with more efficient and stable services. If you have any questions, feel free to reach out to us anytime!
November 15, 2024
Updates
NEW Enhanced Livechat Experience
NEW User and Page Avatars in Chat Bubbles
FIXED Notification Click Issue
TWEAKED Image Preview in Chatroom
TWEAKED Message Display Optimization
NEW:
- Enhanced Livechat Experience:
Improved the overall Livechat user experience for smoother interactions. - User and Page Avatars in Chat Bubbles:
Added user and page avatars to chat bubbles, making conversations more visually intuitive.
FIXED:
- Notification Click Issue:
Fixed an issue where clicking on Livechat notifications did not open the corresponding user’s chat window.
TWEAKED:
- Image Preview in Chatroom:
Images in the chatroom now open in a pop-up window for a larger preview instead of opening in a new tab. - Message Display Optimization:
Optimized the display of certain messages to enhance readability and user experience.
Overview of Updates:
This version primarily enhances the Livechat experience, resolves key user-reported issues, and further improves message display for a more user-friendly interface and interaction.
November 10, 2024
Updates
Updates Ads Welcome Message Support postback on both platforms
Improved Ads Welcome Message Flows
Ads Welcome Message now supports setting postback buttons for both Messenger and Instagram. You can set Messenger Postback for Messenger and Instagram Postback for Instagram separately.

October 15, 2024
Updates
NEW Add Flow Templates
NEW Invoice Access After Subscription Plan
NEW Add Ads Welcome Message Flows
New Features and Improvements
We are excited to announce several important updates that will further enhance the user experience and functionality on our platform. Here are the details of this update:
1. Updated Flow Templates
We have updated the flow templates, allowing all new users to quickly create their first flow and understand how it works using these templates. This will enable new users to get started faster and reduce the learning curve. By selecting ready-made templates, users can immediately experience how to build and optimize flows for more effective customer engagement.
2. Invoice Access After Subscription Plan
After selecting a subscription plan, users can now easily obtain invoices in the transaction log. This new feature aims to simplify financial management processes, allowing users to conveniently view and download invoices.
3. Updated Ads Welcome Message Flows
We have made significant updates to the Ads Welcome Message feature. Now, PRO plan users no longer need to use JSON code to create flows for ads that click to Messenger or Instagram Direct. You can directly create welcome message flows in [direction] Bot Manager > Marketing Tools > ADS Welcome Message [/direction]. When creating ads that click to Messenger or Instagram Direct, you can easily connect to message flows from messaging partner apps. For detailed instructions on how to use this feature, please refer to the usage guide. This improvement will significantly streamline the process, making ad creation more intuitive and efficient.
These updates will help users make better use of our platform and enhance their operational efficiency. We look forward to you experiencing these new features and welcome your feedback!
August 8, 2024
Update
New Optimizing Asset Sending through the Messenger Platform
Benefits of Using Facebook Messenger's Attachment Upload API to Optimize Asset Sending
In modern digital communication, the speed and efficiency of information transfer are crucial. For businesses aiming to enhance customer interaction quality, ensuring the timeliness and accuracy of message content poses a significant challenge. To address this challenge, we have introduced a brand-new feature in the FransChat system: a unified approach to upload and send assets (such as images and videos) via the Facebook Messenger platform's Attachment Upload API. This approach not only improves operational efficiency but also significantly enhances user experience.
1. Increased Upload and Sending Efficiency
Using Facebook's Attachment Upload API allows users to directly upload images and videos in the Visual Flow Builder editor and save them to the Messenger platform. Traditionally, assets had to be sent from FransChat to Messenger, a process that was both time-consuming and complex. Now, all assets can be directly uploaded to Messenger, greatly simplifying this process. This optimization not only reduces data transfer time but also minimizes potential delays, ensuring that information reaches customers quickly.
2. Reduced Response Time
As business volume increases, the need to decrease response time becomes increasingly important. By directly utilizing the asset storage feature on the Messenger platform, we can achieve faster message delivery. Previously, sending assets could lead to delays, especially during peak periods. Now, all assets that need to be sent will be prioritized through the Messenger platform, ensuring that customers receive timely information. This quick response capability is undoubtedly a significant advantage in a competitive market.
3. Enhanced User Experience
Users have growing expectations and needs when interacting with brands. Using the Messenger Attachment Upload API not only speeds up asset sending but also ensures asset quality. Whether it’s high-definition images or smooth videos, users will receive a better visual experience in the messages they get. This high-quality interaction will greatly enhance customer satisfaction, increase user engagement, and ultimately promote long-term business growth.
4. Simplified Operation Process
Users who have previously uploaded any media will not need to make any modifications. Whenever there is media to be sent in your flow, if that media has not been uploaded to the Attachment Upload API, it will be automatically uploaded without any action required. This seamless automation allows users to manage media content more easily, ensuring timely information delivery to customers.
Conclusion
Overall, the strategy of using Facebook Messenger's Attachment Upload API to optimize asset sending provides significant advantages for businesses. By improving upload efficiency, reducing response time, enhancing user experience, and simplifying operation processes, this new feature will empower our clients to better interact with their users. As we continue to advance this strategy, we look forward to seeing the positive outcomes it brings, helping businesses maintain their competitive edge in the market.
July 1, 2024
Official Version
We are Excited to Announce the Official Launch of FransChat
An Automated Chatbot Platform
Dear Users,
We are thrilled to announce that FransChat is now live! FransChat is an all-in-one automation platform designed to enhance business interactions on social media. Integrating automated chatbot functionalities for Facebook Messenger and Instagram, FransChat aims to streamline communication processes, reduce manual workload, and boost efficiency.
Main Features and Benefits:
1. Automated Reply Process:
- Smart Conversations: FransChat can automatically respond to common customer queries and provide personalized interaction through customized conversation flows.
- Reduce Manual Workload: By automating replies, the platform significantly reduces the workload of human customer service representatives, allowing them to focus on more complex tasks.
- Increase Response Speed: Available 24/7, FransChat provides instant support to ensure customer issues are resolved quickly, enhancing customer satisfaction.
2. Multi-Channel Management:
- Centralized Management: Manage multiple Facebook Messenger and Instagram accounts from a single platform, simplifying operations and improving management efficiency.
- Seamless Integration: Supports integration with various third-party applications, extending platform functionality and enhancing flexibility.
3. Integrated AI ChatGPT:
- Intelligent Conversations: Leveraging the latest AI technology, FransChat offers more natural and intelligent conversation experiences, further improving customer interaction.
4. Form Collection of User Information:
- Streamlined Data Collection: Automatically collect user information such as email, phone number, and address through chatbots, simplifying the data collection process and improving accuracy.
5. Email and SMS Marketing:
- Targeted Marketing: Use collected user information to conduct targeted email and SMS marketing, enhancing marketing effectiveness.
- Automated Marketing Workflows: Set up automated rules for efficient email and SMS delivery, improving operational efficiency.
The launch of FransChat will help businesses achieve more efficient customer service management, enhance brand influence, and deliver an exceptional customer service experience through intelligent automation features. Our team will continue to optimize platform features to ensure you stay at the forefront of the market.
Thank you for your attention and support for FransChat!
For more information, please visit our official website or contact our customer support team.
Best regards,
The FransChat Team
Action Button
In the Action Button settings, we can set some system-fixed trigger reply content
For example:
Get started & welcome message section, when a new user enters the message through Get started, we can set the “Get-started Template” in the Action Button to set the automatic reply content
Get-started Template
Need to trigger Get-started Template reply You must enable “Get started & welcome message“

Now we click on “Get-started Template” and you will be taken to the edit page. Here we only need to edit the text part. You can modify the content in the original text component and add buttons to set the flow of the next reply.

No Match Template
To use the No Match Template, you must enable the “Reply if no match found” feature in the “General settings“
Note: After enabling the “Reply if no match found” feature, all subsequent messages will use this template to reply unless the keyword triggers the automatic reply flow.
If “Reply if no match found” is not enabled, users will not be replied to topics other than keywords.

Now we click “No Match Template” to edit it. By default, you can modify the content in the default Text component and add more information or buttons.

If you want to fully automate the conversation with the user, you can use the AI component
Note: You only need to use one AI component. You must configure the ChatGPT API first. For details, please refer to here
Now you just need to enter some keywords in the Ai reply component to tell the AI how to reply to the user, what to answer, etc.

Button Reply Template
The following 8 template types all belong to the template content of the next reply after the user completes the button click or completes the operation using the “System default action button” in the “Button component”


Four of the templates are for obtaining user information, such as Birthday, Email, Phone, Location
When obtaining user information, the system will save the user information in the user configuration.


When you use “System default action button” and now Email via a button, the specific process is as follows:
First, we set the corresponding template message in the “Action Button”
In the reply content, we use the variable #system_email#, which will attach the email provided by the user in the next reply when the user provides an email

Next, we need to use the button in any get user flow and select “System default action button” , “user email”

Now when this flow is triggered, a button to get email will be displayed. When the user clicks it, a half-window web page will be opened to enter the user’s email


When the user submits the completed email, the window will automatically close after the message “Success!” is displayed.
And reply to the message of the corresponding template in “Action Button”
And we can see here that the variable #system_email# in the original message is successfully replaced with the Email entered by the user

Subscribe Template
For “Un-subscribe Template” and “Re-subscribe Template”
After the user clicks the button, the system will cancel the user’s subscription status or re-subscribe. This will be used when sending Broadcasting to the user. If you can click to unsubscribe, you will not be able to send Broadcast to the user again.

Chat with Human & Robot
When “System default action button” is selected in the button and “chat with human” is used, this will pause the automatic reply for that user, and the user will not be able to reply even if he enters keywords.
The user can restore the automatic reply by clicking the “Chat with robot” button again.

If you need to be notified after a user clicks “Chat with Human”, you can set a notification email address in General settings Chat with human email . Every time a user clicks “Chat with Human”, the system will send a notification email with the user’s name and basic information to the email address, informing you that a user needs a human reply.

Persistent Menu
How it works
With a persistent menu, you can create and send a menu of key business features (like hours, store locations, and products) that always appears in people’s Messenger conversations with your business.

Create Persistent Menu
After entering the Persistent Menu, click the “Create persistent menu” button in the list.

Now you will enter the edit page of Create persistent menu, where there are several options
1. Locale (This is the language used for selecting persistent menu, usually the default is OK)
2. Composer input disabled? (If enabled, users will not be able to enter any text in messenger, which is usually used in fully automated and unmanned situations)

Menu
This section is for creating menus
1. Menu Title (menu name)
2. Web URL / Postback (action after clicking the menu)
3. Set the action target after clicking the menu. If you choose Web URL, enter your URL link

When you select Postback, the third option will show all your current flows. You can choose which flow will be triggered when clicking this menu. You can also click Add to create a new one.
If you need to create more menus, you can click the “Add” button below to create more menus.

After finishing, click Submit. After saving, you will see the currently created persistent menu in the list.
It may take some time for the persistent menu to update in Messenger. If you don’t see it update, you can try deleting your current Facebook account and the current Page Messenger conversation history and resending a new message to see if the persistent menu is displayed.

Team members
Before creating Team Members, you must first create Team Roles. You can view how to create Team Roles here.
In Team members, you can manage currently created members, modify member information, change passwords, delete members, etc.
To create a new Team member, you can click the NewTeam Member button

Note that you will need to fill in the member’s name, email, and password to create a member account.

When logging in with a Team member account, you need to select Login as Team member on the FransChat login page.

Then log in using the Team member account in this login form.
Team members accounts cannot access some sensitive information, such as API channels and payment pages

Team Roles
In Team Roles you can create new Team Roles or edit and delete them
Now let’s click the New Role button to create a new Team Role

In the Modules section, select the modules that the current role is allowed to manage.
In the Allowed privileges section, you can see the permissions that the role is allowed to manage the current module. If you do not select the default, all permissions will be selected.
Finally, click “SAVE”

Marketing Messages
If you have created Marketing Messages in any Flow, they will be displayed in the list. You can refer to here for how to create Marketing Messages.
In the list, you can clearly see how many subscribers each Marketing Message currently has. If you need to view detailed subscriber details, you can click the user icon button in “Actions” and you will see who the current subscribers are in the pop-up window.

ADS Welcome Message Flow
When creating Click-to-Messenger or Click-to-Instagram Direct ads, you can enhance user engagement by connecting message flows from messaging partner applications. These message flows can include text, images, emojis, and button message types.
This guide explains how to manage welcome message flows using FransChat.
Navigate to Bot Manager Marketing Tools ADS Welcome Message , and select “Create New Flow.”

Next, you will see a pop-up window. Here, you must enter the Flow Name and select Eligible Platforms. If your page is linked to Instagram, you will see both Messenger and Instagram as options. You need to choose which platform this ads welcome message flow will be used for.
Note:
- If you select the Instagram platform and choose Text under Messenger Type, you can only select either Buttons or Quick Replies, not both.
- If it’s for the Messenger platform, you can choose both Buttons and Quick Replies.
- If Messenger Type is set to Card and you’re using the Instagram platform, you won’t be able to select Quick Replies.

After adding a button, you can choose between two modes: Postback or Web URL.
- If you choose Postback, you will need to select the corresponding Postback ID. If none is available, you can click “Add New Flow” to create a new Postback.
- If you choose Web URL, you will need to provide your website URL.

When you select Card under Messenger Type, you can upload an image or directly provide an image link.
You need to fill in the Card Title and Card Subtitle.
If necessary, you can also add Buttons or Quick Replies.

Once you have filled in all the information, click Publish Flow and wait for the upload to complete.

After completion, you can find the recently created flow in the Ads Welcome Message list, where you can edit or delete it.
In the Used in Ad column, you can see whether the flow is currently being used in any ads.
Please note that you cannot update flows that are currently connected to ads.

Next, we can select Partner App in Facebook Ads.

Then, select the FransChat platform in the Partner App.

In the Message Flow, you can see the ads welcome message flows that you just created in FransChat.

After selecting Message Flow, you can view the actual message template in the right-hand pane.


If you have created Quick Replies, you can also see the message templates with Quick Replies in Facebook Ads.

Finally, if you need to test this flow, you can click Preview in Messenger. You will then see the message template in your Messenger.
Once you confirm that there are no issues, click Finish to complete the setup.

Webform builder
How it works
The Messenger Platform allows you to open a standard webview, where you can load webpages inside Messenger. This lets you offer experiences and features that might be difficult to offer with message bubbles, such as picking products to buy, seats to book, or dates to reserve.
Webform builder
Go to Messenger Bot Webform builder and you will see all your existing webview form you built so far.
- icon refers webview preview to know how it will look like and to copy webview url
- icon refers webview report to view form details and submitted form data
- Export Form Data
- icon refers webview edit
- icon refers webview delete

Create New Webform
To create a new webview form simply click “New form” button. This is a drag and drop form builder. Choose form name, title, page. You choose optional label and reply template. When people will submit the form they will be assigned to the selected labels and also they will receive the inbox reply.
Design your form easily by dragging the elements you want from right sidebar. Your form must have a submit button.

For each form field, you can edit it by clicking the pencil icon

If it is a special field, such as email or mobile number, you can select the corresponding field in Type.

Finally, each form needs to have a button, click “Save” when you are done

How To Use The Webform
Click icon and you can see your Webform preview, copy the browser URL, this is the Webform URL.

Now it’s time to use this Webform in bot settings. Go to Bot Manager Bot Reply , create a new flow or edit an existing bot settings. Webform works with text with buttons, generic template, carousel & media. Choose button type and choose Webform and put the copied URL.


This will how this will look like in bot live action :


After submitting the form, the window will automatically close after Success! is displayed.

Then you will receive a response after submitting the form

Report
Click icon in webview manager and you can see your webview report grouped by subscriber and clicking the eye icon inside here will pop up the submitted form data in details.


Example Use Cases
- A ticket-search bot can display an interactive stadium seat map for choosing a seat.
- A travel bot can provide travel preferences—aisle vs. window, inn vs. hotel, dietary needs—accessible from the persistent menu.
- A dental-appointment bot can display an interactive calendar for choosing an appointment slot.
- A news bot can provide a multi-select list of topics to subscribe to.
- A commerce or brand bot can offer personal preferences to customize offers and free gifts.
If you are a developer, you can set a webhook URL after the user submits the form. The system will send the content in the form to the webhhok URL after the user submits the form.

For details on how to set the webhook url, please refer to JSON API Connector
Sequence Message
Sequence messaging is a marketing strategy that sends, or “drips,” a pre-written set of messages to messenger bot subscribers over time. This feature can send 24H promo and non-promotional with tag message sequence to messenger bot subscriber. It uses BOT API for sending message. The subscribers will be assigned under your sequence campaign automatically based on their entry point (engagement plugins) or post-back click. However, you can also assign manually or change the campaign.
Create New Sequence
How to create Sequence Messaging can be viewed here
Sequence Lists
To view all the sequences that have been created, you can go to Bot manager Marketing Tools Sequence message and click Lists

Here you can see all the sequences that have been created. In Actions, you can click Report to view some basic data reports of the current sequence.


Messenger Engagement
Messenger Engagement Plugin
This guide lists different ways that you can use the Messenger Platform from Meta to drive business discovery and engagement.
Send to messenger plugin
The send to Messenger plugin renders a button on your website that allows a person to opt-in to receive messages from you on Messenger. This is useful for providing follow-up at a later time, such as confirmations and updates. This plugin only works in HTTPS websites.
To create a new plugin click Flow builder button.

Create a new plugin
After clicking the Flow builder button, we will enter the following page. In the menu on the right, the corresponding plugin will be automatically selected for Action Button and Messenger engagement plugin. No settings are required.

Now we need the parts in the picture
1. Domain = (Enter the website domain where you are about to insert the Send to messenger plugin)
2. Language = (Select the language of your plugin)
3. Cta button text = (Select the click button text of the Send to messenger plugin, you can set it according to the situation)
4.Plugin skin = (Set the appearance color of the Send to messenger plugin)
5. Plugin size = (Set the size of the Send to messenger plugin)

Next, continue to set up the completed content that will be displayed after the user clicks the plugin and logs in to Facebook (Opt-in success message in website)

If enabled (I want to add a button in success message)
Then a button will be added after the success message is displayed after the user clicks the plugin

If enabled (Redirect to a webpage on successful opt-in)
Then the user will be redirected directly to the set link after clicking the plugin

Finally, you must set (Reference)
You can set a name for the activity related to this plugin
Note: All References must be unique.
Select label(s) is to set a label, which will be automatically added to the user when the user clicks to join.

Finally click Done and you will see the plugin settings on the editor.

Finally, you can set up the next conversation in “Start Bot Flow”. For example, if we add a “Text” component in “Start Bot Flow”, when the user clicks on the plug-in to join successfully, it will automatically reply to the user’s information in the Text.

Plugin List
This list shows all the plugins you’ve created so far, and if you’ve lost that plugin, you can get the embed code for that plugin. This list shows all the plugins you’ve created so far, and if you’ve lost that plugin, you can get the embed code for that plugin.

Click the edit icon in Actions to enter the edit page to modify the plugin
Click “js code” to get the plugin code and embed it in your website

Copy the embed code and put it on your website
Put this code inside the html block of your website where you want to display this plugin.

How it looks on your website

When the user clicks, a pop-up window will pop up to log in to the Facebook account. After the login is completed, a prompt will be displayed on the page, and the information in Flow will be sent to the logged-in user.

M.me link & QR code
m.me is a shortened URL service operated by Facebook that redirects users to a person, page, or bot in Messenger. You can use them on your website, email newsletters, and more. The m.me link for your bot allows you to link people directly to your Messenger bot. When the link is clicked, a conversation is automatically opened on messenger.com or in the Messenger mobile app. You will also get QR code image of your m.me link from this list below.
To create a new plugin click Flow builder button.

Create a new plugin
After clicking the Flow builder button, we will enter the following page. In the menu on the right, the corresponding plugin will be automatically selected for Action Button and Messenger engagement plugin. No settings are required.

If you need to use embed code to display this button, you can set the “Button” part
In the “Reference” part, you must set a parameter. The “Reference” value of each plugin is unique and is used for system identification.
In the Select label part, you can set a label if necessary. When the user enters Messenger through me.link, this label will be automatically added to the user
Click Done when completed

Next you will see the details of the settings in the “Action Buttons” component. Now you can continue to set the information content after the “Start Bot Flow” component

For example, in the demo, the purpose of Me.link is to give users the function of obtaining coupons, and I can edit it like this.
Now when the user enters Messenger through Me.link, the following information will be automatically sent to the user
After editing, click Save.

Plugin List
This list shows all the plugins you’ve created so far, and if you’ve lost that plugin, you can get the embed code for that plugin. This list shows all the plugins you’ve created so far, and if you’ve lost that plugin, you can get the embed code for that plugin.

Click the edit icon in Actions to enter the edit page to modify the plugin
Click “js code” to get the plugin code and embed the button into your website

You can copy the plugin code and embed the button on your website, or you can use “M.me Link” and when users visit this URL they will be redirected to Messenger. You can also embed this link into your website button.

You can use QR Code, and when users scan this QR code, they will be redirected to Messenger.

How does the workflow on your website work via buttons or URLs?
You can embed the button into your website through js code, or customize a button and jump to the URL of M.me Link

When the user clicks the button, he will be redirected to the user’s Messenger and receive the following message.

User Input Flow
You can check here how to create User Input Flow
In Bot manager Marketing Tools User Input Flow you can view the list of currently created User Input Flows and create new Custom Fields
User Input Flow List
Click the Lists button in the User Input Flow

In “Action”, you can click the eye icon to view the users who have completed the User Input Flow and the information they have submitted.
You can also export this information or edit it.

Custom Fields
In the “Custom Fields” section, click the Lists button

You can see all the Custom Fields that have been created so far. If you want to create a new Custom Field, you can click the “New Custom Field” button above.

Enter the name of the Custom Fields and the corresponding Type in the pop-up window, and click Save when you are finished.

Whitelisted domains
Generally speaking, any URL sent by Facebook needs to be set as Whitelisted domains before Facebook allows this URL to be sent.
In FransChat, if a third-party URL is entered in the button, FransChat will automatically set this URL to Whitelisted domains, so generally there is no need to set it up. FransChat will automatically complete it.
You can view the currently added URLs in Bot manager Marketing Tools Whitelisted domains Action

The URLs that have been added so far will be displayed here

If you encounter a situation where you cannot send a message or receive an error message when sending a message, and the message contains a third-party URL, you can check whether this URL has been added to the Whitelisted domains. If not, you can manually add it again by clicking “New Domain” and entering your URL in the pop-up window, then save it.

All Post List
Create campaigns
To create campaigns, click on the Campaigns option on the All Post List page.
Instantly, a Facebook comment automation campaign page will appear.

The page is divided into three sections.
On the Pages section, you have to select a Facebook page.

In the middle section, you can see reports.

Full page campaigns
The Full page campaigns section requires upgrading to the PRO plan to use it
This feature can automate all posts on the current Facebook Page.
In the free plan, if you need to automatically reply to comments in each post, you must enable automation settings for each post separately.
The Full page campaigns feature will enable automation for all posts, including posts from ads. If you need to enable automated comment replies in ad posts published through Facebook ADS, you must use the “Comment & inbox reply” feature in “Full page campaigns”

Comment & inbox reply
After clicking Enable full page reply, a pop-up window will open, where you need to set up automated comment replies and private replies for all pages.


What do you want about offensive comments?
In the following settings, you can filter offensive comments in the comments. You can choose whether you want to hide or delete offensive comments when they appear.
Write down the offensive keywords in comma separated
Enter the keywords related to offensive comments here. If there are many keywords, you can use commas to separate them.
Select a message template for private reply after deleting offensive comment
If you need to send a private message to a user who has made an offensive comment, you can set it up as follows. In the drop-down list, select the message template you want to send. If there is no message template, click “Add Message Template” and the Visual Flow Builder Editor will open, where you can create one. If you do not need to send a private message to a user, you do not need to set a reply template.

If enabled, you will be replied to when the same user comments multiple times. If disabled, you will only be replied to when the same user comments for the first time. You will not be replied to when the same user comments again.
The system will reply to comments only after it is enabled, and it generally needs to be enabled.
After enabling, when a user comments, your Facebook Page will automatically like the user's comment
After enabling, when a user makes a comment, the system will automatically reply to the user's comment and hide the comment
- This feature helps you hide potential customers from your peers and business competitors.

Automated reply by ai
If you use Ai Reply, you must configure the Openai API before it can work properly.
First we need to set a name for this campaign.
Then in the Ai training data section you need to provide the AI with a prompt for how to reply to comments.
Note: When using Automated reply by ai, all comments posted by users will be automatically replied.

Generic message for all
Generic reply means same reply for everyone, no comment filtering applicable. It’s simple, just provide message for comment reply and inbox private reply. Everyone will get same reply no matter whatever they comment. The reply supports spintax and you can embed commenter name variable inside reply message. Tagging user is also possible for comment reply only, not for inbox private reply.

Send message by filtering word/sentence
On the other hand, if you choose to send a message by filtering words/sentences, more fields will appear.
First, write the campaign name in the Autoresponder Campaign Name field.
Then you have to enable one of the two options – Reply if the filter word matches exactly and Reply if any of the filter words match.
Then, you have to write the filter word or sentence in the appropriate field (separate with commas if there are multiple filter words).
After that, write a message for the comment reply, you can also upload a picture or video to reply to the comment (if you want a private reply, you don’t need to set this).
Then select a message template for the private reply (if you want a comment, you don’t need to set this).

If you have different filter terms that require different responses, you can click the “Add more filtering” button below
Then you will see the same filter terms field settings displayed

Finally, in the “Comment reply if no matching found” section, if you need to make an additional reply when a user’s comment does not contain the filter words, you can set it here (if you only need to reply to comments containing the filter words, then you don’t need to set it here)
Then click the “Save” button.

Auto like & share
This feature can auto like any new post of your page as your other pages and also can auto share any new post of your page as your other pages. It’s very simple, just select pages you want to hit like with and pages you want to share the new posts. Using enough share delay can be very useful for large number of share & avoid spamming.

Latest Posts
Now come to the latest post sections. In the section, you can see the list of latest posts.
Now click on the gear icon of any post and a drop-down menu of different options — Enable auto reply, Enable auto comment, Check latest comments, Leave a comment now.

Enable auto reply
To enable auto reply for the post, click on the Enable auto reply option.
Instantly a modal form will appear. Now you have to fill out the modal form.
If you want to use a saved template, keep the radio button turned on.
Now select labels from the choose labels fields. Of course, you can select multiple labels.
Then you have to select an auto reply template.
Now click on the submit button.

Or you can cancel the template and create a new reply template

Enable auto comment
To enable auto comment, click on the Enable auto comment option.
Instantly, a modal form will appear. Now you have to fill out the form.
There are two modes for automatic comments: One time and Periodic
One time
In One time mode, comments will only be automatically made once within a specified time.
You need to fill in the campaign name and set the Auto comment template. You can see how to create an Auto comment template here.

Periodic
In Periodic mode, you can repeat comments within a set time.
You can set the time for repeated comments, your time zone, and the start and end time of the activity in “Periodic schedule time”
In “Auto comment type”, if your Auto comment template has multiple comments set, then if you select “Random”, a comment in a template will be randomly selected for each repeated comment to be published, otherwise if you select “Serially”, it will be published in the order in the comment template

Check latest comments
To check latest comments, click on the Check latest comments opinion. And instantly, all the latest comments will appear on a modal form.

Leave a comment
To leave a comment under a post now, click on the Leave a comment option.
Instantly, a modal form will appear. Write a comment in the field and click Create comment button.

Comment Template
Creating auto comment template
To create a comment template, click on the comment template option.

Instantly, the Auto comment template manager page will appear with a button called Create new template. Now click on the Create new template button.

Instantly, a modal form will appear— you have to fill out the form to create an auto comment template.
Write a ‘Template name’ in the ‘Template name’ box. Then write a comment in the ‘Auto comment’ box, the comment that will be made automatically under your Facebook pages’ posts. You can add as many comments as you want by clicking on the ‘Add more’ button. Then click on the ‘Save’ button.

Instantly, a successful message will appear.

Now the template is created, and you can see the template name on the page called ‘Auto comment template manager’. Next to the template name, you will see the ‘edit’ and ‘delete’ icons. By clicking on the ‘Edit’ icon, you can edit the campaign. And by clicking on the ‘Delete’ icon, you can delete the template. Of course, you can create another template by clicking on the ‘Create new template’ button— you can create as many templates as you want.
Reply Template
Creating auto reply template
To create auto reply template, click on the Reply template option on the Comment Manager page.

Instantly, Auto reply template manager page will appear with a button called Create new template.
Now click on the Create new template button.

Instantly, a modal form will appear — you have to fill out the form.
Please select a page for auto-reply
First, you have to select a Facebook page from the drop-down menu.

What do you want about offensive comments?
In the following settings, you can filter offensive comments in the comments. You can choose whether you want to hide or delete offensive comments when they appear.-
Write down the offensive keywords in comma separated
-
Select a message template for private reply after deleting offensive comment

If enabled, you will be replied to when the same user comments multiple times. If disabled, you will only be replied to when the same user comments for the first time. You will not be replied to when the same user comments again.
The system will reply to comments only after it is enabled, and it generally needs to be enabled.
After enabling, when a user comments, your Facebook Page will automatically like the user's comment
After enabling, when a user makes a comment, the system will automatically reply to the user's comment and hide the comment
- This feature helps you hide potential customers from your peers and business competitors.

Generic message for all
After that, select Generic message for all option. And instantly, three fields will appear.
Write a template name in the Auto reply campaign name field.
Then write a message for Message for comment reply field.
After that, you have to select a message template for private reply.
Then click on the Save button.

Send message by filtering word/sentence
On the other hand, if you choose to send a message by filtering words/sentences, more fields will appear.
First, write the campaign name in the Autoresponder Campaign Name field.
Then you have to enable one of the two options – Reply if the filter word matches exactly and Reply if any of the filter words match.
Then, you have to write the filter word or sentence in the appropriate field (separate with commas if there are multiple filter words).
After that, write a message for the comment reply, you can also upload a picture or video to reply to the comment (if you want a private reply, you don’t need to set this).
Then select a message template for the private reply (if you want a comment, you don’t need to set this).

If you have different filter terms that require different responses, you can click the “Add more filtering” button below
Then you will see the same filter terms field settings displayed

Finally, in the “Comment reply if no matching found” section, if you need to make an additional reply when a user’s comment does not contain the filter words, you can set it here (if you only need to reply to comments containing the filter words, then you don’t need to set it here)
Then click the “Save” button.

Reports
you can see all the reports by clicking on the Reports option.


